Hey, let’s learn Free App to Take Note Evernote App on Windows 11 PC. Evernote is a popular note-taking application that helps users organise their thoughts, tasks, and important information. This application allows you to create notes that can include text, images, audio recordings and PDFs.
There are different versions of Evernote available, with the latest version for Windows being 10.129.2. The service is free to use and offers note templates for various purposes, such as meeting notes, project planning, and to-do lists. Different versions of Evernote are available.
Evernote is used to create notes on your phone. And you can also use this app on your computer. We already have a related post about that Evernote App Installation Guide using Intune check this for more details.
In this post, I will explain the different ways to install the Evernote app on Windows 11. Specifically, I will show you how to install Evernote from the Microsoft Store and how to use it on Windows 11.
Table of Contents
What are the Advantages of the Evernote App?

Evernote helps with notetaking, organisation, syncing across devices and easy search. Followings are some other advantages of Evernote. Here are some key benefits that make Evernote a powerful tool for productivity and organisation.
1. Collaboration and sharing with teams or individuals
2. Offline access (available in the premium version)
3. Integration with third-party apps (Google Drive, Outlook, Slack, etc.)
4. Cloud backup and security to protect the note.
5. Cross-platform syncing (Windows, macOS, iOS, Android)
6. Multiple content formats (text, images, audio, PDFS, web clippings)
7. Powerful search (handwriting and text recognition)
Free App to Take Note Evernote App on Windows 11 PC
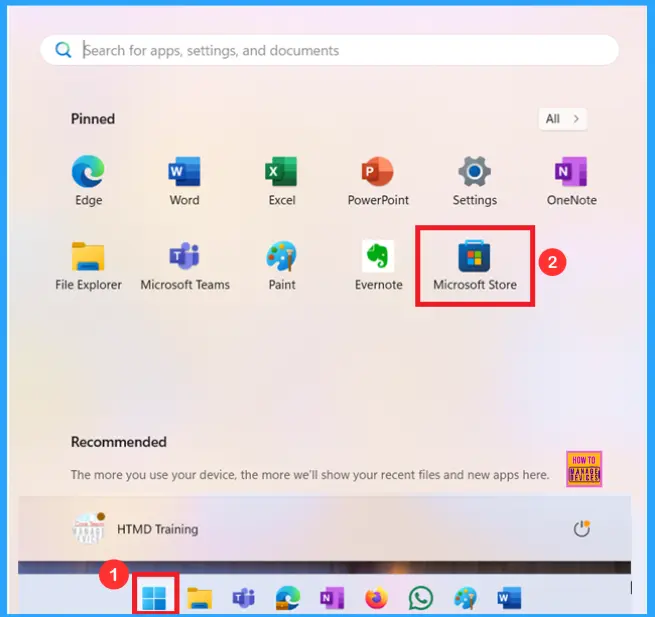
You can easily use the Evernote App on your Window 11 PC. You can install Evernote app from Microsoft store or from their official website. The following are the steps to install Evernote app on your windows 11 PC from Microsoft store.
- Select Microsoft Store from the Start Menu
- All in One Guide OneNote for Windows 11 Detailed Review OneNote Versions
- Copilot in OneNote | Your Digital Notebook Reimagined with Copilot
- How to Install and Use Notepad++ on Windows 11 PC | Detailed Review
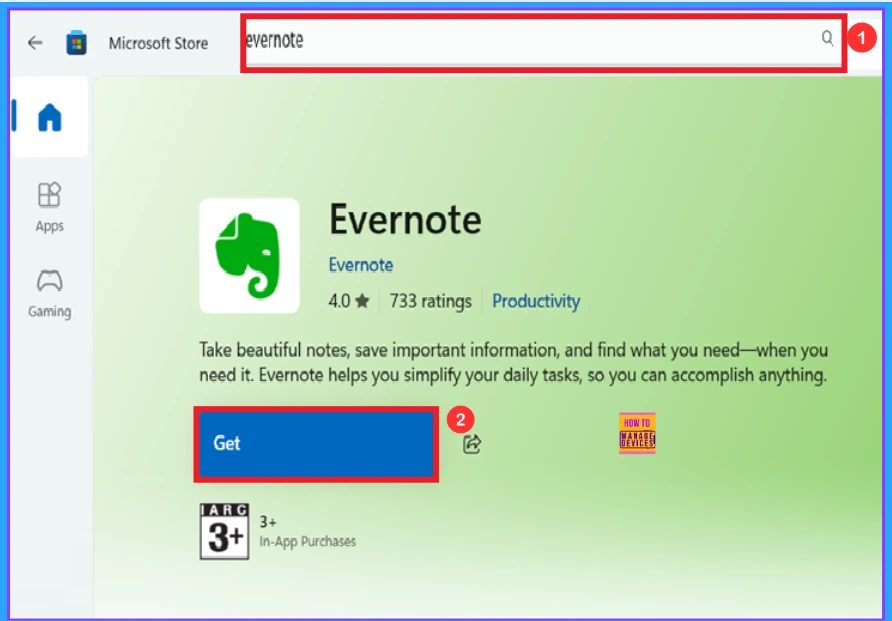
You can easily find the Evernote app in the Microsoft Store. Simply search for “Evernote” and then click the “Get” button to install it. Refer to the screenshot below for guidance on how to install the Evernote app on your Windows 11 PC.
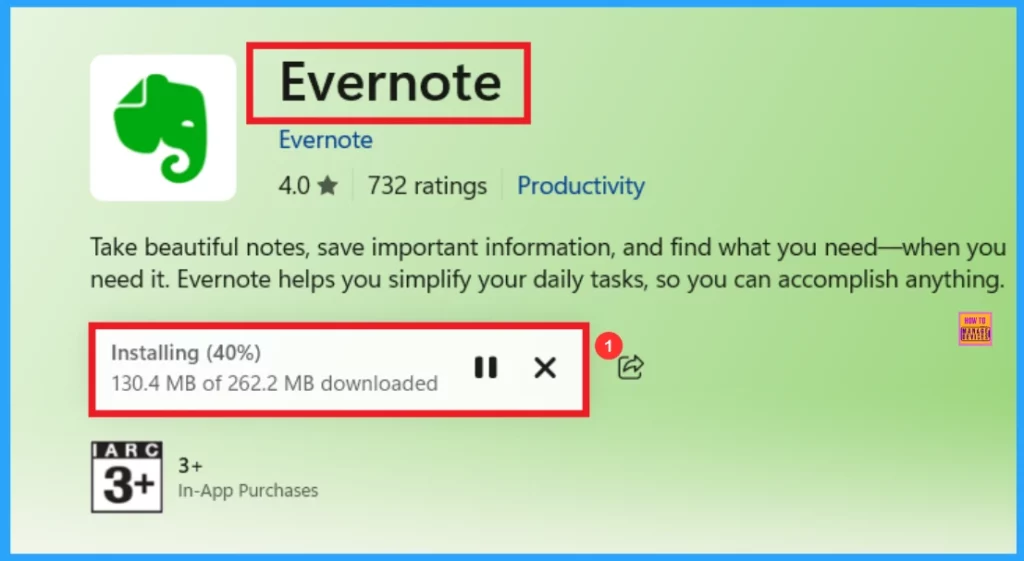
You can see in the below screenshot that the Evernote App is started downloading. You can close the installing using close button and pause the installing using pause button. Here you can see 130.4MB of 262.2 MB download completed.
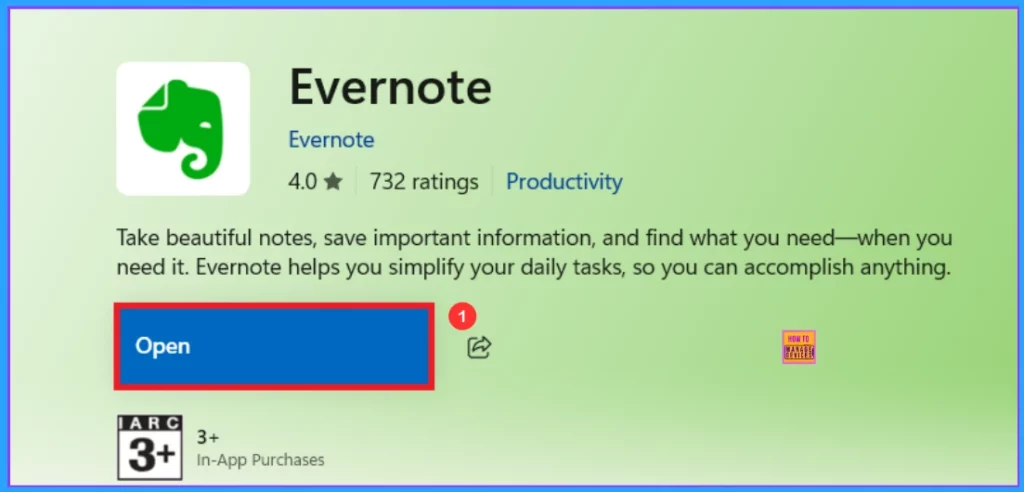
You can easily use the Evernote App on your Windows 11 PC. With the Evernote App, take beautiful notes, save important information, and find what you need when you need it. By clicking the Open button in the screenshot below.
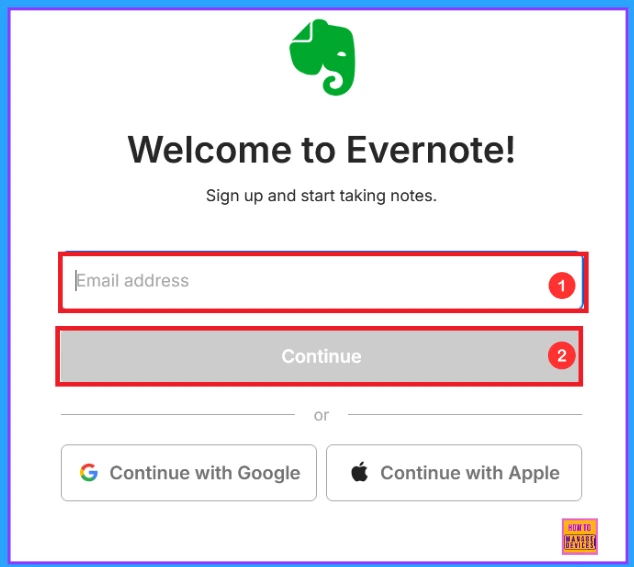
After clicking the open you can see a login page. It welcomes user to Evernote and invites them to sign up and start taking notes. Enter your Email address, then click the “continue” button. You can also sign up using your Google or Apple account.
You can easily create notes in the Evernote app by clicking “Create a Note,” as shown below. Your setup is now complete. Start by creating a note and exploring everything else that Evernote has to offer.

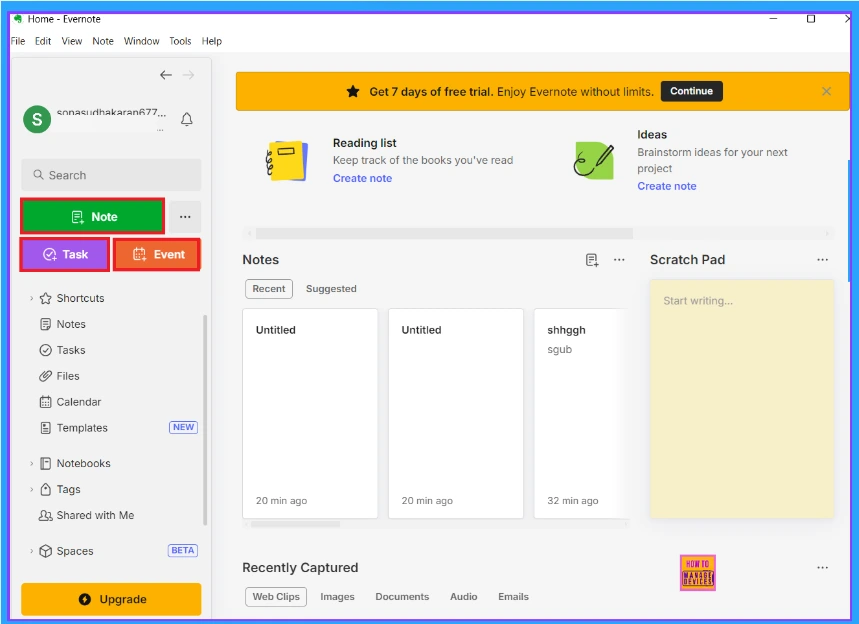
The home page of the Evernote App is given below. Here you can see the options to create notes, tasks, and events. Evernote App provides a 7-day free trial. Some options and their uses are given below.
| Options | Used to |
|---|---|
| File | Do things like open or save notes. |
| Edit | Change or fix the note content. |
| View | Change how things look. |
| Notes | To create notes. |
| Window | Manage Evernote windows. |
| Tools | Extra features and settings. |
| Help | Get help or information. |
| Task | To create a task |
| Event | Add a calendar event |
| Shortcuts | Quick access to favourite items. |
| Calendar | Connect and view your calendar |
| Templates | Use ready-made note formats. |
| Notebooks | Organise notes into groups. |
| Tags | Label and find notes easily. |
| Shared With Me | See what others shared with you. |
| Spaces | Collaborate in shared areas. |
| Upgrade | Get more features with a paid plan. |
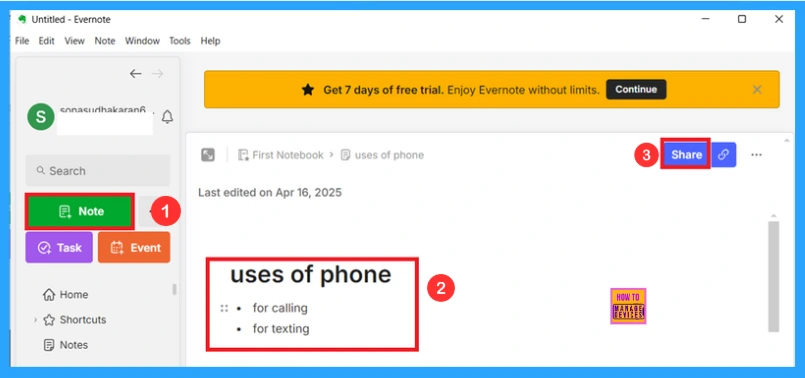
You can create notes in Evernote. Click on the Note button to start a new note. This is where you can write and organise your content. To share your note with others, click the Share button.
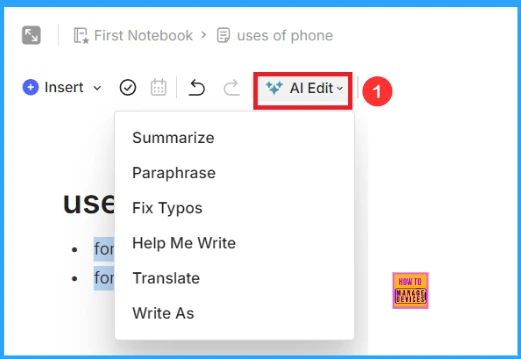
Evernote’s AI Edit is a feature that uses Artificial intelligence to help users edit and improve their notes. To use AI Edit in Evernote, highlight the text you want to edit then click the AI Edit button. From there choose an action like summarize, help me write, translate.
| AI Edit |
|---|
| Summarize |
| Paraphrase |
| Fix typos |
| Help me write |
| Translate |
| Write As |
Evernote allows you to create and manage tasks by clicking the Task button. You can add due dates, reminders, assign tasks, and prioritise. Then click the Create task button as shown below.

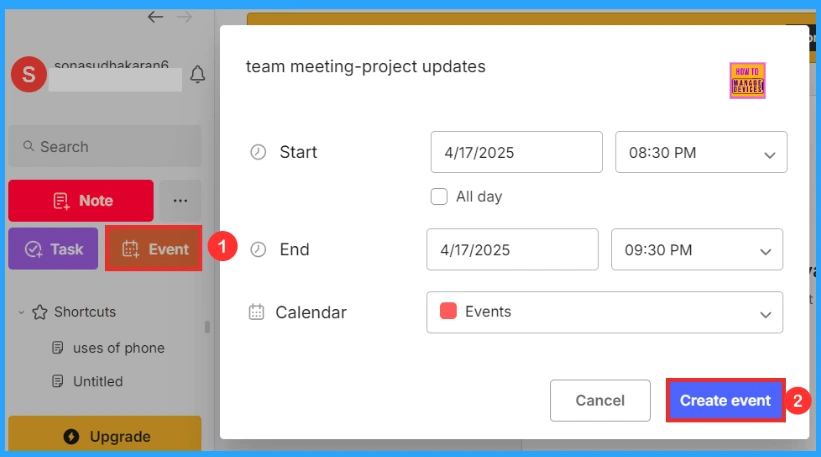
Event option allows you to create calendar events in Evernote. When you click on the Event button, you can set a title, date and time, and even link it to your calendar. Then click the Create Event button as shown below.
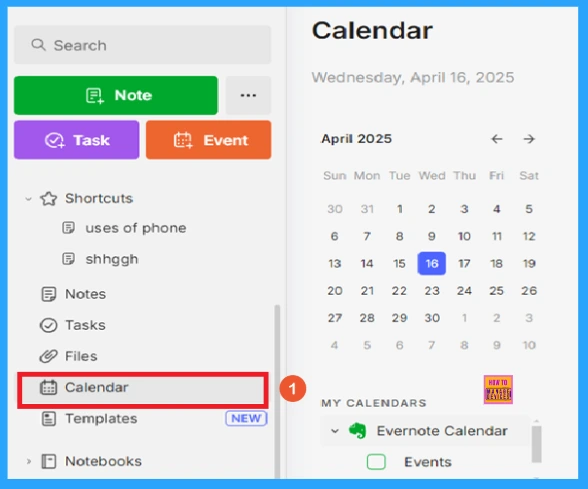
Evernote’s calendar allows you to manage events, link notes to those events and receive reminder to take notes. Click the calendar button as shown below screenshot. You can also set reminders for calendar events like remind me to take notes or remind me to open notes.
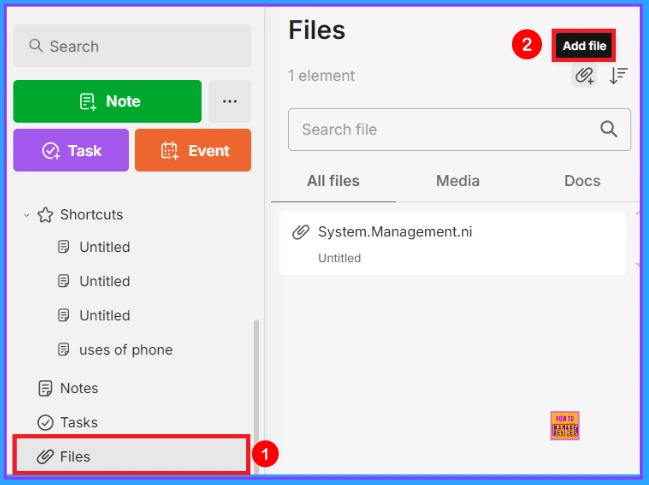
You can manage and access all the files you have uploaded to your notes by using the File option. When you click the file button, you can see three options for all files, media, and docs. You can create a new file using the Add File button.
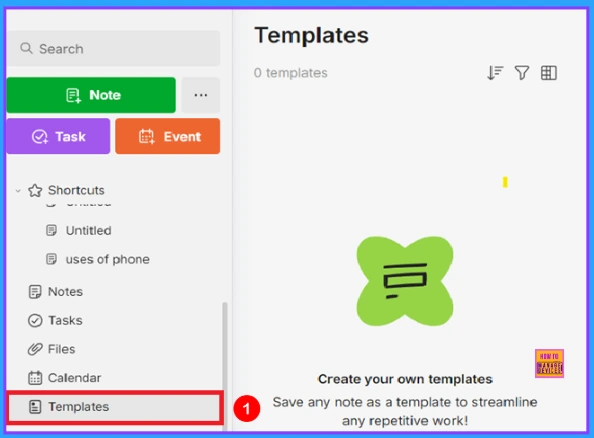
You can create your templates in Evernote by using the Template button. Save any note as a template to streamline any repetitive work. You can access pre-made templates through Evernote’s online gallery.
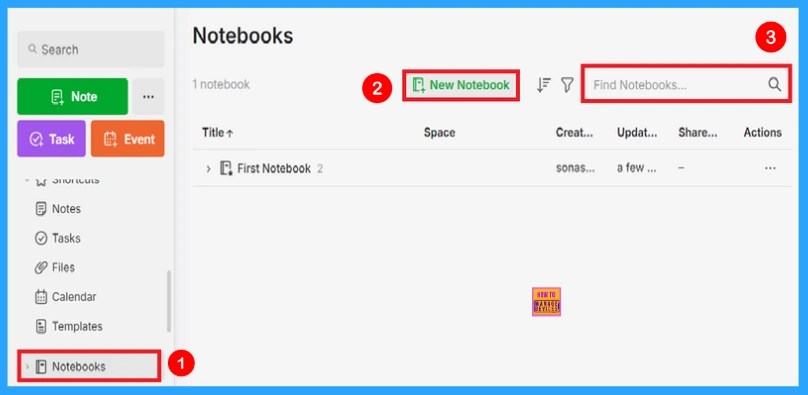
You can create a notebook in Evernote. Notebooks are useful for grouping notes around a common topic. Click on the Notebook button to open the notebook section. You can create a notebook using the New Notebook button.
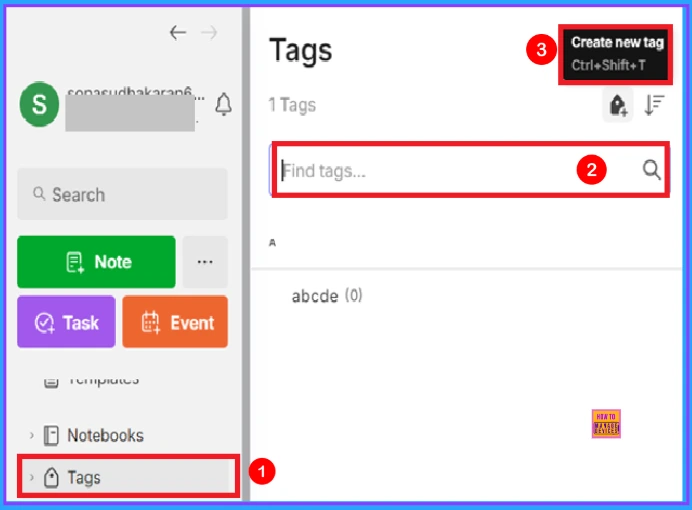
Tags help you to find your notes more easily. Tags let you add keywords to notes, making them easier to find and browse. Click the Tags button to open this section. Click the Create new tag button above to create your tag. Ctrl+Shift+T is the shortcut key used to create a new tag.
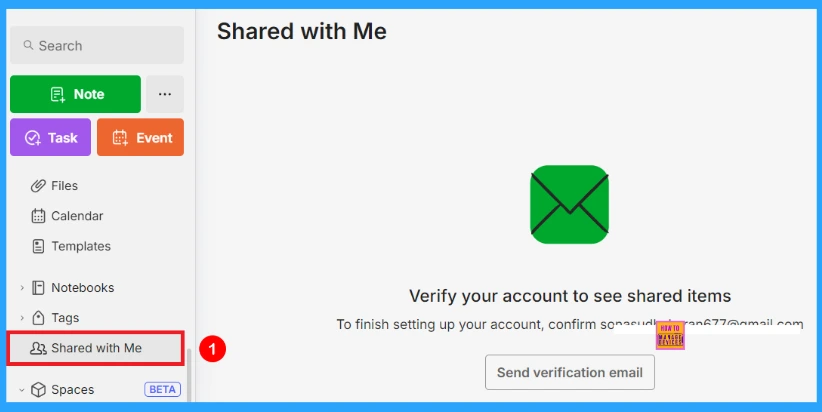
In Evernote, the shared with me option allows you to easily view notes, notebooks others have shared with you. You can access this by using the Shared with me button. It shows shared items along with your access level, whether you can view, edit or invite.
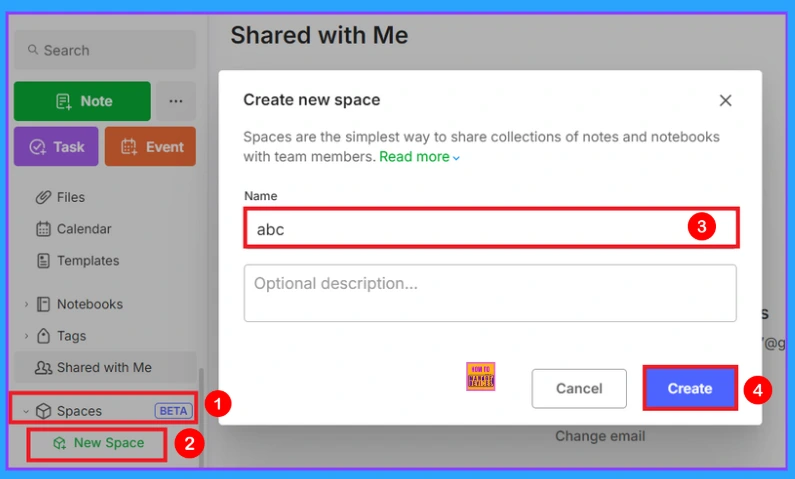
In Evernote, spaces are the simplest way to share a collection of notes and notebooks with team members. It allows you to access related notes and notebooks in one central place. You can create a new space using the New Space button. Enter name, description(optional), then click the Create button.
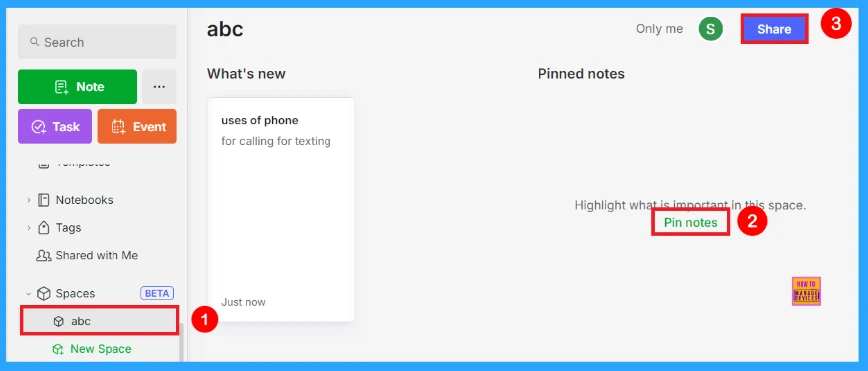
After you create a new space, you can create a note or notebook there. You can pin important notes using the Pin notes button, and you can share the notes using the Share button.
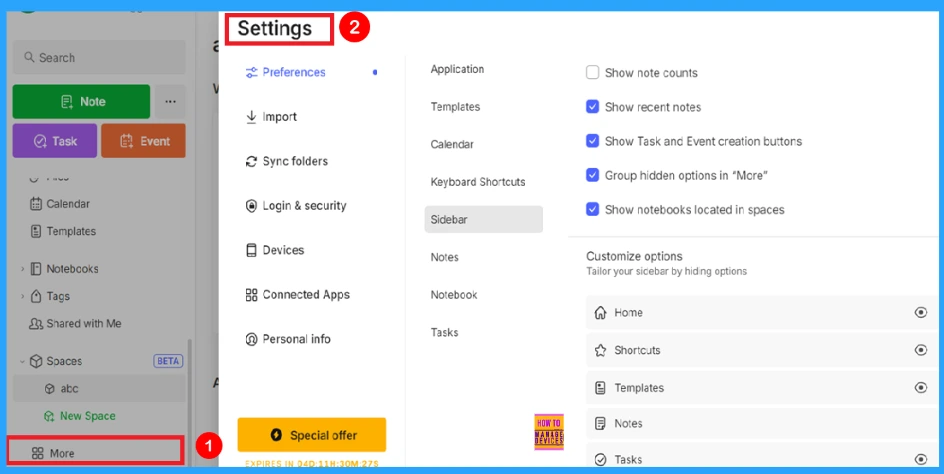
More option allows you to access the additional tools and settings. You can see the settings section by using the More button. It gives access to settings like application, templates, calendar, keyboard shortcuts, sidebar, notes, notebook, and task as shown below.
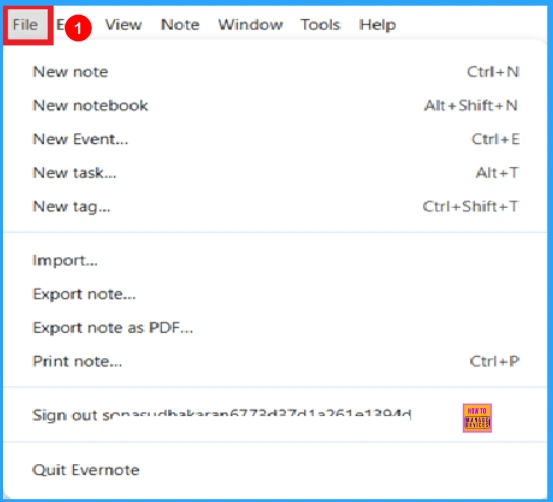
The File option helps you to create new note, notebook, event, task or tags with their respective keyboard shortcut keys. It provides options to import and export notes, export notes as PDF. More details are given below.
| Options | Shortcut Keys | Use |
|---|---|---|
| New note | Ctrl + N | To create a new note |
| New notebook | Alt + shift + N | To create a new notebook |
| New event | Ctrl + E | To create a new event |
| New task | Alt + T | To create a new task |
| New tag | Ctrl + shift + T | To create a new tag |
| Print note | Ctrl + P | To print notes |
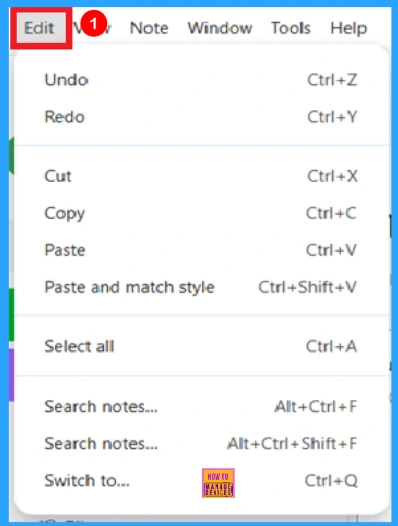
You can edit your note by using the Edit option. Evernote lets you protect your notes from accidental changes and allows multiple people to edit a note together at the same time. A list of common editing options and their shortcut keys is given below.
- Undo (Ctrl + Z) – Go back one step.
- Redo (Ctrl + Y) – Go forward one step.
- Cut (Ctrl + X) – Remove and copy.
- Copy (Ctrl + C) – Just copy.
- Paste (Ctrl + V) – Add what you copied.
- Paste and match style (Ctrl + shift + V) – Paste and match the text style.
- Select all (Ctrl + A) – To select all content.
- Search notes (Alt + Ctrl + F) – Look for something in notes.
- Search notes (Alt + Ctrl + Shift + F) – For searching notes
- Switch to (Ctrl + Q) – Change to something else.
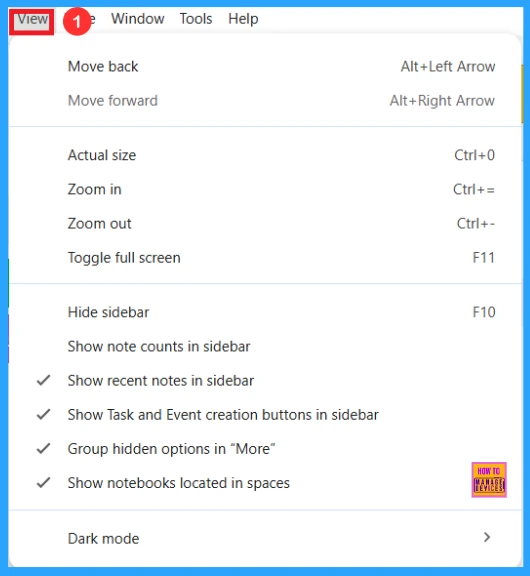
You can control how the app looks and behaves using the view option. Evernote offers various view options to customise how you display your notes. It lets you move back or forward, zoom in or out, toggle full screen, turn on dark mode. It also includes options to display recent notes, tasks, and notebooks in the sidebar. Shortcut keys are given in the table below.
| Options | Shortcut Keys |
|---|---|
| Move back | Alt + left + arrow |
| Move forward | Alt + right + arrow |
| Actual size | Ctrl + 0 |
| Zoom in | Ctrl + = |
| Zoom out | Ctrl + – |
| Toggle full screen | F11 |
| Hide sidebar | F10 |
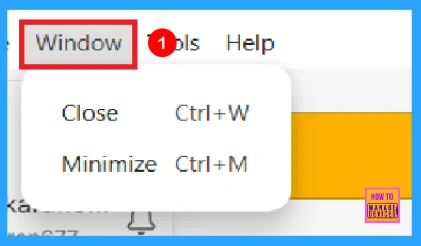
When you click the Window menu in Evernote. A dropdown menu is open, offering two options. Close (Ctrl + w) to close the current window and Minimize (ctrl +M) to minimize it. It helps manage the window’s behaviour quickly using keyboard shortcuts.
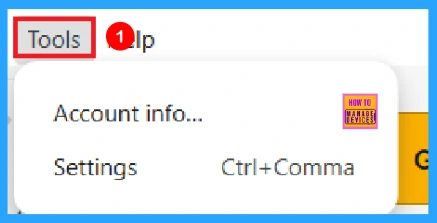
The given screenshot shows the Tool menu in Evernote. Under tools, you can access account info and settings (ctrl + comma). Using settings, you can adjust options like syncing, notifications, account management. Account info provides details about your account such as your email address, subscription plan, storage usage etc…
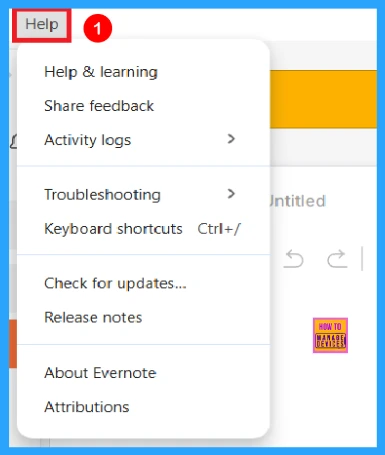
Evernote’s Help & learning offers articles and guides to help you quickly solve the common problems and learn how to use the app better. The available options are given below.
- Help & learning – Access articles and guides.
- Share feedback – Send feedback to Evernote.
- Activity logs – View system activity logs.
- Troubleshooting – Tools to fix problems.
- Keyboard shortcuts – View shortcut keys.
- Check the updates – Update the Evernote app
- Release notes – See what is new.
- About Evernote – Information about this app.
- Attributions – Legal credits.
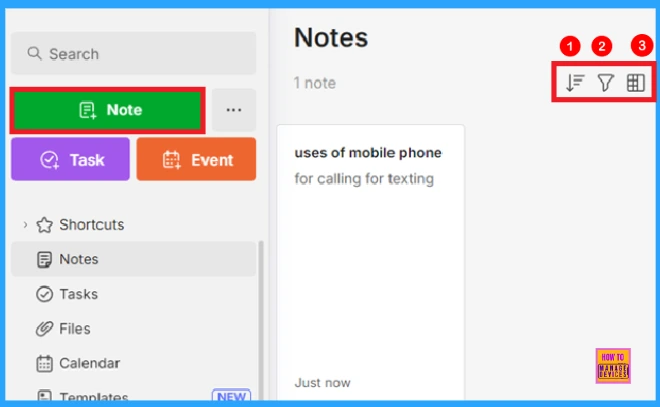
You can create notes using the Note button in Evernote. When you click the Note button you will see three icons. Those three icons are sort options, add filters, view options.
- Sort options available
- Date updated (last modified time)
- Title (alphabetical order)
- Date created (when the note was originally made)
- Add filter section
- Tags – select specific tags assigned to notes.
- Located in – choose the notebook where the note is stored.
- Created – filter by the date the note was created.
- Updated – filter by the date the note was last updated.
- View options
- Cards (Ctrl + F6) – Grid or card format.
- Snippets (Ctrl + F5) – Small preview blocks.
- Side list (Ctrl + F8) – List with side preview.
- Top list (Ctrl + F7) – list with preview on top.
- Show images – Display attached images.
- Show body text – Display part of the note’s main text.
- Show tags – Display the tags attached to notes.
- Show reminder – Display reminders set on notes.
How to Create Notes in Evernote
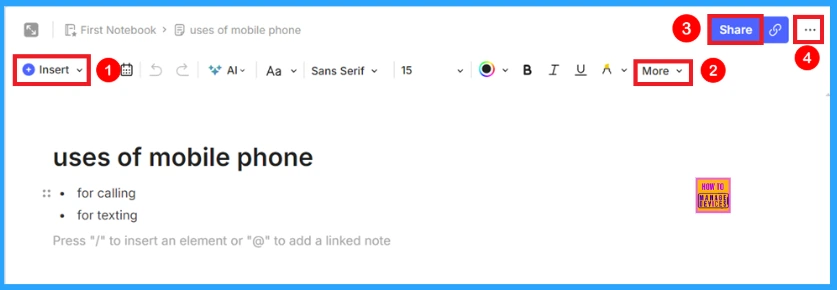
You can create notes by using the Note button in Evernote. You can see more options in the screenshot below. Details of each option are given below.
- Insert – lets you insert elements like tables, images, links, etc..
- AI edit – It helps users edit and improve their notes.
- Font – you can change the font.
- Font size – you can change the font size.
- Font colour – you can change font colour.
- Bold – used to bold the text.
- Italic – you can write text in italic style
- Underline – used to underline the text.
- Highlight – used to add background colour to text.
Then click the More button, which gives you formatting options like making lists, adding links, aligning text, and applying special text styles. It helps make your text clearer, more organised, and sometimes more visually appealing. You can share your notes with others.
When you click on the three dots in the screenshot below, it provides extra actions for managing your note, like sharing, copying, moving, duplicating, etc. Here you can see an example of a created note. The title of the note is Uses of mobile phone.
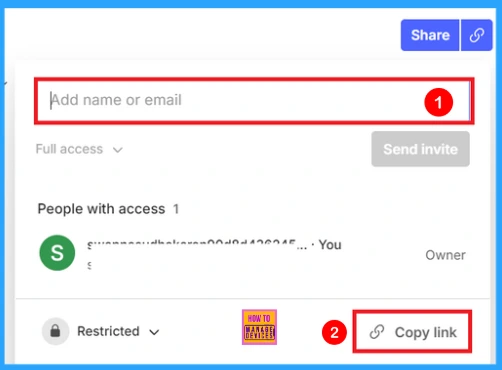
When you click the Share button, a page like will appear as shown in the screenshot below. Here you can add Email or name to share. You can copy the link of that note using the Copy link button.
How to Create a Task in Evernote
This post has already mentioned how to create task in Evernote. After clicking the create task, you can see a page like this. Here you will see the task title, due date, assigned note and assigned to.

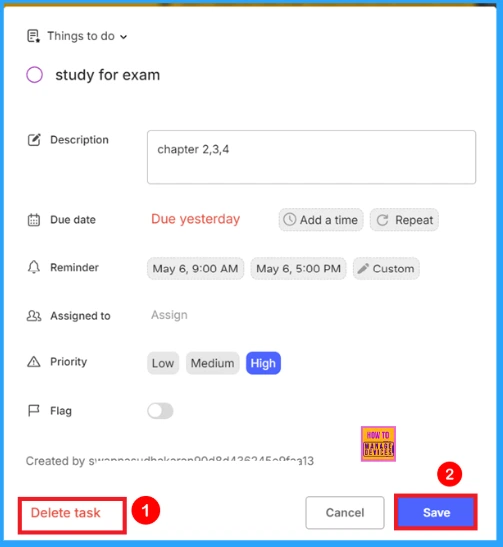
When you click on the task, you should see a page like the one shown in the screenshot below. There, you can edit the task, delete the task using delete task button, save the task using save button.
Need Further Assistance or Have Technical Questions?
Join the LinkedIn Page and Telegram group to get the latest step-by-step guides and news updates. Join our Meetup Page to participate in User group meetings. Also, Join the WhatsApp Community to get the latest news on Microsoft Technologies. We are there on Reddit as well.
Author
Anoop C Nair has been Microsoft MVP from 2015 onwards for 10 consecutive years! He is a Workplace Solution Architect with more than 22+ years of experience in Workplace technologies. He is also a Blogger, Speaker, and Local User Group Community leader. His primary focus is on Device Management technologies like SCCM and Intune. He writes about technologies like Intune, SCCM, Windows, Cloud PC, Windows, Entra, Microsoft Security, Career, etc.

