Today we are discussing on the policy that Prevent Automatic Space After Text Suggestions for Accurate Typing using Intune Policy. As we all know that setting catalog feature that helps the organization to deploy policies for their organizational benefits.
This policy helps organizations manage how text prediction behaves on on-screen keyboards by controlling whether a space is automatically inserted after a user selects a suggested word. It ensures a consistent typing experience across all managed devices within the organization.
If this policy is Enabled, the setting will be locked so that no space is inserted automatically after a text prediction is selected. Users will need to manually press the spacebar to add a space after the chosen word. This configuration ensures that all devices under management follow the same input behavior, preventing any changes from being made at the user level.
If the policy is Disabled or Not Configured, users can manually control the option and decide whether they want the space to be inserted automatically or not. This gives them more flexibility but may lead to inconsistencies in text formatting across different users.
How is this Policy Helpful to Organizations?
This policy is highly beneficial for organizations that require consistent and accurate text input across all employee devices. By turning off the automatic insertion of spaces after text prediction, organizations can reduce the chances of typing or formatting errors, especially in sensitive data entry environments.
Prevent Automatic Space After Text Suggestions for Accurate Typing using Intune Policy
This policy mainly affects users who rely on on-screen keyboards or touch-based devices. When users type, they receive predictive text suggestions. Normally, after selecting one of these predictions, a space is automatically added to allow the next word to be typed smoothly.
- Enable or Disable Text Prediction Policy in MS Edge Browser using M365 Admin Center
- Enable Edge Mini Menu Feature on Text Selection
- Enable Disable Autocorrect Misspelled Words on Windows 11
Real-world Examples for this Policy
For example, in data entry departments, employees often fill forms, type serial numbers, or enter product codes where an unwanted space could cause invalid entries. In software development teams, where developers often commands, automatic spaces can break syntax or cause code errors.
Profile Creations
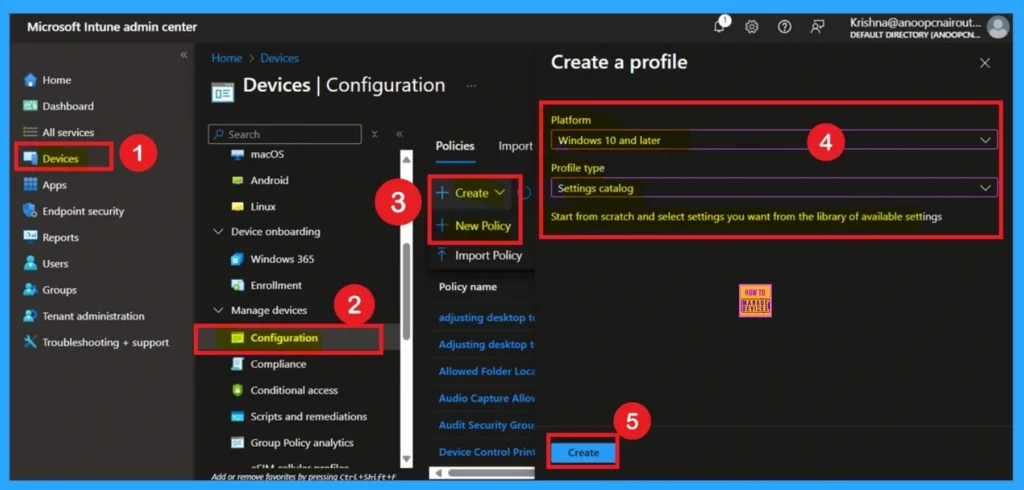
By signing in Microsoft Intune admin center, you can start configuring Tab Lifecycles Policy Policy. Open the Microsoft Intune Admin center. Go to Devices > Configuration > +Create >+ New Policy. After that, you have to select platform and profile. It is important to select the platform and profile before configuring the policy. Here, I selected Windows 10 and later as the Platform and Settings catalog as the profile type. Then click on the Create button. Then you will get the basic tab.
Filling Basic Tab
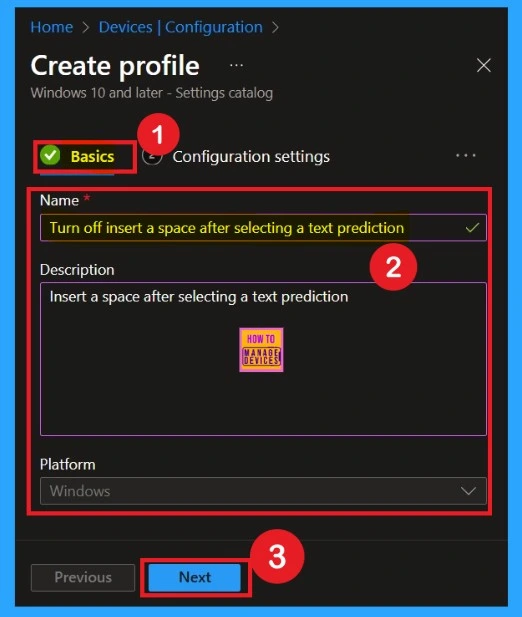
In the Basic tab, you need to give your policy a name and a short description. The name should clearly tell what the policy does for. Example, “Turn Off Insert Space After Text Prediction. ”You can also mention what platform it is for, like Windows 10 and later. The description helps other admins understand the purpose of the policy and when to use it.
- Now Click on the Next.
Configuration Settings
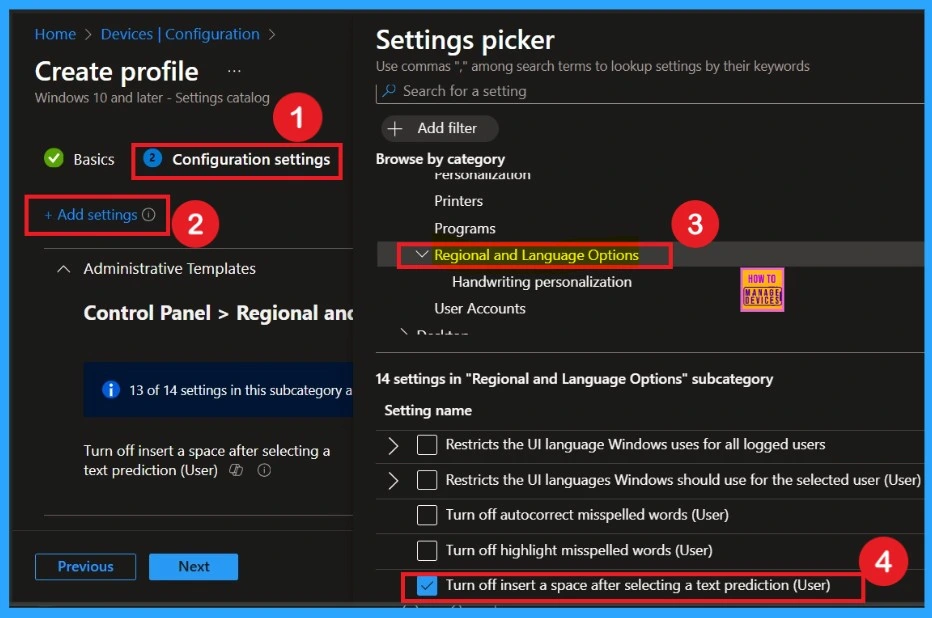
In the Configuration Settings tab, you set up what the policy will actually do on the user’s device. Click on Add Settings, and then go through the categories to find the setting you want to control. For example, to stop adding a space after a text prediction, go to Administrative Templates > Control Panel > Regional and Language Options > Text Prediction Settings.
Disable the Policy
By default, you should understand that a policy can be either enabled or disabled. In this case, the policy is disabled by default. If you want to keep it in the disabled mode, you have to click Next to continue.
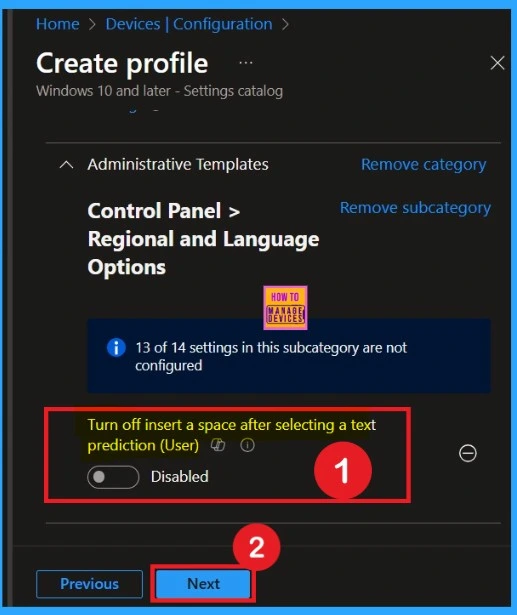
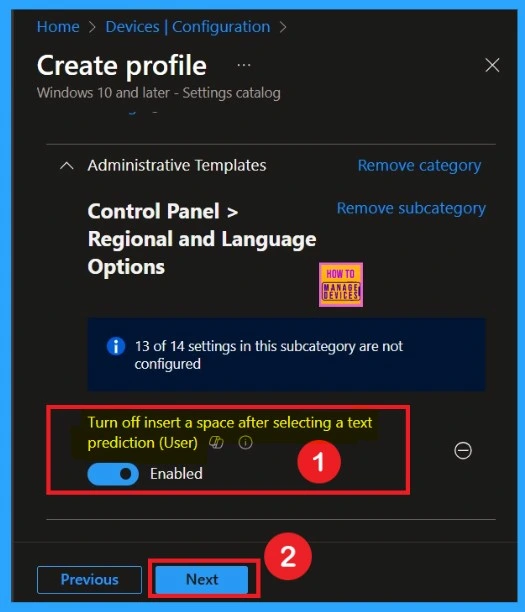
Enable the Policy
After select the Settings and then choose Enabled to turn off the auto-space feature. In the Enabled, mode then the option will be locked to not insert a space after selecting a text prediction. To set that toggle the pane left to the right and turn as blue color.
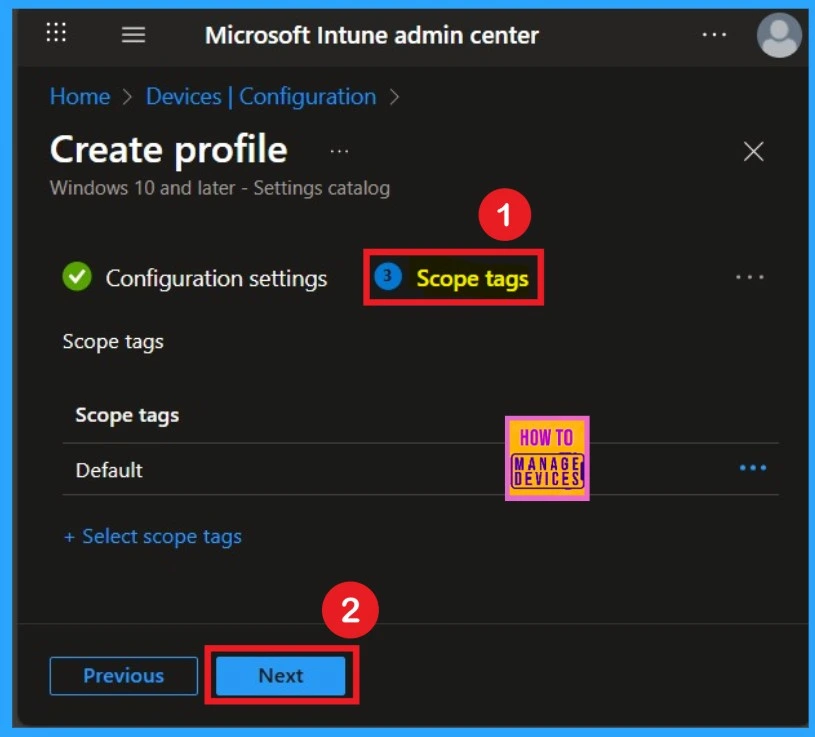
Selecting Scope Tags
Scope Tags sections helps you to add restriction to the visibility of the Policy. But it is not a mandatory step, so you can skip this step. Here I don’t add scope tags for Bing SafeSearch Policy. Click on the Next button.
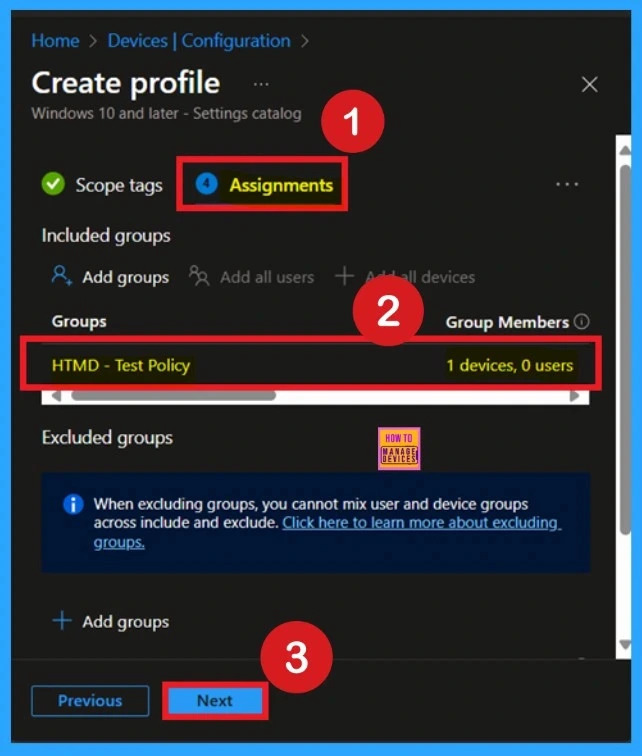
Selecting Group from Assignment Tab
To assign the policy to specific groups, you can use the Assignment Tab. Here I click, +Add groups option under Included groups. I choose a group from the list of groups and click on the Select button. Again, I click on the Select button to continue.
Review + Create Tab
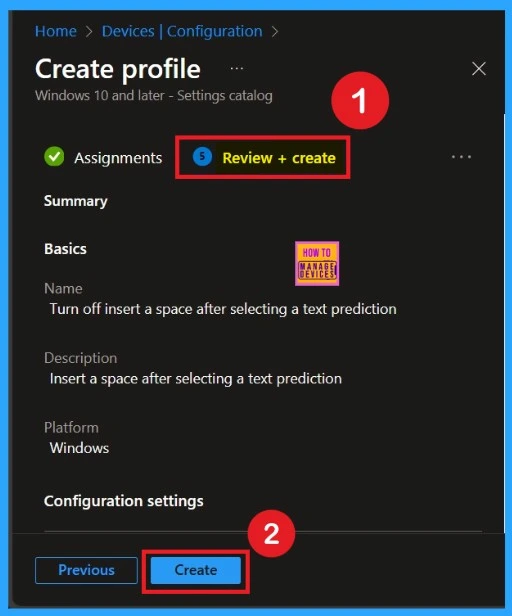
Before completing the policy creation, you can review each tab to avoid misconfiguration or policy failure. After verifying all the details, click on the Create Button. After creating the policy, you will get a success message.
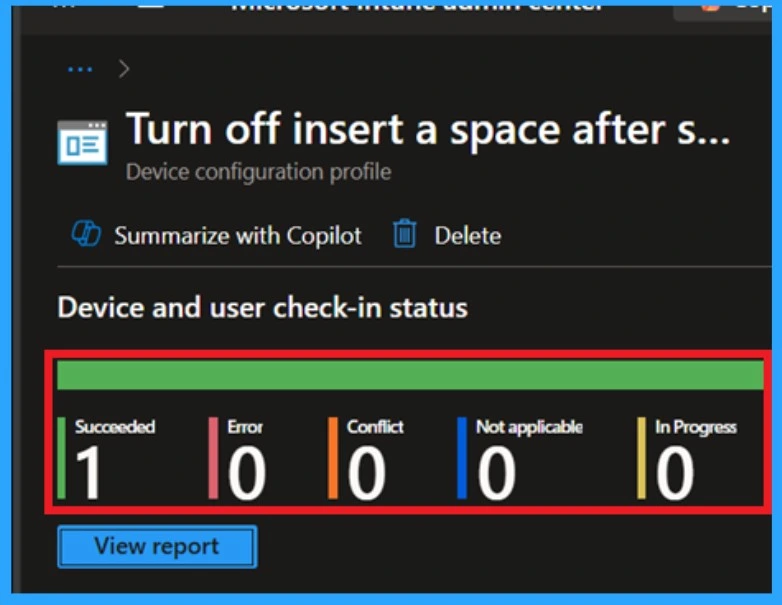
Device Check-in Status
The Monitoring Status page shows whether the policy has succeeded or not. To quickly configure the policy and take advantage of the policy sync the assigned device on Company Portal. Open the Intune Portal. Go to Devices > Configuration > Search for the Policy. Here, the policy shows as successful.
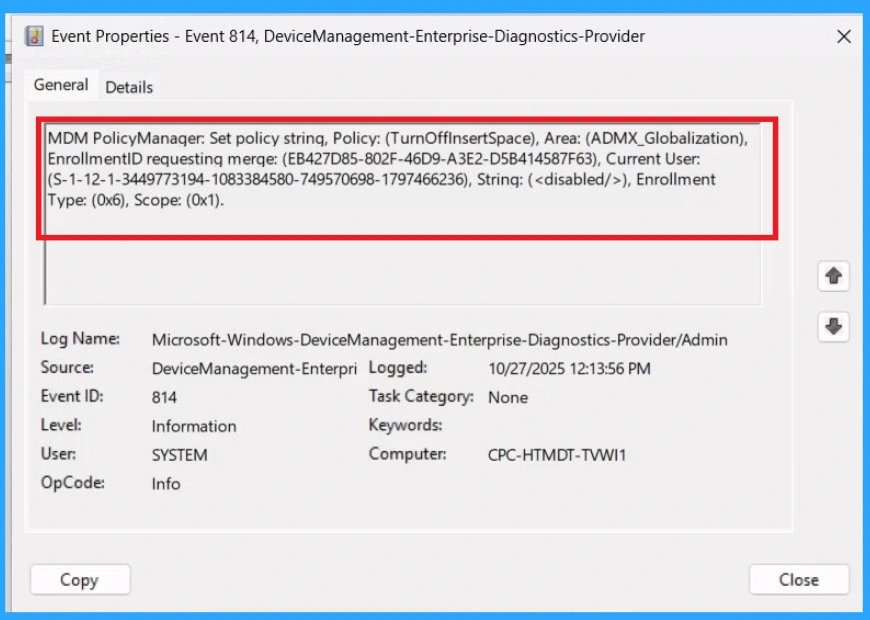
Event Viewer
It helps you check the client side and verify the policy status. Open the Client device and open the Event Viewer. Go to Start > Event Viewer. Navigate to Logs: In the left pane, go to Application and Services Logs > Microsoft >Windows > DeviceManagement-Enterprise-Diagnostics-Provider > Admin.
- Filter for Event ID 814: This will help you quickly find the relevant logs.
| Policy Info |
|---|
| MDM PolicyManager: Set policy string, Policy: (TurnOffInsertSpace), Area: (ADMX_Globalization), EnrollmentID requestinq merqe: (EB427D85-802F-46D9-A3E2-D5B414587F63), Current User: (S-1-12-1-3449773194-1083384580-749570698-1797466236), Strinq: (), Enrollment Type: (0x6), Scope: (0x1). |
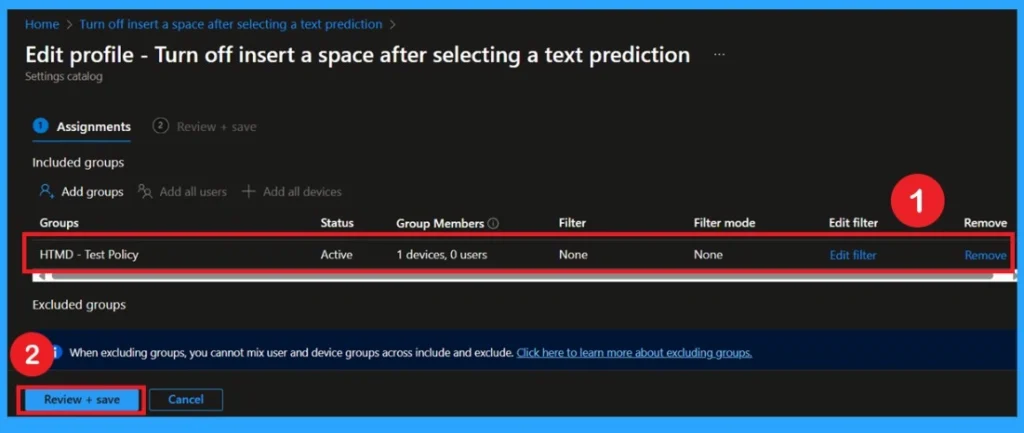
Removing the Assigned Group from these Settings
If you want to remove the Assigned group from the policy, it is possible from the Intune Portal. To do this, open the Policy on Intune Portal and edit the Assignments tab from monitoring status page and the Remove Policy.
Delete the Policy
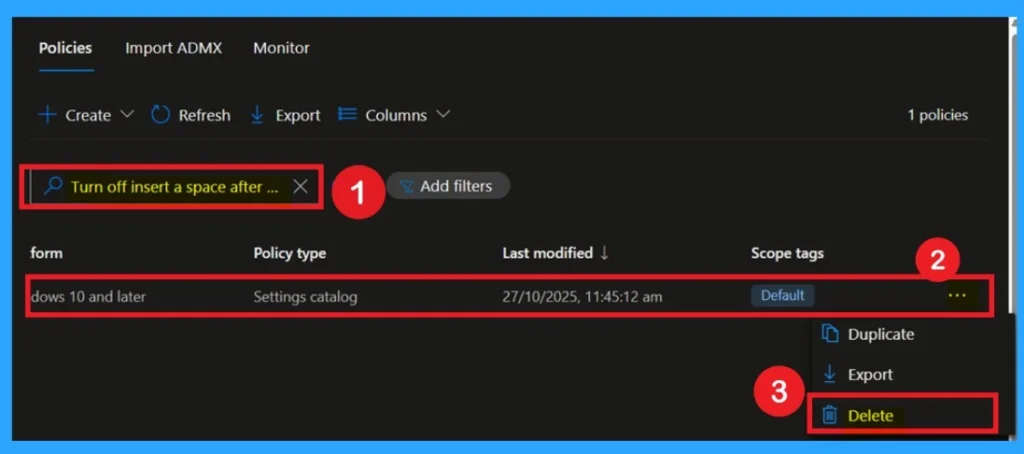
To delete a policy in Microsoft Intune, first sign in to the Microsoft Intune Admin Center. Navigate to Devices and then select Configuration. Locate and select the specific policy you want to remove. Once you’re on the policy details page, click the 3 -dot menu in the top right corner and choose Delete from the available options.
Need Further Assistance or Have Technical Questions?
Join the LinkedIn Page and Telegram group to get the step-by-step guides and news updates. Join our Meetup Page to participate in User group meetings. Also, Join the WhatsApp Community to get the latest news on Microsoft Technologies. We are there on Reddit as well.
Author
Anoop C Nair has been Microsoft MVP for 10 consecutive years from 2015 onwards. He is a Workplace Solution Architect with more than 22+ years of experience in Workplace technologies. He is a Blogger, Speaker, and Local User Group Community leader. His primary focus is on Device Management technologies like SCCM and Intune. He writes about technologies like Intune, SCCM, Windows, Cloud PC, Entra, Microsoft Security, Career, etc.

