Let’s learn How to Create a Task Scheduler and run Automated Tasks on Windows 11 using Task Scheduler. Task Scheduler (formerly known as Scheduled Tasks) is a job scheduler in Microsoft Windows that helps to launch computer programs/scripts at pre-defined times or after a specified time interval.
User can use Task Scheduler to create the scheduled tasks to run automatically on their PC. The tasks run as per the time scheduled during the creation of a task. It provides task automation on Windows to make tasks run automatically in a specific schedule as provided by the user.
Task scheduler helps you do a lot of stuff in less time, enabling you to focus on new content, programs, and design ideas. It is a core component of Windows Service. When a user frequently uses particular programs in Windows 11 and faces the problem of opening the required program after reboot, so needs to schedule tasks for the applications to perform well for the same.
Most of the app monitors the time and events occurring in Windows 11 and starts a task when the given condition is matched. When the Windows 11 PC updates the OS/security patches, there is an automated task behind the actions. Get the step-by-step details from this post.

- Easy Steps to Copy SCCM Task Sequence for Deployment
- Turn off App Notifications On The Lock Screen Policy using Intune
What Task Schedulers Do
Windows 11 lets you utilize the Task Scheduler to schedule automatic tasks. Also, you can create concentrated automation on Windows PC, like the Task Scheduler launching the Outlook app and sending an important email automatically at a scheduled date and time. The following is a list of the usages of Task Scheduler.
- Launching Applications, Services, and Batch files at a scheduled time.
- Sending emails or texts automatically using a specific program.
- You can send out task reminders and notifications by using it.
- Remotely control the security of your device.
- Not required to open applications manually after every restart or shutdown. The Task Scheduler opens applications for you as scheduled.
How to Open Windows Task Scheduler Application
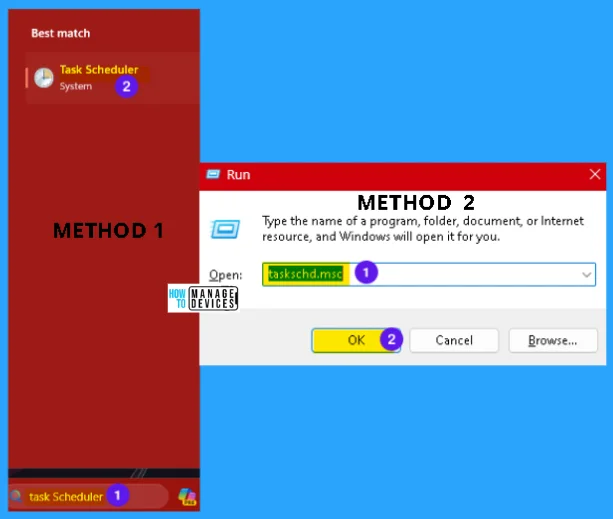
You can open the Windows task scheduler application by typing task scheduler in the search box on the taskbar. Then click on the appropriate application to open the task scheduler.
There is another way to open the task scheduler using the Run dialog box, to do so, press Win Key + R. When the run dialog box opens, type taskschd.msc and press OK.
You can also open the task scheduler using the Computer Management window, click on the link to learn how to open Computer Management in Windows.
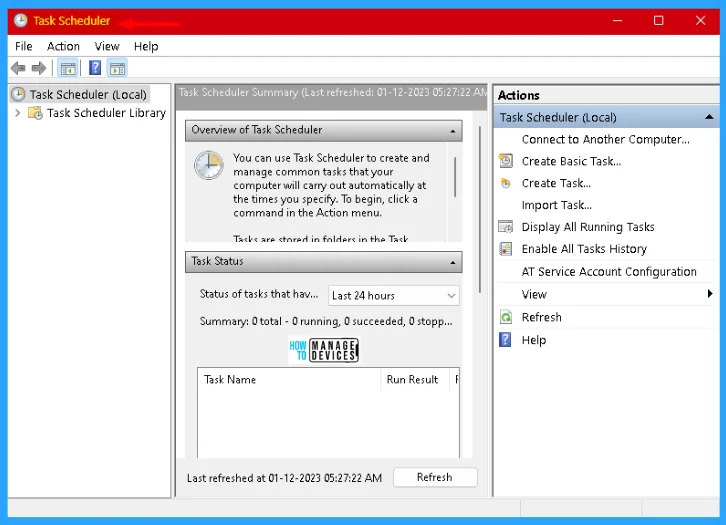
The task scheduler window opens after performing one of the methods discussed above. You can use Task Scheduler to create and manage common tasks that your computer will carry out automatically at the times you specify. To begin, click a command in the Action Menu.
Tasks are stored in folders in the task scheduler library. To view or perform any operation on an individual task, select the task in the Task Scheduler Library and click on a command in the Action Menu.
Create a New Task Library in the Task Scheduler
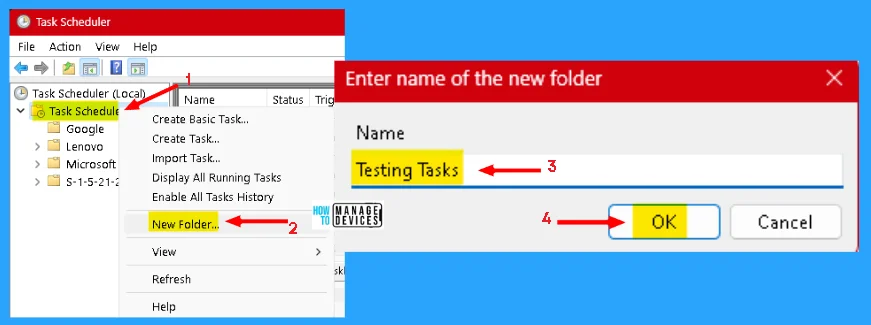
When you launch the Task Scheduler window, you will notice under Task Scheduler (Local), there is a Folder as Task Scheduler Library. When you expand the Task Scheduler Library, all predefined tasks are listed under it. Follow the steps listed below to create a new task library.
- Right-click on the Task Scheduler Library
- Click on New Folder
- In the Next window, provide a name for your library and press OK.
NOTE! The above-listed step is recommended to separate your tasks from predefined system tasks and application tasks.
Create Basic Task to Run Automated Tasks on Windows 11 using Task Scheduler
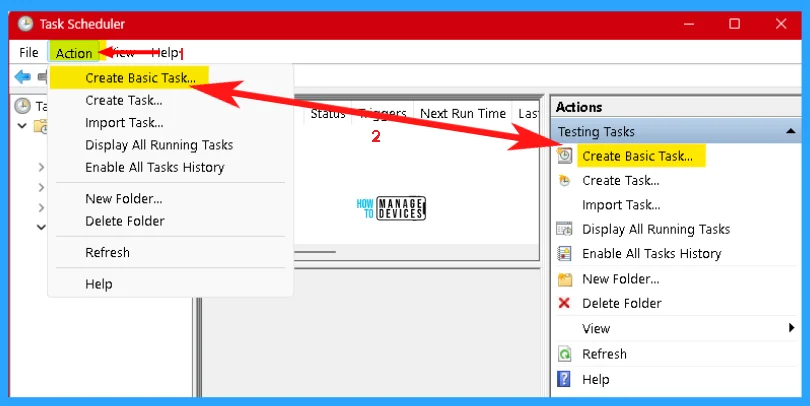
Following the steps above, schedule new tasks for you when you successfully create a New Task Library. Select your Task Library, and click Create Basic Task at the right panel of your Task Scheduler Window or under the Actions menu.
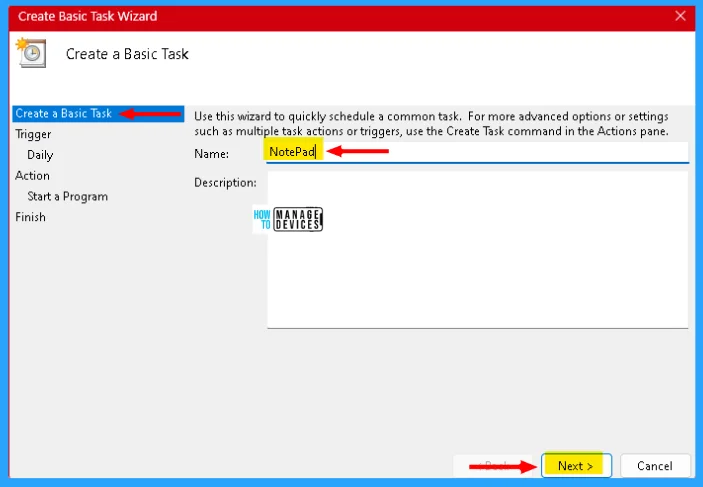
The Create Basic Task Wizard is open now. Use this wizard to schedule a common task quickly. For more advanced options or settings, such as multiple task actions or triggers, use the Create Taxk Command in the Actions pane.
Provide a Name for your task, which is mandatory, and provide a Description for your task, which is optional, it depends upon you if you want to provide a description for your task or not, then click Next to continue.
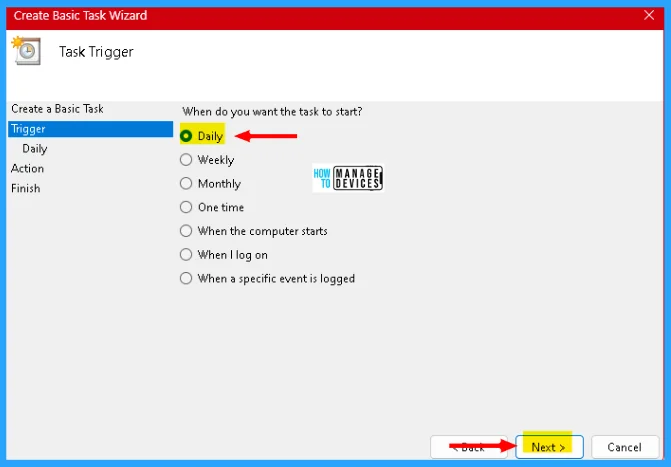
Then it moves to the next step, which is Trigger. Under trigger, there are seven options are there. You can select one of them as per your requirements. If you choose When the computer starts & When I log on, then it directly moves to the Action window; otherwise, it creates a subfolder under the trigger. Choose your desired option and click Next to continue. The options are listed below.
NOTE! Task Scheduler includes a number of triggers, including on a specific date, during startup, or when a particular user signs in. Depending on the trigger, you need to configure additional parameters.
- Daily
- Weekly
- Monthly
- One time
- When the computer starts
- When I log on
- When a specific event is logged
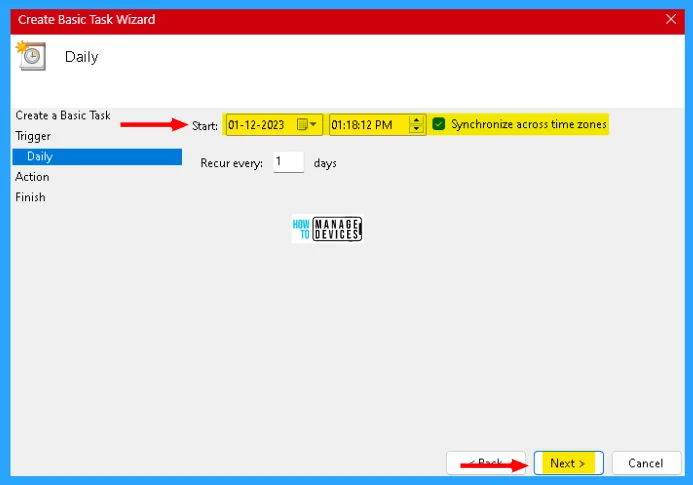
After choosing your trigger point, it moves to the trigger settings. You can set the start date and time as you need and also set the time to recast the same task. Fill in the details as you need, then click Next to move to the Action window.
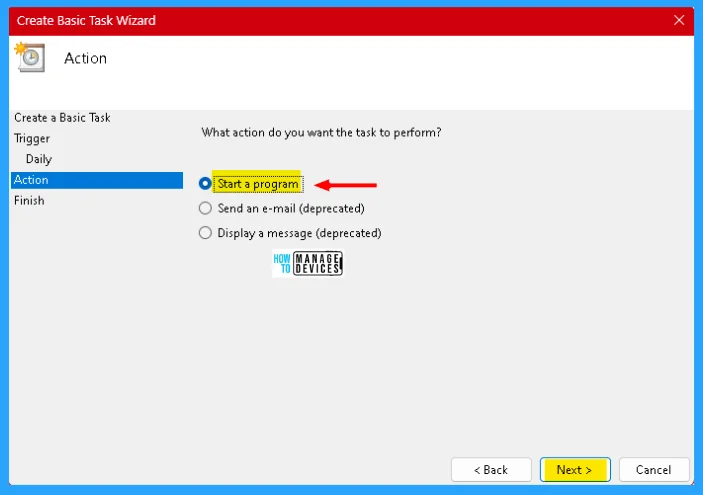
In the Action window, you can the what action to perform in your task. What you select that particular action is going to perform in your task. Select your appropriate Action and click Next to continue, the actions are listed below.
- Start a program: This allows you to run any program or script on the PC.
- Send an e-mail (deprecated): This allows you to send an e-mail from and to a specific address, including attachments, but you need to specify an email server for it to work
- Display a message (deprecated): This shows a text message on the screen on the set scheduled date and time.
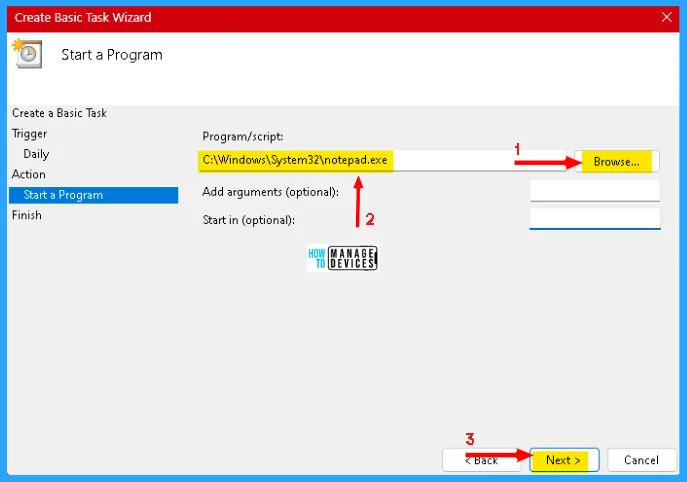
You must provide the application path in the program/script option at the start of a program window. If you do not know the path, then you simply can browse it from your PC and click Next to continue.
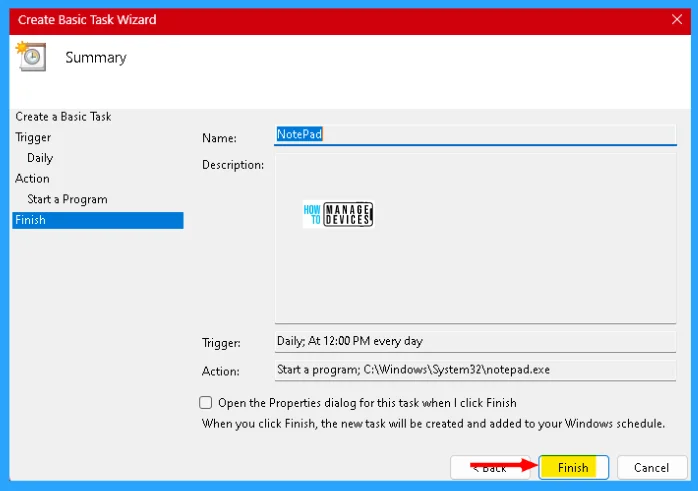
Now, at last, it shows the summary that you have made in the settings. If any thing you want to change you can go back and change as required. If not, check properly and click Finish to add the created task to the list.
Create an Advanced Task in the Task Scheduler to Perform Actions
The Advanced Task in the task scheduler is the same as the basic task, the only difference is that in advance, you can create multiple tasks at a time.
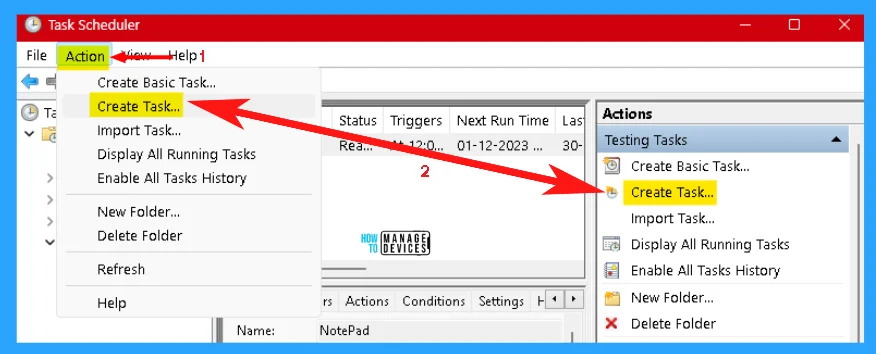
To create it, click Create Task under Actions in the right pane, or click on the Action tab, then click on the Create Task option under it, as shown in the image below.
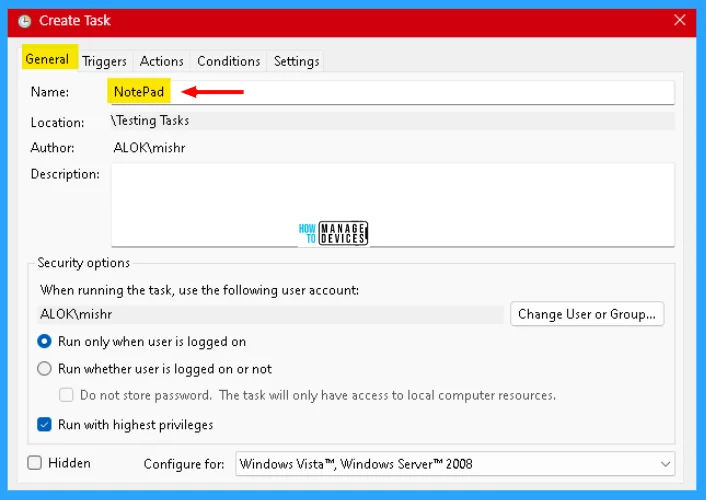
Now as the same procedure as the basic task, provide the Name of the task, check the security options under the General tab, then jump to the Triggers tab.
Under the Triggers tab, click on New to open New Trigger. Provide the details of your task, its settings, advanced settings, or any other privileges, then click OK and jump to the Actions tab.
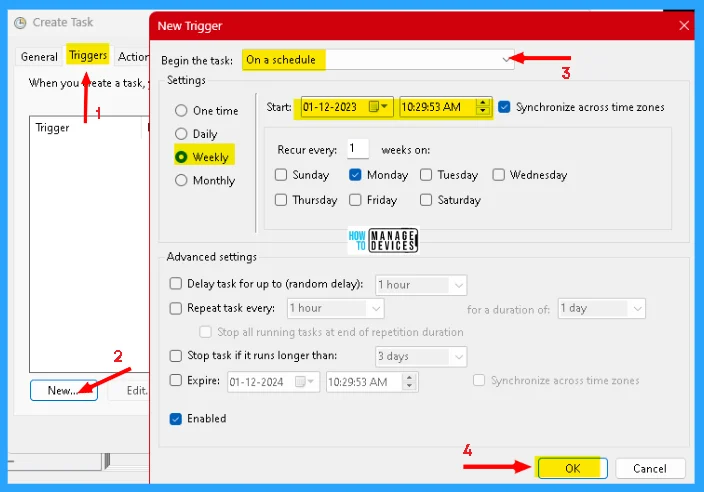
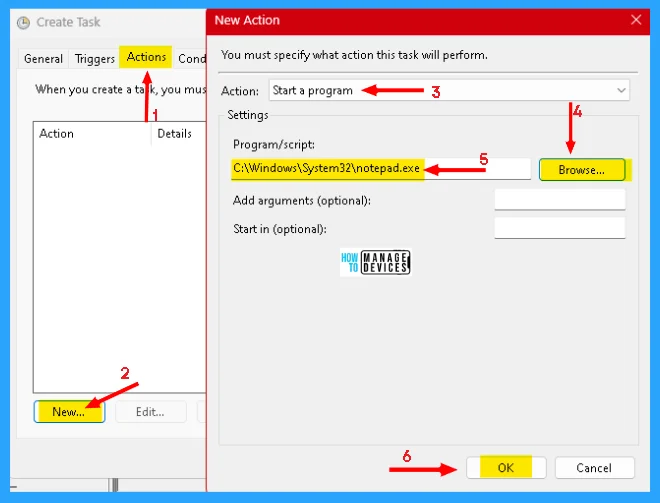
In the Action tab, again click on New under Action to set specific action against your task. In the New Action window, you set the actions to be performed by the task you selected. Select the action, browse the path, click OK, and then jump to the Conditions tab.
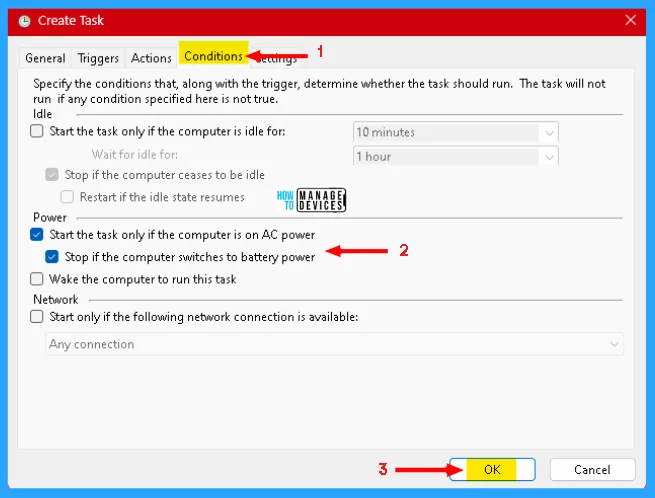
Under the Conditions tab, specify the conditions that, along with the trigger, determine whether the task should run. The task will not run if any condition specified here is not true. After the selection conditions, move to the settings tab.
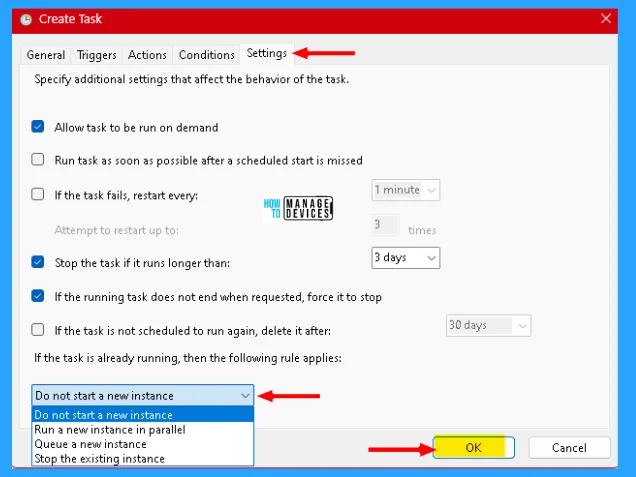
In the Settings tab, choose the additional settings that affect the behaviour of the task. Here you can specify the additional settings to give some restriction to the task according to your requirement, then click OK, and your task is created and added to the list.
Edit Tasks in the Task Scheduler to Perform Actions
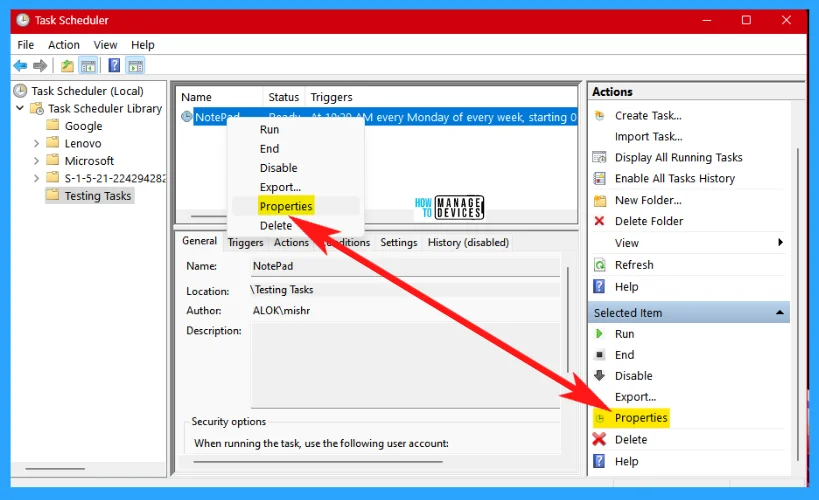
Whenever you need to edit your task, simply go to the Task Library and find the task you want to edit, then select the task, right-click on it and move to properties. On the other hand, you can choose the task and find properties in the right pane under Actions, as shown in the image below. This allows you to make necessary changes to your task if required.
I hope that the How to Create a Task Scheduler to Perform Actions in Windows 11 information is helpful. Please follow us on the HTMD Community and visit our website HTMD Forum, if you like our content. Suggest improvements, if any, and we love to know which topic you want us to explore next.
We are on WhatsApp. To get the latest step-by-step guides and news updates, Join our Channel. Click here – HTMD WhatsApp.
Author
Alok is a Master of Computer Applications (MCA) graduate. He loves writing on Windows 11 and related technologies. He likes to share his knowledge, quick tips, and tricks with Windows 11 or Windows 10 with the community.
