Let’s learn about the AVD Admin Experience and how to create a Host Pool, Workspace, and Session Host. I explained the AVD v2 ARM model architecture in the last blog post. The spring 2020 release is not generally available, but I think Microsoft plans to get AVD v2 out of public preview very soon.
In this post, I will help you understand how to Register an Azure Virtual Desktop, Create a New Host Pool, Create New Session Hosts (VM), and Create a New Workspace.
To create a host pool, you can start by accessing the RAS console and navigating to Farm > <Site> > AVD > Host pools. This will allow you to add one or more identical virtual machines (VMs) within an Azure Virtual Desktop environment, each containing an application group that users can access.
Register with Azure Virtual Desktop V2
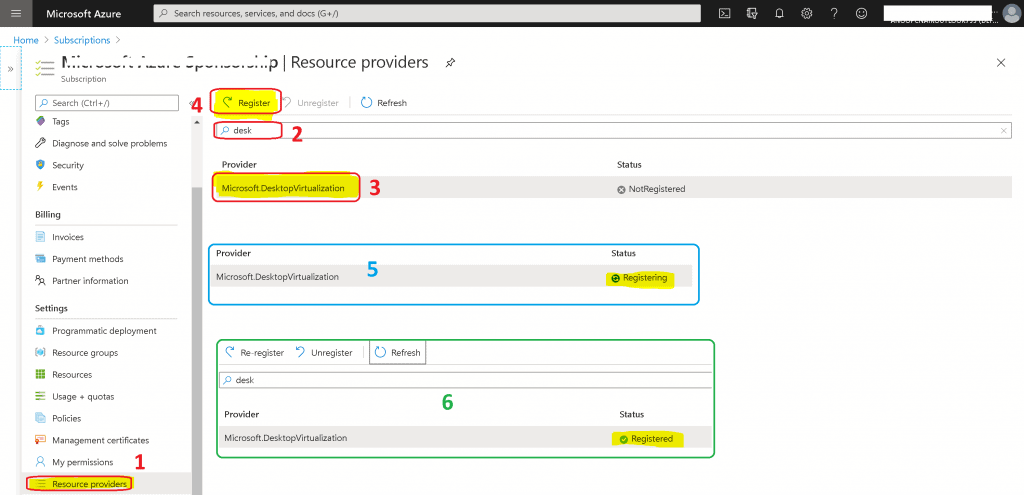
Let’s see how to register the host pools with AVD in the new admin experience from the Azure Virtual Desktop portal itself.
- Click on the Subscription icon.
- Select the Subscription.
- Click Resource Providers.
- Search with “Desktop“.
- Click on Microsoft.DesktopVirtualization
- Click on the Register button
- Check the status changing from NonRegistered>Registering>Registered
Create AVD v2 Host Pool -AVD Admin Experience
Let’s create a new AVD v2 host pool using a new admin experience.
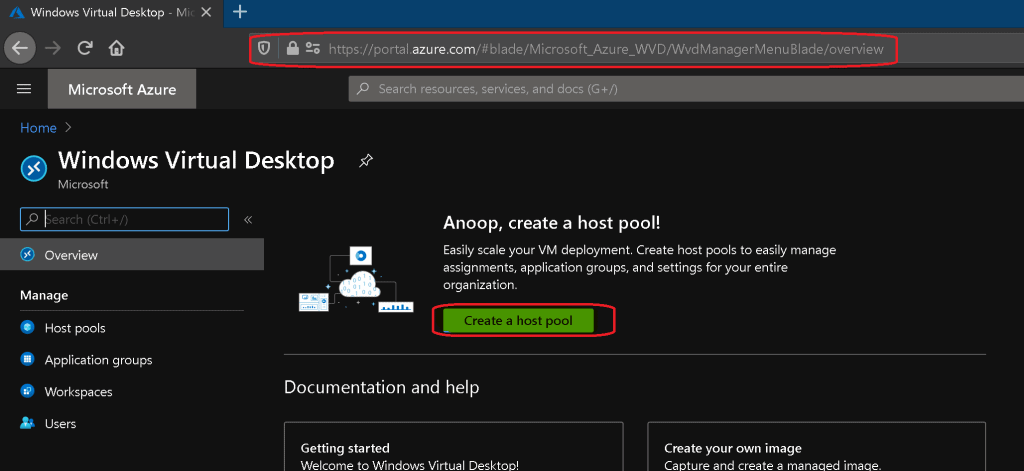
- Login to portal.azure.com
- Search with “Azure Virtual Desktop“.
- Click on the Azure Virtual Desktop icon, as shown in the below screenshot.

Click on Create a Host Pool to continue.
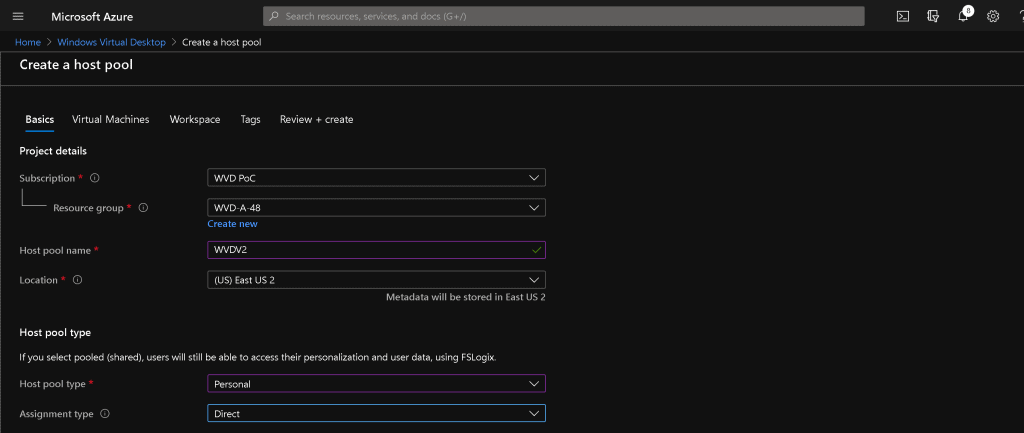
- From Project details, Select Subscription from the drop-down menu.
- Create a new Resource Group – Click on Create New – AVD A-48.
- Host pool name – Enter the name of the Host Pool Name – AVDv2.
- Location – Select the Azure region to store Metadata – East US2.
Select Host pool type – Personal.
If you select pooled (shared), users can still access their personalization and user data using FSLogix.
Assigned Type: Direct
Automatic assignment: The service will select an available host and assign it directly to a user. Assignment: The Admin selects a specific host to assign to a user.
NOTE! – You must use the PowerShell command to assign a user to a personal host pool. PS Command Update-AzWvdSessionHost -HostPoolName $hostpoolname -Name $sessionhostname -ResourceGroupName $resourcegroupname -AssignedUser $userupn. More details here.
Create Virtual Machines and Add to AVD Host Pool
Add virtual machines to the new host pool with a new AVD admin experience. Host pools are a collection of one or more identical virtual machines within Azure Virtual Desktop environments.
- You detail creating a resource group with virtual machines in an Azure subscription here.
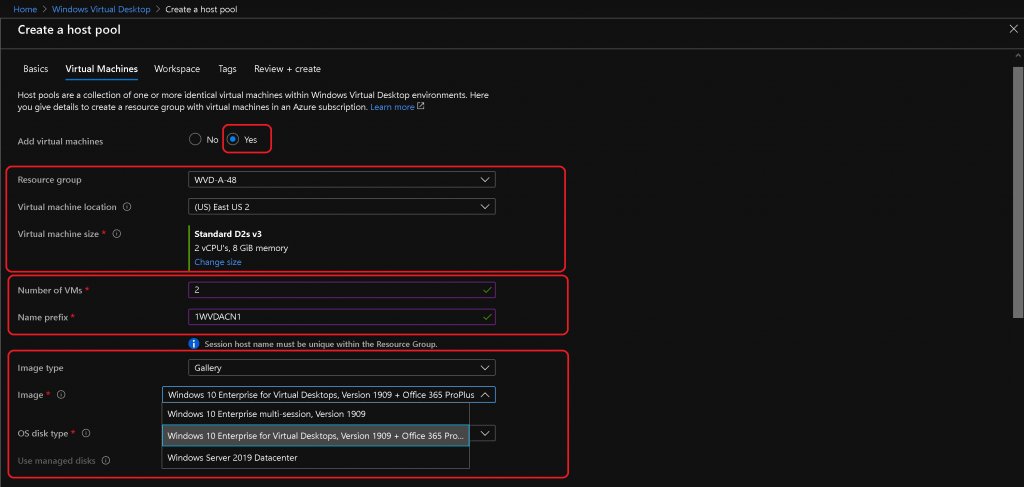
- Add virtual machines Yes.
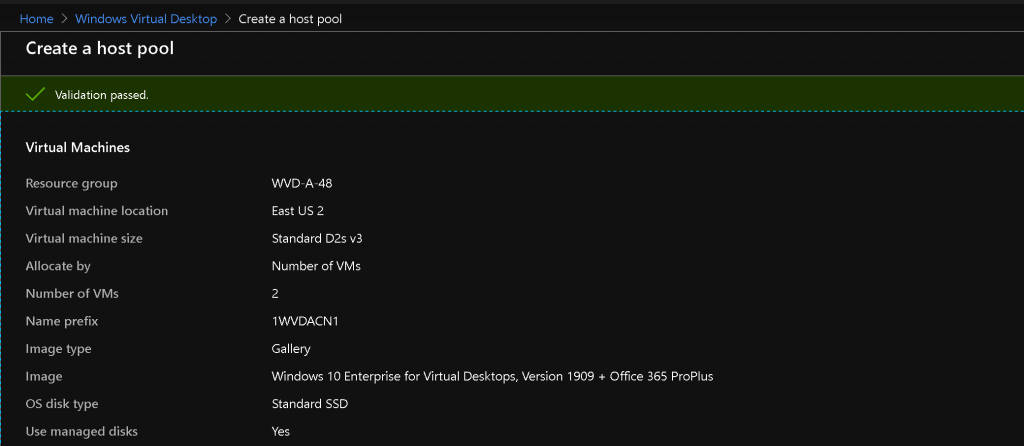
- Select Resource Group AVD A-48.
- Select Virtual Machine Location East US 2
- You can choose a region for virtual machines that differs from the host pool, especially if you want metadata stored in a particular geography but want the virtual machines closer to the user.
Select Machine size Standard D2s v3 – 2 vCPUs, 8 GiB memory.
Select a virtual machine size to support the workload that you want to run. Your size determines processing power, memory, and storage capacity. Azure offers a wide variety of sizes to support many types of uses. Azure charges an hourly price based on the virtual machine’s size and operating system.
Select the Number of VMs you need to add to the new Host Pool 2
Select the Host Name Prefix for the VM 1WVDACN1
Select Image Type from Azure Image Gallery.
Choose the base image to create virtual machines Windows 10 Enterprise 2004.
OS Disk Type – Standard SSD.
Use Managed Disks – Yes.
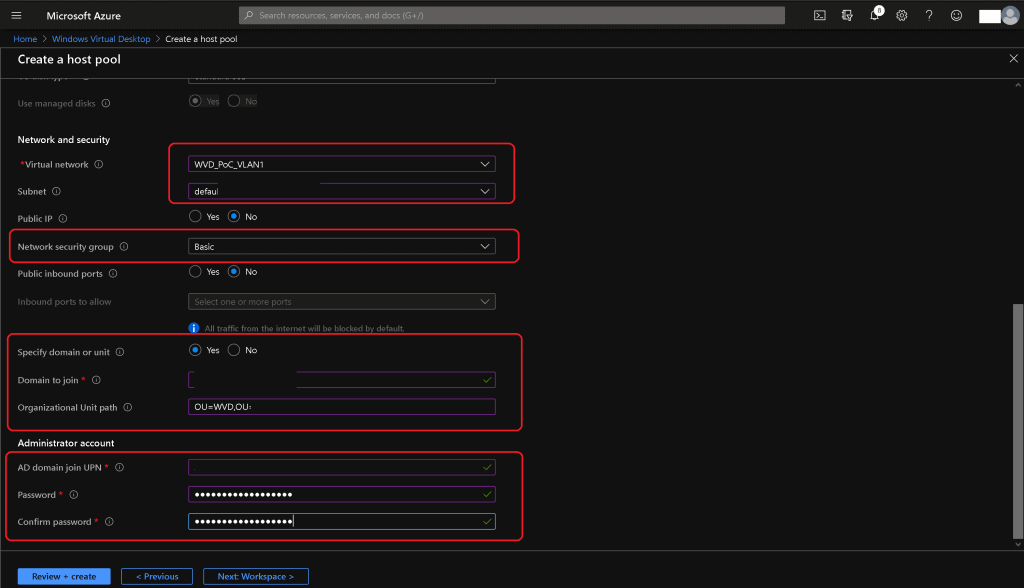
Network & Security Configurations for AVD Session Hosts
Now, let’s create network and security configurations for AVD session hosts.
- Select the already created Virtual Network WVD_PoC_VLAN1.
- Select the Subnet from the drop-down Default.
- Select Public IP NO.
- Select Network Security Group (NSG) per your organization’s standard Basic.
- Select the Public inbound ports option No
Specify Domain or unit to YES
Select yes to join virtual machines to a specific domain or organization unit (OU).
Select not to join the virtual machines to an OU.
If you select no, the domain name will use the suffix of the Active Directory domain to join UPN by Default. For example, the user “vmjoiner@contoso.com” would get the default domain name “contoso.com”.
Enter the Domain name for the Domain to join—HTMD.Local (where HTMD.local is my domain name).
Enter the OU path OU=WVD,OU=AAA UK,OU=Org,DC=HTMD,DC=local
Enter the AD Domain and join UPN anoop@HTMD.Local.
Enter the password ********
Click on the NEXT Workspace button.
Create a New Workspace for Azure Virtual Desktop
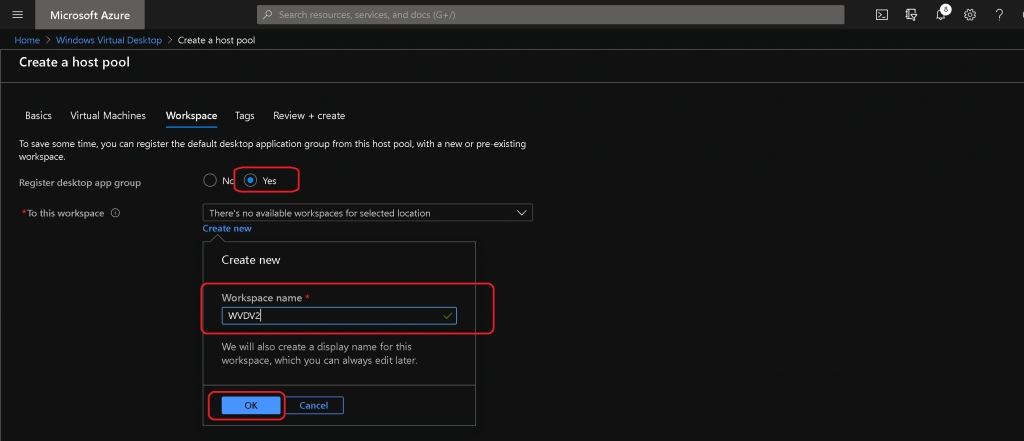
To save time, you can register the default desktop application group with a new or pre-existing workspace from this hosted pool.
NOTE! – The wizard creates a display name for this workspace, which you can always edit later.
- Register desktop app group Yes.
- To register the desktop app group from this hosted pool to an existing workspace, select the name of the workspace you want to register.
- To register the app group to a new workspace, select Create new.
- Enter the Workspace name AVDv2.
- Click OK to continue.
Let’s learn more about Tags. Tags are name/value pairs that enable you to categorize resources and view consolidated billing by applying the same tag to multiple resources and resource groups. Learn more.
Note that if you create tags and then change resource settings on other tabs, your tags will be automatically updated.
- Click on the Next: Review + Create> button.
- Validation passed.
- Click on the Create button to start the deployment.
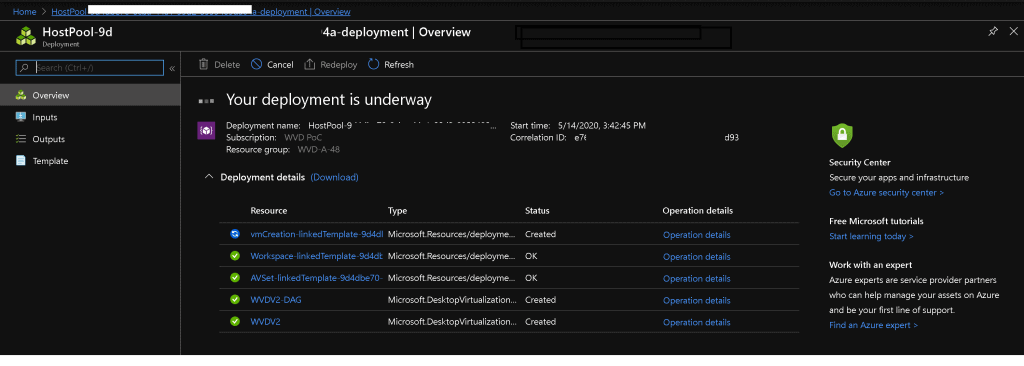
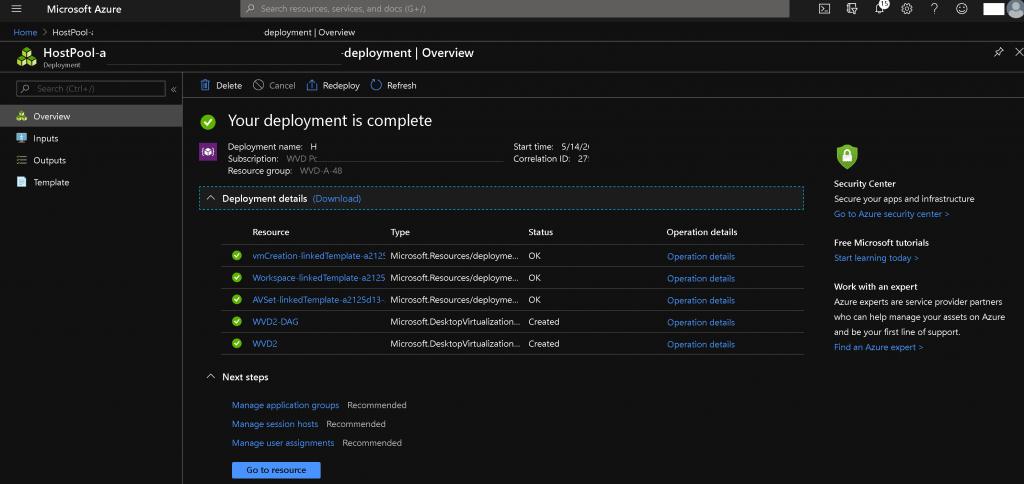
Results – AVD v2 Admin Experience | Session Host
Login to portal.azure.com
Search with “Windows Virtual Desktop“.
Click on the Windows Virtual Desktop icon to check the
New Host Pool
Let’s create a new host pool from the Azure Virtual Desktop portal.
- Click on the Host pools node to check the new AVD v2 host pool created.
- Name WVD2.
- Resource Group WVD A-48.

Application Groups
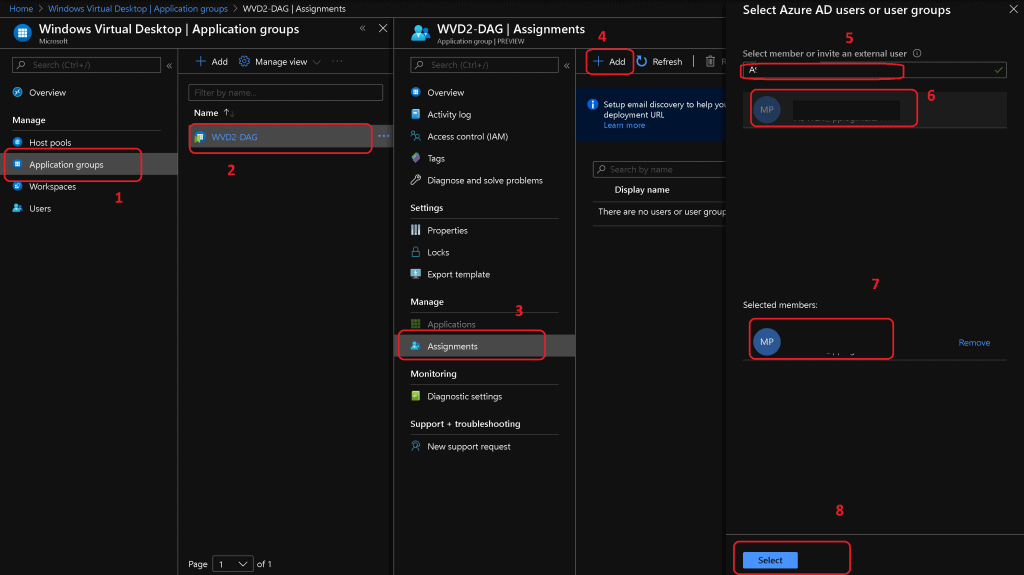
You will now have to create the application group or select one application group for the AVD host pool assignment.
- Select Application Group Name WVD2-DAG.

Click on Application Group WVD2-DAG.
Click on Assignments +Add.
Search for Azure AD Users or Groups to assign Desktop Application Group created through the Hostpool.
Workspace
Click on Workspace WVD2.

Session Host for AVD
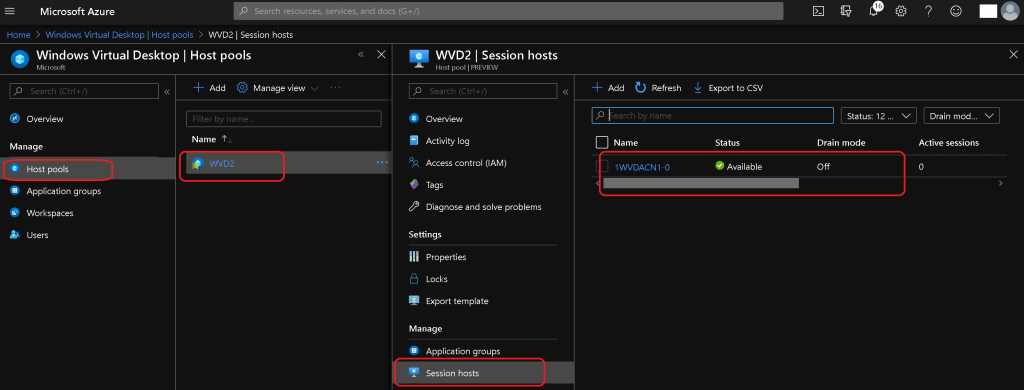
Click on Host Pools. Select the host pool WVD2.
Click on the Session Hosts button.
Check the Session Host Available for Host Pool WVD2.
Client-Side Access of AVD Session Host
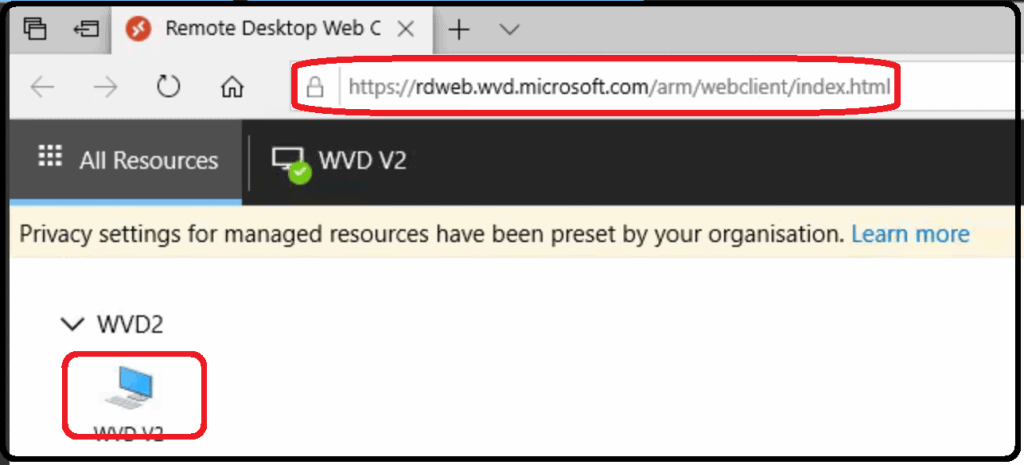
Log on to https://rdweb.wvd.microsoft.com/arm/webclient/index.html with Azure AD user name and password.
Click the Remote Desktop Session host available.
Log in to Remote Desktop using the same Azure username and password above.
Resources
- Install Subscribe Windows RD Client for WVD End User Step-by-Step Guide
- Microsoft VDI Story WVD Concept Setup Guide Myths Known Issues
We are on WhatsApp. To get the latest step-by-step guides and news updates, Join our Channel. Click here –HTMD WhatsApp.
Author
Anoop C Nair is Microsoft MVP! He is a Device Management Admin with more than 20 years of experience (calculation done in 2021) in IT. He is a Blogger, Speaker, and Local User Group HTMD Community leader. His primary focus is Device Management technologies like SCCM 2012, Current Branch, and Intune. He writes about ConfigMgr, Windows 11, Windows 10, Azure AD, Microsoft Intune, Windows 365, AVD, etc.
