Hi All, Let’s learn Azure AD SSPR Self Service Password Reset. In this post, we have explained AAD Self Service Password Reset options and how it is enabled from the server side, what are the SSPR core components, etc. You can easily set up and configure Azure AD SSPR for your organization.
This article helps the admins to configure the policy and end-user how to change or reset their passwords. The Azure AD self-service password reset includes 3 main points Enable AAD SSPS, Licensing Requirements, and Architecture. Users can enroll in SSPR and reset their passwords using the self-service portal, reducing the burden on IT administrators and improving user productivity.
Azure Active Directory (Azure AD) Self-Service Password Reset (SSPR) empowers users to change or reset their passwords without needing administrator intervention or assistance from the help desk. This self-service feature puts the control in the hands of users, allowing them to manage their passwords conveniently and efficiently.
By utilizing SSPR, users can independently reset their passwords using various authentication methods, ensuring the security and confidentiality of their accounts. This eliminates the traditional reliance on IT administrators or helps desk personnel, freeing up their time and resources for more critical tasks. With SSPR, users can regain access to their accounts swiftly, minimizing disruptions and promoting productivity.
- Enable Self Service Password Reset SSPR on Windows Login Screen using Intune Policy
- Best Set of Updated Windows 11 Password Policies
What is Azure AD Self-Service Password Reset (SSPR)?
Azure Active Directory SSPR allows users to change or reset passwords without administrator or help desk involvement. This feature helps the organization reduce costs and provides a self-service experience for the end users.
What are the Prerequisites and Licenses for Azure AD SSPR?
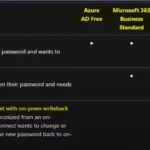
To enable the policy from Azure AD, you need to have Global administrator or Authentication policy administrator privileges. The end User should have access to the Microsoft Online Password Reset URLs. License is another important thing. It includes the following.
1. Azure AD Premium P1 or P2
2. EMS Licenses
3. Microsoft 365 Enterprise or Business
Video – Azure AD SSPR Self-Service Password Reset Guide
In this video, let’s discuss Azure AD SSPR Self-Service Password Reset Guide. Configuring and enabling self-service password reset (SSPR) is a straightforward process that allows users to reset their lost or forgotten passwords effortlessly.
Azure AD SSPR Self-Service Password Reset
With self-service password reset enabled, users no longer rely on administrators or help desk personnel to handle password-related issues. Instead, they can take control of their password management, saving time and resources for both users and IT support teams.
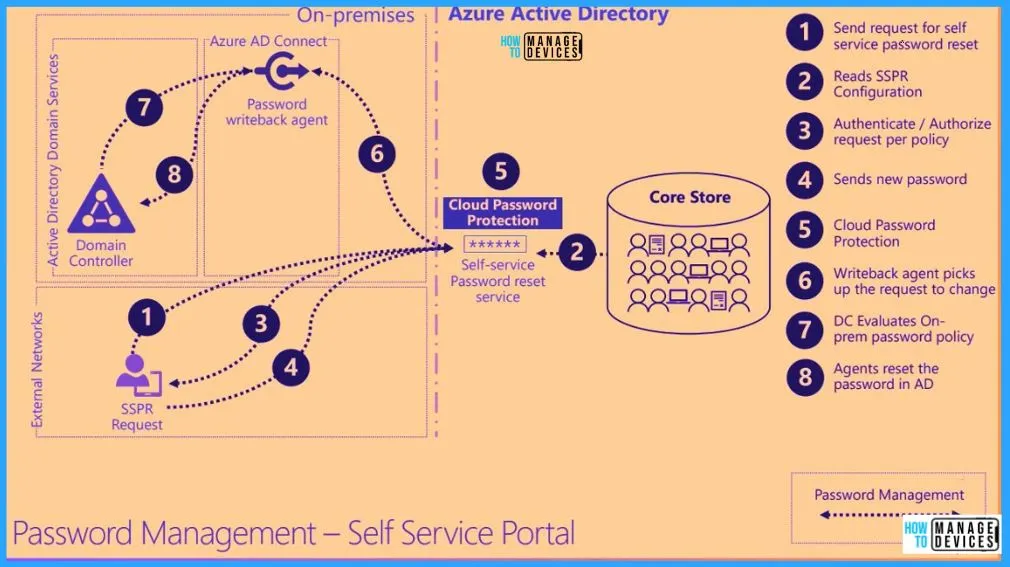
Password Management – Self-Service Portal – AAD SSPR Workflow
Let’s talk about the core store, as shown in the below window. It provides localization of the content of the website depending on the language. It is the high-level architecture that Microsoft provided, including the following steps.
| Steps for Password Management Self Service Portal |
|---|
| Send request for self service password reset |
| Reads SSPR Configuration |
| Authenticate / Authorize request per policy |
| Send new password |
| Cloud password protection |
| Writeback agent picks up the request to change |
| DC Evaluates On-prem password policy |
| Agents reset the password in AD |
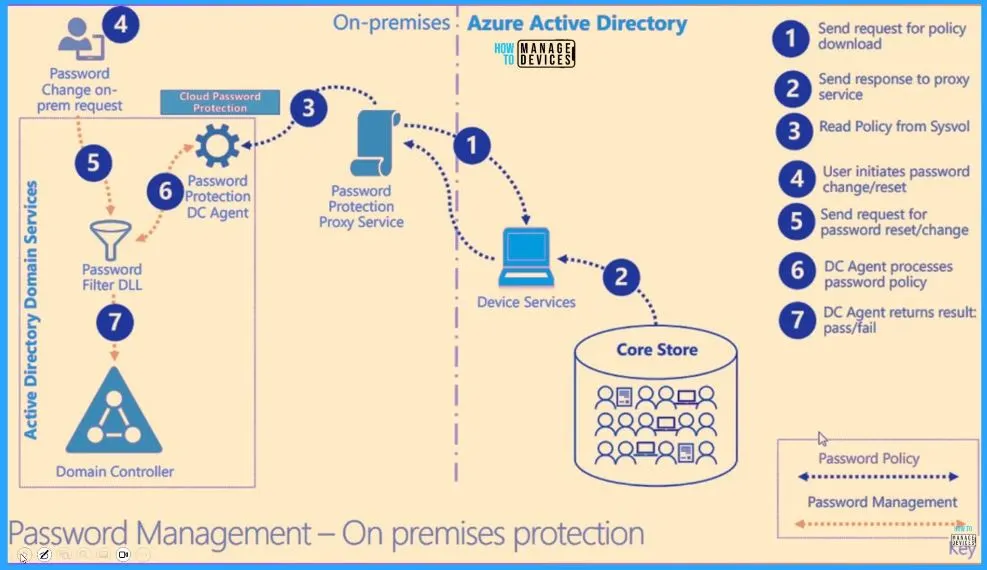
Password Management – On Premises protection – AAD SSPR Workflow
The password management on-premises protection is shown in the window, screenshot below, and the list shows the 7 steps for the on-premises Azure active directory. This is the flow chart of Self-Service Password Reset.
- Send request for policy download.
- Send a response to the proxy service
- Read policy from sysvol
- The user initiates password change/reset
- Send request for password reset/change
- DC Agent processes password policy
- DC Agent returns result:pass/fail
How to Enable Self-Service Password Reset – Policy Config from Entra Portal
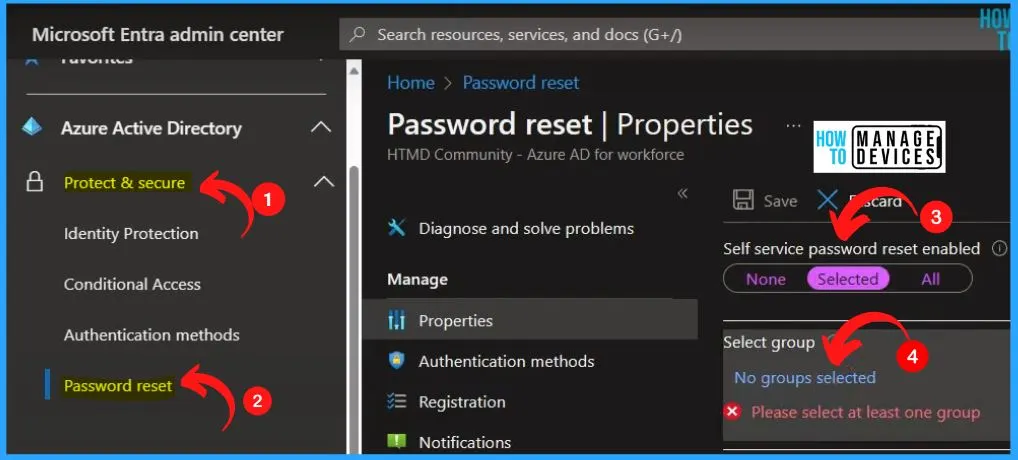
The below screenshot shows the Azure AD portal or Microsoft Entra admin center configuration. Under Microsft Entra admin center, expand the Protect and Secure tab and select the Password reset option. Clicking the password reset page will lead you to the password reset properties page.
- Login to Entra portal https://entra.microsoft.com/#home
- Navigate to Protect & Secure -> Password Reset node.
- Self-service password reset enabled shows 3 options
- One is None means it is not Enabled
- Selected means Enabled for selected users
- All Enabled for All users
- Here we choose the selected option and add an Azure AD User Group with selected users.
- Click on the SAVE button to continue.
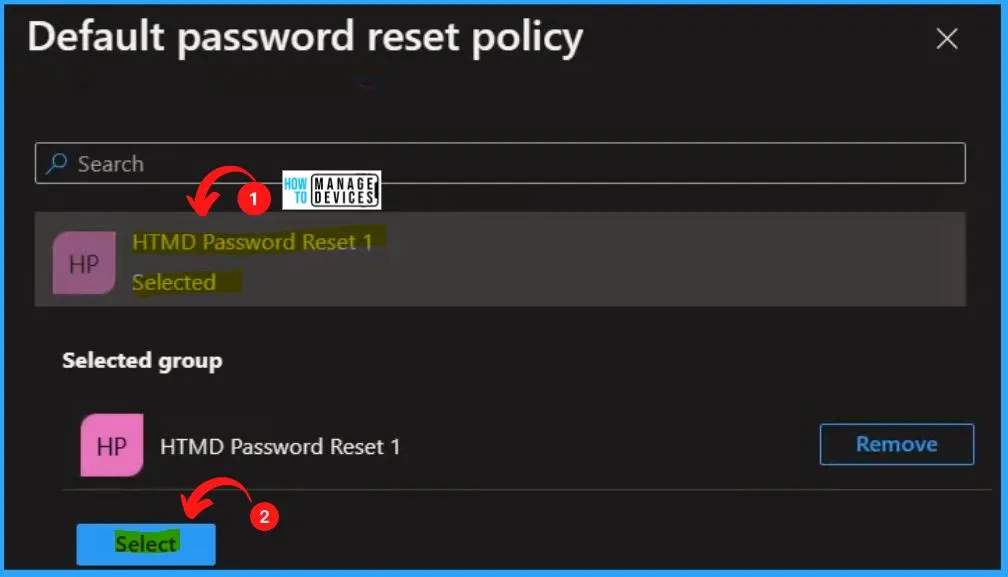
After choosing the selected option, the below default password reset policy window will appear. The default password reset policy window helps you to search and select a group. You can remove the selected group by clicking the Remove button below.
Authentication Methods
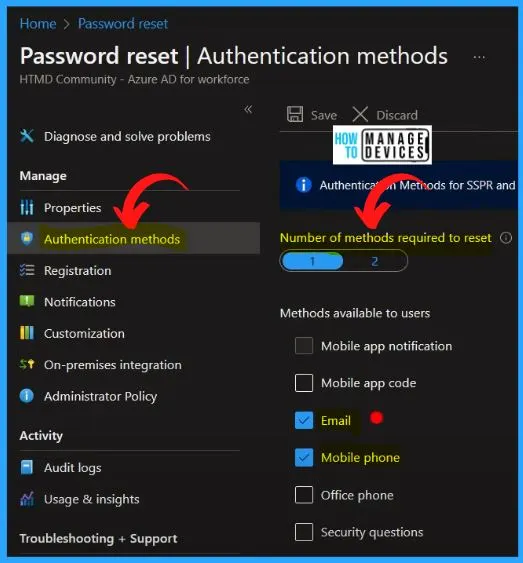
The Authentication methods show the Number of methods required to reset the password. The Authentication methods for SSPR and signin can now be managed in one converged policy. The following are the methods available for users.
- Mobile app notification
- Mobile app code
- Mobile Phone
- Office Phone
- Security questions etc
- Here we are selecting 2 methods as Email and Mobile phone
Registration
You’ll find a menu on the left side of the Registration page. Ensure you select “Yes” for the option “Require users to register when signing in.” This setting prompts users to register for self-service password reset during their sign-in process, ensuring they are enrolled in SSPR.
- Select the Number of days before users are asked to re-confirm their authentication information.
- By default Number of days before users are asked to re-confirm their authentication information is 180 days.

Notifications
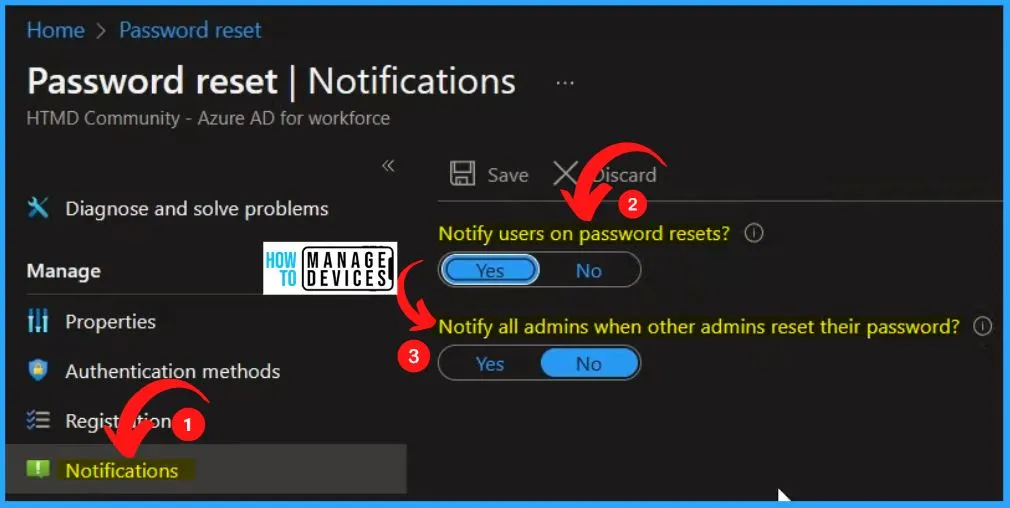
Azure AD can configure email notifications for SSPR events to enhance user awareness of account activity. This feature enables organizations to keep users informed about important password-related activities.
- Select Notify users on password resets—option to Yes.
- Select Notify all admins when other admins reset their password options to Yes.
Customization
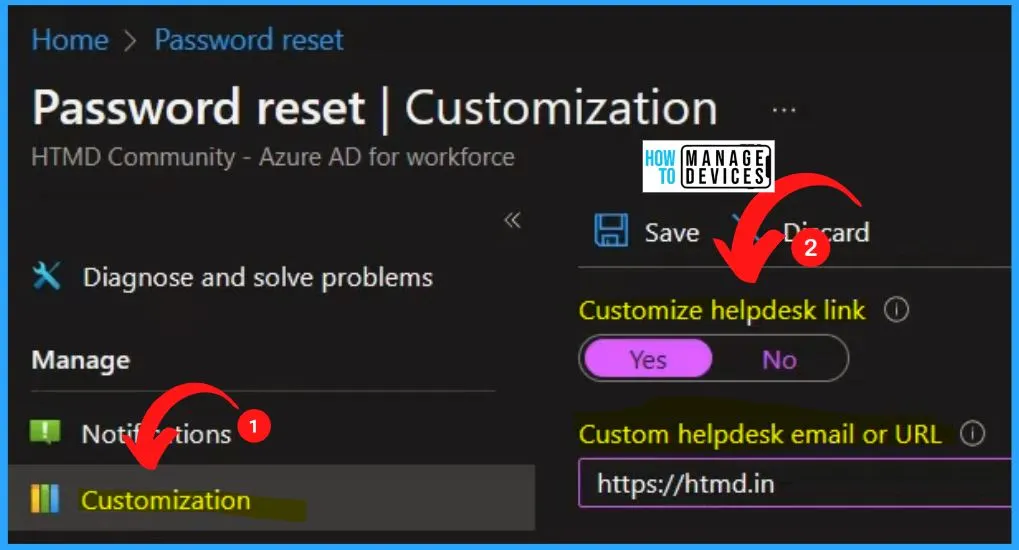
To provide users with additional assistance during the SSPR process, Azure AD allows customization of the “Contact your administrator” link. This customizable link is valuable for users who may require further guidance or support when registering for SSPR, unlocking their accounts, or resetting their passwords.
- Under the Customization page, select Customize helpdesk link to Yes.
- The Custom helpdesk email or URL field allows you to specify an email address or web page URL where your users can seek additional assistance and support from your organization.
- Here we are giving https://htmd.in
- To apply the custom link, select Save.
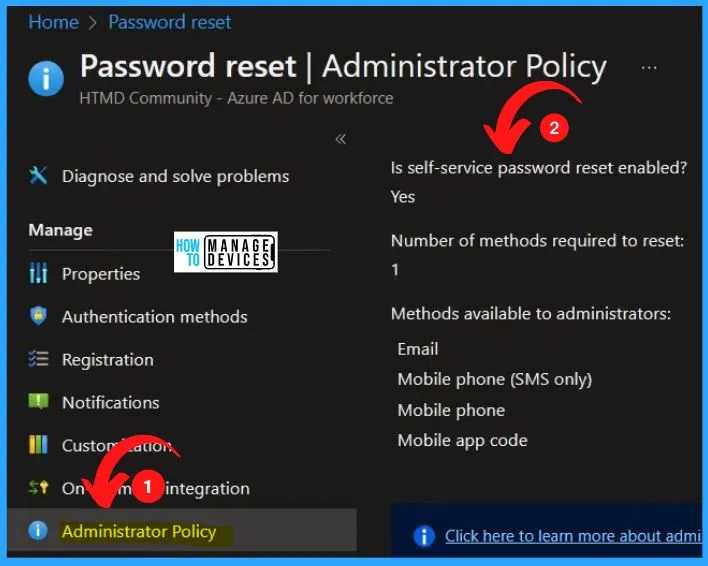
Administrator Policy
Administrator policy is the review of the configuration. It shows information such as whether SSPR is Enabled or Disabled, the Number of methods required to reset, methods available to administrators, etc.
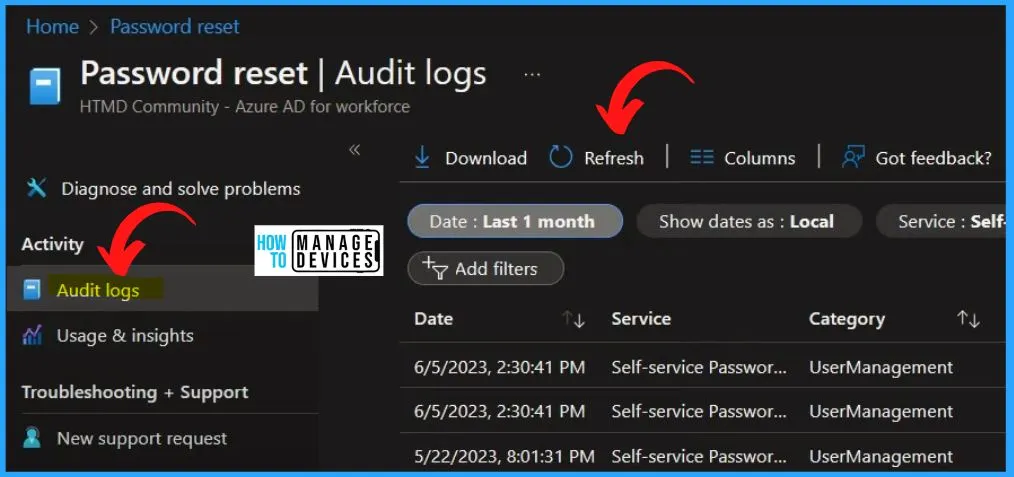
Audit logs
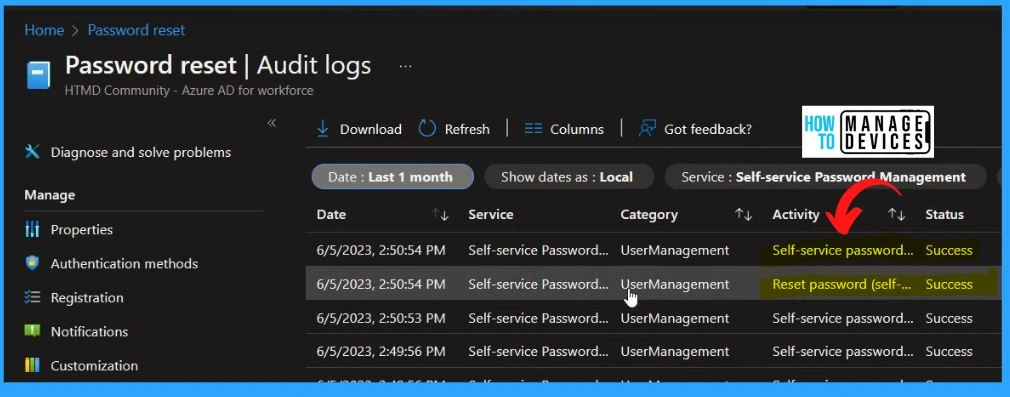
You can easily check the Audit logs. You can easily see if there is any password reset initiated etc., under the Audit logs. The audit logs tab helps you to show the Audit log details such as Activity type, correlation ID, Category, etc.
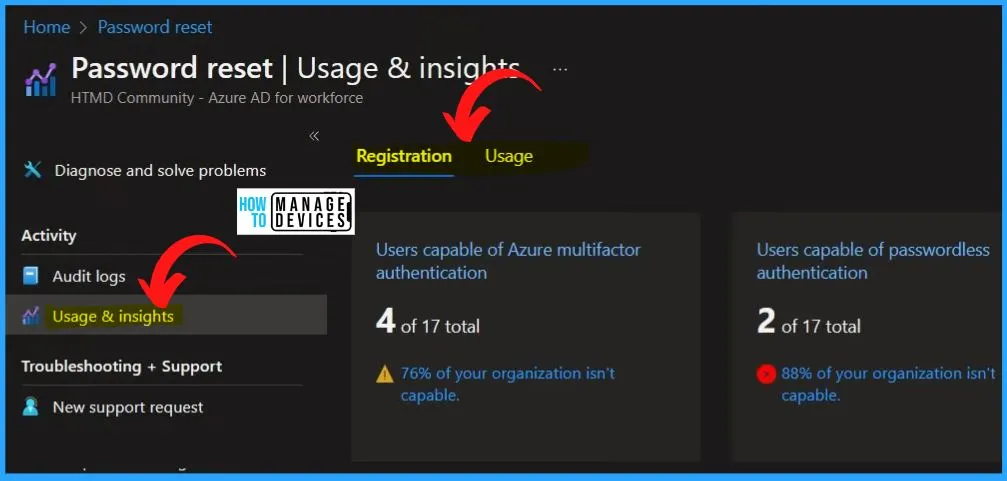
Usage and Insights
Usage and insights help you to show the dashboard type of details. Usage and insights show 2 menus such as Registration and Usage. The Registration menu shows the users capable of Azure multifactor authentication, Users, capable of self-service password reset, etc.
SSPR Self-Service Password Reset and The Manual Registration Process
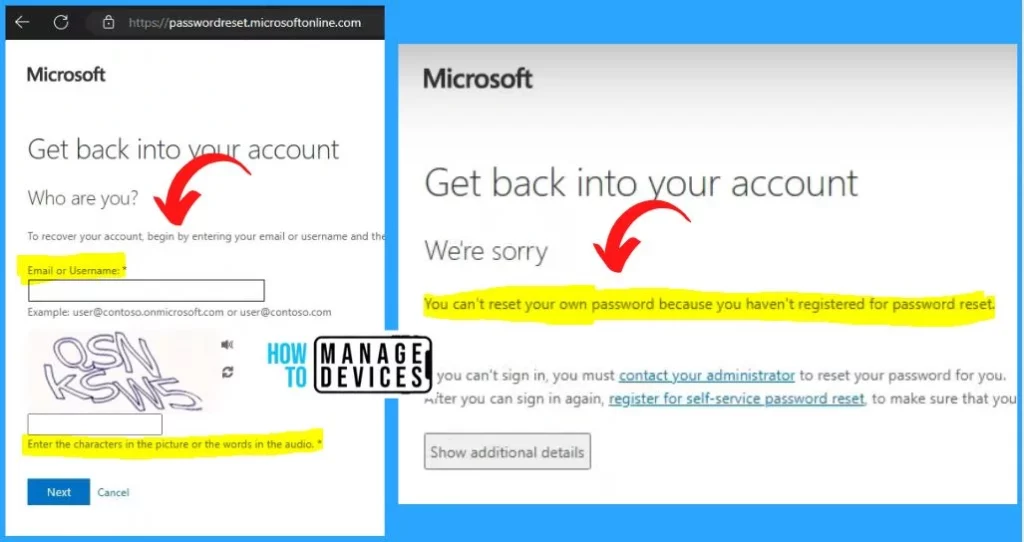
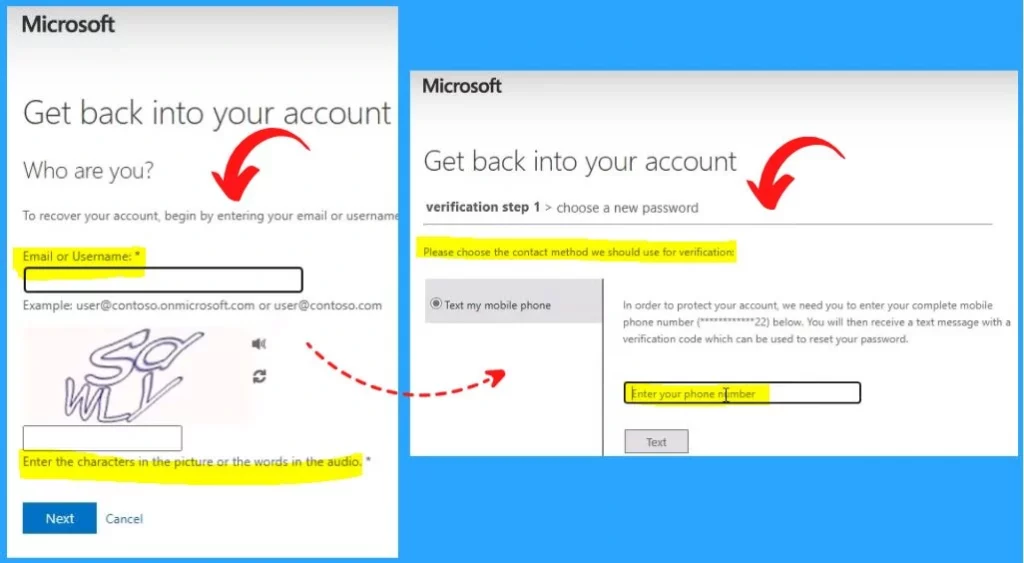
Let’s go to the SSPR Self Service Password Reset to see the manual registration process, open a new browser, and open https://aka.ms/sspr or https://passwordreset.microsoftonline.com. Azure AD will re-direct users to this registration portal when they sign in next time.
- Enter your email or username and enter the characters in the picture or the words in the audio. After entering all the details, click the Next button.
- If you get the error message “You can not reset your password because you have not registered for a password reset.”
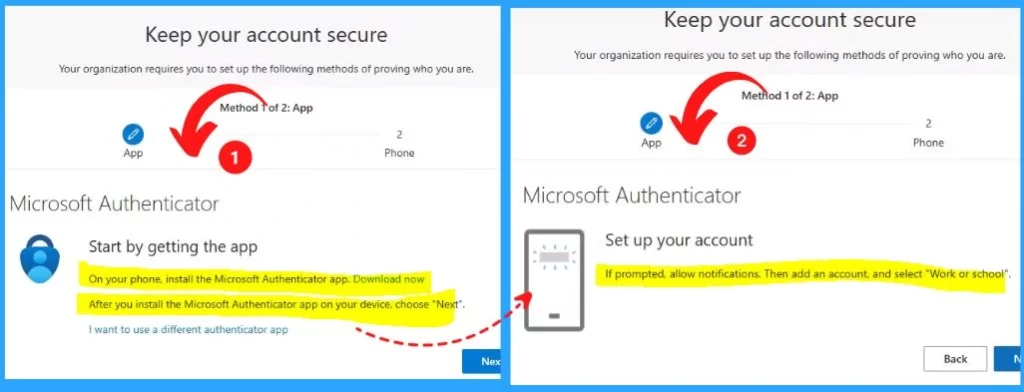
Open the web browser on your device and go to the Security info page. After clicking the Security info hyperlink and log in with your username and password.
NOTE! – This part is not always shown to end-users. The additional security requirements depend on the security setting for your tenant. This also depends on the SSPR policy configuration shown above Authentication Methods.
- While in the signin process, it says your organization requires additional security information. Follow the prompts to download and set up the Microsoft Authenticator app.
- On your phone, install the Microsoft Authenticator app.
- After you install the Microsoft Authenticator app on your device, choose Next.
- If prompted, allow notifications, add an account, and select Work or School.
- Select the Next button from the 2nd window.
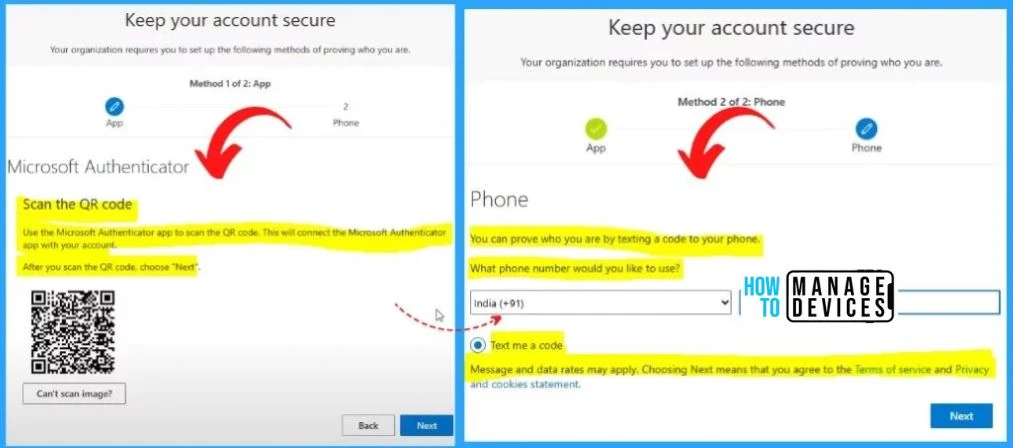
You can scan the QR code using the Microsoft Authenticator app in the below window. This will connect the Microsoft Authenticator app to your account. After you scan the QR, choose Next.
In the 2nd window, you can prove who you are by texting a code to your phone. Enable the “Text me a code” and click the Next button from the below window.
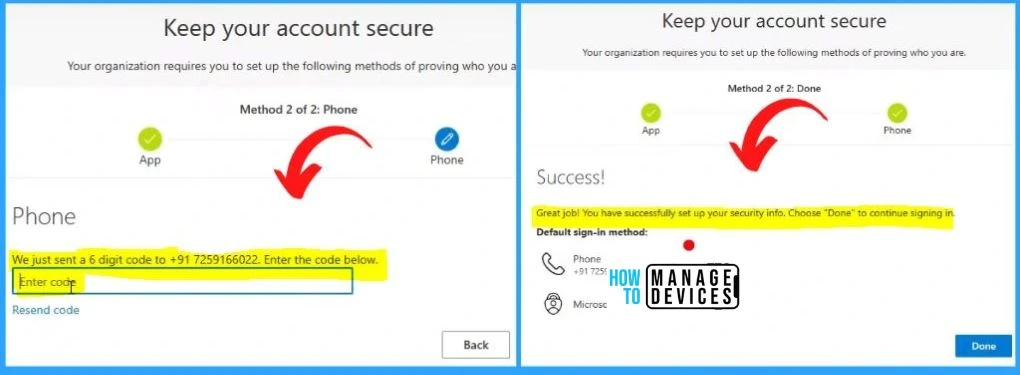
You will get a 6-digit code to your mobile number and enter the code in the 1st below window. The 2nd screenshot shows the success message “Great job. You have successfully set up your security information. Click Done to continue signing in.
Click the Microsoft Online Password Reset hyperlink and sign in with your email id. The 2nd window shows the pre Authentication; enter the Mobile Number. You will then receive a text message with a verification code which can be used to reset your password.
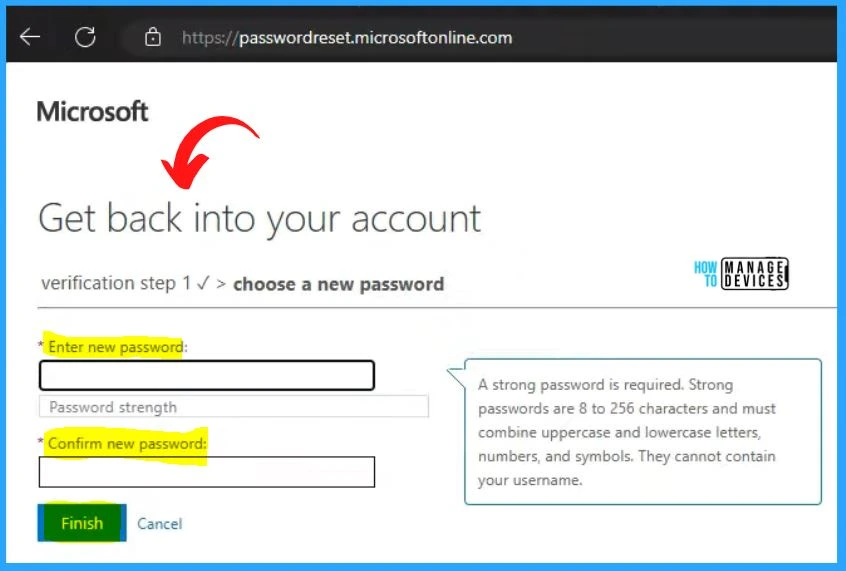
You can enter a new password in the window below and click the Finish button. A strong password is required. Strong passwords are 8 to 256 characters and must combine uppercase and lowercase letters, numbers, and symbols. They cannot contain your username.
Note! – Once users have successfully registered their password through the SSPR process, it remains valid for 180 days. Users can confidently utilize their chosen passwords to access their accounts without interruptions. However, after 180 days, users must go through the password registration process again.
In the Microsoft Entra admin center, you can see that the Reset password (self-service) is successful, and the Self-service password reset flow activated is also successful.
Author
About Author – Vidya is a computer enthusiast. She is here to share quick tips and tricks with Windows 11 or Windows 10 users. She loves writing on Windows 11 and related technologies. She is also keen to find solutions and write about day-to-day tech problems.
