Let’s check what the Best Option is to Deploy MS Teams MSI Using SCCM. I have a post about deploying Microsoft Teams using the Office 365 ProPlus deployment workflow in SCCM. I don’t think deploying the entire Office 365 ProPlus content is a great idea when you want to deploy ONLY MS Teams from the Office 365 ProPlus package.
NOTE! – Microsoft Teams is part of Microsoft 365 Apps. You can use the same method to Deploy Microsoft Teams with Microsoft 365 Apps.
I got feedback that Office 365 ProPlus workload installation downloads 2 GB of complete Office suite no matter what product you want to install from the wizard. I agree & I think in the specific case of Teams.
Microsoft announced that Skype for Business will end support by July 31, 2021. So, most organizations have started migrating to MS Teams. SCCM allows admins to easily deploy the application to Windows 10 devices.
Download MS Teams MSI – Deploy MS Teams MSI Using SCCM | ConfigMgr
The best way to deploy MS Teams MSI is when you already have the Office 365 ProPlus package in your managed devices. You can download and deploy only the MSI from Microsoft (around 150 MB).
Command-Line Options
The following are the command line options for deploying the MS Teams MSI. You can use these commands while you deploy this MSI using Configuration Manager | SCCM.
msiexec /i Teams_windows.msi OPTIONS="noAutoStart=true"
msiexec /i Teams_windows_x64.msi OPTIONS="noAutoStart=true"
NOTE! – You can Disable auto-launch for the MS Teams MSI installer. When a user logs in to Windows, Teams is installed with the MSI, and a shortcut to start Teams is added to the user’s desktop.
Create MS Teams Application Using SCCM
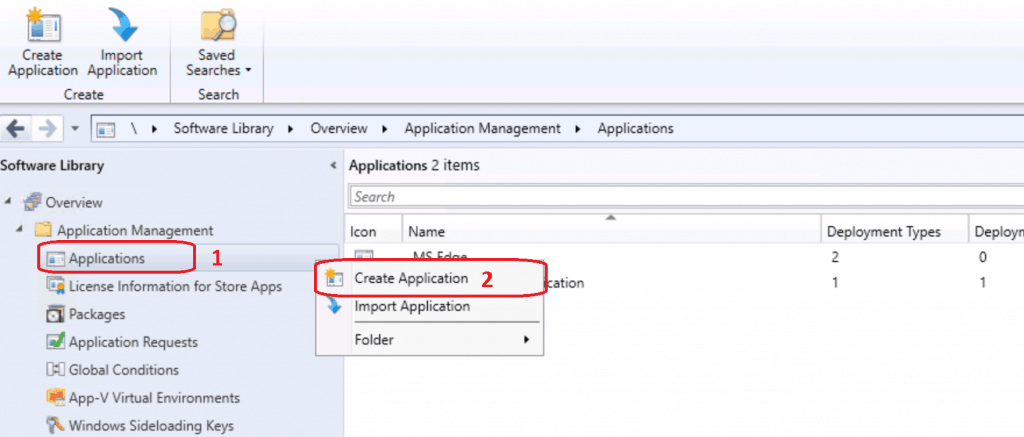
- Launch SCCM Console
- Navigate to \Software Library\Overview\Application Management\Applications
- Right Click on the Applications node
- Select Create Application
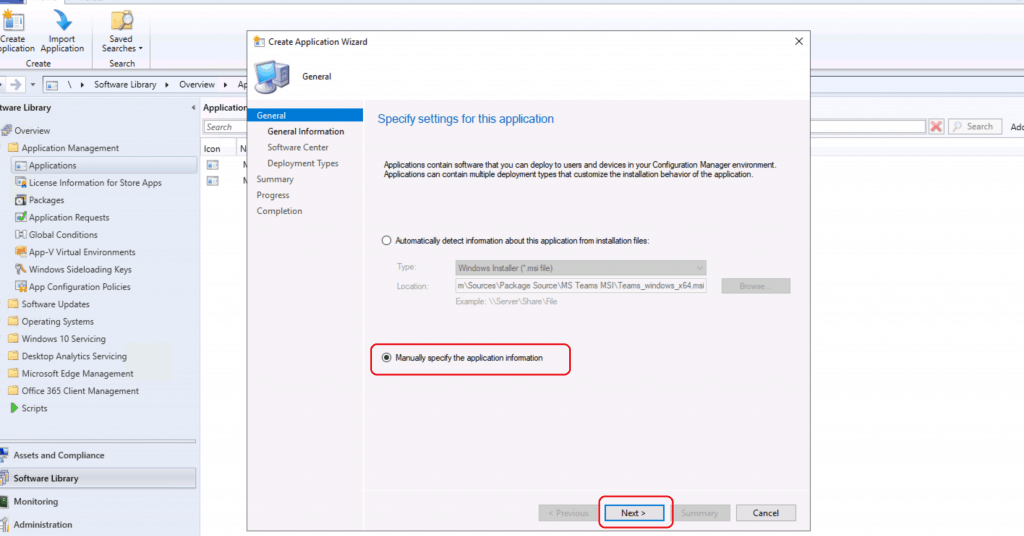
Specify Settings for this Application
- Select the option called “Manually specify the application information“
- Click on the NEXT button
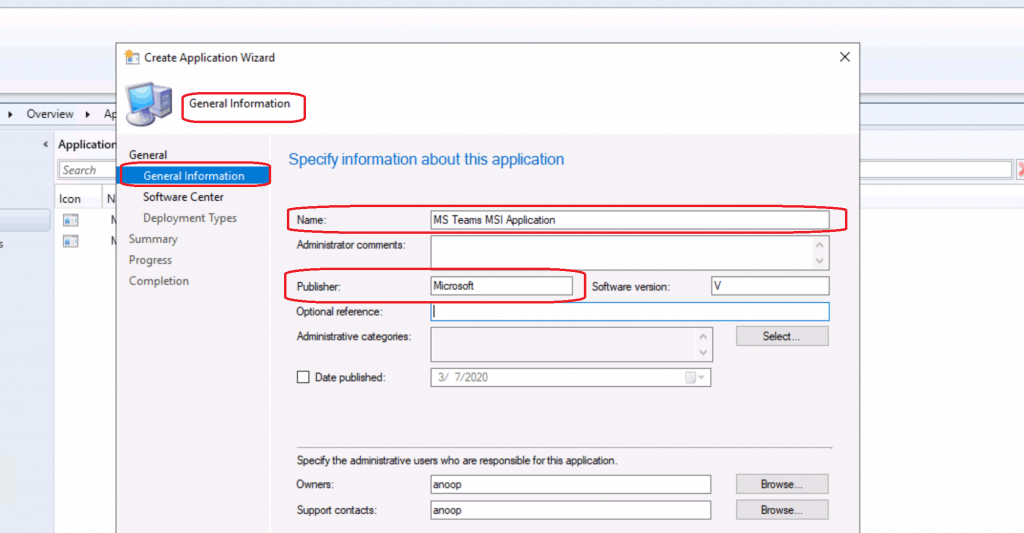
- Enter the name of the application you want to deploy – MS Teams MSI Application
- Enter the Publisher Name – Microsoft
- Click on NEXT to continue
- Click on Browse to select the Software Center ICON for MS Teams
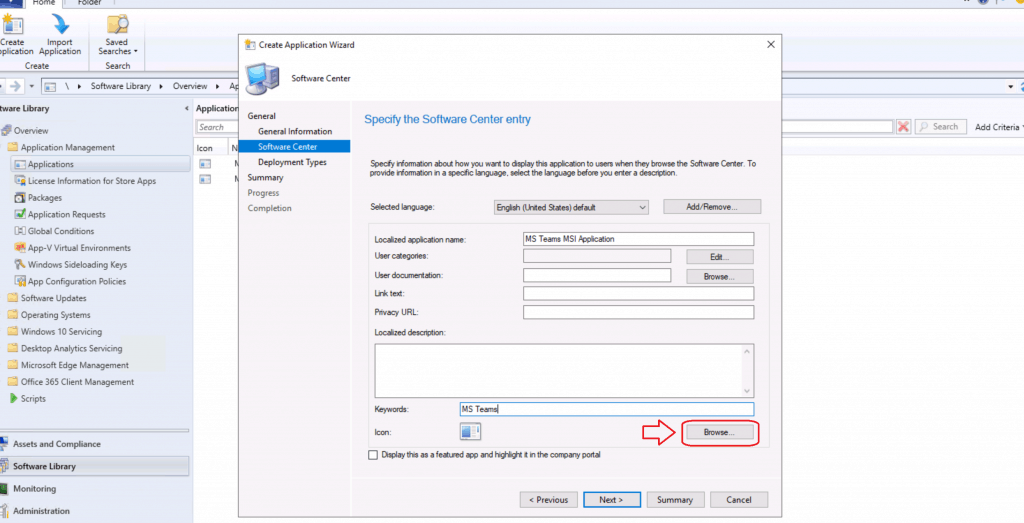
- Download the following Teams ICON Save the picture to a network location and use it for the next step

- Click on the NEXT button once the Teams ICON is uploaded

- On the Deployment Types page, you need to provide the following details.
- Deployment Types include information about the installation method and the source files for the application
- Click on ADD button to configure the MS Teams application
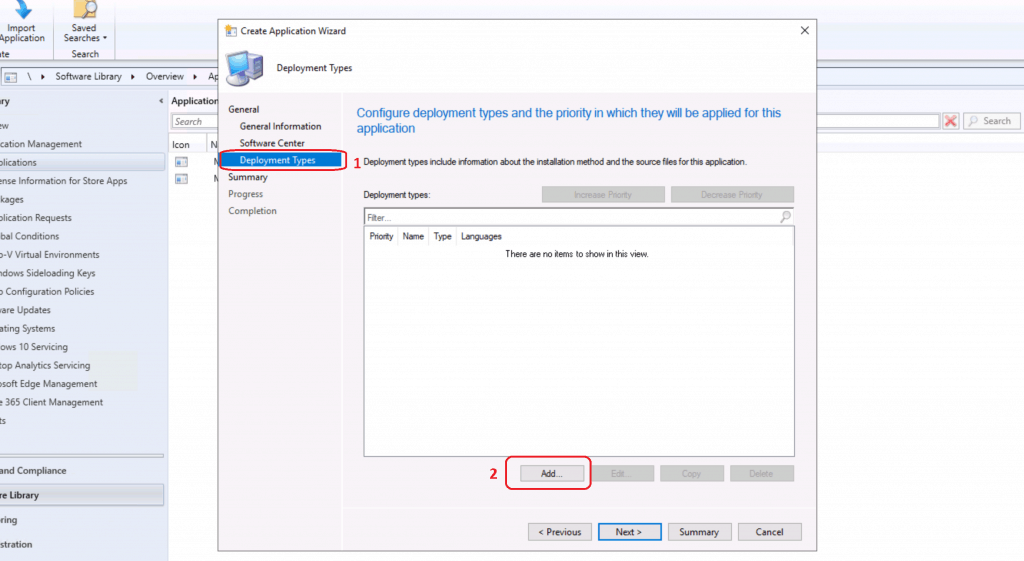
Deployment Type Creation for MS Teams
- Specify the settings for this deployment type
- Type of the Application – Windows Installer (*.msi file)
- Click on the Browse button to automatically identify the information about deployment type from MS Teams Installation File
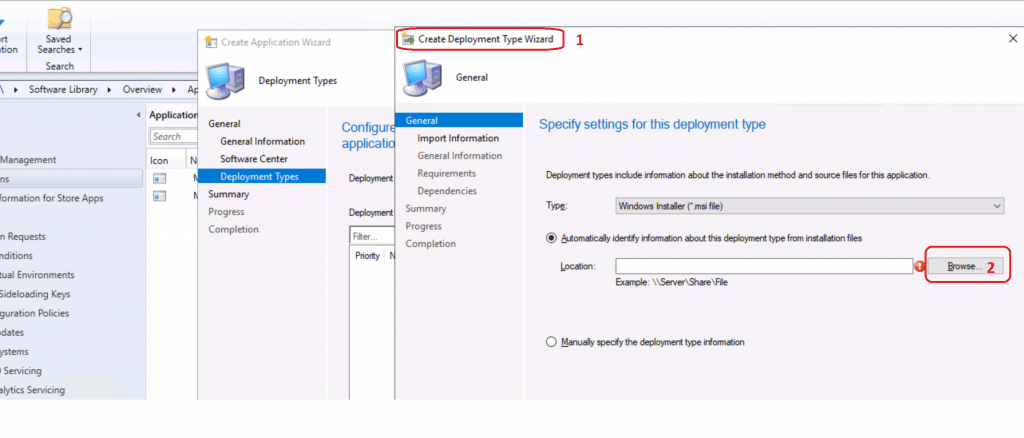
- Select the Downloaded Teams MSI – Teams_windows_x64.msi
- Click on NEXT to continue
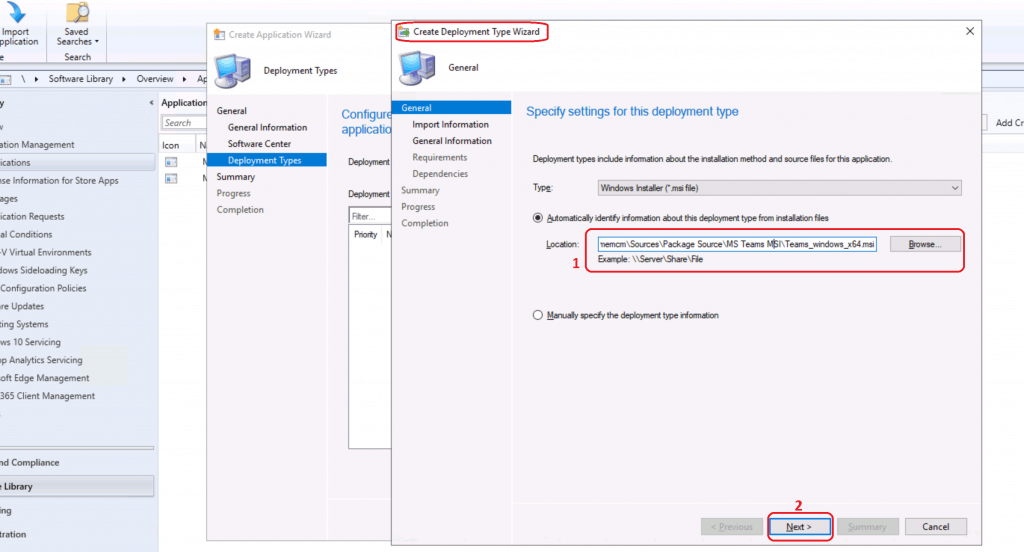
- Click on NEXT to continue.
- The following is the information that SCCM imported from MS Teams MSI file
General Information
Name: Teams Machine-Wide Installer - Windows Installer (.msi file) Technology: Windows Installer (.msi file)
Software version:
Detection Method
Product code: {731F6BAA-A986-45A4-8936-7C3AAAAA760B}
User Experience
Installation behavior: Install for user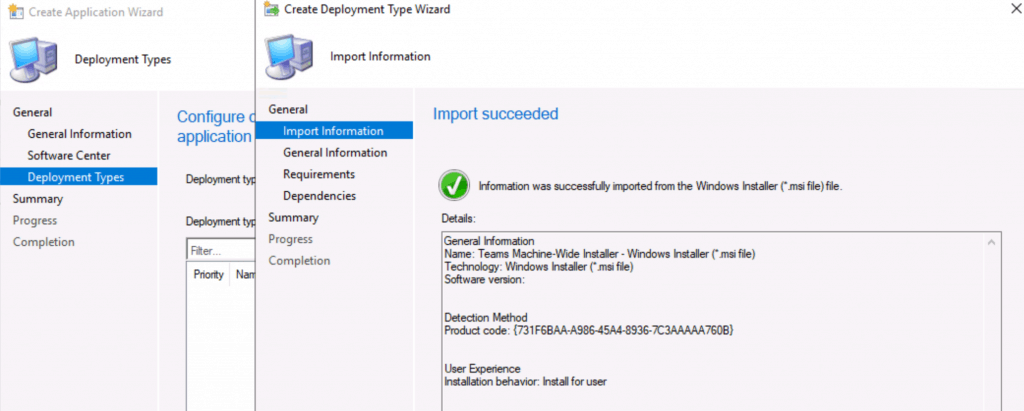
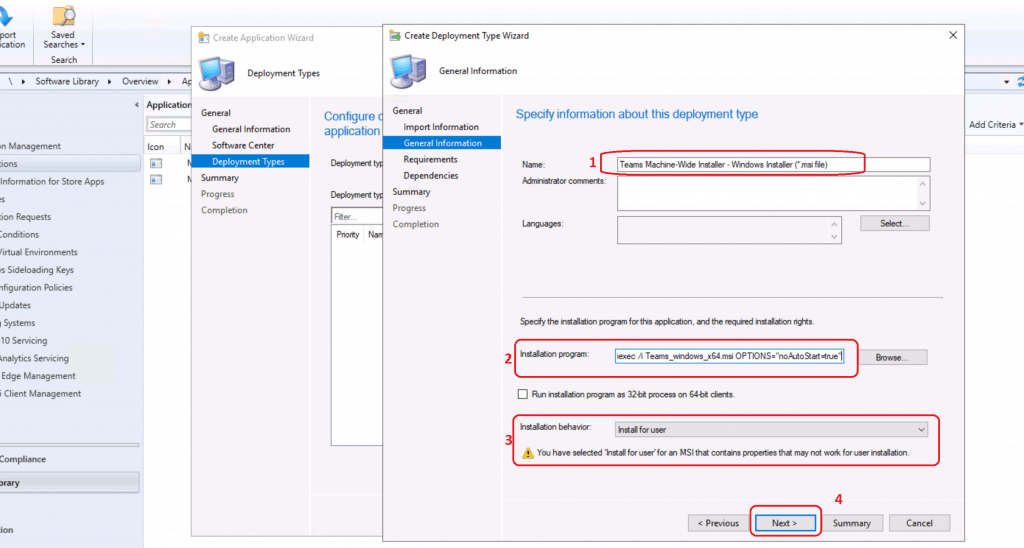
- Enter the Name of the deployment – Teams Machine-Wide Installer – Windows Installer (*.msi file)
- Installation Program – for 64-bit Teams MSI installation
- msiexec /i Teams_windows_x64.msi OPTIONS=”noAutoStart=true”
- Select Installation Behavior – Install for User
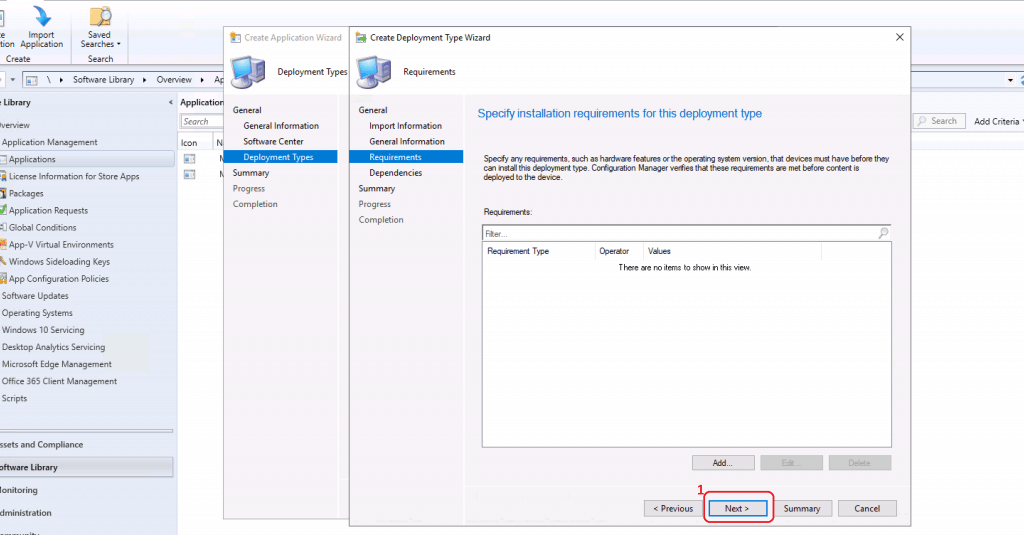
- Click on NEXT to continue on the Requirements page
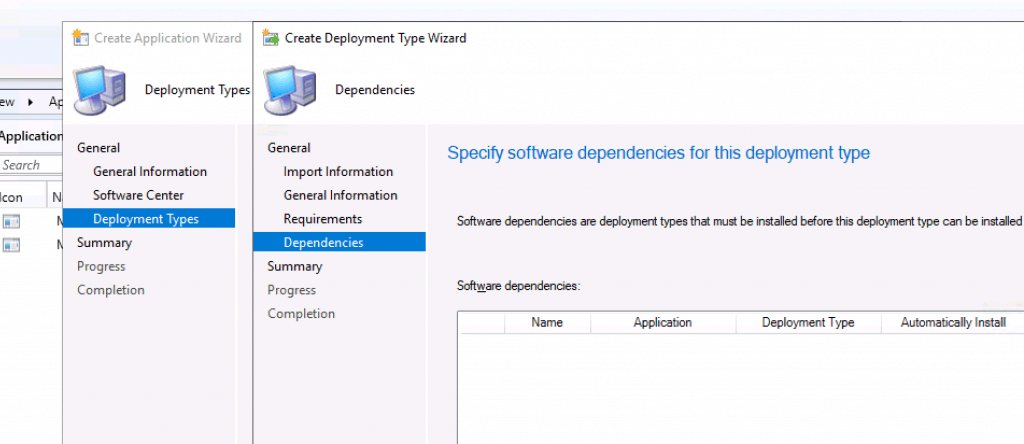
- Select the Software Dependencies of the Team application
- Click NEXT to Continue
- Confirm the Settings of Teams Deployment configuration
- Click on NEXT to continue
General Information:
 •    Name: Teams Machine-Wide Installer - Windows Installer (.msi file) •    Technology: Windows Installer (.msi file)
 •    Administrator comments:
 •    Languages:
 Content:
 •    Content location: \cmmemcm\Sources\Package Source\MS Teams MSI
 •    Installation program: msiexec /i Teams_windows_x64.msi OPTIONS="noAutoStart=true"
 Detection Method:
 •    Product code, equals, {731F6BAA-A986-45A4-8936-7C3AAAAA760B}
 User Experience:
 •    Installation behavior: Install for user
 Requirements:
 Dependencies: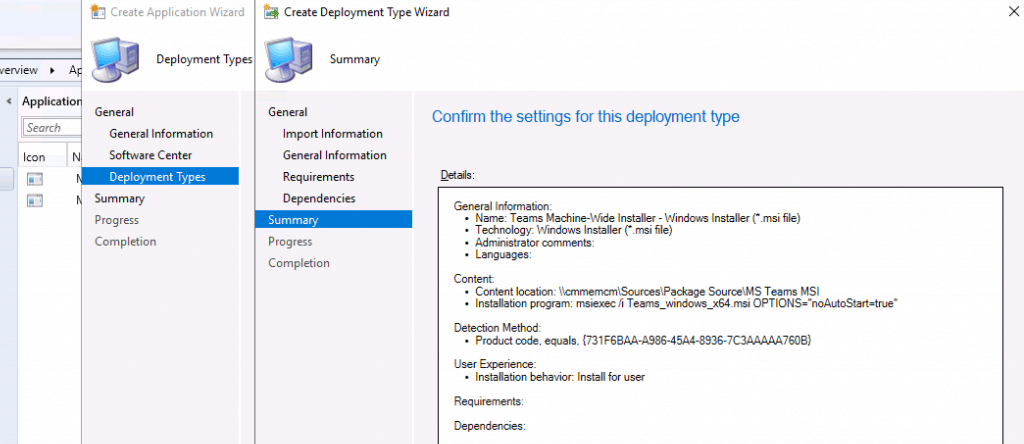
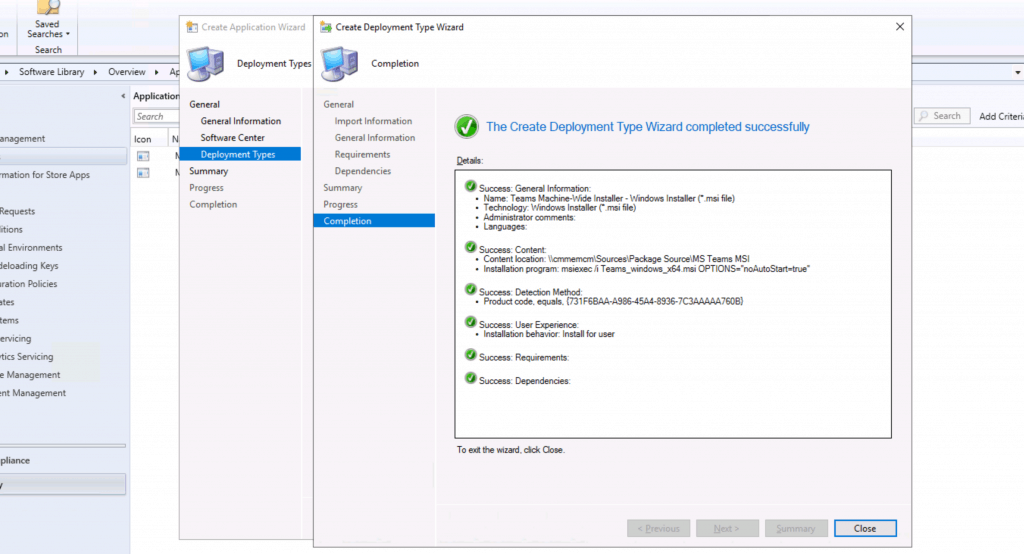
- Click on CLOSE to complete the MS Teams Application Deployment type using SCCM
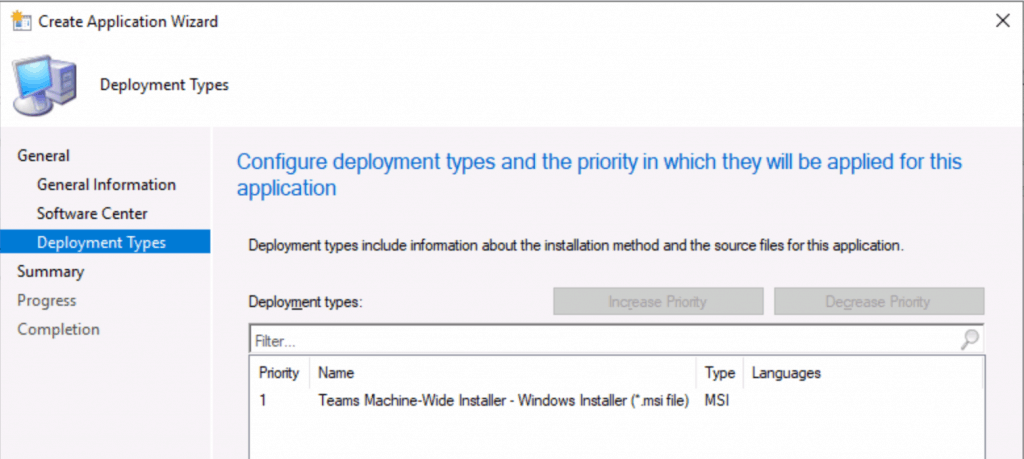
- Click on NEXT to Continue
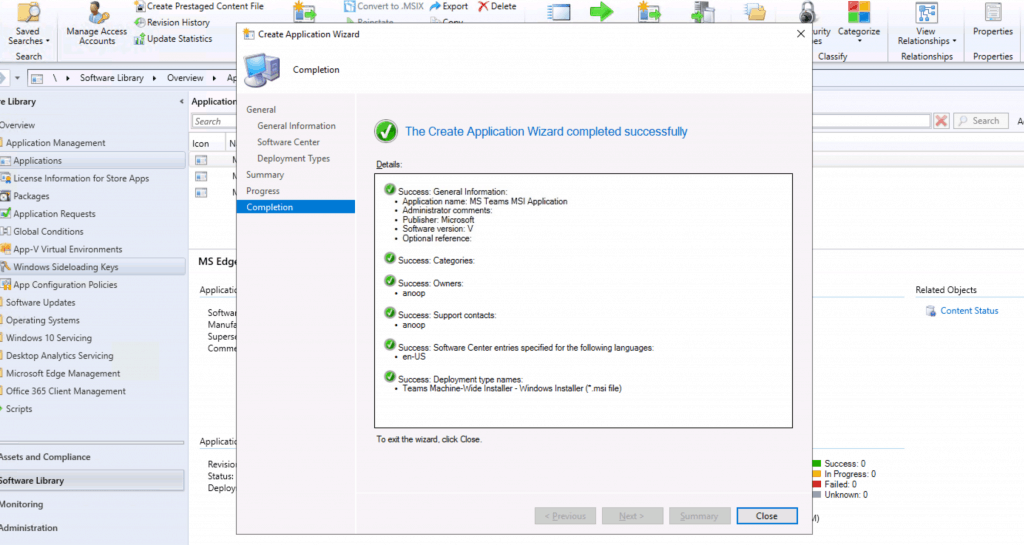
- Click on NEXT, NEXT, and CLOSE to complete the application creation process
Deploy MS Teams Using SCCM
- Navigate to \Software Library\Overview\Application Management\Applications
- Right-click on the MS Teams application created above
- Select DEPLOY
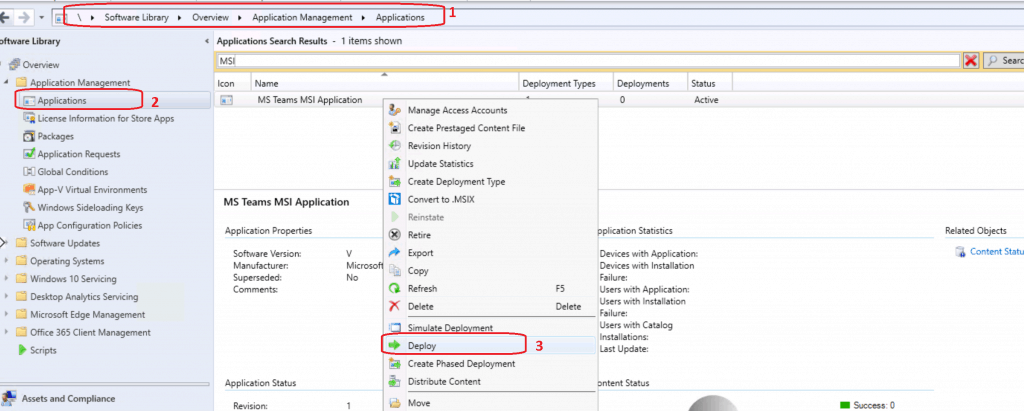
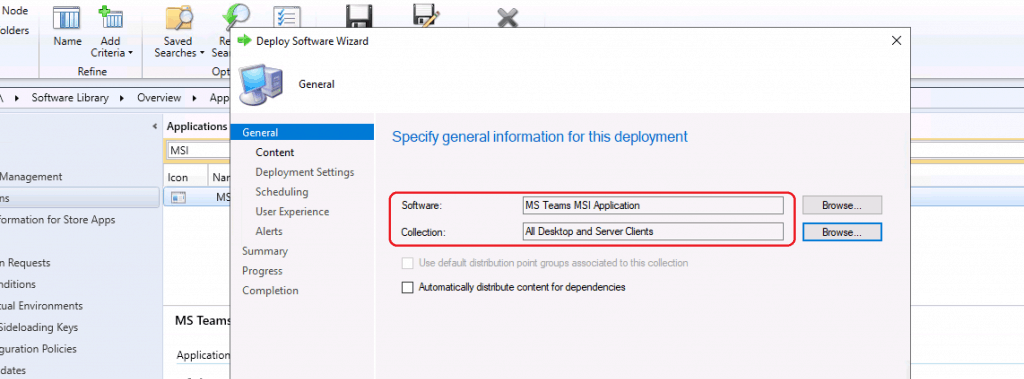
- Click on the BROWSE button near the Collection
- Select the COLLECTION you want to deploy the MS Teams application
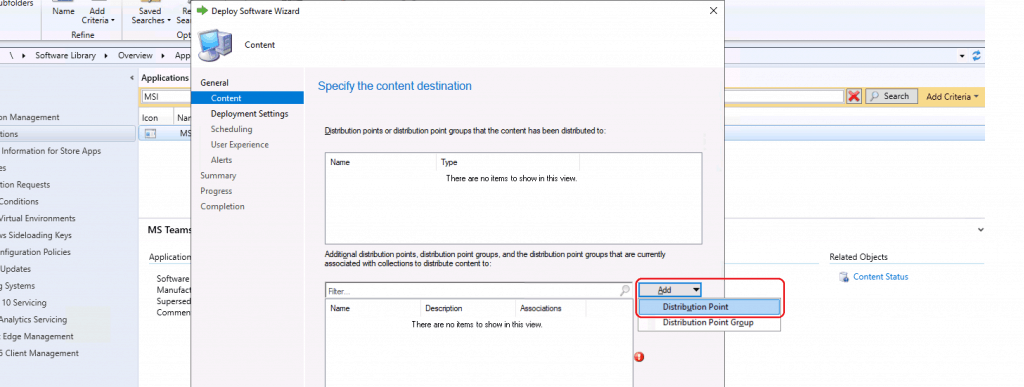
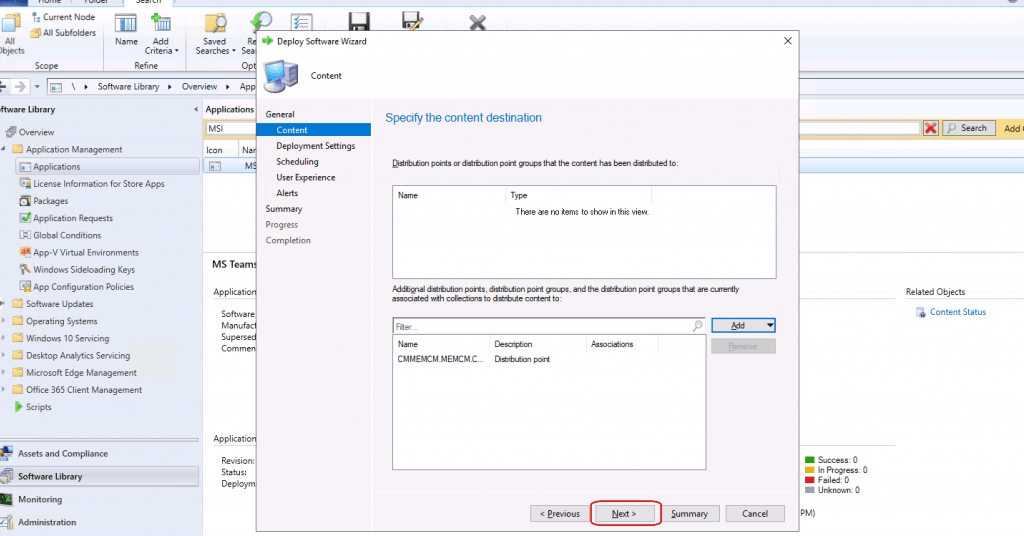
- Click on ADD button to distribute the Source files of the Teams application to the Distribution Point server
- Select the Distribution Point option
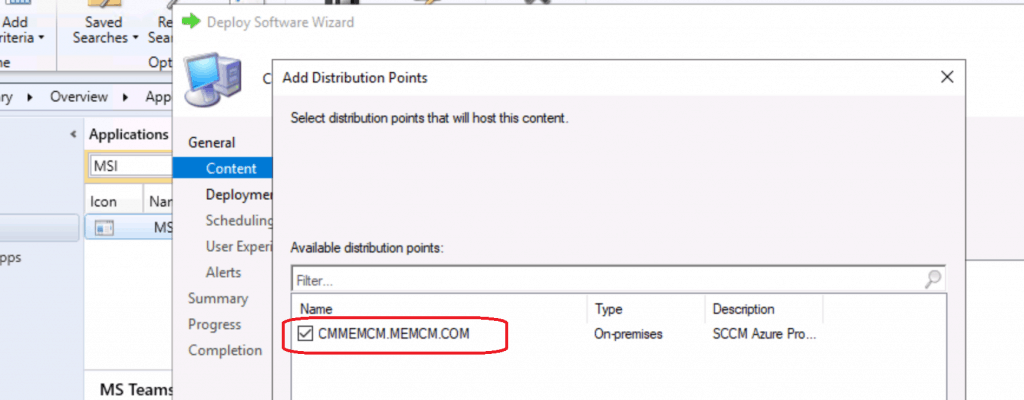
- Select DP CMMEMCM.MEMCM.COM
- Click OK to continue
- Click on NEXT to continue
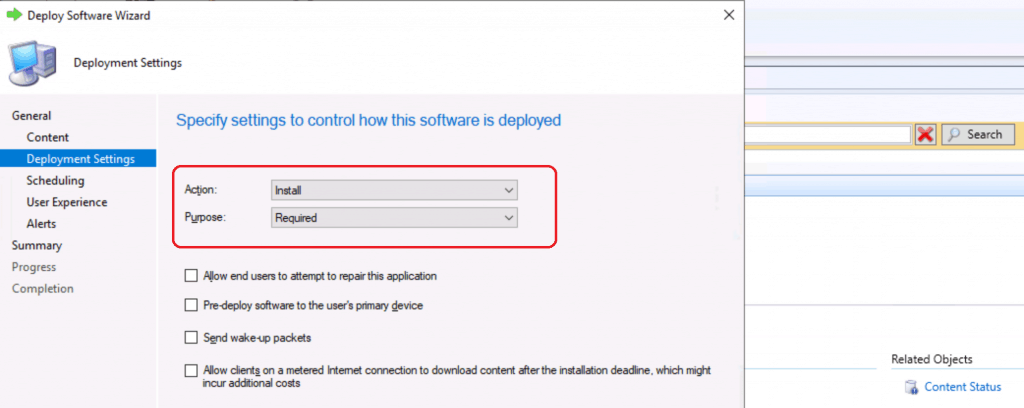
- Select the installation ACTION as INSTALL
- Select the Purpose as REQUIRED
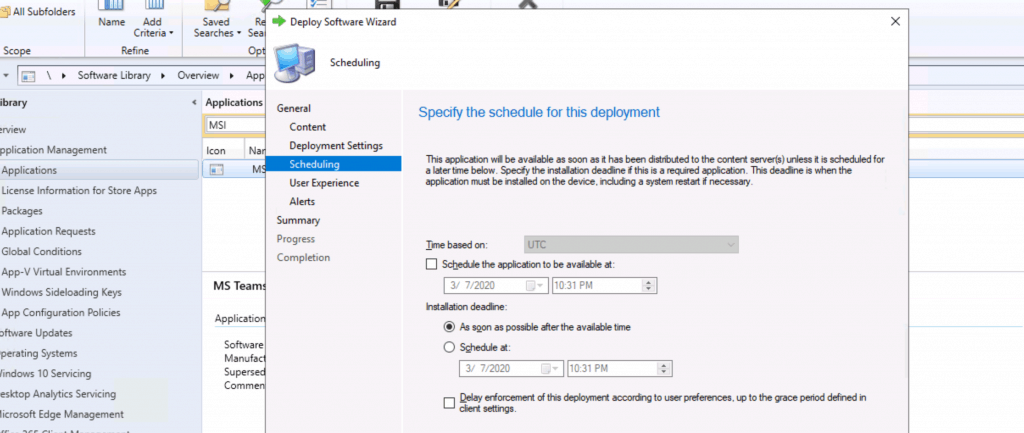
- Schedule the installation of the MS Teams application on to Windows 10 devices
- Installation Deadline
- As Soon As Possible after the available time
- Click on the NEXT button on the USER EXPERIENCE page
- Click on the NEXT button on the ALERTS page
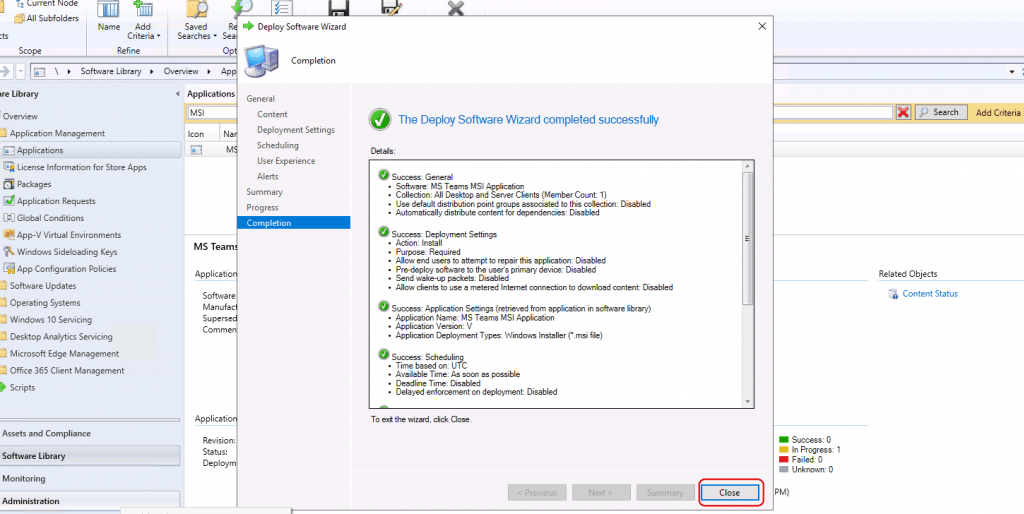
- Click NEXT and Confirm the summary page
General
 •    Software: MS Teams MSI Application
 •    Collection: All Desktop and Server Clients (Member Count: 1)
 •    Use default distribution point groups associated to this collection: Disabled
 •    Automatically distribute content for dependencies: Disabled
 Deployment Settings
 •    Action: Install
 •    Purpose: Required
 •    Allow end users to attempt to repair this application: Disabled
 •    Pre-deploy software to the user's primary device: Disabled
 •    Send wake-up packets: Disabled
 •    Allow clients to use a metered Internet connection to download content: Disabled
 Application Settings (retrieved from application in software library)
 •    Application Name: MS Teams MSI Application
 •    Application Version: V
 •    Application Deployment Types: Windows Installer (*.msi file)
 Scheduling
 •    Time based on: UTC
 •    Available Time: As soon as possible
 •    Deadline Time: Disabled
 •    Delayed enforcement on deployment: Disabled
 User Experience
 •    User notifications: Display in Software Center and show all notifications
 •    Ignore Maintenance Windows: Disabled
 •    When software changes are required, show a dialog window to the user instead of a toast notification: Disabled
 •    System restart  (if required to complete the installation): Disabled
 •    Commit changes at deadline or during a maintenance window (requires restarts): Enabled
 Alerts
 •    Enable System Center Operations Manager maintenance mode: Disabled
 •    Generate System Center Operations Manager alert when a software installation fails: Disabled
 •    Create a deployment alert when the threshold is lower than the following: Disabled
 •    Create a deployment alert when the threshold is higher than the following: Disabled
 Content (1):
 •    CMMEMCM.MEMCM.COM
- Click CLOSE to finish the deploy MS Teams using SCCM
Results
Software Center shows MS Teams application successfully INSTALLED on the Windows 10 Device.

- Restart the Windows 10 machine to complete the installation of MS Teams
Resources
- https://docs.microsoft.com/en-us/MicrosoftTeams/msi-deployment
- How to Install Office 365 ProPlus Client Package
- Skype for Business Online – End of Life – July 31, 2021
- Install Microsoft Teams using Microsoft Endpoint Configuration Manager
We are on WhatsApp. To get the latest step-by-step guides and news updates, Join our Channel. Click here –HTMD WhatsApp.
Author
Anoop C Nair is Microsoft MVP! He is a Device Management Admin with more than 20 years of experience (calculation done in 2021) in IT. He is a Blogger, Speaker, and Local User Group HTMD Community leader. His main focus is on Device Management technologies like SCCM 2012, Current Branch, and Intune. He writes about ConfigMgr, Windows 11, Windows 10, Azure AD, Microsoft Intune, Windows 365, AVD, etc.

Anoop, this is the installation of the “Teams Machine-Wide” Installer which if set to default will start to automatically update the users version on it’s own from Microsoft as new versions come out. Since the MSI Product code was selected for the deployment type detection method, what happens when new versions of the Users Teams client are automatically downloaded, do they have the same Product Code? If not will the Application Deployment detection method, detect the change and try to re-deploy then now older package on the MECM server? Note: The detection method is for the team wide installer so it may remain the same on the client while the updated user teams client keep increasing higher. In that case when does the MECM package which is installed on new machines become so old that it does not install a user teams client that can update automatically?
John – These steps might help for the first or initial migration scenarios from Skype for Business to Microsoft Teams. Once the migration is done, we should manage Microsoft Teams update via Office 365 ProPlus update mechanism? Does this make sense or am I missing something? https://www.anoopcnair.com/how-to-deploy-ms-teams-using-configmgr/
Anoop, You are correct the teams machine-wide install for new builds works well, we have deployed it in our enterprise successfully, although I used a file version detection method.
The machine wide installer does not get updated by Office 365 ProPlus update as far as I have observed, nor does it need to since at that point the user has clicked on the teams icon on the desktop and the teams machine wide installer has installed into the users profile the same version which WILL get updated using Office 365 ProPlus update. That will work just fine, automatic updates for the users install. But lets say a year or two from now the user leaves the company and a new user logs in. He will click on the Teams icon on the desktop and invokes the machine-wide installer, which by now is at least a year old, it will probably work just fine, but will not support any new features unless it starts auto updating, which it should as long as Microsoft supports that version of the Machine-wide installer. This is a very remote scenario I suppose. If we update the Teams machine-wide installer in MECM a couple of times a year and use it for new installs only then if Microsoft supports it for at least 3 years our lease replacements will solve the problem(if there is one) as they will just go away.
Our teams package was created using the PowerShell Application Tool Kit wrapper. Using the information from Microsoft and a script they created as a way to completely uninstall teams from all users on a machine, our wrapper can be used with the MECM Application “Repair” to completely remove all user instances of the teams and the Teams machine-wide installer and then install the latest version of the Teams Machine Wide installer. Seems to work.
In any case we will have to wait some months to see if the Teams machine-wide installer gets updated and if it does how does it interact (if at all) with the current updated user instances?
Microsoft is pretty smart, they probably have all of this covered, but it is something to be aware of.
I subscribe to your emails and they have been very helpful. Thanks for all you have done for the MECM community.
This seem to work for NEW user profiles, installing Teams after initial login. However, doesnt appear to work for existing user profiles. Am I missing something, or have others seen this behavior?
Thanks
Richie
Richie,
The Machine wide installer stages the product on the machine and when the user next logs on after the install, the machine wide installer, installs an instance of teams in each users profile when they log on to the machine. In the Microsoft Teams docs on installation.
https://docs.microsoft.com/en-us/MicrosoftTeams/msi-deployment
https://gallery.technet.microsoft.com/scriptcenter/Install-and-Uninstall-Teams-a9d2ebbc
Once installed for a user the MS Teams app will automatically update every few days from Microsoft and it is then newer in the user instance than the Teams/Machine wide install.
The script references explain it better than I can, but using that script you can “Scrub” both the machine wide installer and all user instances, the reinstall the latest version of the machine wide installer and have the user log off and then back on so that the Teams shortcut re-appears on their desktop, click on that, provide their credentials.
I have the same issue for existing users the teams doesn’t install.
any one got this working?
Has anyone had issues with the Teams Outlook addin not appearing with the MSI install?
Hello Tom – I never used Teams outlook addin myself … I might try later what do you see there ?
When using the MSI for enterprise install and using the /noautostart parameter, our users reported that after the install that MS teams was not installed, but when using the /noautostart option the MS teams shortcut on the desktop does not appear until the users log off and log back on, with the rapid conversion to laptops, many of our users were not logging off at all, just closing the covers and suspending. Until they logged off and back on or did a system restart, the MS Teams shortcut did not appear, also be aware that when they do log off an back on the MS Teams shortcut will take a minute or two to appear. Communication of this to the users is essential.
Might be a bit late to the party here, but AFAIK the Outlook IM integration actually depends on SfB components, I believe they are still working on Teams integration so for the time being you may need to still deploy SfB to maintain presence status within Outlook?
I am unable to import the MSI file. It says:
“The publisher of Teams_windows_x64.msi file could not be verified. Are you sure that you want to import this file?”
And then on next page:
Import failed.
The specified Windows Installer file could not be opened. Verify the file is a valid Windows Installer file.
Click Previous to attempt to correct the problem, or click Cancel.
Is anyone else having the same issue?
Did you unblock the msi, go to file properties>advanced, check the unblock box?
NVM, I was able to import, I had to close and relaunch MECP for some reason 😐
We have just started looking at this and I think there a couple of ‘gotchas’ to consider. Firstly, we haven’t used Install for User – seems more sensible to Install for System if it is machine wide and essentially just stages the install? MS documentation is a little vague here in my opinion.
We also saw similar ‘confusing’ behaviour for the user – the install runs and succeeds, but no Teams installed. That’s because it only installs on the next login! The ‘stub’ has deployed successfully, but the user based install has not initiated.
To get around this, you can either force a reboot from SCCM regardless of return code, or more elegantly, alter the success codes to Soft Reboot (AppDeployToolkit will also enable this to be wrapped up nicely as per previous post).
According to MS Docs, even if you do not update the installer, an older one will check and download the latest version if it is too old – otherwise it installs and then auto-updates. From what I can see, the MSI code remains the same, but I’ve not looked far back and a file based detection may be best with a ‘greater than or equal to’ rule.
Hello Phil – Great information ℹ️. Thank you much for sharing
Hello I would like to know Why “install for User” instead of “Install for System”?
SCCM will suggest that after MSI detection. Isn’t it?
Teams is per user install for most of the scenarios.
However, Teams per-machine installation is used in some WVD or VDI scenarios
Hey all,
Great information so far, however we find ourselves in this situation.
Deployed TMWI(Teams Machine Wide Installer) via ConfigMan to Desktops/Laptops and Shared Meeting Room devices.
N.B. Meeting Room Devices have older user profiles deleted by a script when HDD gets low or every 3 months.
All Devices were on Win10 1809.
A Feature update to 1909 was run across fleet.
Teams then broke and wouldn’t start automatically.
On the shared (meeting room) devices we had to manually uninstall OLDER version TMWI install a later version.
However I now have a fleet of 1909 user assigned devices that could have new users logging on and potentially installing the last version of Teams from the TMWI.
I understand a move to the O365 Apps for Enterprise would make sense however what the hell do I do with the current TMWI ? Remove completely and deploy the O365 version with a special configuration.xml ?
I could create an app TS to perform the steps but I really need to keep the reputation of IT and Teams seamless and beautiful. i.e. the minimal disruption to the users and fleet.
Any ideas you wonderful experts ?
Cheers
Jof
Same issue as mentioned above. The Teams Machine Wide Installer stages the Teams.exe (should be named Teams 32 or Teams 64 Setup.exe) to C:\|ProgFiles(x86)\Teams Installer. It also sets a RunOnce Key so Teams will install to each user’s profile as they log in for the 1st time.
PROBLEM #1
Once Teams Machine Wide Installer gets too OLD, it wont install and a net new user gets a prompt. To get around this we were thinking about pointing the RunOnce key away from the ProgFiles\Teams Installer\Teams.exe instead toward a \\ServerShare\..\Teams Installer\Teams.exe that we could frequently refresh. We instead decided to leave the RunOnce Pointer as it is and instead just use a GPO to periodically force down a FRESH Teams.exe to each local machine
PROBLEM #2
Microsoft unnecessarily makes our lives difficult by not properly labelling Teams.
We cant tell the difference between the 32 bit version and the 64 bit version. They use the same 32 bit file location for both 32 & 64, they use the same File Name and metadata. The Registry location is the 32 bit \Wow6432\ location for both and they even use the very same GUID. ARGHhhhhhhhh!!!!
Whats more 64 bit Office installs 32 bit Teams and at this point they cant tell us an ETA for when 64 bit will be included. For the Meantime we will EXCLUDE Teams from our 64 bit Office install XML and install 64 bit as a “Standalone” app.
Now I just need them to tell me what to use as detection 🙂 If I cant tell the difference then neither will SCCM and the job will just sit there thinking all those 32 bit Teams installs are 64 bit Teams compliant.
I know I can create a DUMMY registry entry or File to use as a 64 bit Teams “flag” but that is so “bush league” I hesitate to resort to that.
Does any one here have a way to distinguish 64 bit teams from 32 bit? if not then hopefully MSPS will tell me and I’ll report back here 🙂