Learn the 4 Best Ways to Schedule Auto Shutdown in Windows 11. You often want your PC to complete certain tasks while attending to other work. Scheduling Auto Shutdown is recommended when downloading large files or copying data from another device without interruption overnight.
In Windows 11, you can schedule your computer to automatically shut down your device at a specific time when not in use. Scheduling the auto shutdown allows your device to cool down its internal components and provide greater performance.
Not letting your device turn off can be harmful. It also hampers the electrical components’ durability and will impact its performance. Scheduling auto shutdown is a good idea when waiting for big files to download or transfer something.
Auto shutdown will turn off your device after completion of the specified countdown time elapsed. So, Windows allows your device to schedule time per your requirement by entering the command. This post describes the various ways to schedule auto-shutdown with a step-by-step process.

Methods for Scheduling Auto Shutdown in Windows 11
Scheduling Auto Shutdown in Windows 11 is a Windows Operating System function that ensures your computer’s safety and security. Proper system shutdown helps to extend the life of the Operating System.
Using Windows’s various processes, you can schedule the time for shutting down your device properly without failing. There are four ways to schedule an automatic shutdown listed below.
- Use Run Command for Scheduling Auto Shutdown
- Use Elevated Command Prompt for Scheduling Auto Shutdown
- Use Desktop Shortcut for Scheduling Auto Shutdown
- Use Task Scheduler for Scheduling Auto Shutdown
1. Use Run Command for Scheduling Auto Shutdown
You can schedule an automatic shutdown by using the Run Command dialogue box. This is the most convenient and fastest method to schedule a shutdown.
To do so, press Win Key + R on your keyboard to open the Run Command dialogue box. Then, type shutdown -s -t <time in seconds> and click OK or hit Enter, as in the image below.
shutdown -s -t <time in seconds>
NOTE! Replace <time in seconds> with the number of seconds, e.g., 1 minute = 60 seconds, 30 minutes = 1800 seconds, 1 hour = 3600 seconds and so on.
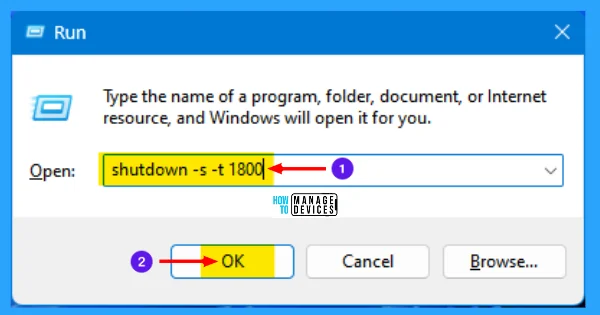
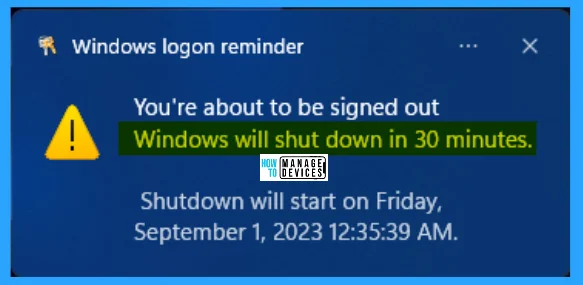
The time will be mentioned here in seconds, if you put the value as 1, then the system will shut down in one second. After running the command, a confirmation will flash on your screen as, a Windows logoff reminder that Windows will shut down in 30 minutes, as shown in the image below.
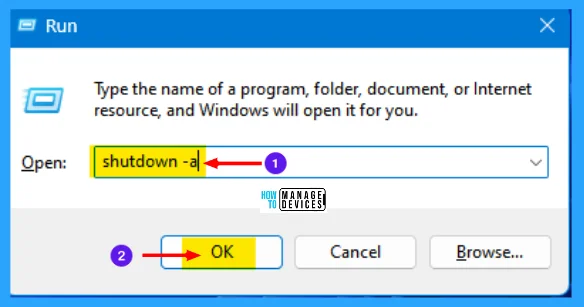
If you wish to adjust the time or cancel the shutdown, open the run command dialogue box, type shutdown -a and click OK. Again run the auto shutdown command to adjust the time.
shutdown -a
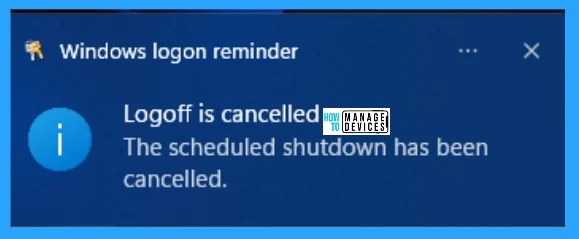
After clicking OK, the existing scheduled time will be cancelled, and another flash shows that the scheduled log-off is cancelled. The scheduled shutdown has been cancelled, as shown in the Windows logon reminder.
2. Use Elevated Command Prompt for Scheduling Auto Shutdown
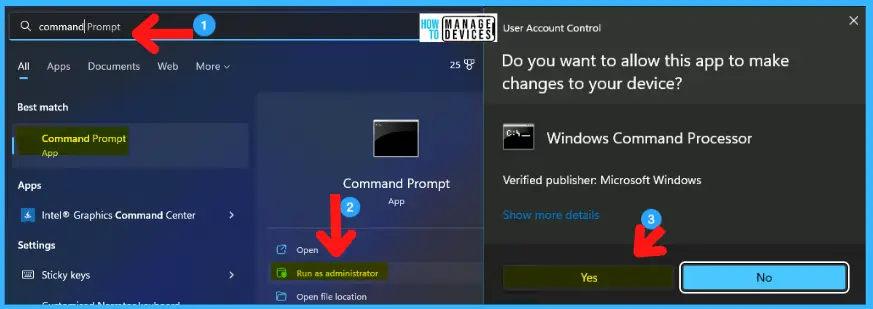
To open the Elevated Command Prompt, click on the search box in the taskbar and type Command Prompt; in the right panel, the command prompt app appears, and click Run as Administrator.
Hence, it needs the admins’ permission to open the Elevated Command Prompt. Press YES in the User Account Control window to continue.
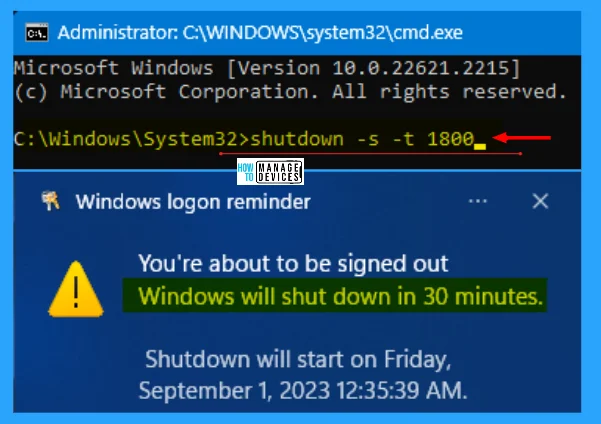
Now the Administrative Command Prompt window opens, type shutdown -s -t <time in seconds> and hit Enter. The <time in seconds> represents the time multiplied by 60 seconds, e.g., 30 minutes multiplied by 60 seconds, resulting in 1800 seconds.
After hitting Enter, the conditions apply to your PC, and a flash message appears on your desktop for your reference, as Windows will shut down in 30 minutes.
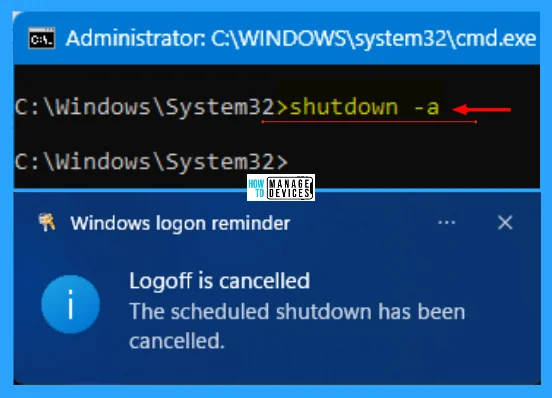
To cancel the auto shutdown, type shutdown -a and hit Enter. A flash message appears as the Windows logon reminder says the scheduled shutdown has been cancelled.
3. Use Desktop Shortcut for Scheduling Auto Shutdown
In this method, you can create a Desktop shortcut for auto shutdown, and after executing, it will start a shutdown countdown. It is very convenient to schedule auto shutdown with just a click away.
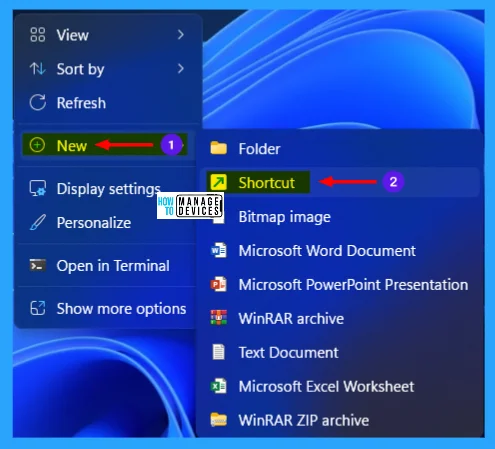
To create a shortcut, right-click on the Desktop and hover over the ‘New‘ option. Then, select ‘Shortcut‘. This will open a window on your screen, as illustrated in the image below.
NOTE! The only bottleneck is you can only define the time duration at the time of creation, which cannot be modified later.
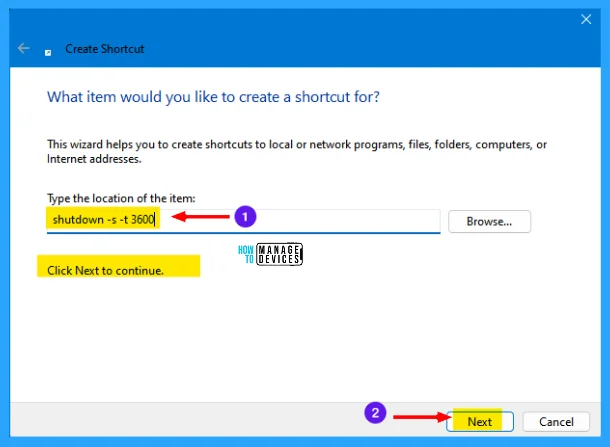
When the Create Shortcut window opens, it asks, “What item would you like to create a shortcut for?”. This wizard helps you to create shortcuts to local or network programs, files, folders, computers, or Internet addresses.
Now under the type, the location of the item type shutdown -s -t <duration in seconds>, click on Next to continue.
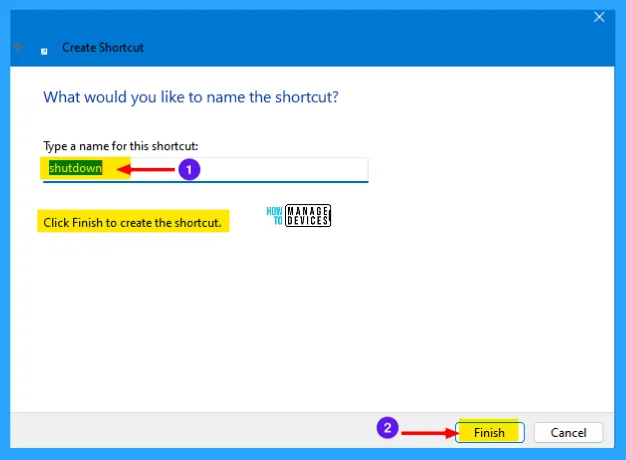
The next screen asks, “What would you like to name the shortcut?“. Type a name here for your shortcut and click on Finish the setup.
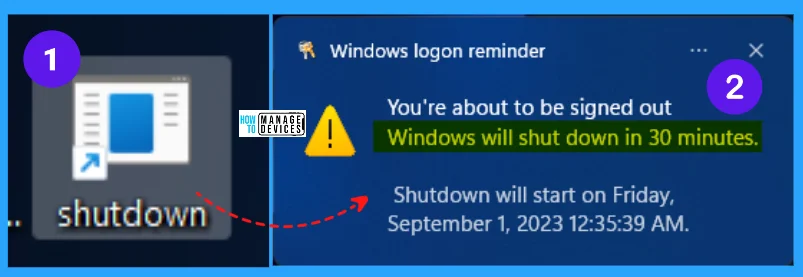
Once created, you see the shortcut on the Desktop. Double-click on it to schedule an auto-shutdown setting. A flash message appears on your desktop for your reference, as Windows will shut down in 30 minutes
4. Use Task Scheduler for Scheduling Auto Shutdown
Task Scheduler is an administrative tool on Windows devices for performing automated computer tasks. To create a shutdown task in Task Scheduler, to automatically shut down your computer.
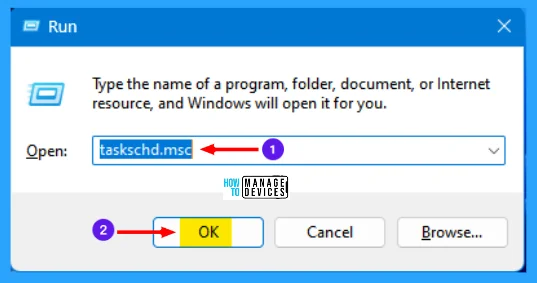
Press Win Key + R on your keyboard to open the Run Command dialogue box. Then, type taskschd.msc and click OK or hit Enter, as in the image represented below.
After that, the Task Scheduler window opens; now click on the Create Basic Task from the right section of the window. This will open a separate window on your screen.
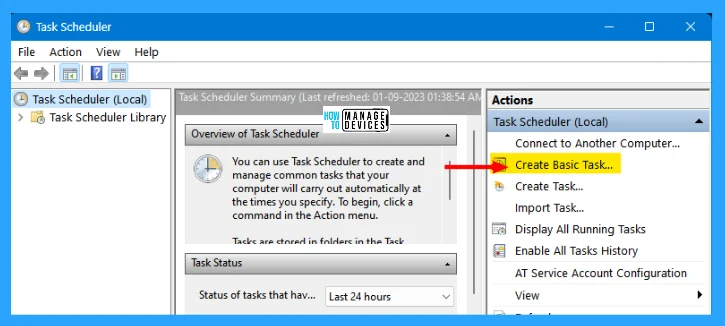
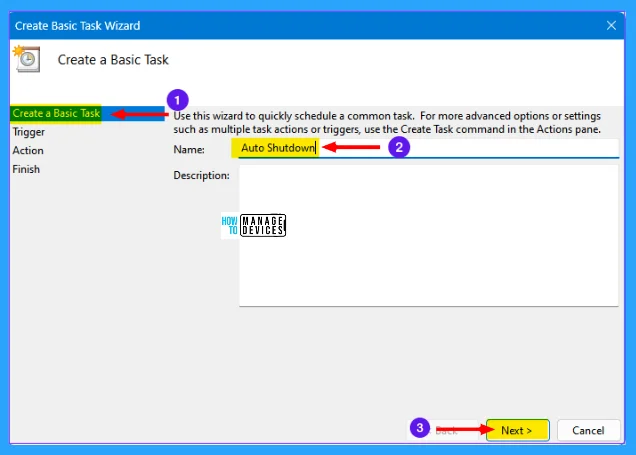
The next screen is all about Create a Basic Task. Use this wizard to schedule a command task quickly. Use the Create Task command in the Actions pane for more advanced options or settings, such as multiple task actions of triggers.
Now place a name for creating a basic task, e.g., Auto Shutdown. You may fill in the description or not. If it is not mandatory, then click Next to continue.
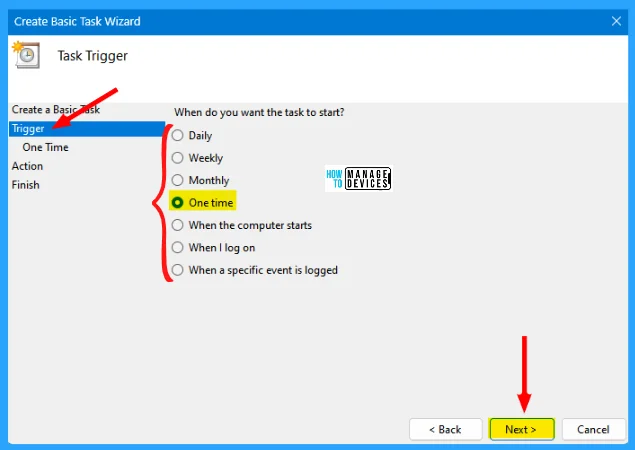
The next is the Task Trigger window, which schedules your task and asks, “When do you want the task to start?“. Let’s choose the One-time options from the list for this particular event and click Next. There are many options present, as illustrated in the table and image below.
| Options | Descriptions |
|---|---|
| Daily | It indicates to active auto shutdown every day. |
| Weekly | It indicates to active auto shutdown for a particular day in a week. |
| Monthly | It indicates to active auto shutdown for a particular day in a month. |
| One Time | It is created to auto-shutdown for once. |
| When the Computer starts | It was created to apply the changes after the system started. |
| When I log on | It starts when the user logs in. |
| When a specific event is logged | It is created for some specific event to log in. |
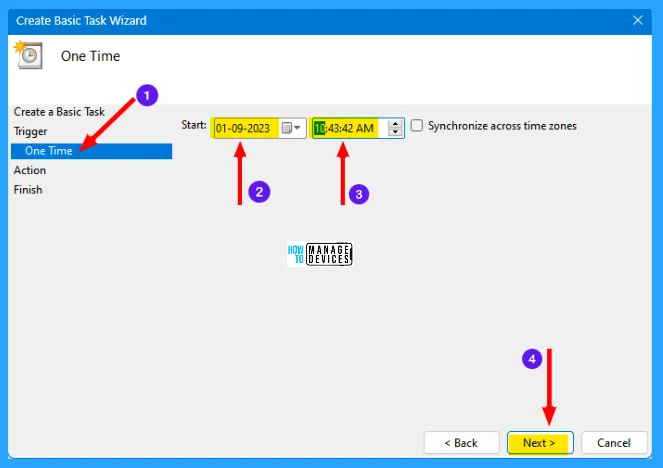
Now for the One Time option, you have to choose a start date from the drop-down calendar available in it, select the time to auto shutdown and click Next to continue.
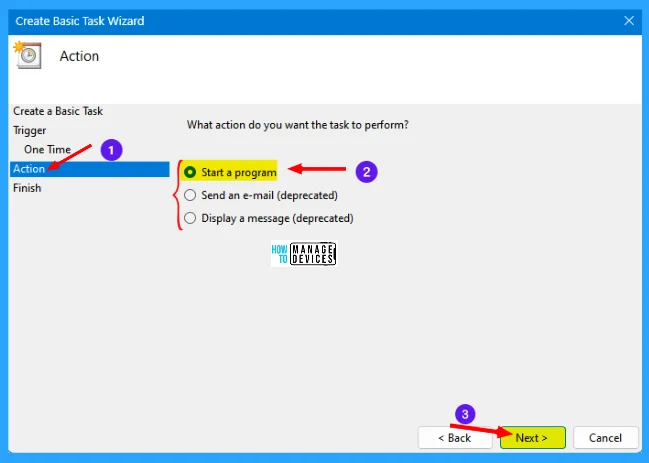
Now the Action window opens, and it asks, “What action do you want the task to perform?”. There are a few options, from them, select Start a Program and click Next to continue.
- Start a program
- Send an e-mail (deprecated)
- Display a message (deprecated)
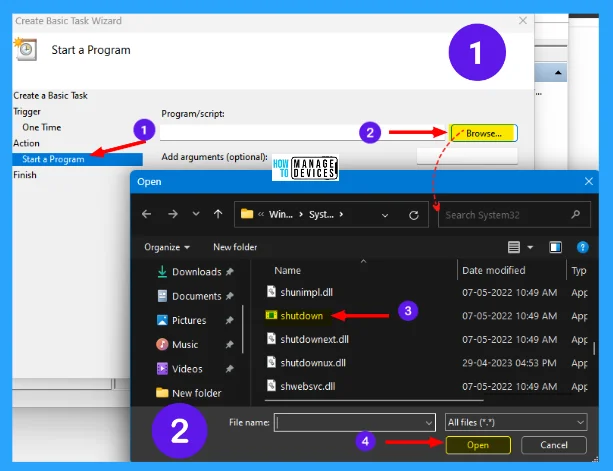
Now you are forwarded to the Start a program window. In this window, you have to provide the program/script to execute and click on Browse. Now move to C:\Windows\System32\ and find the executable file named shutdown.exe. Shown in the image below.
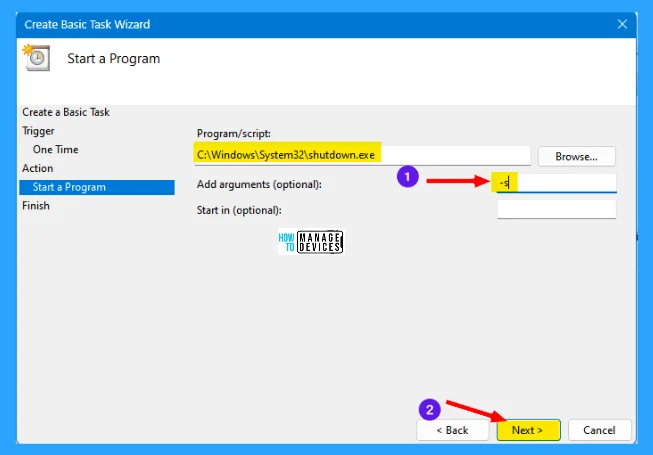
After providing the proper program path. You have to provide an argument for the script. So, you can type -s in the arguments section and click Next.
On the next screen, give a name to the task and then click Finish. Make sure you ensure the shutdown is scheduled at a time set by you. Once completed, select Finish. Now you have successfully scheduled your computer to shut down at the specified time automatically.
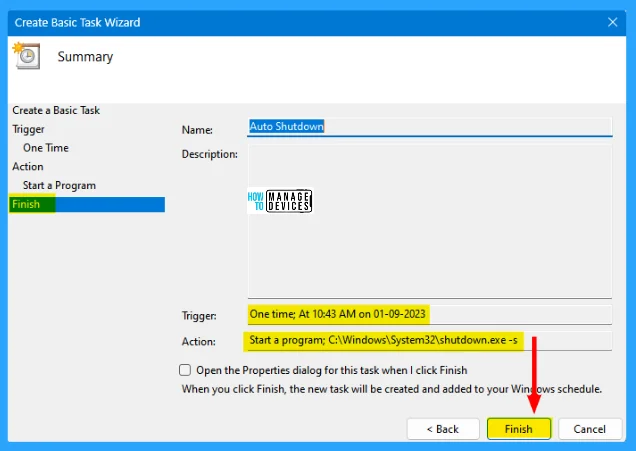
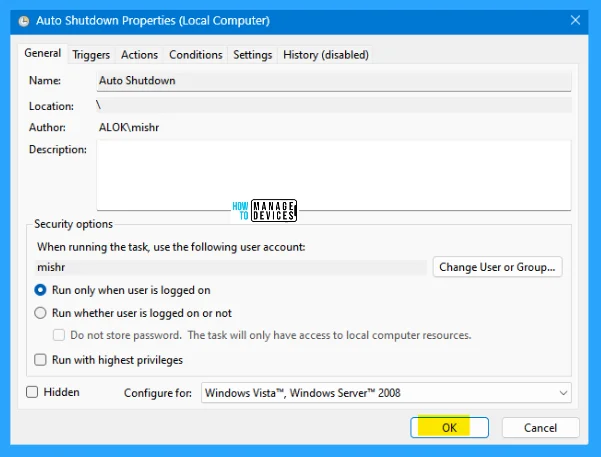
If you mark the Open the Properties dialog for this task when I click Finish, then the properties window will appear for the newly created task, as shown in the image below.
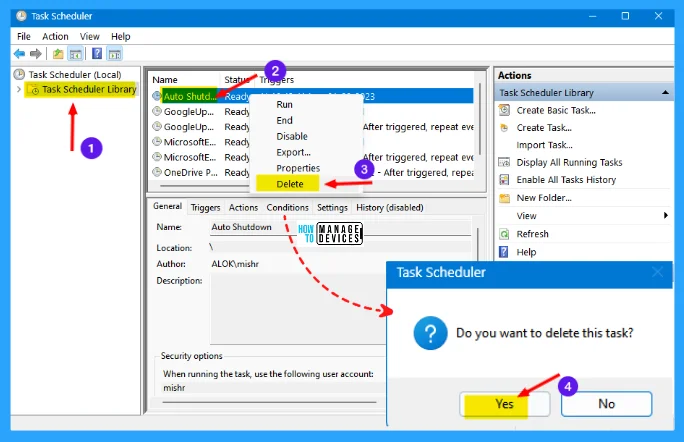
If you want to cancel the auto shutdown, open the Task Scheduler again, and select Task Scheduler Library on the left panel, at the right panel, locate the newly created program, right-click on it and choose Disable or Delete.
I hope the information on the 4 Best Ways to Scheduling Auto Shutdown in Windows 11 is helpful. Please follow us on HTMD Community and visit our website HTMD Forum if you like our content. Suggest improvements, if any, and we love to know which topic you want us to explore next.
Author
Alok is a Master of Computer Applications (MCA) graduate. He loves writing on Windows 11 and related technologies. He likes to share his knowledge, quick tips, and tricks with Windows 11 or Windows 10 with the community.

