Let’s learn how to analyse and Clean up Component Store WinSxS Folder in Windows 11. The WinSxS folder, located at C:\Windows\WinSxS, serves as the Windows Component Store. It houses essential system files and component assemblies required for customising, servicing, and updating the operating system. This folder enables features such as installing roles, applying updates, and recovering system integrity by maintaining multiple versions of system components.
The Windows Component Store WinSxS folder contains essential system files and component binaries that constitute the Windows operating system. Located at C:\Windows\WinSxS, this folder stores multiple versions of components to support various system functions. It enables rollback of updates, recovery of corrupted files, and smooth customization of system features.
Although files in the WinSxS folder may appear to exist in multiple locations across the operating system, there is typically only a single physical copy. The apparent duplicates are hard links, pointers to the original file within the Component Store. Tools such as File Explorer may calculate folder sizes without accounting for hard links, which can significantly overstate the disk space used by the WinSxS directory. This often leads to the misconception that the folder consumes more storage than it truly does. You can learn about Safeguard Holds for Feature Updates by clicking here.
Windows employs automated processes to manage and minimize the size of the WinSxS folder. This includes mechanisms that identify and remove outdated system components that newer versions have superseded. While earlier versions are temporarily retained to support rollback scenarios, they are scheduled for automatic deletion after a defined period. These internal housekeeping tasks help ensure that the Component Store remains efficient without compromising system recovery capabilities.

Table of Contents
Are there any Group Policy and Intune Policy Settings that Analyse and Clean up Component Store WinSxS Folder in Windows 11?
The answer is no. We cannot find any Group Policy and Intune Policy to Analyse and cleanup component store WinSxS folder in Windows 11. If you have anything, let us know in the Comments.
How to Analyse and Clean Up Component Store
Several methods are available to initiate cleanup of the Windows Component Store WinSxS folder. These leverage a combination of package removal and component compression techniques to optimize disk usage. Cleanup processes may be triggered manually through tools like DISM or automatically during system maintenance, helping reduce redundancy without affecting system stability.
- How to Check Reliability History in Windows 11
- ConfigMgr SCCM Antivirus Scan Exclusion Recommendations
- Microsoft is Removing the M365 Feed Widget
NOTE: You must be signed in as an administrator to analyse and clean up the component store.
The WinSxS folder contains critical system files that are essential for Windows to function properly. Some of these components exist solely within this directory. Manually deleting files or the entire WinSxS folder can result in severe system instability, including boot failures and an inability to apply updates.
Instead of attempting manual deletion, you should use built-in Windows utilities to safely reduce the size of the Component Store. These tools perform intelligent cleanup operations, such as removing outdated packages and compressing components, while preserving system integrity. The methods are listed below.
- Analyze the Component Store Using Windows Terminal (Admin)
- Clean up the Component Store Using Task Scheduler
- Clean up the Component Store Using Windows Terminal (Admin)
- StartComponentCleanup Command
- StartComponentCleanup /ResetBase Command
Analyze the Component Store Using Windows Terminal (Admin)
This option allows you to assess the true disk space usage of the WinSxS folder and evaluate whether cleanup operations are advisable. It accounts for hard links and other storage optimisations, providing an accurate measurement that helps guide maintenance decisions for system efficiency. To do this, right-click on the Windows button, then click on Windows Terminal (Admin).
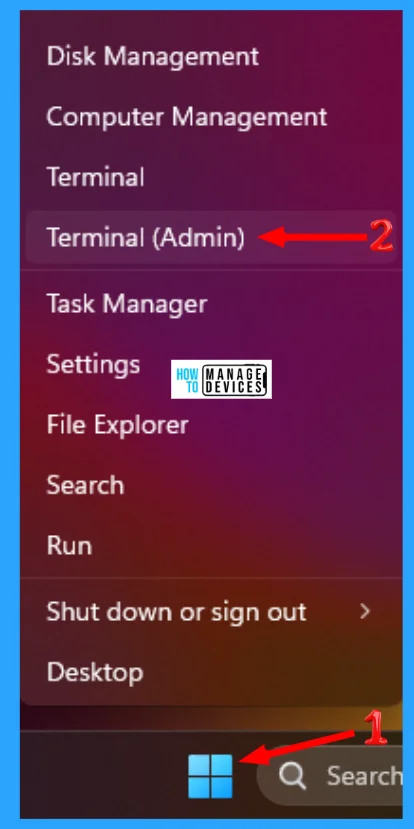
When the Windows Terminal (Admin) opens, select Windows PowerShell or Command Prompt and type or copy and paste the following command and press Enter.
DISM /Online /Cleanup-Image /AnalyzeComponentStore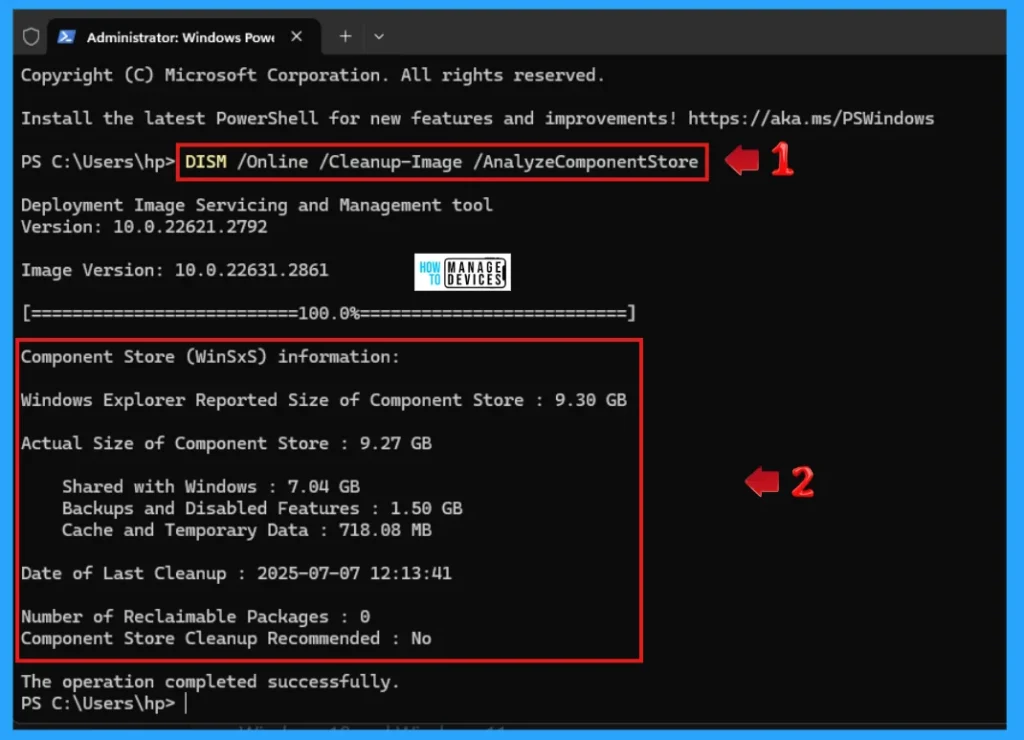
To determine the overhead of the WinSxS folder, analyse the output of the component store evaluation. Specifically, calculate the total overhead by summing the following elements.
- Backups and disabled features size
- Cache and temporary data size
This combined value reflects the reclaimable space and helps assess whether cleanup actions are warranted to optimise disk usage. Component store cleanup recommended will report yes or no if cleanup is needed. Some information that is available in the output is described below.
| Information | Description |
|---|---|
| Windows Explorer Reported Size of Component Store | This value is the size of the WinSxS folder if computed by Windows Explorer. This value doesn’t factor in the use of hard links within the WinSxS folder. |
| Actual Size of Component Store | This value factors in hard links within the WinSxS folder. It doesn’t exclude files that are shared with Windows by using hard links. |
| Shared with Windows | This value provides the size of files that are hard-linked so that they appear both in the component store and in other locations (for the normal operation of Windows). This is included in the actual size, but shouldn’t be considered part of the component store overhead. |
| Backups and Disabled Features | This is the size of the components that are being kept to respond to failures in newer components or to provide the option of enabling more functionality. It also includes the size of component store metadata and side-by-side components. This is included in the actual size and is part of the component store overhead. |
| Cache and Temporary Data | This is the size of files that are used internally by the component store to make component servicing operations faster. This is included in the actual size and is part of the component store overhead. |
| Date of Last Cleanup | This is the date of the most recently completed component store cleanup. |
| Number of Reclaimable Packages | This is the number of superseded packages on the system that component cleanup can remove. |
| Component Store Cleanup Recommended | This is a component store cleanup recommendation. Cleanup is recommended when performing a cleanup process may reduce the size of the component store overhead. |
Cleanup the Component Store Using Task Scheduler
The StartComponentCleanup task is designed to automatically clean up obsolete system components during periods of system inactivity. Its behaviour varies slightly depending on how it is triggered.
- Automatic Execution:
- Waits at least 30 days after a component has been updated before uninstalling its previous versions.
- Helps ensure system stability by retaining older versions temporarily for rollback or compatibility.
- Manual Execution:
- Can be triggered at any time by the user or administrator.
- Has a 1-hour timeout, after which it may terminate without completing a full cleanup.
- May not remove all eligible files due to dependencies, locks, or timeout constraints.
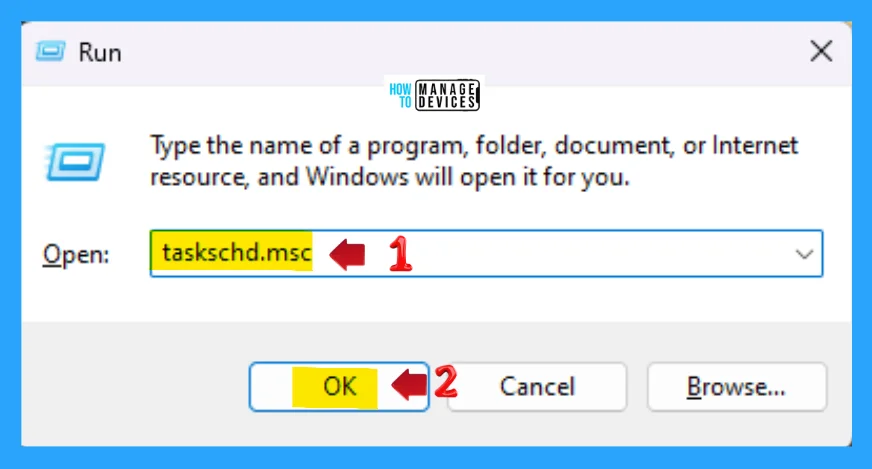
To open the task schedule, press Windows Key + R from the keyboard simultaneously, when the run dialogue box opens, type taskschd.msc and click on OK or press Enter.
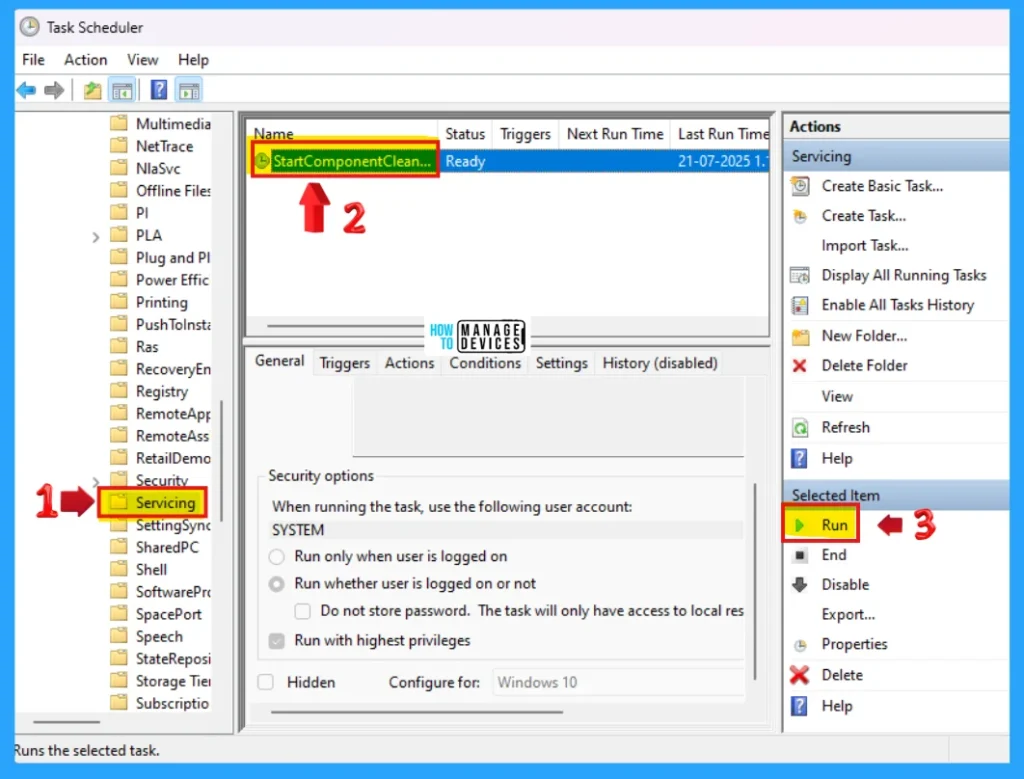
Running the StartComponentCleanup Task via Task Scheduler UI. Once you have navigated to the Servicing folder in Task Scheduler Library, follow these steps as illustrate in the image below.
- In the Actions pane on the right, click Run under Selected Item to initiate the cleanup process.
- In the middle panel, locate and select the task named StartComponentCleanup.
Task Scheduler Library > Microsoft > Windows > Servicing
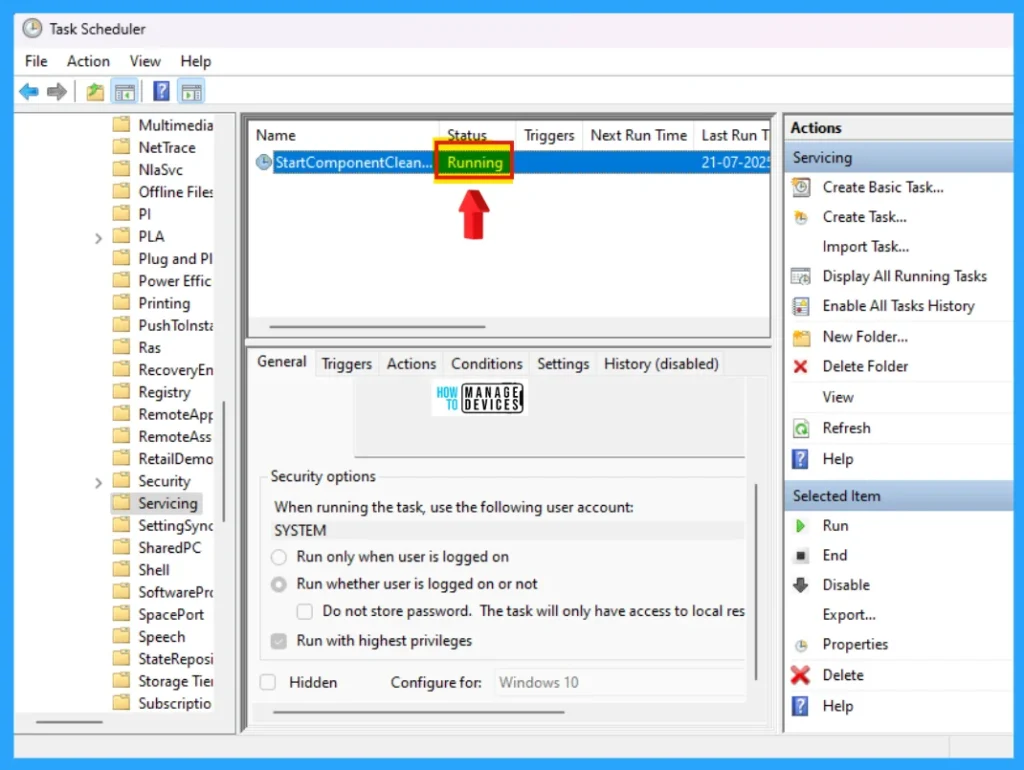
Visual reference is inserted below to aid understanding you can see the StartComponentCleanup is in the Running status.
Cleanup the Component Store Using Windows Terminal
The same task scheduler is also run StartComponentCleanup task using the command using Windows Terminal (Admin). Type or Copy and paste the following command and press Enter to execute.
Schtasks.exe /Run /TN “\Microsoft\Windows\Servicing\StartComponentCleanup”
StartComponentCleanup Command
Running the /StartComponentCleanup parameter with Dism.exe yields similar results to executing the StartComponentCleanup task via Task Scheduler, but with some key differences:
- No Grace Period: Previous versions of updated components are deleted immediately, bypassing the standard 30-day retention period used in scheduled executions.
- No Timeout Restriction: Manual DISM execution does not impose the 1-hour timeout, allowing a more complete cleanup where system conditions permit.
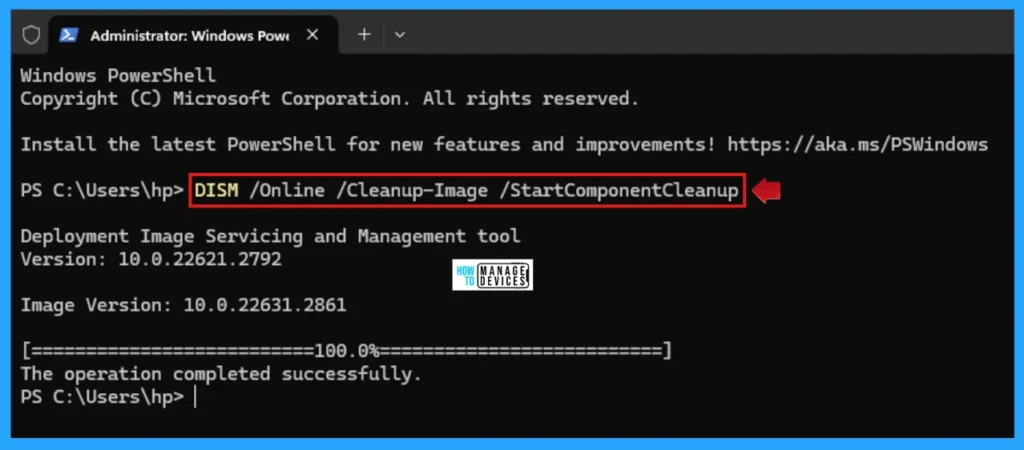
This method is particularly useful for administrators seeking to proactively reclaim disk space without waiting for automated task conditions. Now type or copy and paste the following command and press Enter.
DISM /Online /Cleanup-Image /StartComponentCleanupOnce you see the message “The operation completed successfully” in Windows Terminal (Admin), it indicates that the cleanup command has finished executing its tasks.
- You may close the terminal at this point, although it’s safe to leave it open if you prefer to monitor post-execution behaviour.
- Keep in mind that the system may continue background processing even after the message appears, especially if files are pending compression or finalisation.
StartComponentCleanup /ResetBase Command
Using both /StartComponentCleanup and /ResetBase with DISM.exe helps reduce disk usage by:
- Removing superseded versions of components in the Windows Component Store.
- Ensuring only the latest versions remain, making future servicing more efficient.
Note: After this cleanup, you won’t be able to uninstall updates that were previously replaced. Use it when you’re confident about update stability.
Running DISM.exe /StartComponentCleanup /ResetBase streamlines your system by removing outdated component versions. However, it comes with an important caveat:
- Existing superseded update packages become permanent you won’t be able to uninstall them after the cleanup.
- Future update packages remain unaffected you can still install and uninstall updates released after this command.
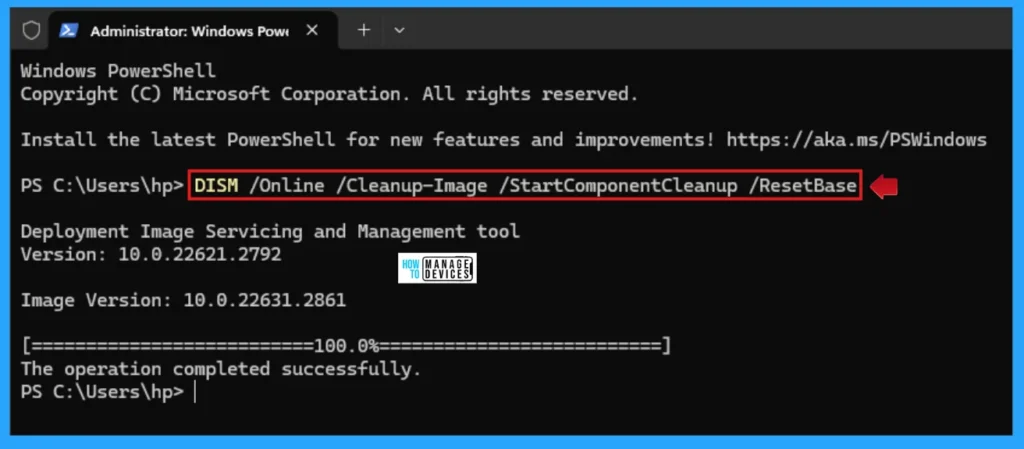
Use this combination when you are confident that your current updates are stable and you are ready to lock in a cleaner system state. Now open Windows Terminal (Admin) and type or copy and paste the following command and press Enter to execute.
DISM /Online /Cleanup-Image /StartComponentCleanup /ResetBaseOnce “The operation completed successfully” appears in Windows Terminal (Admin), the command has finished executing. Now, you can safely close the terminal, or leave it open if you want to observe any lingering background activity.
NOTE: Some tasks, like system optimisations or cleanup finalisation, may continue briefly even after the message displays.
Additional Tip
You can also initiate the Analyze Component Store and Clean Up Component Store option in to the Context Menu using Registry Editor. The details are explained below.
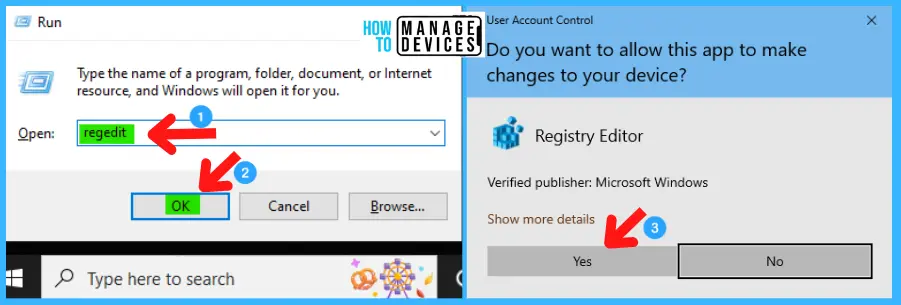
Open Run Window, and press Windows Key + R from the keyboard simultaneously. This is the keyboard shortcut to open the run window. Now, type regedit and click on OK to continue. Then, it asks the Admin’s permission to change the Device. Click Yes.
- Window Key + R (To open run command)
- Type ‘regedit‘ and press OK
- Administrator Permission press Yes
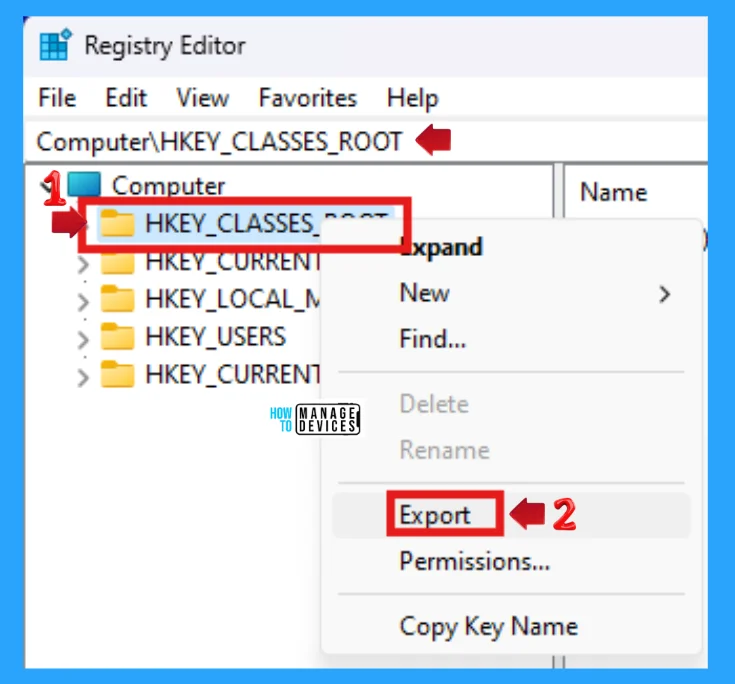
NOTE! Take Backup—If any mistake occurs in the Registry Editor, it may affect the system. It is advisable to take a backup of the Registry before proceeding. To back up, go to File in the top left corner of the Registry Editor. Click on it, then select Export and save the backup.
- Go to File.
- Right-click on HKEY_CLASS_ROOT.
- Click on Export.
- Please save it.
Create a .reg file, now open NotePad, type the following code, and name it AddComponentStoreCleanupContextMenu. Then, save it on the desktop using the .reg extension, which initiate the Component Store Cleanup option in to the Context Menu.
Windows Registry Editor Version 5.00

[HKEY_CLASSES_ROOT\DesktopBackground\Shell\WinSxS]
"Icon"="cleanmgr.exe"
"MUIVerb"="Component Store Cleanup"
"Position"="Bottom"
"SubCommands"=""

[HKEY_CLASSES_ROOT\DesktopBackground\shell\WinSxS\shell\001menu]
"HasLUAShield"=""
"MUIVerb"="Analyze Component Store"

[HKEY_CLASSES_ROOT\DesktopBackground\shell\WinSxS\shell\001menu\command]
@="PowerShell -windowstyle hidden -command \"Start-Process cmd -ArgumentList '/s,/k, DISM /Online /Cleanup-Image /AnalyzeComponentStore' -Verb runAs\""

[HKEY_CLASSES_ROOT\DesktopBackground\shell\WinSxS\shell\002menu]
"HasLUAShield"=""
"MUIVerb"="Clean Up Component Store"

[HKEY_CLASSES_ROOT\DesktopBackground\shell\WinSxS\shell\002menu\command]
@="PowerShell -windowstyle hidden -command \"Start-Process cmd -ArgumentList '/s,/k, DISM /Online /Cleanup-Image /StartComponentCleanup' -Verb runAs\""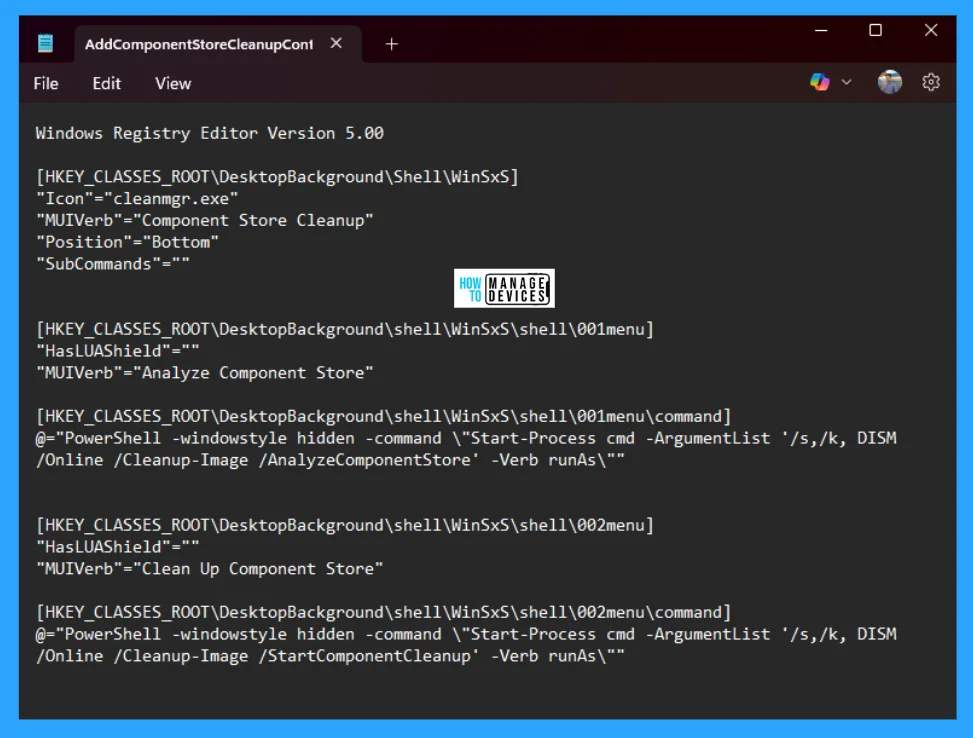
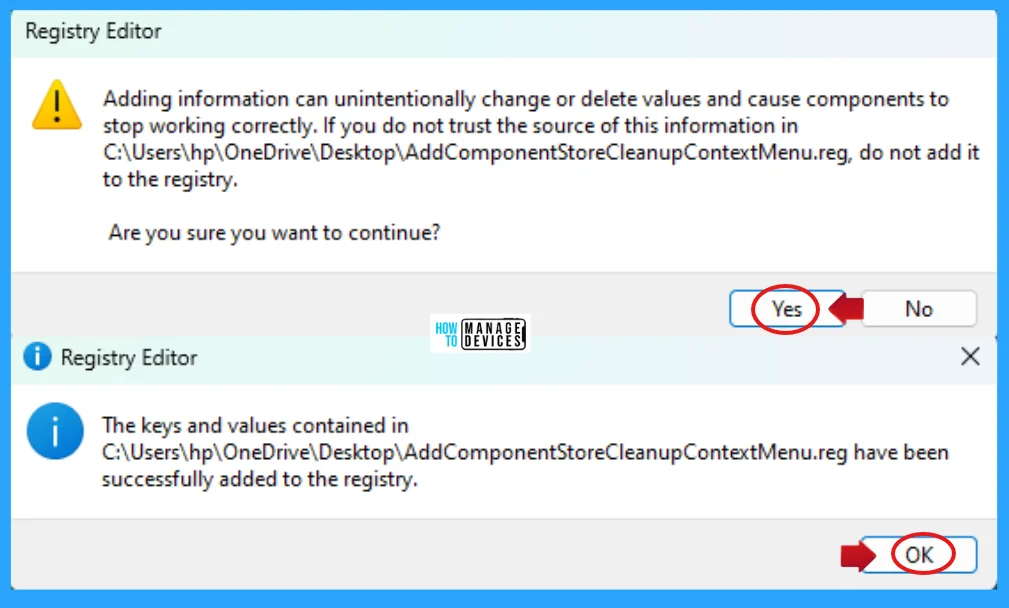
When the file is saved at your selected location, double-click on it. The User Account Control Window will open; click Yes to continue. Then, the Registry Editor Warning window will open.
Adding information can unintentionally change or delete values and cause components to stop working correctly. If you do not trust the source of this information in the path you created, do not add it to the registry; otherwise, click Yes to continue. The following window shows that the key and value you added have been successfully added to the registry editor and click on OK.
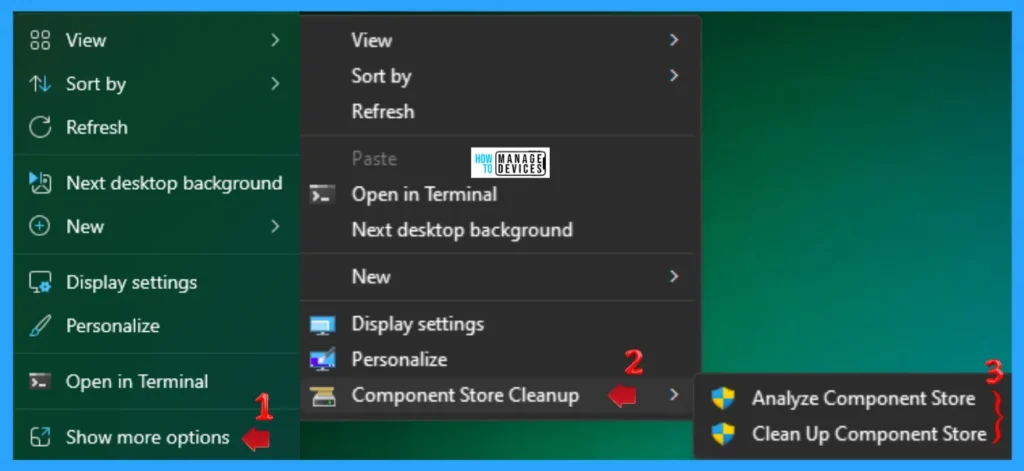
Now after making the above configuration using registry file, it is time to restart your device which help to initiate the changes to the Windows. After restarting right click on desktop, click on Show more options, then you find a Component Store Cleanup option is there and it carries both Analyze Component Store & Clean Up Component Store options.
If you want to remove this from the context menu then, create a .reg file, now open NotePad, type the following code, and name it RemoveComponentStoreCleanupContextMenu. Then, save it on the desktop using the .reg extension, which removes the Component Store Cleanup option from the Context Menu.
Windows Registry Editor Version 5.00

[-HKEY_CLASSES_ROOT\DesktopBackground\Shell\WinSxS]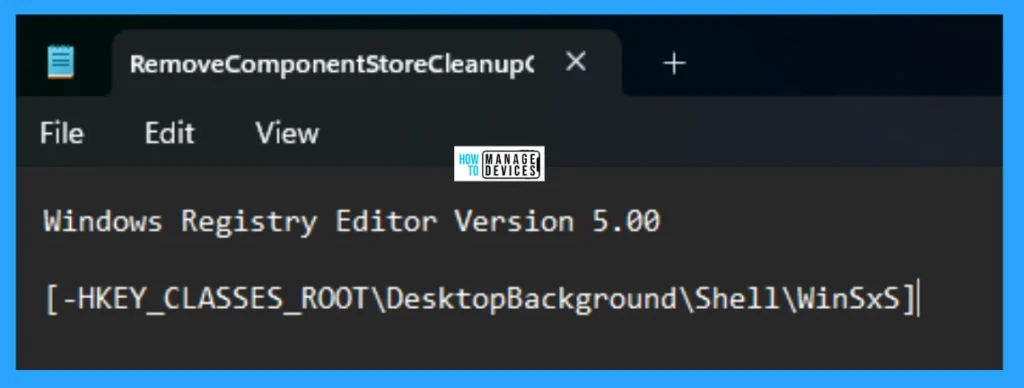
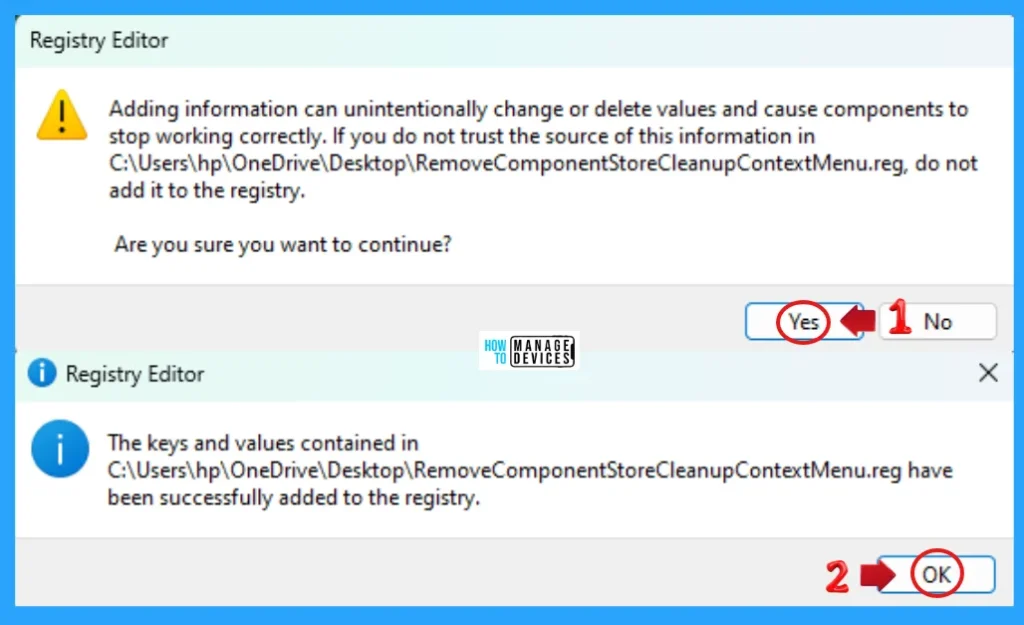
When the file is saved at your selected location, double-click on it. The User Account Control Window will open; click Yes to continue. Then, the Registry Editor Warning window will open.
Adding information can unintentionally change or delete values and cause components to stop working correctly. If you do not trust the source of this information in the path you created, do not add it to the registry; otherwise, click Yes to continue. The following window shows that the key and value you added have been successfully added to the registry editor and click on OK.
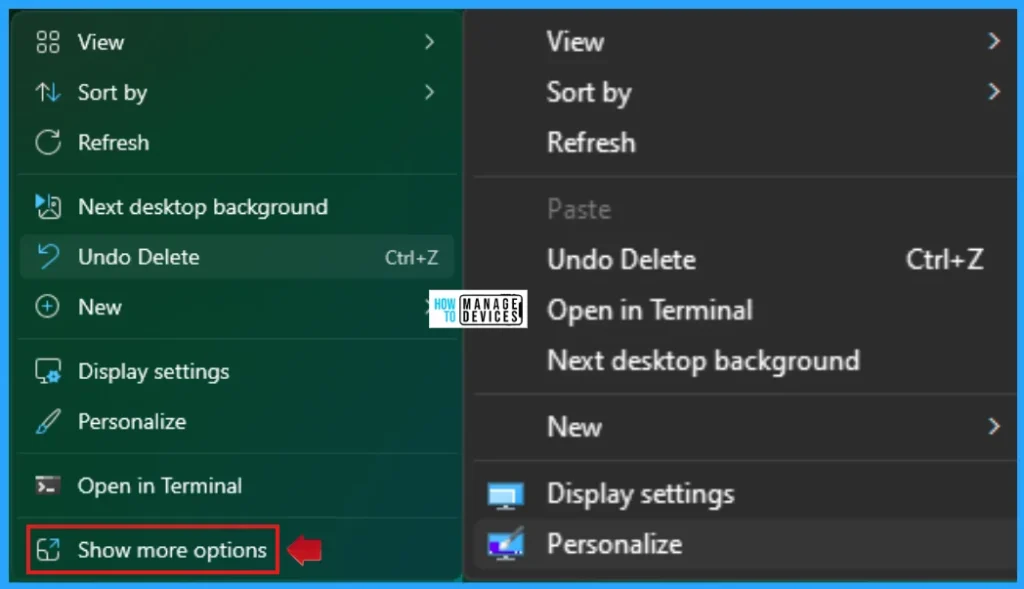
Restart you device then right click on desktop, click on Show more options, then you find the Component Store Cleanup option is removed from the context menu.
I hope the information on How to Analyse and Clean Up Component Store WinSxS folder in Windows 11 is helpful. Please follow us on the HTMD Community and visit our website, HTMD Forum, if you like our content. Suggest improvements, if any, and we would love to know which topic you want us to explore next.
Sources
Need Further Assistance or Have Technical Questions?
Join the LinkedIn Page and Telegram group to get the latest step-by-step guides and news updates. Join our Meetup Page to participate in User group meetings. Also, Join the WhatsApp Community to get the latest news on Microsoft Technologies. We are there on Reddit as well.
Author
Alok graduated with a Master of Computer Applications (MCA) degree. He loves writing on Windows 11 and related technologies. He likes to share his knowledge, quick tips, and tricks with Windows 11 or Windows 10 with the community.

