Let’s dicuss how to configure Windows Search UI policy using Intune. This policy (DisableSearch) controls the availability of the Windows Search interface. The Search UI in Intune allows for efficient searching and filtering through tools like the main search bar and Device Query. And also through UI improvements in end-user apps.
Enabling Disable Search policy completely disables the Search UI, removing all access points, including Keyboard Shortcuts, Touchpad Gestures, Start Menu type-to-search, and hiding the Start menu’s search box and Taskbar button.
When this policy is disabled or not configured, users have full access to the Search UI. All access points, including touchpad gestures, keyboard shortcuts and Start menu search features, remain available, enabling complete search functionality.
In this blog post, I will detail the process of configuring the Fully Disable Search UI Policy, located under the Search settings in Intune. With Intune policies, organizations can control devices and apps to ensure security and compliance.
Table of Contents
What are the Allowed Values of Disable Search Policy ?
This policy has two types of allowed value settings: 0 (Do not disable), which is the default and keeps the search UI available. The second is 1 (Disable), which completely turns off the Windows Search interface.
Windows CSP – Search
Configuration Service Providers (CSPs) are like controls in Windows that let administrators manage device settings. They help tools like Intune set up and secure devices for organizations. The CSP details of the Fully Disable Search UI Policy under the Search category in Intune are given below.
| Property Name | Property Value |
|---|---|
| Format | int |
| Access Type | Add, Delete, Get, Replace |
| Default Value | 0 |
Group Policy Mapping:
Mapping GPOs to Microsoft Intune simplifies the move to modern Windows device management for businesses.
| Name | Value |
|---|---|
| Name | DisableSearch |
| Friendly Name | Fully disable Search UI |
| Location | Computer Configuration |
| Path | Windows Components > Search |
| Registry Key Name | SOFTWARE\Policies\Microsoft\Windows\Windows Search |
| Registry Value Name | DisableSearch |
| ADMX File Name | Search. admx |
./Device/Vendor/MSFT/Policy/Config/Search/DisableSearch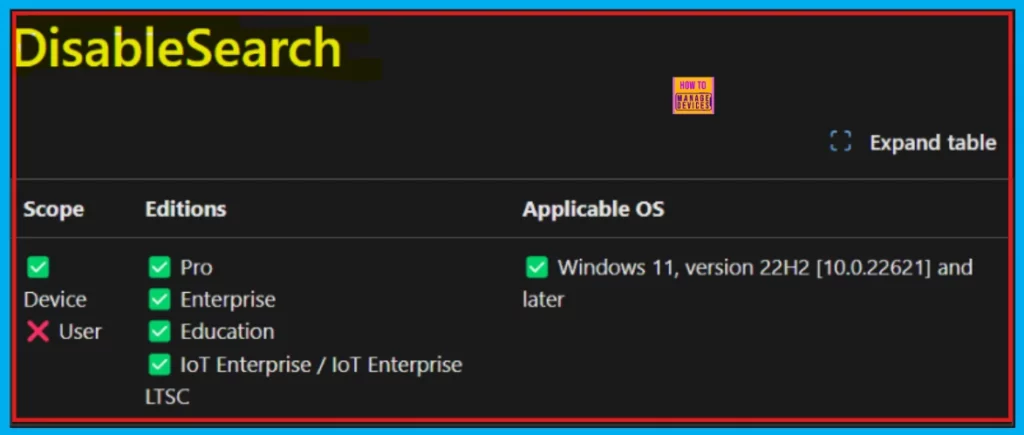
- Enable Additional Search Box In Edge Browser Using Microsoft 365 Admin Center Policy
- Enable Disable Font Providers using Intune Policy.
- Enable or Disable Web-to-App Linking with App URI Handlers in Windows using Intune Policy.
Configure Windows Search UI Policy under Search in Intune
Intune provides a Search UI that allows administrators to easily locate specific devices, users, and settings through search and filtering. Additionally, it has features like Device Query for advanced and targeted information recovery.
To begin creating a new Microsoft Edge browser policy, navigate to the Settings section of the Microsoft 365 admin center and then choose Microsoft Edge.
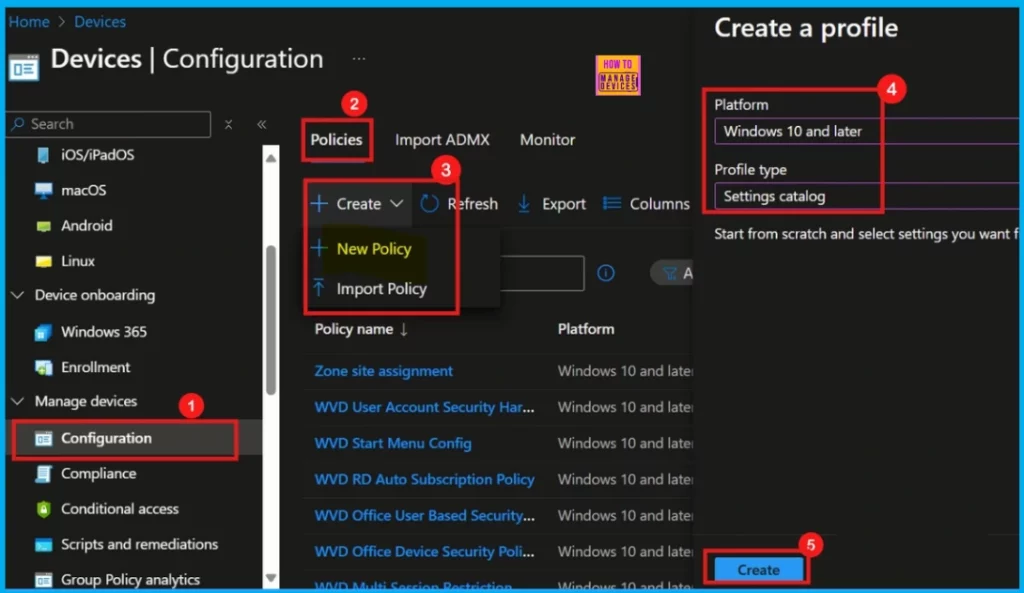
- Configuration Policies > Create Policy> New Policy
- Select the Platform as Windows 10 and later
- Choose Settings catalog as the profile type.
- Click Create to continue.
Basics
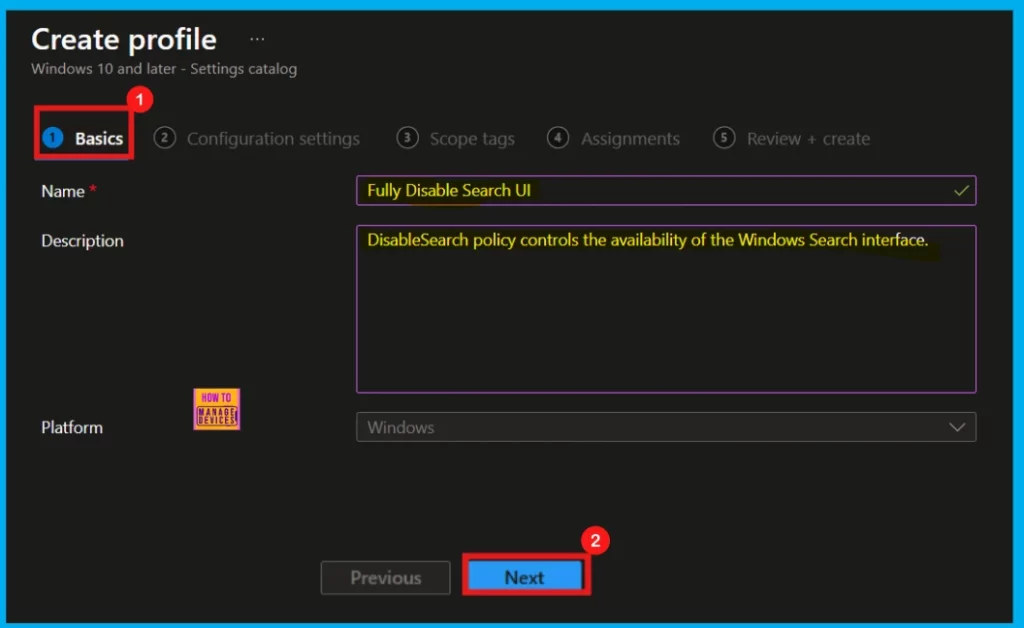
Begin policy setup on the Basics tab. Enter a required, descriptive Name for the policy. You can also include an optional Description explaining its function. The Platform (Windows) you selected earlier is shown for confirmation. After adding the relevant details, click Next to move on.
- Policy Name: Fully Disable Search UI
- Description: The DisableSearch policy controls the availability of the Windows Search interface.
- Platform: Windows
Configuration Settings
The Configuration settings section allows you to define how the policy will function. To include specific settings, click Add settings. This action will launch the Settings picker window, enabling you to explore and select various setting categories. For the Fully Disable Search UI (DisableSearch) policy, locate and select the Search category.
- After selecting the desired policy, close the Settings Picker.
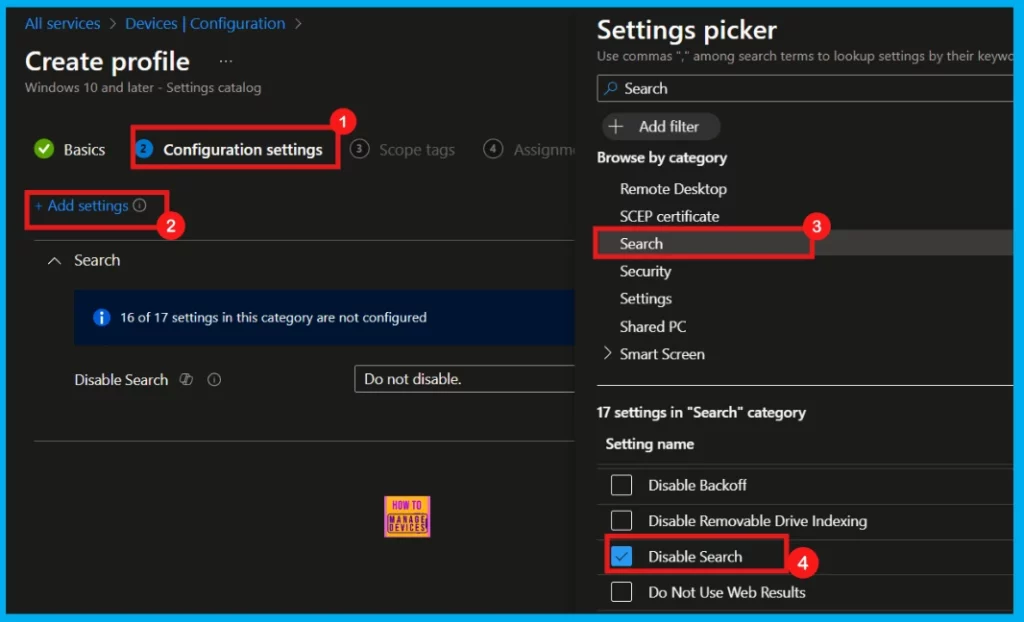
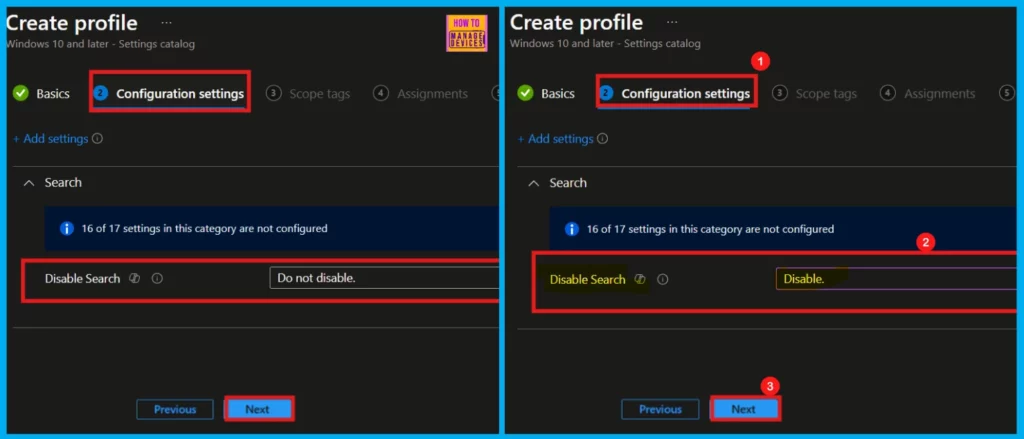
Once you close the settings picker, you’ll be taken back to the main configuration settings screen. Here, you can adjust different settings and enable or disable policies and other special features. By default, the Fully Disable Search UI (DisableSearch) policy will appear as Do not disable.
- To enable the policy, use the dropdown arrow to change the default Do not disable setting to Disable.
- After making this change, click Next to proceed with the configuration.
Scope Tags
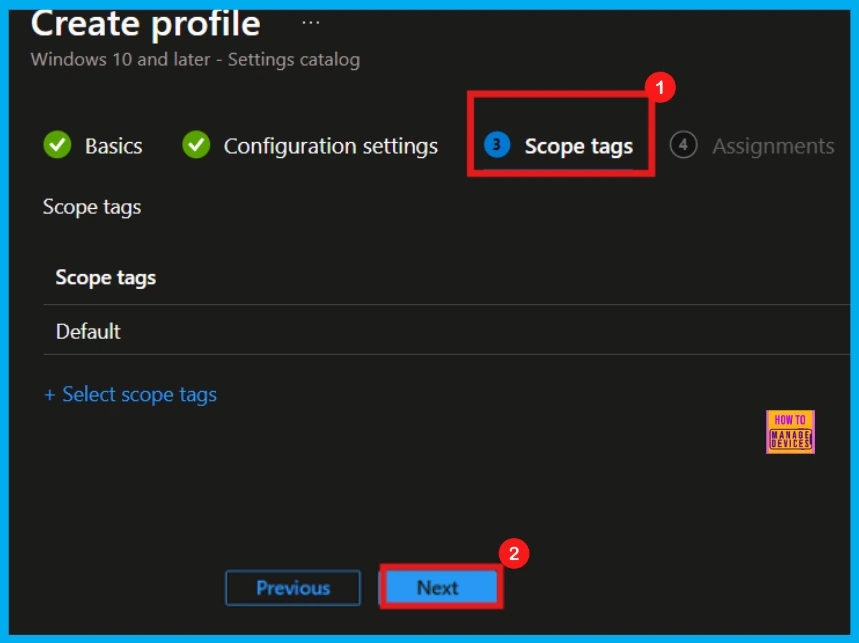
You can optionally apply Scope tags in the next step. These tags help organize and control who can access the policy, using criteria like department or location. If you prefer to skip this, simply click Next.
Assignments
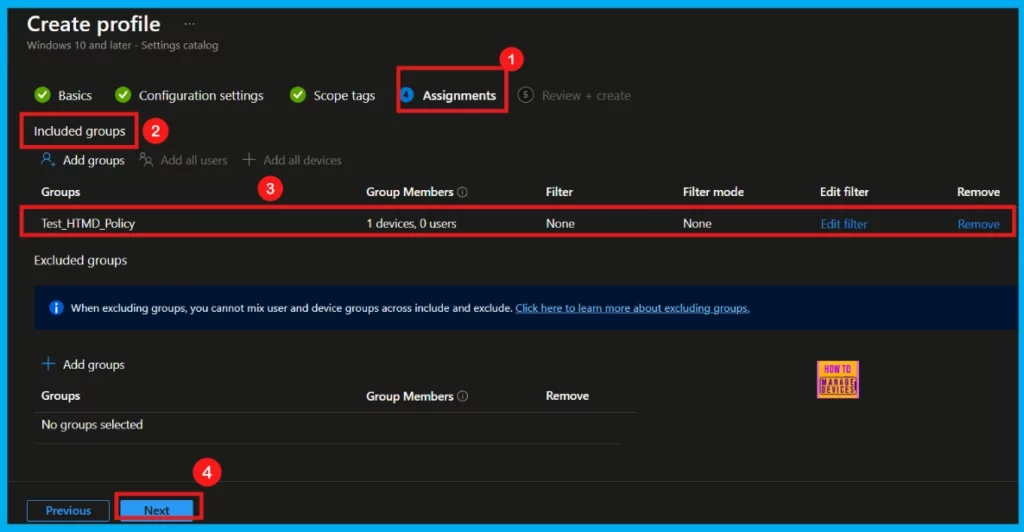
In the Assignments section, you will assign the policy to specific groups. Click Add groups under Include groups, select the desired group in the pop-up window, and then click Select.
- Here, I am selecting the Test_HTMD_Policy group.
Review + Create
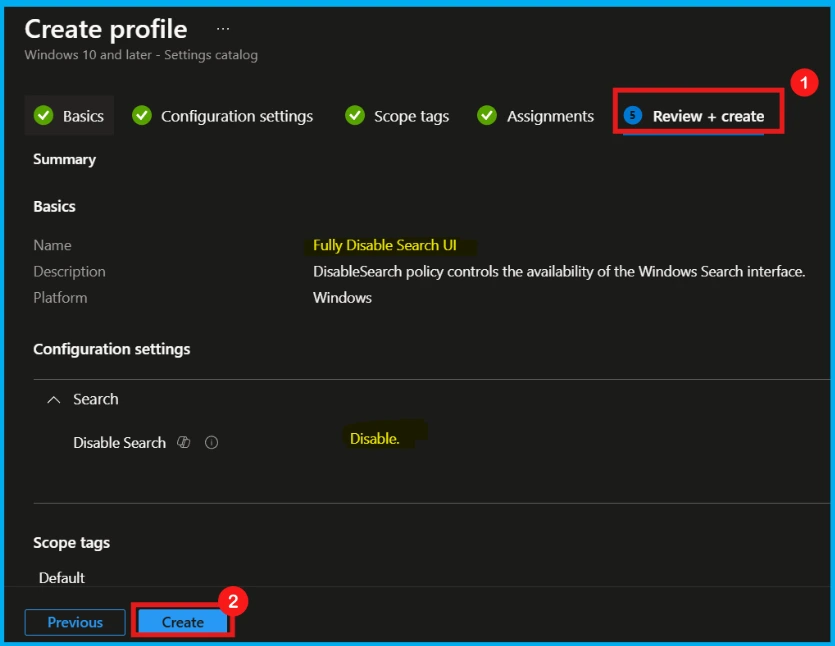
The Review + Create section offers a final summary of your policy’s configuration (name, description, platform, and settings) before deployment. Use Previous to make any necessary changes. Once you have verified the settings, click Create to deploy the policy to the assigned groups.
Monitoring Status
After you click Create, a notification will confirm that the policy has been created successfully. You can verify the new policy in the Intune Portal by going to Devices > Configuration > Policies.

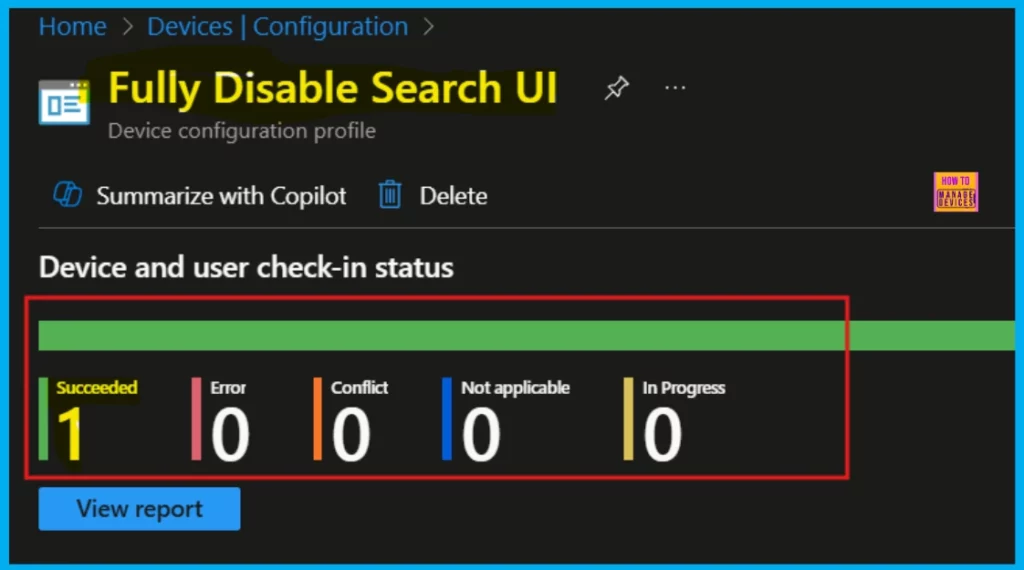
Device and User Check-in Status
To track the policy deployment, open it from the Configuration section (Devices > Windows > Configuration). For quicker updates, sync the device using the Company Portal. The Device and user check-in status will display the policy application status.
Client Side Verification
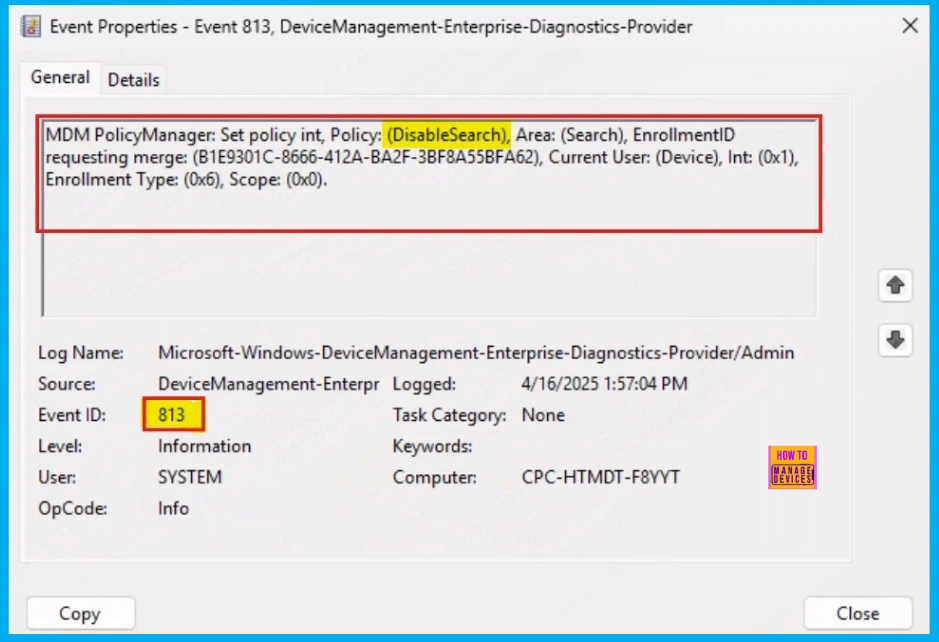
To confirm the policy has been applied to a Windows 10 or 11 device, use Event Viewer and look for Intune event IDs 813 or 814. You can find these events by navigating to Applications and Services Logs > Microsoft > Windows > Devicemanagement-Enterprise-Diagnostics-Provider > Admin. These event IDS indicate successful policy application and show the policy’s value.
- In this case, the Event ID is 813.
How to Delete or Remove App Assignment from Intune
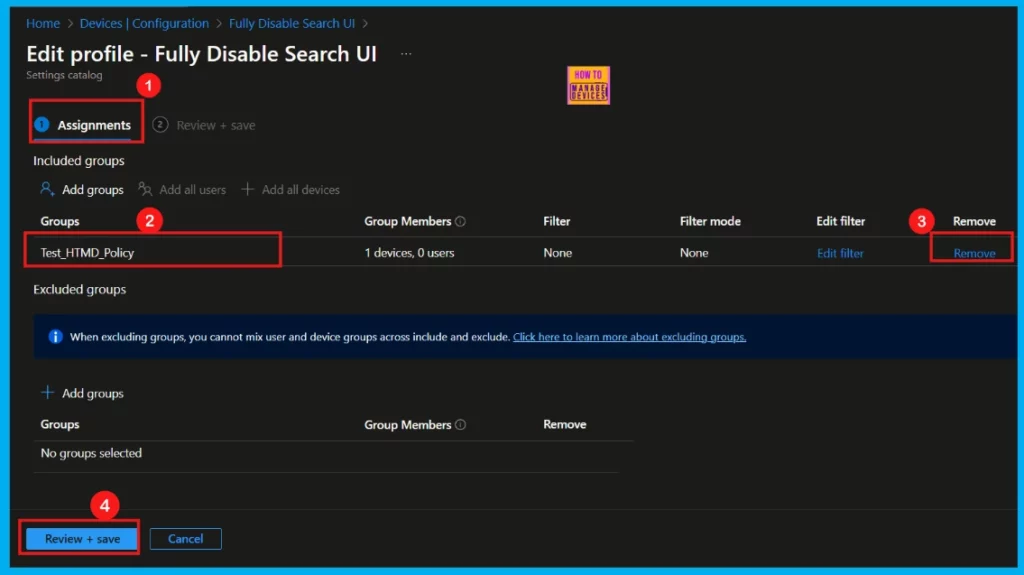
If you need to remove a group from a policy assignment, follow the instructions shown in the screenshot. This is often done for security updates or to streamline processes. After removing the desired group, click Review + Save to save your changes.
For detailed information, you can refer to our previous post – Learn How to Delete or Remove App Assignment from Intune using by Step-by-Step Guide.
How to Delete Fully Disable Search UI in Intune
If your organization encounters any security issues due to this policy configuration, you can easily delete it from Intune. To do this, search Fully Disable Search UI policy in the Intune admin center. Click the three-dot (…) option in the right side, and then click the Delete button.
For detailed information, you can refer to our previous post – How to Delete Allow Clipboard History Policy in Intune Step by Step Guide.

Need Further Assistance or Have Technical Questions?
Join the LinkedIn Page and Telegram group to get the latest step-by-step guides and news updates. Join our Meetup Page to participate in User group meetings. Also, Join the WhatsApp Community to get the latest news on Microsoft Technologies. We are there on Reddit as well.
Author
Anoop C Nair has been Microsoft MVP for 10 consecutive years from 2015 onwards. He is a Workplace Solution Architect with more than 22+ years of experience in Workplace technologies. He is a Blogger, Speaker, and Local User Group Community leader. His primary focus is on Device Management technologies like SCCM and Intune. He writes about technologies like Intune, SCCM, Windows, Cloud PC, Windows, Entra, Microsoft Security, Career, etc.
