Hey everyone! This week let’s learn about a new article on how to create custom attributes for macOS using Intune. We’ll walk you through what you need to do before you start and give you some important things to consider as you’re setting things up. We’ll even show you how to deploy a sample attribute and get it working.
Our previous blog post covered the Best way to Deploy Shell Scripts using Intune. We explained the process of deploying shell scripts along with the important things to remember while working on shell scripts. We provided step-by-step instructions for deploying a shell script on Intune and demonstrated the end-user experience clearly and concisely.
Did you know that Intune can provide you with important data about macOS devices, like serial number, available memory, and operating system info? Intune has a custom attribute feature that can gather even more data by running a shell script on the device and saving it as a custom attribute. Using this feature can help IT Admins get a better idea of end-User device status.
To better understand the topic and its real-life implementation, Let us check below what custom attributes are. What is the purpose or requirement of using it in Production? How to implement it in end-user devices using Intune, Also, we will review once the attributes are deployed how to monitor them in Intune Portal and some issues we usually get in case of any error or conflicts.

- How to deploy Microsoft Defender for macOS using Intune
- Learn How to Configure macOS Antivirus Policy Using Intune
What is Custom Attribute?
We can generate a custom attribute by running a bash script to obtain specific details about a Mac device. It’s worth noting that Bash is as effective as Powershell, even if one is more familiar with the latter. Once the command is executed, the relevant information will be presented in the desired format.
The process is uncomplicated and easy to carry out. Now that we understand what is a custom attribute, let us check the purpose and requirements.
Purpose Custom Attributes for macOS
In order to guarantee the proper functioning and security of Mac devices in an organization, IT Admins require access to a lot of information regarding end-user devices (Understanding a device can include simple details like when it was last restarted or more complex information like the number of installed applications and their versions and patches.
This encompasses ensuring that devices are updated with the most recent patches, dealing with any issues concerning applications or devices, and maintaining the overall health of the devices to ensure peak performance.
When IT Admins determine their requirements, they can create and deploy a necessary custom attribute in Intune straightforwardly by executing a basic shell script using Intune.
Requirement Create Custom Attributes for macOS
Before we start using Intune, getting familiar with the program’s default details is important. This will help you understand which ones you can ignore when creating custom attributes. So let us first check what minimum details we can find about a Mac device once enrolled into Intune by following the steps below.
- Sign in to the Microsoft Intune admin centre https://intune.microsoft.com/.
- Select Devices > macOS > Under macOS devices, click on the Hyperlink of the enrolled Mac device to land on the overview page.
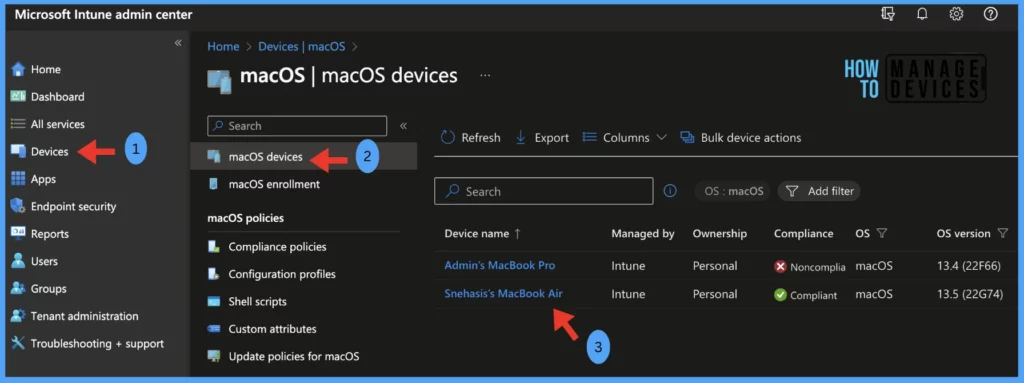
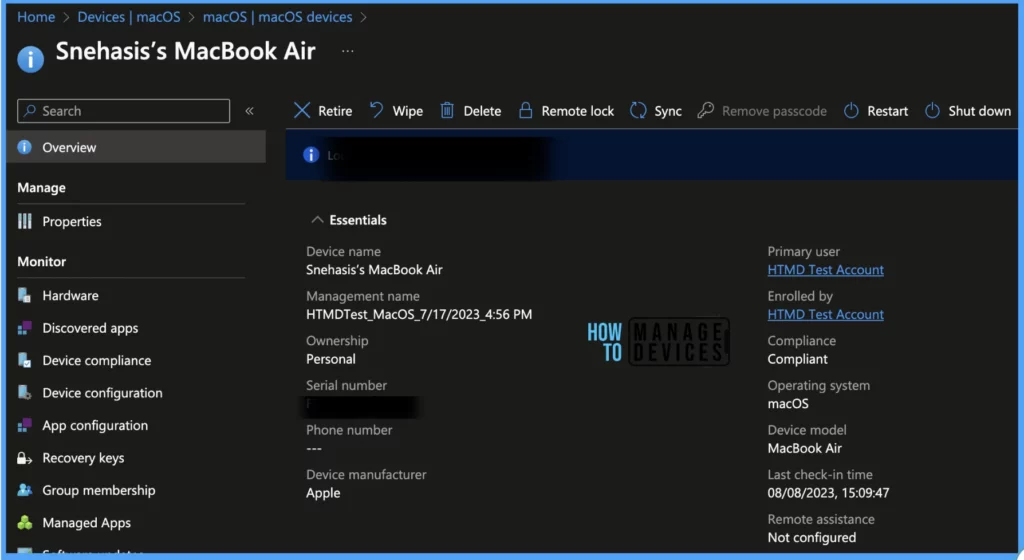
On the overview page, we can get basic details such as :
- Device Name
- Primary User
- Compliance Status
- Last login time
- Serial Number
- Enrollment Type
- Model
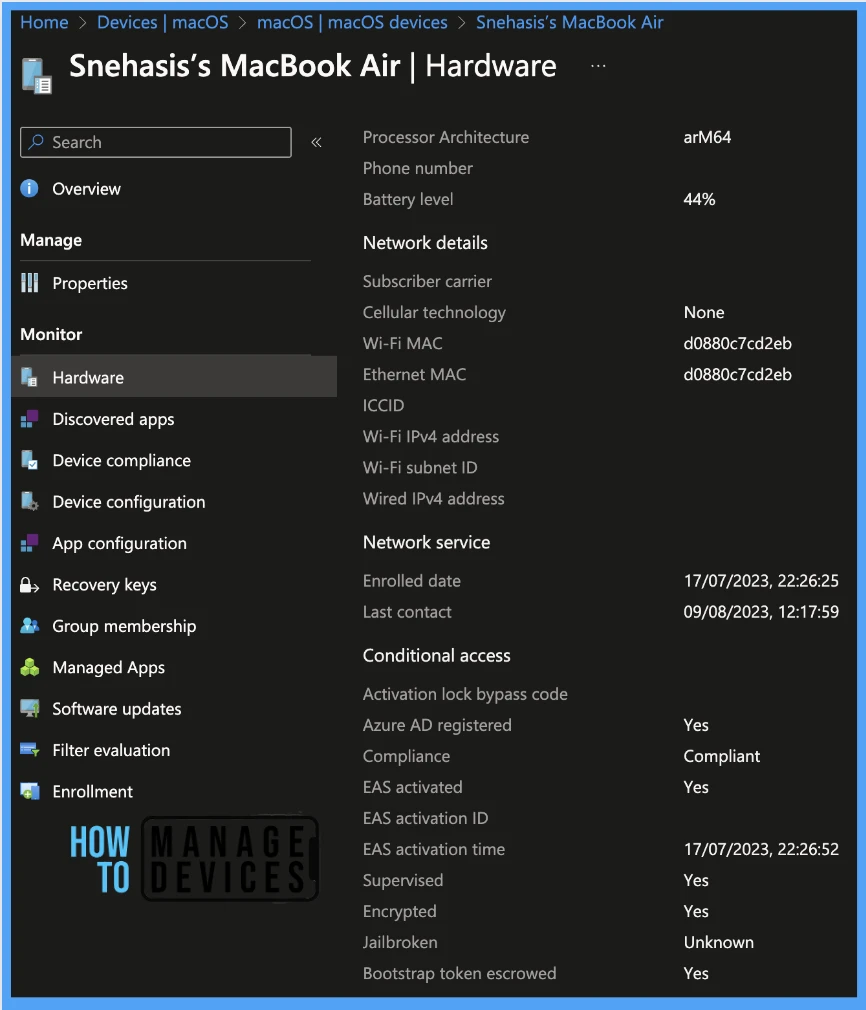
To get more details on the device, you may click on Hardware blade, which consists of a lot of details like :
- System Details (such as Name, Serial number)
- OS Details ( such as OS Version and patch detail)
- Storage Details ( such as TOtal and Free storage)
- System Enclosure (such as Model, processor and battery level)
- Network Details (such as Wifi Mac address)
- Network Service (such as the enrolled date and last contact time)
- And Conditional policy details (such as compliance status, Azure AD registration status, supervision and encryption details)
Sample Script Check and Deploy in Intune
Now that we understand what are the already available details of the client device, Without further ado, let’s create a sample attribute and deploy using Intune using the below methods.
For the sample we have created and tested our sample.sh file and saved it on our Mac, as part of the process, we will upload it into Intune and deploy it to all macOS devices. To deploy the script, please follow the steps outlined below.
#!/bin/bash
#set -x
#process=”last reboot | head -1″
echo $process
- Sign in to the Microsoft Intune admin centre https://intune.microsoft.com/.
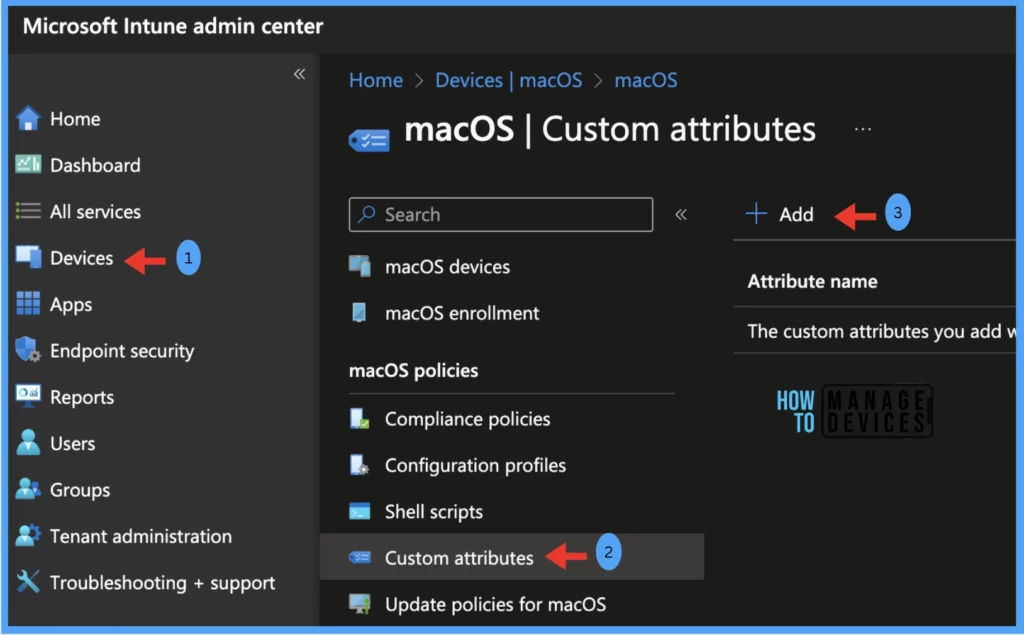
- Select Devices > macOS > Custom attributes and click on Add.
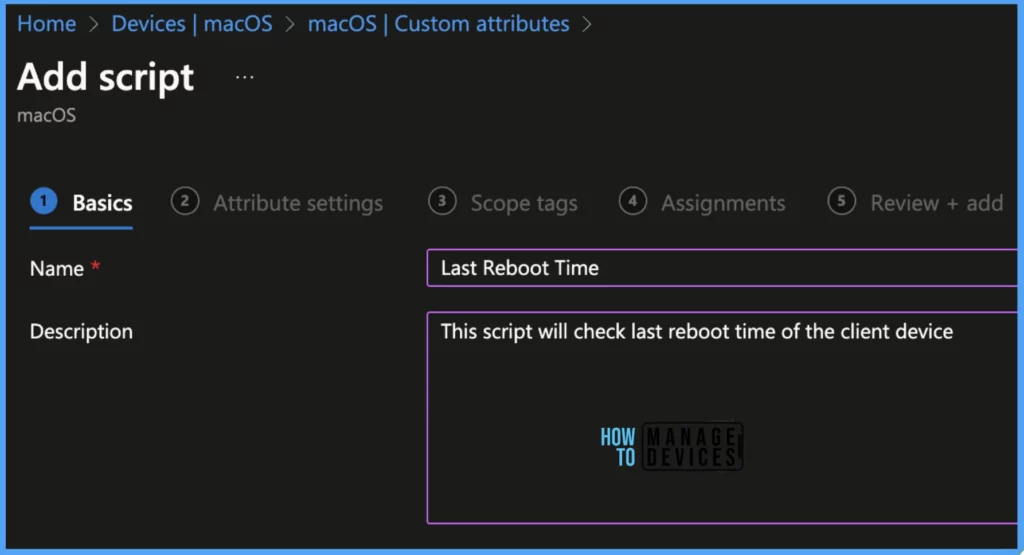
Once you click the Add button from the above page, Provide the Name and Description and click Next.
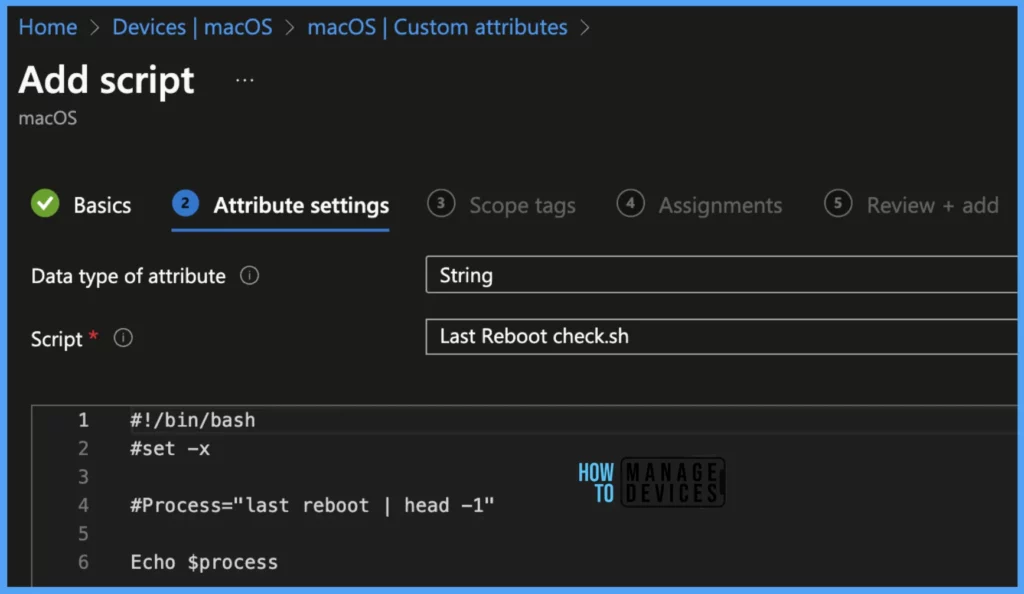
Under the Attribute settings tab, upload the Script with .sh extension, and once uploaded, you should be able to view the commands in the text window below. Once everything is set, please set the settings as below.
- The data type of attribute: Set the data type for the result of the attribute the script returns as per the 3 available options (date/string/ integer).
- Script: Upload the already prepared script and click on next.
To deploy the Shell script on HTMD Mac devices, we have selected the options below:
| Settings | Value |
|---|---|
| The data type of attribute | String |
| Script | Uploaded the script to check last reboot time check |
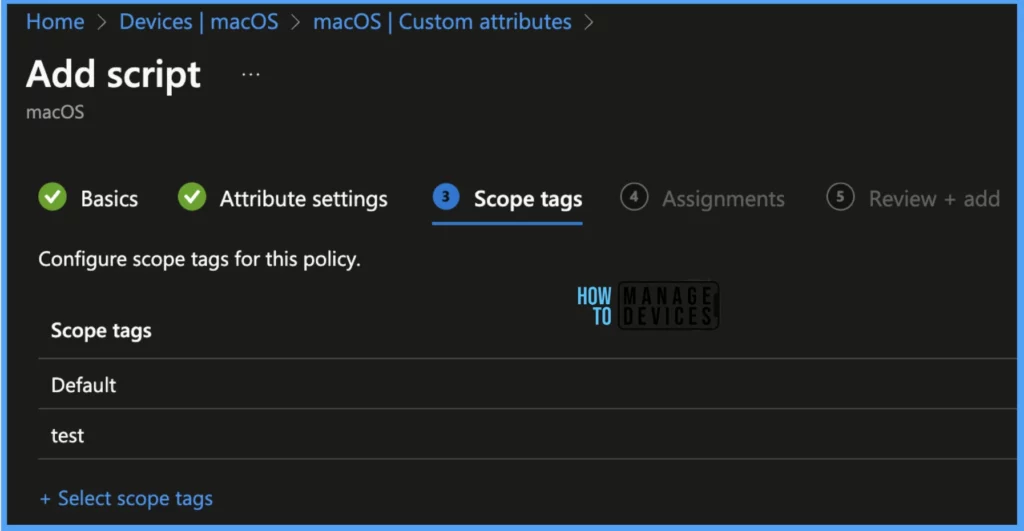
Scope tags are filtering options provided in Intune to ease the admin jobs. In the scope tag section, you will get an option to configure scope tags for the policy. Click on Next.
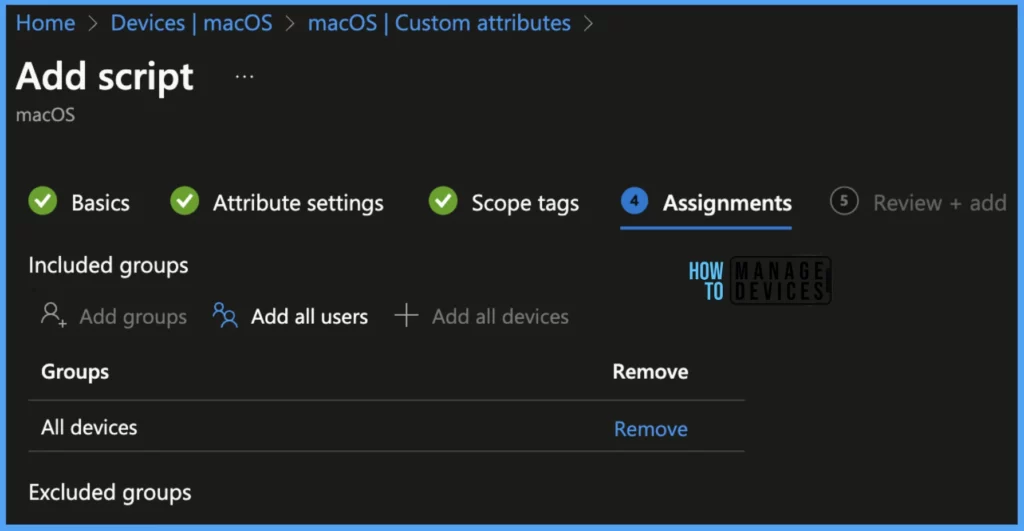
On the next page, select Assignments group (Included groups and Excluded groups) and click Next.
Note! Assignment Group: It determines who has access to any app, policy, or configuration profile by assigning groups of users to include and exclude. In this case, we have selected All Devices under Assignments.
On the Review+create page, please review if any settings need to be changed, or else go ahead and create the Script.
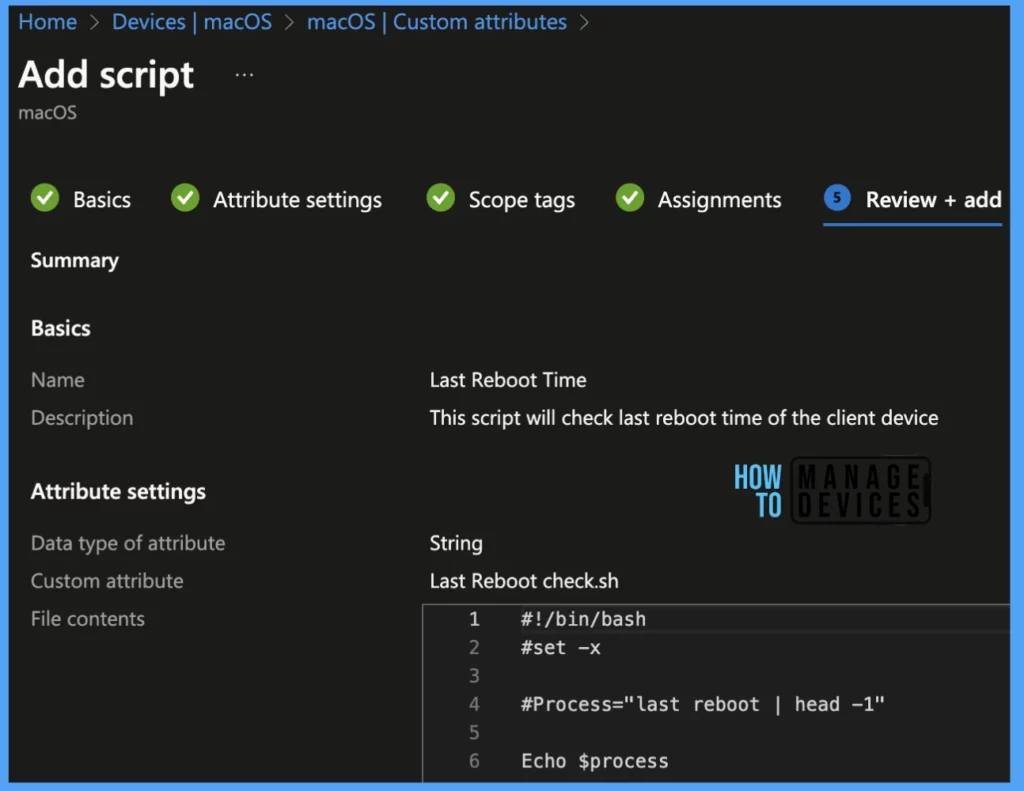
Once the Shell Script is created, it will take a few minutes to get pushed to all the devices in the organization; also, to monitor the status of the list of targeted devices, we can check as per the below steps.
Steps to Monitor Deployed Custom Attribute
To see if the script has been successfully pushed to all the devices and check its success and failure ratio, let us navigate to Devices > under macOS > Select Custom attributes, once you see the attribute, click on it to go to the Overview page to view the graphical format of User and Device Status with status shown under the category Succeded and Error.
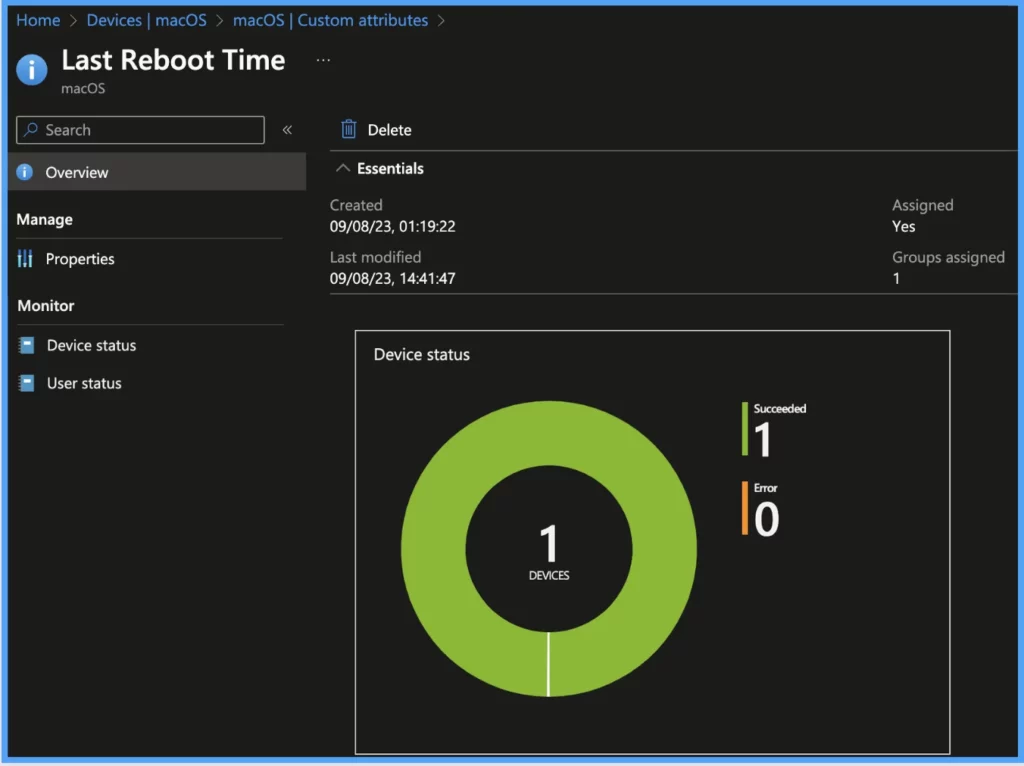
Also the same status also can be viewed in detailed format under the Monitor category. To check if the script ran successfully on the devices, click on Device Status, and we can get the status as Succeded or Error along with Device details, User Name, OS Version, and Last Updated Date and time stamp.

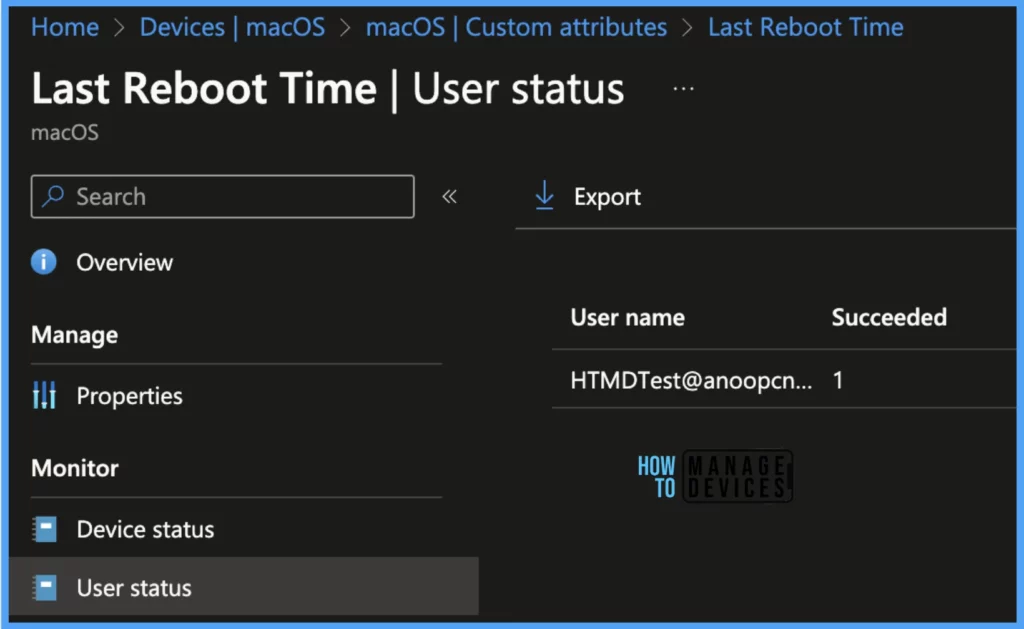
To view User Status, we can get the status as Succeded or Error along with User details as shown in the below image.
End User Experience
We pushed the Shell scripts to all macOS devices in our organization and checked what happens when the script runs. As it ran, we were able to fetch the last reboot time of the device from the end-user device.

Conclusion
After reading the article above, you should understand the steps required to create custom attributes using Intune. I personally think that the feature mentioned above is incredibly useful and can save a lot of time and effort in gathering and reporting information. It’s great that there are tools available to make this process easier for Mac users.
Author
Snehasis Pani is currently working as a JAMF Admin. He loves to help the community by sharing his knowledge on Apple Mac Devices Support. He is an M.Tech graduate in System Engineering with over 6+ years of IT Experience.

why put comment in #process
so the line will not execute in the script..correct me if i’m wrong
Has anyone figured out a way to Dynamically Group Target or deploy configs based on these new properties?