Let’s see how to Deploy a Proactive Remediation Script using Intune. First, you must ensure that Tenant Attach and Endpoint Analytics are enabled for the SCCM environment. You can use built-in script packages to get started with Proactive remediations.
The Intune remediation script, previously referred to as ProActive Remediation, is a feature that automates tasks within your environment based on the outcome of a check. This functionality requires knowledge of PowerShell scripting as it offers extensive customization options to tailor it to your specific requirements.
Remediation scripts enhance data loss prevention by running automated actions responding to incidents triggered by a policy engine or endpoint agent.
Before beginning the following activity, you can refer to the prerequisites of the proactive remediation script. Proactive remediations are script packages from the Intune portal that can detect and fix common support issues on a user’s device before they even realize a problem.
| Index |
|---|
| Video Proactive Remediation Script Package |
| Detection Script – Intune Proactive Remediation |
| Remediation Script – Intune Proactive Remediation |
| Built-in Script Packages |
| Background |
| Deploy |
| Scripts |
| Results |
Video Proactive Remediation Script Package
Let’s discuss the Intune Proactive Remediation Script Package and PowerShell Script in this video—advanced workflow to detect and remediate common issues with the PowerShell script package. Proactive remediations are part of Endpoint analytics.
Detection Script – Intune Proactive Remediation
Let’s check out the sample PowerShell script to detect whether the BITs log file size is set to 2. If not, a remediation script will be used to fix this issue.
# Define the path to the registry key
$Path = "HKLM:\SOFTWARE\WOW6432Node\Microsoft\Windows\CurrentVersion\BITS"

# Define the name of the registry value to check = VALUENAME
$Name = "LogFileSize"

# Define the expected value of the registry value = VALUE DATA
$Value = "2"

# Retrieve the value of the registry value
$Registry = Get-ItemProperty -Path $Path -Name $Name -ErrorAction SilentlyContinue | Select-Object -ExpandProperty $Name

# If the registry value matches the expected value, output "Compliant"
If ($Registry -eq $Value){
    Write-Output "Compliant"
    Exit 0
}
# If the registry value does not match the expected value, output "Not Compliant"
Else {
    Write-Warning "Not Compliant"
    Exit 1
}
Remediation Script – Intune Proactive Remediation
Let’s now check the Remediation Script for Intune Proactive Remediation functionality, which will help fix BITs’ log file size issues.
# Define the path to the registry key
$Path = "HKLM:\SOFTWARE\WOW6432Node\Microsoft\Windows\CurrentVersion\BITS"

# Define the name of the registry value to check
$Name = "LogFileSize"

# Define the expected value of the registry value
$Value = "2"

# Retrieve the value of the registry value
$Registry = Get-ItemProperty -Path $Path -Name $Name -ErrorAction SilentlyContinue | Select-Object -ExpandProperty $Name

# If the registry value matches the expected value, output "Compliant"
If ($Registry -eq $Value){
    Write-Output "Compliant"
    #Exit 0
}
# If the registry value does not match the expected value, remediate and output "Fixed"
Else {
    Write-Warning "Not Compliant. Attempting remediation..."
    # Set the registry value to the expected value
    Set-ItemProperty -Path $Path -Name $Name -Value $Value -Force
    # Verify remediation
    $RemediatedRegistry = Get-ItemProperty -Path $Path -Name $Name -ErrorAction SilentlyContinue | Select-Object -ExpandProperty $Name
    if ($RemediatedRegistry -eq $Value) {
        Write-Output "Fixed"
        Exit 0
    } else {
        Write-Warning "Remediation failed"
        Exit 1
    }
}
Built-in Script Packages
Let’s understand the built-in scripts available while writing this post. I will try to keep this updated. I will provide the community with the comments section to notify you of the availability of new built-in scripts in the portal.
While writing the post, the following Proactive Remediation Script Packages are available in the Intune portal.
- Update Stale Group Policies – Stale Group Policies can lead to helpdesk tickets related to connectivity and internal resource access.
- Restart Office Click-to-run service – When the Click-to-run service is stopped, Office apps fail to start, leading to helpdesk calls.
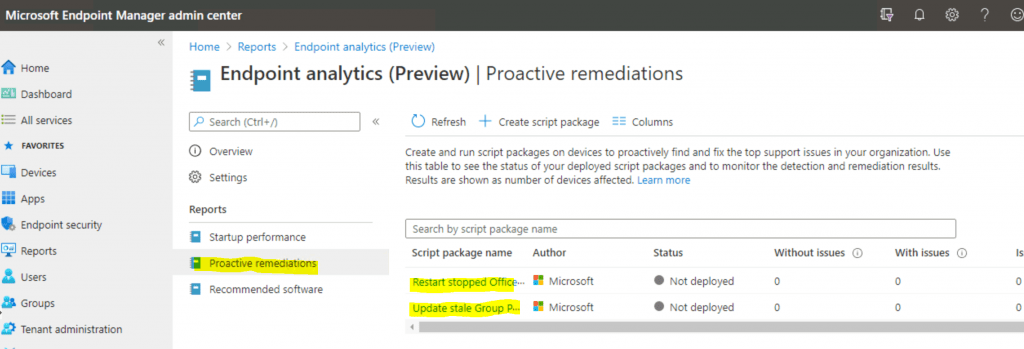
Background
The Microsoft Intune Management Extension is the agent that helps Intune deploy Proactive Remediation Script Packages. The IME service gets the scripts from Intune and runs them on Windows 10 co-managed devices (SCCM + Intune).
By default, the scripts are rerun every 24 hours. The following built-in script packages must be assigned to the device groups from Intune.
Deploy
Let’s check the Proactive Remediation Script Packages steps in the below section:
- Launch endpoint.mirosoft.com portal
- Navigate to Reports – Endpoint Analytics
- Click on Proactive Remediation
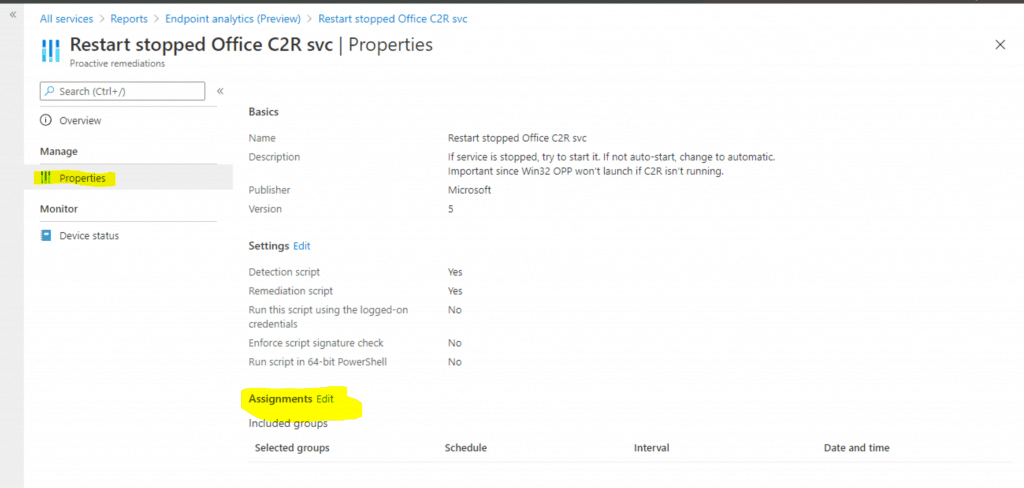
- Click on the built-in script – Restart stopped Office C2R svc
- Click on Properties
- Navigate to the Assignment section and click Edit to deploy the built-in Proactive Remediation Script Package called Restart stopped Office C2R svc.
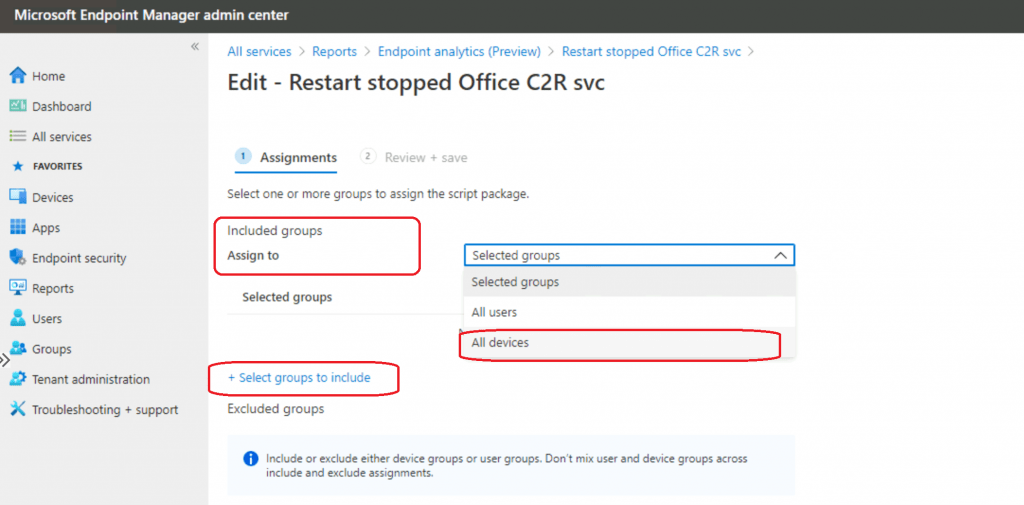
- You can deploy the script package to all devices or users.
- You can also select Azure AD custom groups using the + Select Groups to Include option.
NOTE: Include or Exclude either device groups or user groups. Don’t mix user and device groups across, including and excluding assignments.
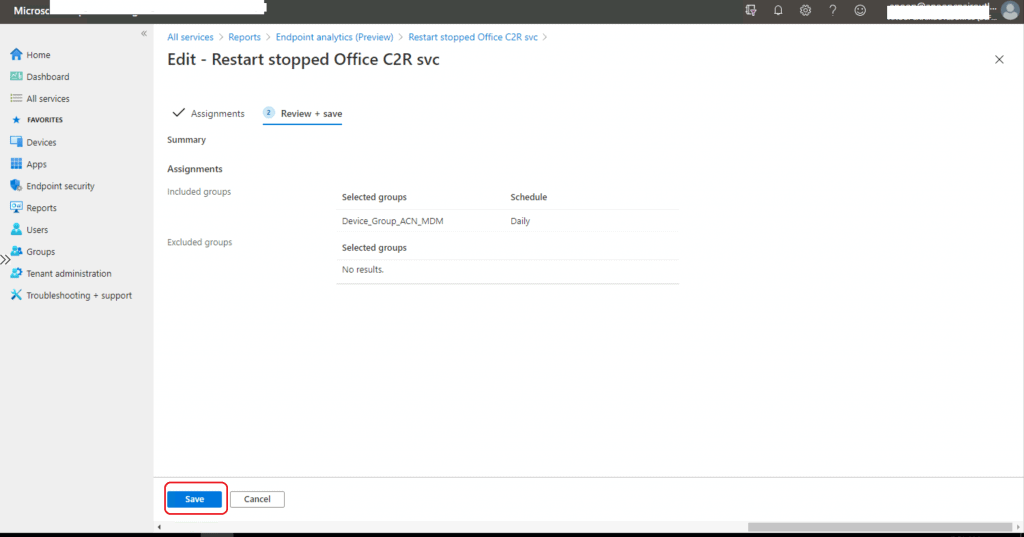
Select groups include: After selecting a particular AAD Group, click the Select button. Then click the Review + Save button.
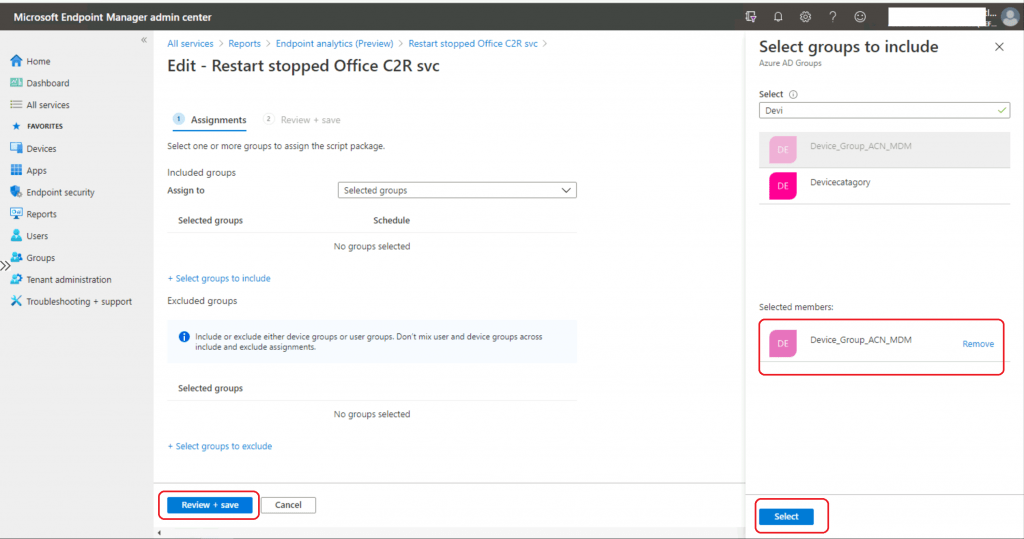
Click on the Save button to complete the deployment process.
Scripts
Let’s check the detection and remediation scripts in the section below. You can also check them from the settings section of the proactive remediation script package.
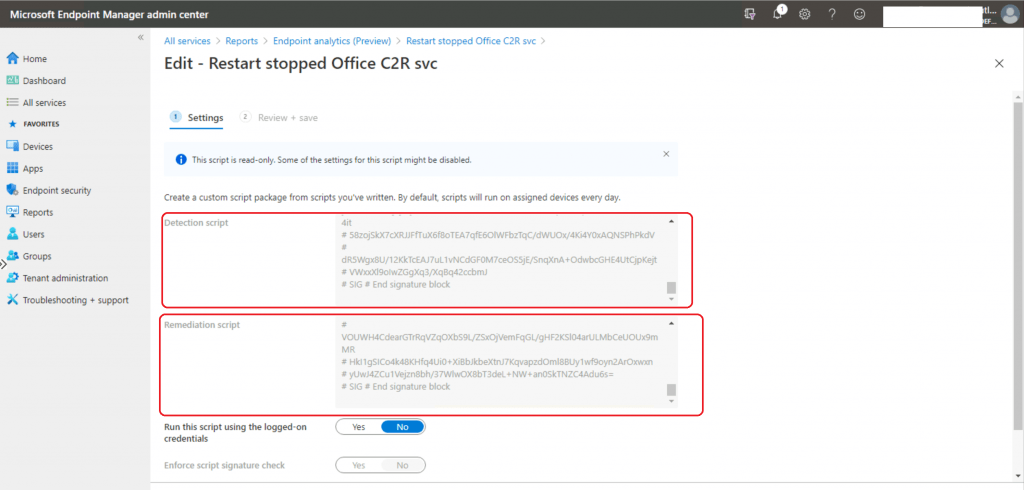
Detection Script for Restart stopped Office C2R svc!
=============================================================================================================================
#
Script Name: DetectClickToRunServicecState.ps1
Description: Purpose of this script is to detect if Office 16 installed and further if "Click to Run Service" is running
Notes: No variable substitution should be necessary
#
=============================================================================================================================
Define Variables
$curSvcStat,$svcCTRSvc,$errMsg = "","",""
Main script
If (-not (Test-Path -Path 'hklm:\Software\Microsoft\Office\16.0')){
Write-Host "Office 16.0 (or greater) not present on this machine"
exit 0
}
Try{
$svcCTRSvc = Get-Service "ClickToRunSvc"
$curSvcStat = $svcCTRSvc.Status
}
Catch{
$errMsg = $_.Exception.Message
Write-Error $errMsg
exit 1
}
If ($curSvcStat -eq "Running"){
Write-Output $curSvcStat
exit 0
}
Else{
If($curSvcStat -eq "Stopped"){
Write-Output $curSvcStat
exit 1
}
Else{
Write-Error "Error: " + $errMsg
exit 1
}
}
SIG # Begin signature block
#Signature Removed - But will be available in the Intune portal.
SIG # End signature block
Remediation Script for Restart stopped Office C2R svc!
=============================================================================================================================
#
Script Name: RemediateClickToRunServiceState.ps1
Description: Purpose of this script is to start the "Click to Run Service" and change its startup type to Automatic
Notes: No variable substitution needed
#
=============================================================================================================================
Define Variables
$svcCur = "ClickToRunSvc"
$curSvcStat,$svcCTRSvc,$errMsg = "","",""
$ctr = 0
First, let's make sure nothing has changed since detection and service exists and is stopped
Try{
$svcCTRSvc = Get-Service $svcCur
$curSvcStat = $svcCTRSvc.Status
}
Catch{
$errMsg = $_.Exception.Message
Write-Error $errMsg
Exit 1
}
If the service got started between detection and now (nested if) then return
If the service got uninstalled or corrupted between detection and now (else) then return the "Error: " + the error
If ($curSvcStat -ne "Stopped"){
If ($curSvcStat -eq "Running"){
Write-Output "Running"
Exit 0
}
Else{
Write-Error $errMsg
Exit 1
}
}
Okay, the service should be there and be stopped, we'll change the startup type and get it running
Try{
Set-Service $svcCur -StartupType Automatic
Start-Service $svcCur
$svcCTRSvc = Get-Service $svcCur
$curSvcStat = $svcCTRSvc.Status
While ($curSvcStat -eq "Stopped"){
Start-Sleep -Seconds 5
ctr++
if(ctr -eq 12){
Write-Output "Service could not be started after 60 seconds"
Exit 1
}
}
}
Catch{
$errMsg = $_.Exception.Message
Write-Error $errMsg
Exit 1
}
SIG # Begin signature block
#Removed the Signature
SIG # End signature block
Results
The results of the remediation script can be checked in the Intune portal section below. Click on the overview and device status tab to see the results.
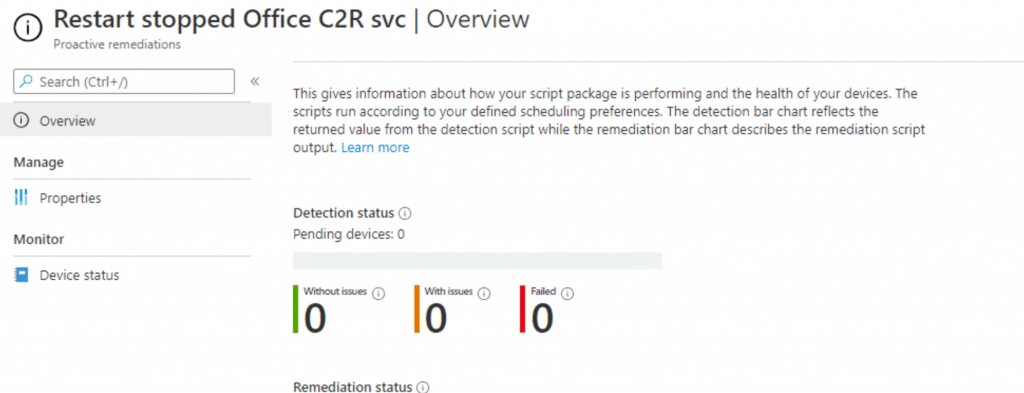
NOTE! – This gives information about how your script package is performing and the health of your devices. The scripts run according to your defined scheduling preferences. The detection bar chart reflects the returned value from the detection script, while the remediation bar chart describes the remediation script output.
Resources
- Intune MEM Endpoint Analytics with Joy | Learn and Discover #1
- Microsoft Docs – Tenant attach: Deploy endpoint security Antivirus policy from the admin centre (preview).
- Microsoft Docs – Settings for Microsoft Defender Antivirus policy for tenant-attached devices in Microsoft Intune.
We are on WhatsApp. To get the latest step-by-step guides and news updates, Join our Channel. Click here –HTMD WhatsApp.
Author
Anoop C Nair is Microsoft MVP! He is a Device Management Admin with more than 20 years of experience (calculation done in 2021) in IT. He is a Blogger, Speaker, and Local User Group HTMD Community leader. His primary focus is Device Management technologies like SCCM 2012, Current Branch, and Intune. He writes about ConfigMgr, Windows 11, Windows 10, Azure AD, Microsoft Intune, Windows 365, AVD, etc.

I will apply same policy but in device status i can not check Device lists please suggest me.
hi anoop. is there a way, proactive remediation script, can be triggered at specific time intervals? much like scheduled tasks?
Hi,
Can you guys create a new post for disk cleanup using Proactive Remediations?
Question: When disk space of less than 20% is detected, A Disk cleanup should be used as remediation.
I really appreciate your help on this.
Many Thanks,
Niranjan
Hi Anoop, Using the PowerShell script ,We can create when to start and in which intervals the script has to be executed right? Why should we use remediation script.
Hi Niranjan,
Did you get any replies for this?
I’m looking into doing something like this for our organisation. I did wonder if a profile deletion script would be enough?
Hi Anoop,
How to run a powershell script on all intune devices and get the output file as a csv file, is there any way for this.
Regards,
Upendar.
Hi, are you looking to collect a particular information from Intune managed devices in CSV format? If so, you can create a PS script to collect the information in CSV format and upload it to a common shared location. But if you ask me whether that would be useful? No! Because you are end up analyzing 1000s of CSV files!
If you need to combine common CSV files, dump all your CSV into a folder (ex. C:\temp\CSVFiles), and then run the below command. In the below example it will take all CSV files and merge them into one.
copy “C:\temp\CSVFiles\*.csv” “C:\temp\AllCSVCombined.csv”