Let’s discuss Deploy Windows 10 20H2 Using SCCM Task Sequence | ConfigMgr. In this post, I will cover all the steps for bare metal deployment (Windows 10 20H2) using the configuration manager.
The bare metal scenario occurs when you have a blank machine you need to deploy or an existing machine you want to wipe and redeploy without preserving any existing data. You can install the latest Windows version on a new computer (bare metal) using sccm in simple steps.
Microsoft released Windows 10, version 20H2 feature update, a.k.a. Windows 10 October 2020 Update, in October 2020. The update brings new features, performance improvements, and security enhancements to the Windows 10 operating system.
This update is compatible with devices running Windows 10 versions 1903 and higher, allowing users to experience the latest advancements in the Windows platform.
- Deploy Windows 11 23H2 Using SCCM Step-By-Step Guide
- Easy Guide To Deploy Windows 10 21H1 Using SCCM Task Sequence | ConfigMgr | Step By Step
Note – With this release and future releases, the Windows 10 release nomenclature is changing from a year-and-month pattern (YYMM) to a year-and-half-year pattern (YYH1, YYH2). For example – “Windows 10 version 20H2” (instead of “Windows 10 version 2010”).
Deploy Windows 10 20H2 Using SCCM Task Sequence
The setup starts from a boot media, using a CD, USB, ISO, or Pre-Boot Execution Environment (PXE). You can also generate full offline media. The target can be a physical computer or a virtual machine.
The deployment process for the new machine scenario is as follows –
- Start the setup from boot media (CD, USB, ISO, or PXE).
- Wipe the hard disk clean and create a new volume.
- Install the operating system image.
- Apply device drivers by detecting device manufacturers.
- Install applications.
- Apply Customization and additional settings if needed.
- After taking these steps, the computer is ready for use.
Prerequisites
- Ensure you are running with the latest supported version of Configuration Manager.
- Boot images are updated or regenerated.
- Make sure that you added network and storage drivers to the boot image.
- I have configured the boot image to deploy from a PXE-enabled distribution point.
Learn about the supported lists of Windows 10 versions for Configuration Manager, and check Microsoft Blog.
There is no new ADK for Windows 10, version 20H2. The ADK for Windows 10, version 2004, will also work with it.
Download Windows 10 20H2 ISO
You can download the Windows 10 20H2 version of the ISO from MSDN or VLSC (Volume Licensing Service Center).

Note – Before you import the Windows 10 Operating System into SCCM, mount and extract or copy Windows 10 ISO contents to a folder. Create a folder, and Mount the ISO using File Explorer or other options.
Double-click an ISO file to mount it, or Right-click an ISO file in File Explorer. Click the Mount option.

You will notice that Windows 10 ISO will create a disc drive that you can use to access content. Select all contents and copy them to a folder.
Import Windows 10 Operating System Image
Open Configuration Manager Console, Go to Software Library > Operating Systems > Operating System Images.
Right-click on Operating Systems Images and click on Add Operating System Image.

In Data Source, click Browse and specify the network shared path to the install.wim from the Windows 10 Source directory where you extracted the source of an ISO file.
Select the option to Extract a specific image index from the specified WIM file. Then, select the Image index from the drop-down list. Click Next.
You can now specify to automatically import a single Image index rather than all image indexes in the file. This option results in a smaller image file.

On the General page, assign the Name, Version, and Comment. Click Next.

Review the provided information, and click Next to complete the wizard.

Wait for a moment while exporting is in progress.

After successfully completion, click Close to exit the wizard.

The Operating System Image is successfully imported to Configuration Manager.
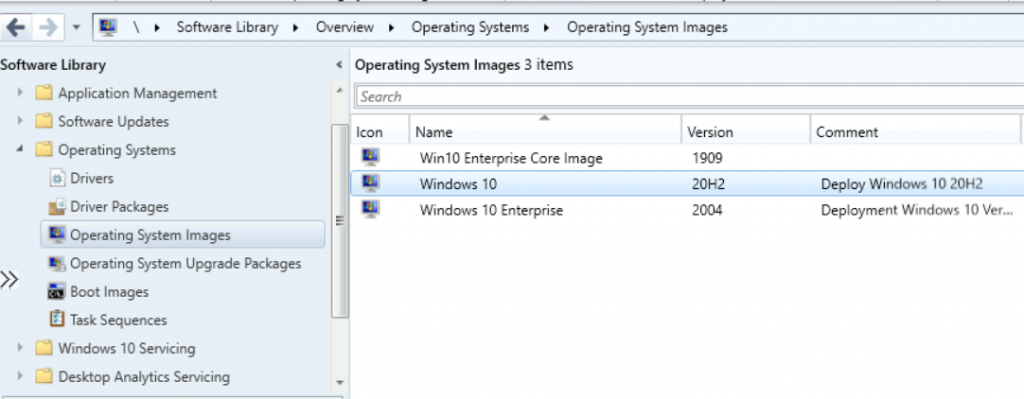
Distribute Operating System Image
Right-click Operating System Image and click Distribute Content.

Review the selected content for distribution. Click Next.

Add the Distribution Point to distribute the content.

Review the selected distribution points and groups. Click Next.

On the Summary page, review the settings. Click Next.

Click Close to complete the Distribute Content wizard

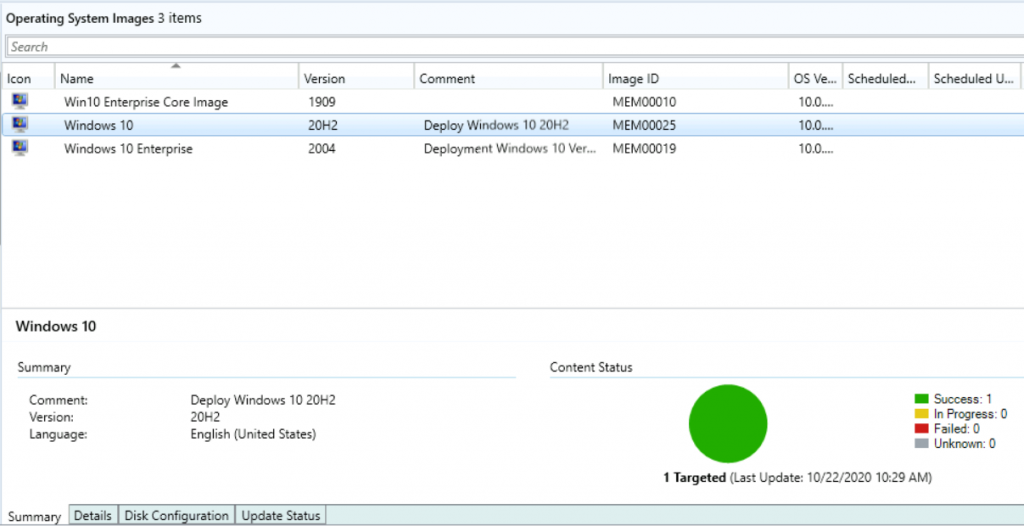
You can monitor the content status, if it’s showing the yellow color that means distribution is in progress. If the content distribution is successful, it will appear green, as shown.
Create a Task Sequence to deploy an OS
This section will walk you through creating a Configuration Manager task sequence to deploy the operating system images.
In the Configuration Manager console, Go to the Software Library workspace, expand Operating Systems, right-click Task Sequences and select Create Task Sequence.
Create Configuration Manager Task Sequence
Select Install an existing image package, and then select Next.

On the Task Sequence Information page, specify the following settings:
Task sequence name: Specify a name that identifies the task sequence.
Description: Optionally specify a description
On the Boot Image, Click Browse and select the available boot image package. Check in the Run as a high-performance power plan. Click Next.

Note: Running a task sequence with the High-Performance power plan to improve the speed of the task sequence execution. At the end of the task sequence, the power plan is reset to the stored value (Balanced Power Plan).
On the Install Windows page, specify the following settings:
Image package: Click on Browse to select the image. Select Partition and format the target computer installing the operating system.
Product key: you can specify the Windows product key for installing the OS.
Specify how to handle the administrator account for the new OS. Click Next.

On the Configure Network page, specify the following settings. Click Next.
Join a workgroup: Add the destination computer to a workgroup.
Join a domain: Add the destination computer to a domain. In Domain, click Browse to specify the name of the Domain. You can also select an organizational unit (OU) in the Domain OU field. This setting is optional.
Account: The user name and password for the account with permission to join the specified Domain.

On the Install Configuration Manager page, specify the Configuration Manager client package, which is selected automatically. Click Next.

Leave it as default on the State Migration page, as these steps are condition-based in a task sequence that will not run automatically. Click Next.

You can specify whether to install the required or all software updates on the Include Updates page. I’m not installing any software updates. Click Next.

Specify the applications to install on the Install Applications page, or you can add them later in the task sequence steps. Click Next.

Review the settings and click Next.

Click Close to complete the wizard.

The Task Sequence is created successfully.
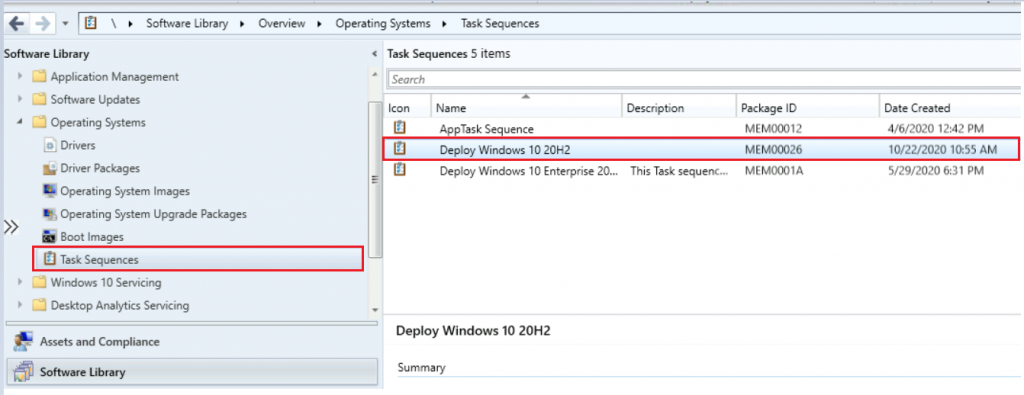
Customize Task Sequence
Use the following procedure to modify an existing task sequence
Under Software Library > Operating Systems > Task Sequences. Right-click on the task sequence and select Edit.

Edit the Task Sequence to add or remove settings – The Task Sequence uses these phases to determine which tasks must be completed.
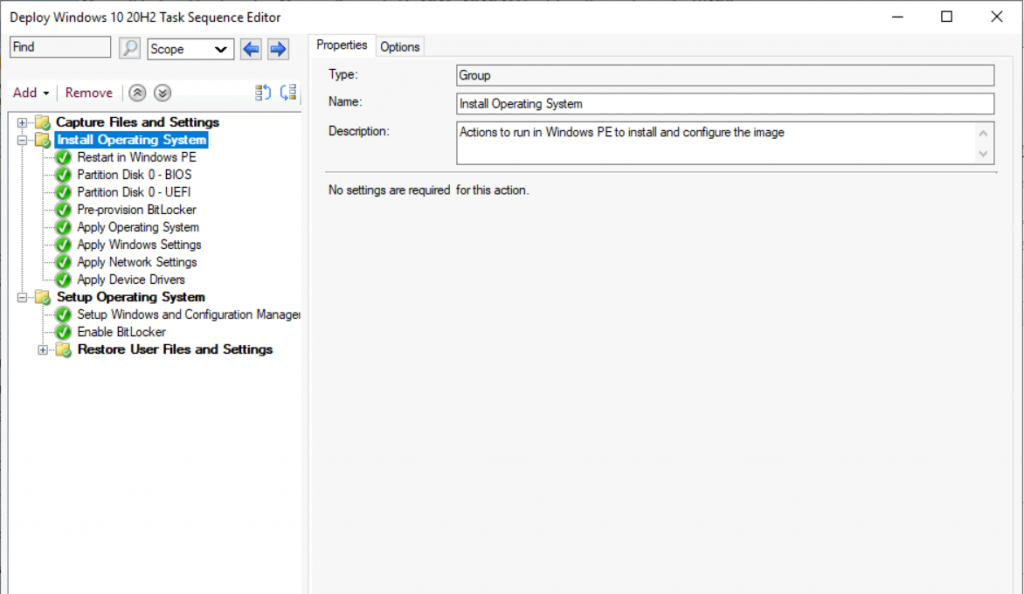
Based on requirements, you might need to add support files, software updates, tools, and applications to the task sequence.
Review drivers and applications that will be installed with the task sequence. Before you deploy the task sequence, make sure the drivers are compatible. To import drivers, create driver packages and process the Integration of driver packages into task sequence.
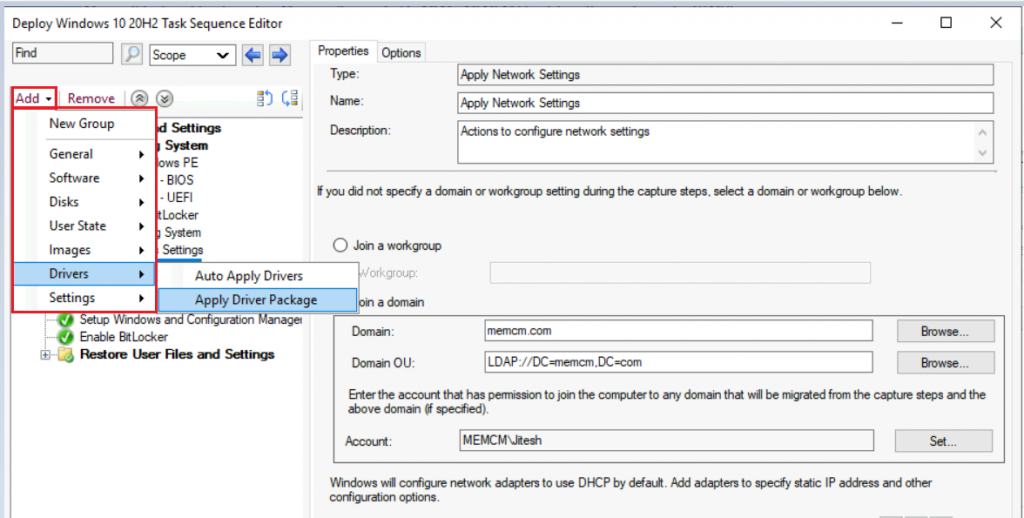
Review the other settings added in Task Sequence and make sure to apply all changes. Then click Apply and OK, and close the window.
Deploy Windows 10 20H2 Task Sequence
Select the task sequence, Right-click, and select Deploy.

On the General, click Browse to select the device collection where you wiDeploymentorm the Deployment.
Deploy to All Unknown Computers—Computers not managed by Configuration Manager or computers not imported into Configuration Manager.

On the Deployment Settings, select Deployment of the Deployment.
Available—Available deployments require that the user be present at the destination computer. The user must press the F12 key to continue the PXE boot process. If a user can’t press F12, the computer boots into the current OS or from the next available boot device.
Required – Required deployments use PXE without any user intervention.
To use a PXE-initiated OS deployment, For the Make available to the following setting, select one of the following options –
- Configuration Manager clients, media, and PXE
- Only media and PXE
- Only media and PXE (hidden)
Note – Use the Only media and PXE (hidden) setting for automated task sequence deployments. To have the computer automate Deployment without user interaction, select Allow unattended operating system deployment and set the SMSTSPreferredAdvertID variable as part of the media.

On the Scheduling tab, you can specify the Deployment for this Deployment. Click Next.

On the User Experience tab, leave the default selected options. Click Next.

On the Alerts page, leave it as default. Click Next.

On the Distribution Points page, you can specify how clients interact with the DPs to retrieve content from reference packages. Click Next.

Review the selected settings and click Next.

The Deployment targeted successful collection. Close the wizard.

Results – Windows 10 Deployment
Depending on deployment settings, press the F12 key on the Target Computer to continue the PXE boot process. Windows PE starts, and then the Task Sequence Wizard starts. You will be presented with the Welcome to the Task Sequence Wizard. If the media is password protected, provide a password. Click Next.

Complete the Task Sequence Wizard by selecting the deployed task sequence (Windows 10 20H2) and Clicking Next.

Once you complete the WizardWizarddeployment of the new operating system begins. When the deployment process is complete, you will be prompted to sign in to the device on the screen.
Sign in to the device with your domain or local credentials. Check that Windows 10, version 20H2, has been installed successfully.

Troubleshooting – Windows 10 20H2 Using SCCM
The first step in troubleshooting SCCM OSD Task Sequence issues is to check the SMSTS.log. Learn how to read SMSTS.log effectively.
The SMSTS.log updates the location depending on the phases of the deployment process.
| Phase | Log Location [Client Side] |
|---|---|
| WinPE (Before HDD are formatted and partitioned) | x:\windows\temp\smstslog\smsts.log |
| WinPE (After HDD are formatted) | x:\smstslog\smsts.log copied to c:\_SMSTaskSequence\Logs\Smstslog\smsts.log |
| Installed Operating System (Before the SCCM client is installed) | c:\_SMSTaskSequence\Logs\Smstslog\smsts.log |
| Installed Operating System (Before the SCCM client installed) | c:\windows\ccm\logs\Smstslog\smsts.log |
| Installed Operating System (When the Task Sequence is completed) | c:\windows\ccm\logs\smsts.log |
Resources
We are on WhatsApp. To get the latest step-by-step guides and news updates, Join our Channel. Click here –HTMD WhatsApp.
Author
Jitesh has over five years of experience in the IT Industry. He writes about and shares his experiences related to Microsoft device management technologies and IT infrastructure management. His primary focus is the Windows 10 Deployment solution with Configuration Manager, Microsoft Deployment Toolkit (MDT), and Microsoft Intune.
