Hello All, My name is Vishal Goyel, and this is my first post on this blog. I worked as a Microsoft support engineer specializing in SCCM Task Sequence and OSD for several years.
In this post, you will learn a step-by-step description of the SCCM OSD Task Sequence Troubleshooting Step-by-Step Ultimate Guide with SMSTS.log
The OSD is ConfigMgr’s (SCCM) most widely used feature. When troubleshooting OSD-related issues, only one file, SMSTS.log, can help.
However, the SMSTS.log file contains a lot of redundant information. Learning to read SMSTS.log is very important for troubleshooting OSD-related problems.
Following are the Main Outputs that you will get out of this Ultimate Guide
- Learn how to understand SCCM OSD Task Sequence Steps & Process
- Learn how to read SMSTS.log effectively
- Learn how to troubleshoot SCCM OSD Task Sequence
Basic SCCM OSD Task Sequence Structure
In this post, I will explain all the steps in a basic Task Sequence and how to read SMSTS.log.
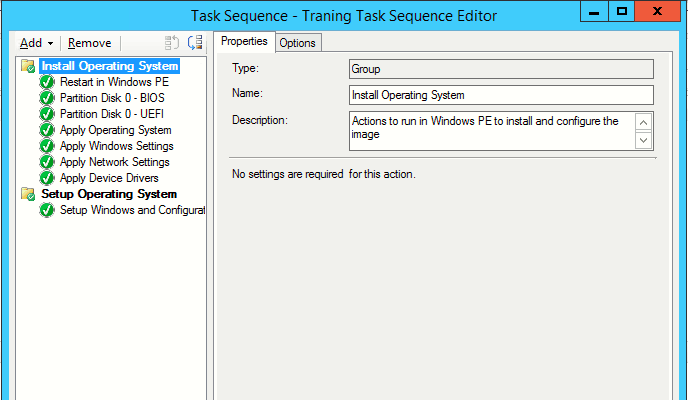
SCCM OSD Task Sequence Troubleshooting Step-by-Step Ultimate Guide with SMSTS.log – Fig.1
WinPE & PXE Boot Stage – SCCM OSD Task Sequence
The machine boots into WinPE and downloads the Boot Image. Once WinPE is initialized, SMSTS.log can be found at the location below.
X:\Windows\Temp\SMSTSLOG\SMSTS.log
If you check the logs, it will show the Boot Image files downloaded at the very beginning.
RAM Disk Boot Path: NET(0)\SMSIMAGES\LAB00005\BOOT.LAB00005.WIM    TSBootShell
 Booted from network (PXE)    TSBootShell

You can confirm from the logs if machine PXE booted or it booted using any media.
Download Variable Files
The first thing that the machine does is to Download variable files from the WDS server from the RemoteInstall\SMSTemp\ folder and store it as a Variable.dat file locally on X drive under X:\SMS\Data folder.
Device has PXE booted   TSPxe
Variable Path: \SMSTemp\2017.03.16.13.41.39.0002.{F4304B8E-9855-401C-8168-D6BAF045258A}.boot.var    TSPxe
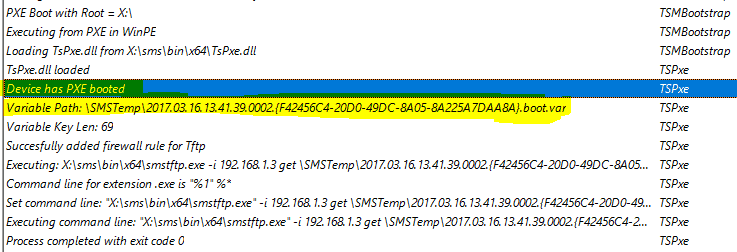
NIC Card is Initialized – SCCM MP Communication
Once variable files are downloaded, the NIC card is initialized on the machine, and the IP Address assigned to the device is shown in the logs (shown below).
Loading Media Variables from "X:\sms\data\variables.dat"    TSPxe
 Found network adapter "Intel 21140-Based PCI Fast Ethernet Adapter (Emulated)" with IP Address 192.168.1.32 TSPxe

Time Zone Update
Then the SCCM TS engine updates the Time information on the client machine.
Time zone: 480,0,0,0,0,0,0,0,0,0,0,0,0,0,0,0,0,0,0,    TSPxe
.
.
 New time: 2017-03-04 21:11:20:246    TSPxe
 Current time: 2017-03-04 21:11:20.238 TZ: Bias:-0480
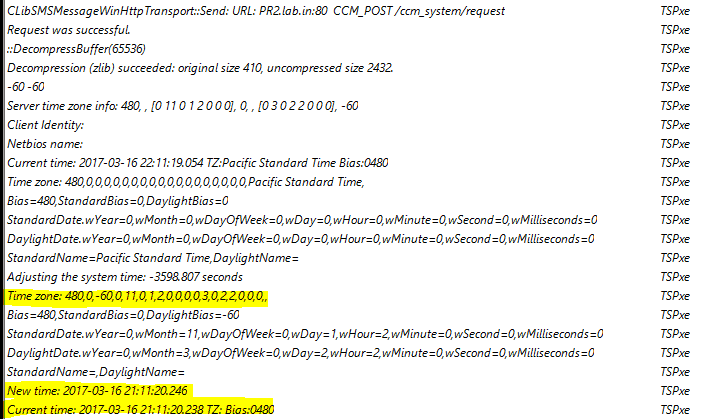
Connects with SCCM MP
The Machine then connects with Management Point to download the base policies deployed to the machine.
CLibSMSMessageWinHttpTransport::Send: URL: PR2LAB.lab.in:80 GET /SMS_MP/.sms_aut?MPKEYINFORMATIONMEDIA
 Request was succesful.
 New MP settings:    TSPxe
         site=01P,01P, MP=http://PR2LAb.lab.in, ports: http=80,https=443    TSPxe
         certificates are received from MP.    TSPxe
 Unknown machine GUIDs: d1c4c682-cf2d-4245-af8d-20e9773f5f2d 0a156af7-e87d-4242-aa58-b3414486bd1c    TSPxe
 Downloading policy from http://PR2LAb.lab.in    TSPxe
 Initializing HTTP transport.    TSPxe
 .
 .
 .
    Setting SMBIOS GUID = 7E25FE8F-F341-11E1-A20A-6C8447038046.    TSPxe
     Adding MAC Address A0:B3:CC:28:14:B7.    TSPxe
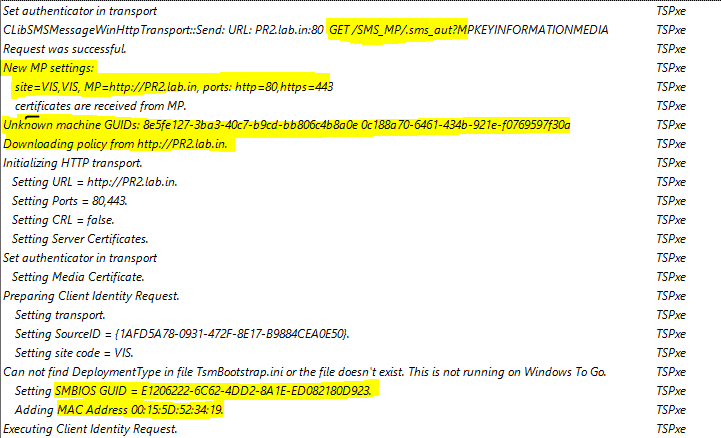
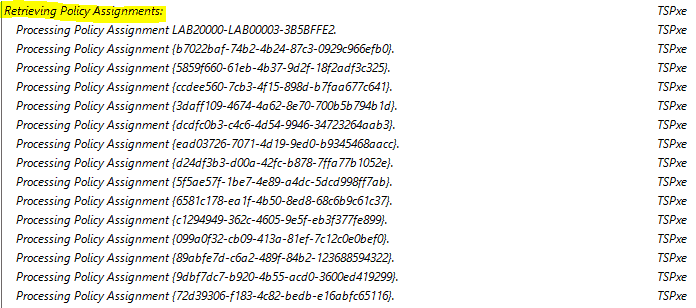
Retrieving Policy Assignment from SCCM MP
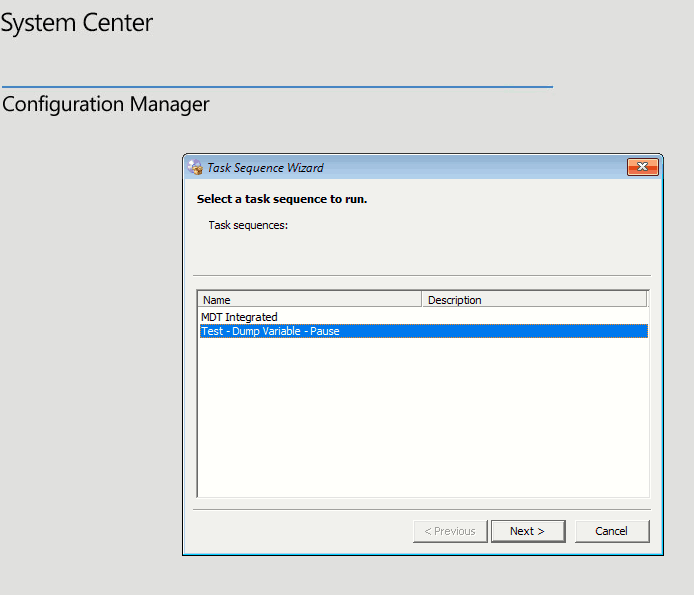
List of Available SCCM OSD Task Sequence
Once the NIC Card is initialized and communication with Management Point is established, we can see a list of deployed Task Sequences on the machine, as shown below.
Policy Download & Resolving Dependencies
Once we select any specific Task Sequence from the above Wizard, the machine downloads the policy and resolves dependencies for all the content associated with the task sequence.
Downloading policy body LAB20000-PR100003-6F6BCC28. TSPxe
 Preparing Policy Body Request. TSPxe
        Setting transport. TSPxe
        Setting policy location = http:///SMS_MP/.sms_pol?LAB20000-PR100003-6F6BCC28.1_00. TSPxe
 Executing Policy Body Request. TSPxe
 Using Authenticator for policy TSPxe
 CLibSMSMessageWinHttpTransport::Send: URL: servername.fqdn.local:888  GET /SMS_MP/.sms_pol?LAB20000-PR100003-6F6BCC28.1_00 TSPxe

Parsing Policy Body.......
Source version for package......
Getting network access account......

Download SCCM OSD Task Sequence Content
Before the SCCM Task Sequence execution starts, the machine resolves the dependencies, which checks for the Content-Location for each package associated with the Task Sequence. It will proceed with the SCCM Task Sequence only if it can receive at least one content location for each package.
If it cannot find any packages on the Distribution Points, it will fail to resolve the dependencies. This is mostly due to Boundary issues or package distribution issues. (Content location for one package is shown below).


Launch TSManager.EXE
Once the dependencies are resolved, it invokes TSManager.exe, which drives the entire Task Sequence.

The first thing that TSManager does is parse all the steps in the Task Sequence. It reads through each step and checks its associated conditions.


Once parsing the Task Sequence, it starts with TS execution.
It is beginning the execution of the First step, which is Partition Disk 0 -BIOS.
Before it executes the step, it evaluates the conditions attached to the step, if any, as shown below.

OSD Diskpart
The OSDDiskpart.exe, which is injected into the Boot Image once we update the boot image on the Distribution Point, takes care of Disk Partitioning. Based on the settings in the step, it creates the disk partitions.

Apply the Operating System Image
After partitioning the disk, the next step is applying the Operating System image using the SCCM OSD Task Sequence.
The OSDApplyOS.exe takes care of applying the OS to the Primary Partition.

Download OS WIM File
Before applying the OS, it needs to download the OS WIM file; we can see from the screenshot below that it is working on downloading the WIM file from the Distribution Point. It uses the Network Access Account(NAA) to download the file.

Wipes Primary Partition
Once the image file is downloaded to the C:\_SMSTaskSequence\Packages folder, before applying the OS, it again wipes the Primary Partition, where it is designed to skip certain folders, including C:\_SMSTaskSequence where all the contents are downloaded during the imaging process.

It then copies the Boot files to the root of the drive, and BCD is written.

Additional Windows Configurations
During the process, it saves the initial Windows configuration to C:\windows\panther\unattend\unaddend.XML file, which will contain all the settings and will be executed at a later point in time when the machine boots into Full OS for the first time.

Then, it proceeds with the Apply Windows Settings step. OSDWinSettings.exe takes care of this process. SCCM OSD Task Sequence Troubleshooting Steps by Step Ultimate Guide with SMSTS.log.

It loads the Unattend.xml and appends it with the settings specified in the Task Sequence step for Apply Windows Settings.

Apply Network Settings
The next step that it runs is Apply Network Settings; OSDNetSettings.exe takes care of this process.

During this step as well, it appends the Unattend.XML file with the specified settings.
NOTE!: Settings specified in Apply Windows and Network settings are not “actually” applied on the machine when these steps are executed. The information is read from the Task Sequence step and written to Unattend. XML. We can find the file under the C:\Windows\Panther\Unattend folder.
Unattend.XML Injection
I am adding the sample Unattend.XML file below. We can see that settings for Time Zone, Local Admin Password, Computer Name, and Domain join are written to the file.

Windows and SCCM Client Setup
It now proceeds with the Setup Windows and Configuration Manager step. During this step, the client agent files are downloaded to the machine, and Boot Manager is updated to Boot into Full OS, which we just installed at the Apply Operating System Step. OSDSetupWindows.exe drives this process.

We can see that it is downloading the Client Agent files locally to the machine.

Reboot to Come Out of WinPE
Now, the machine needs to reboot so that I can come out of WinPE and boot into the Full OS. Before the machine reboots, it creates SetupComplete.CMD file under C:\Windows\Setup\Scripts folder.
If we check this file, we will see the following line:
%windir%\system32\osdsetuphook.exe
/execute
The SetupComplete.CMD file is a Windows Setup file that is executed once Windows Setup completes. Due to this file, Task Sequence continues to run after the boot and booting into the Full OS.

We can see that before Rebooting into WinPE, the Setup Windows and Configuration Manager step requests for a retry.
During this reboot, Windows and Network Settings are executed from the Unattend.XML file created earlier.
Once it has applied the settings, it deletes this file as it contains the Domain Join account and Local Admin Account password in plain text.
Loading the Registry hives, applying the drivers, and setting up the entire OS are done during this phase.

Conclusion SCCM OSD Task Sequence
After the reboot, once the Task Sequence is resumed, it completes the Configuration Manager client and continues with further steps like Application Installation or Software Update installation, if any.
It finally moves the SMSTS.log to the C:\Windows\CCM\Logs folder. Once the installation is completed successfully, it deletes the C:\_SMSTaskSeuquence folder.
Bonus Tip
Have you upgraded to SCCM 1902 version yet? Have you started using PowerShell Scripts without a package or content?
If so, here is the bonus tip for finding out where the PowerShell script must be stored in the Windows 10 client machine.
X:\Windows\Temp\SMSTSPowerShellScripts
Resources
We are on WhatsApp. To get the latest step-by-step guides and news updates, Join our Channel. Click here –HTMD WhatsApp.
Author
Vishal Goyal has over several years of experience in the IT domain, specializing in System Center Configuration Manager. He has been working on designing, implementing, and managing a large-scale ConfigMgr environment.

Excellent post..
Good one Visual.
Very detailed.
Very informative.
Thanks Vishal
Vishal, Your first blog rocks
Waiting for future blog posts … you are great teacher … osd was never my strong point but this blog post from you made it easy to understand and troubleshoot osd related issues. I’m confident that I can handle osd issues better
Thanks Vishal this has helped me better understanding the whole task sequence process. Looking forward to any future postings.
Thank you.
Excellent post!
Keep it up
Great post, very informative. Thank you for sharing.
Thank you!!
As usual, Excellent !!!
Thank You Marc
Where can I find which Task sequence selected in this smsts.log
That is tricky, in the logs you see something like this while it is downloading the policies for the task sequence “LAB20000-PR100003-6F6BCC28” the middle one is the Task Sequence package ID. You can search with this ID and find which task sequence was selected.
Hi Vishal, There is one long time pending issue. could you help me to resolve this issue.
1. ShellExecute (‘raserver.exe’) failed. 0x80070002. in smsts.log I google it most of the site showing related to Network Access Account, we configured properly.
2. error: 0xFFFFFFFF selecting the PS script for selection OU for location” could you please help me.
Hi Vishal
This tutorial looks awesome. However i was trying to find one section which i can describe here. Issue: i have included powershell as an optional conponent in my boot image to run powershell scripts in WinPE. However when running the SCCM TS, it fails to run script and gives error that can not find Powershell.exe at x:/windows/system32/windowspowershell/v1.0/powershell.exe. When i browse that location by pressing F8, i can go till v1.0 directory but can not see powershell.exe over there. Any idea on how to fix this issue to run powershell acript in WinPE. I have MECM 1910 running in environment.
Hello Lucky, going through the logs will give some idea. I would suggest that you check with Boot Image is added to the Task Sequence properties. We need to first make sure that in the task sequence we are using boot image in which you added PowerShell component. If that is not the issue, try adding the component again and make sure you update the boot image to the DPs.
Hi Vishal
Thanks for your quick response. Yes i am using the same boot inage in which i added the conponent. And in the logs, it sasy unable to find powershell.exe in the path i mentioned before. Strange thing is that same is working fine while building a VM using same TS but failing on physical devices i.e laptop or desktop.
Excellent post! Appreciate your efforts! I would like to know what VB script you have used to dump the variable?
Below are the content of the VBS Script to dump the variables. Create a package with below VBS as content and add that to the SCCM task sequence.
Set env = CreateObject(“Microsoft.SMS.TSEnvironment”)
For each v in env.GetVariables
WScript.Echo v & ” = ” & env(v)
Next
Hi Vishal, There is one long time pending issue. could you help me to resolve this issue.
1. ShellExecute (‘raserver.exe’) failed. 0x80070002. in smsts.log I google it most of the site showing related to Network Access Account, we configured properly.
2. error: 0xFFFFFFFF selecting the PS script for selection OU for location” could you please help me.
Hi Vishal,
Thanks a lot for this, cleared many confusion.
Would like to know is there any specific account is being used during OSD? I am aware of one account which is found in TS during domain joining, I hope this is for domain joining only. Any other account is being used for the build? I assume the network access account which is configured in software distribution component is being used as well. Any other account?
Please let me know.
Thanks again.
Hello Tanmay, Domain Join account and NAA are the only 2 mandatory accounts required for Task Sequence deployment. Also, make sure your Domain Join account has permissions only for domain join and isn’t domain admin account.
Thank you so much for having this. Really makes a difference for me since I am just now learning to use it in the environment.
Thank you Vivian. Glad that post was useful.
Hi Vishal
hope you are doing well…
Thank you for brief explanation on OSD.
I have some questions on your article:
1) what is variable.dat file and what is the purpose of that file?
2) From where machine has started in WinPE mode and downloaded boot image if NIC initialized in 3rd step.
Have you checked the video from Vishal? You might more details?
https://www.anoopcnair.com/sccm-osd-troubleshooting-using-smsts-log-with-vishal-configmgr/
Hi Vishal
actually, we have created a task sequence, our moto is from same TS machine should be join to domain with all applications deployment. but if we deploy same TS, either will join domain or deploy applications only. we want both action should be happen in same TS. Please suggest.
Machine should be able to join domain only then it will be able to communicate with SCCM infra and install application. If not joining domian, check NetSetup.log under C:]Windows\Debug folder. If domain join is successful and app install is failing, check SCCM logs under C:\Windows\CCM\Logs folder.
Hi great post! But what about following restarts? How it is managed to start where TS ended? I am asking this, because I am trying to improve deployment over WiFi i.e. need to initialize Wifi ASAP.
Whenever any restarts happens, there is a hook that is created called OSDSetupHook, there is .CMD file under C:\Windows\Setup folder that contains command line called OSDSetupHook, that tells the machine to start with the task sequence again from the same place.
I am unable to image a windows machine (Error – Unable to launch Task sequence). As checked it is because of the time sync issue. I am trying to set the time of the machine to mountain time zone as our servers are in the same time zone, have tried most of the commands, but didn’t help.
Hello everyone. I have exactly the same problem, which I can not solve. Perhaps someone has encountered something similar. Could you explain the mechanism of deployment not from PXE, but from FULLOS.
https://www.reddit.com/r/SCCM/comments/9gsfcb/issue_running_osd_from_within_windows/
and
https://techcommunity.microsoft.com/discussions/windows-deployment/task-sequence-fails-to-prestage-boot-image-error/499355
I have bitlocker turned off. UEFI. Acer Veriton b650 (China)