Hello Readers!!! We bring another post for you. In this post, you will learn the Deployment of Java Using SCCM. We will achieve so using the Application model. This is one of the best EXE application deployment guides using SCCM.
There is certain software that we use on daily bases that requires java to be present on the system for their functioning. Without Java, we won’t be able to use them. We need to keep the updated version of Java in the system.
The latest Java patches enhance the performance, stability, and security of Java applications running on your Windows devices. You can use the same method to install Java updates. Ensure that you use supersedence options in SCCM to remove the existing version and install the latest version with all the patches.
To begin with the Deployment of Java Using SCCM, we must start with the downloading of the Java setup file. From the Java website, one must download the windows offline setup for 64bit architecture. You must use this EXE application guide using SCCM for all the other deployments.
- Top 50 Latest SCCM Interview Questions and Answers
- Top 50 Latest Intune Interview Questions and Answers
- Brave Browser Deployment using SCCM | Step-by-Step Guide
Pre-requisites – Deploy EXE Application using SCCM
We have not seen any Java MSI Application so far, so we need to use EXE Application to deploy and install the Java Application. Now, before we proceed further, we must have these three things in advance, especially when we have a .exe setup:
- Installation Command/Uninstallation Command
- Detection Method
- Application Icon
With the help of the internet, one can find an Install command for any application. In our case, we have to search the install command for the Java Application. After searching, the install command for the Java Application is jre-8u341-windows-x64.exe /s.
After you successfully installed Java using the install command in your test environment. Now you have to try the Uninstall command. For this, you need to go to Registry Editor and follow the path mentioned below:
- Computer\HKEY_LOCAL_MACHINE\SOFTWARE\Microsoft\Windows\CurrentVersion\Uninstall
After this, you have to right-click on Uninstall and click on Find. After this, type Java and search, and you will see this:
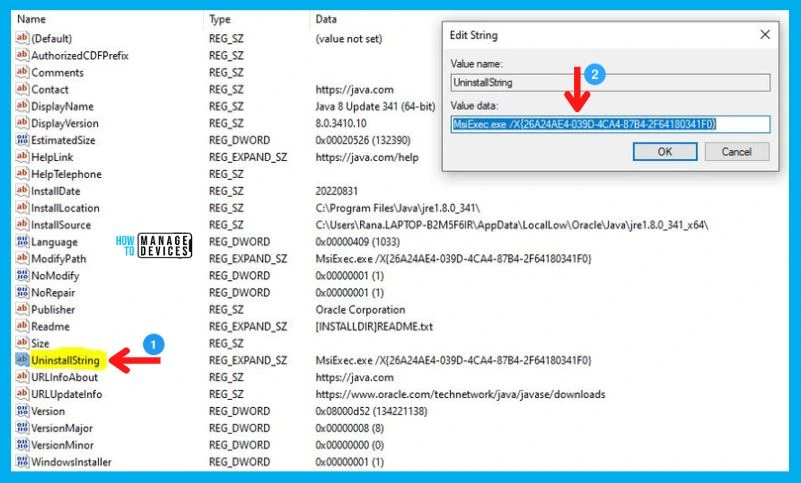
As depicted in the above image, double click on highlighted UninstallString and copy the content from Value data.
- This MsiExec.exe /X {26A24AE4-039D-4CA4-87B4-2F64180341F0} will work as your Uninstall Command after adding /q for silent installation.
- And {26A24AE4-039D-4CA4-87B4-2F64180341F0} this product code will be used in your Detection Method.
Create Java Application using SCCM Console
In this EXE application deployment guide, we will use the SCCM admin console to create applications. However, there are PowerShell methods also available to create and deploy applications. You can refer to the following guide to get more details.
- Create SCCM Application Deployment using PowerShell]
- Create Script Deployment Type using PowerShell for SCCM EXE Application
To start with the Application creation part, copy the downloaded Java .exe setup to the package source location of the SCCM Server.
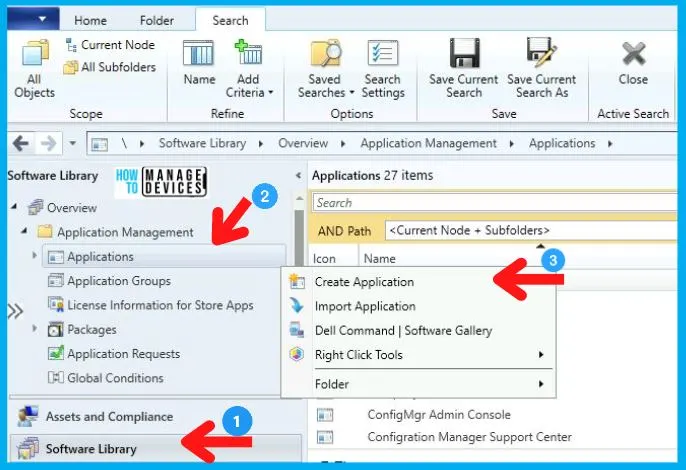
- Navigate to SCCM Console \Software Library\Overview\Application Management\Applications.
- Right-click on Applications and select Create Application.
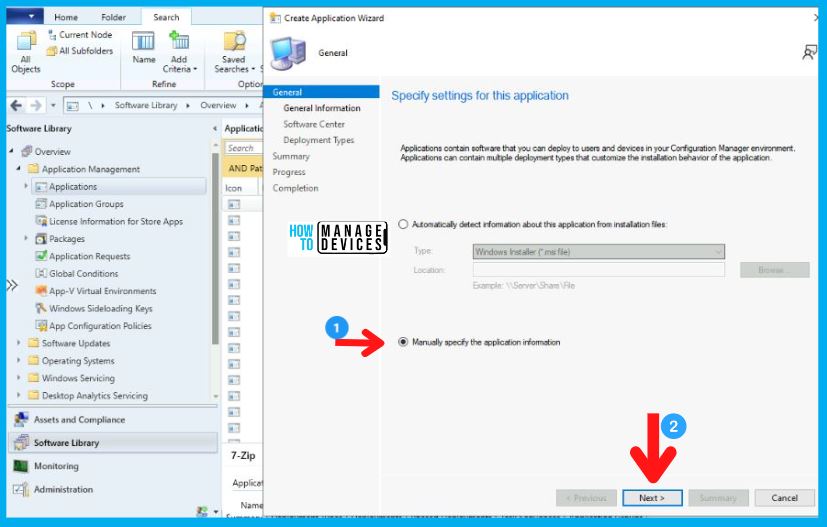
For all EXE application deployment, always Select the Manually Specify the Application Information option and click Next.
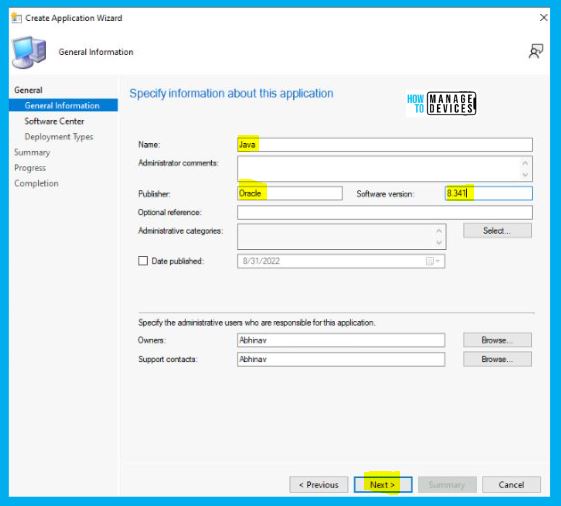
In the General Information Tab, you need to provide the metadata information of the SCCM Java application. You need to enter the details like :
- Name, Publisher, and Software Version
- And Click on Next.
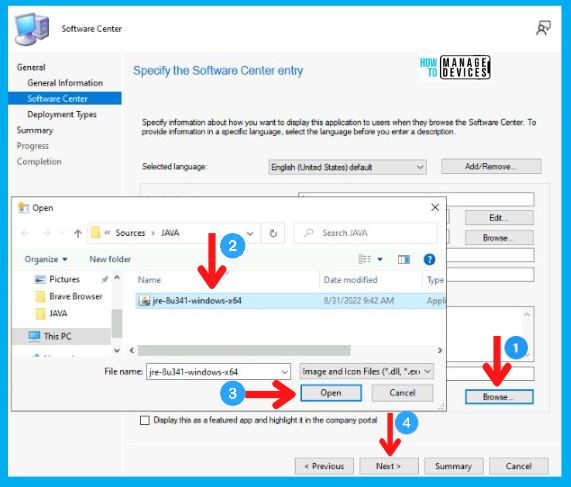
Then in the Software Center Tab, Enter the Application Name and upload the Icon by clicking on Browse. Then Click on Next as highlighted in the image.
The Deployment tab is the place where you need to specify the Java installation command lines and detection methods, etc. This is a mandatory step for all SCCM EXE Application Deployments.
- In the Deployment Types Tab, Click on Add.

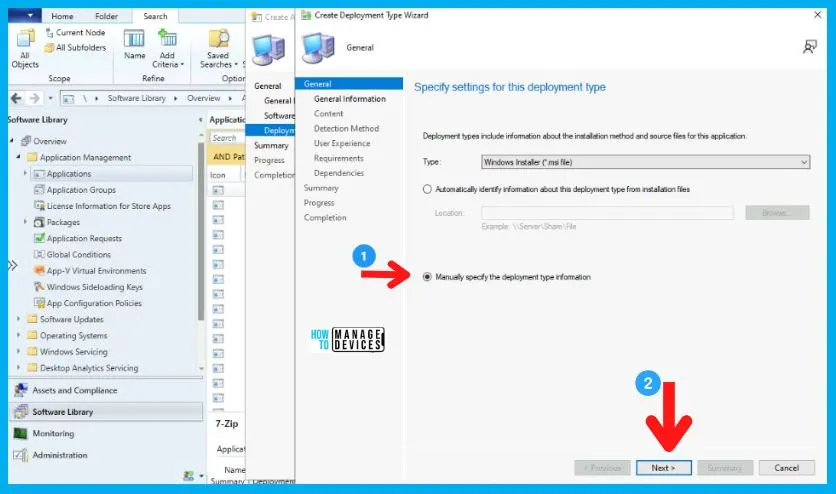
Now the Deployment Type Wizard will pop up, and in General Tab, select Manually Specify the Deployment type information and click on Next.
Java JRE Install or Uninstall Command Lines
After this, the General Information Tab appears, in which you just have to enter the name of the Application and click on Next.
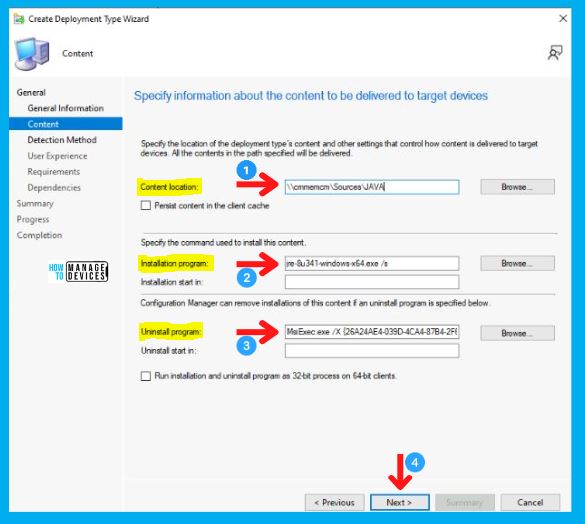
Now in Content Tab, enter the important details mentioned below and click Next.
- Content Location (Browse for the UNC path where your setup is kept)
- Installation Program
- jre-8u341-windows-x64 /s
- Uninstall Program
- MsiExec.exe /X {26A24AE4-039D-4CA4-87B4-2F64180341F0} /q
| Install Command Line for Java JRE | Uninstall Command Line for JRE |
|---|---|
| jre-8u341-windows-x64 /s | MsiExec.exe /X {26A24AE4-039D-4CA4-87B4-2F64180341F0} /q |
| jre-8u341-windows-x64.exe INSTALL_SILENT=Enable AUTO_UPDATE=Disable WEB_JAVA_SECURITY_LEVEL=H WEB_ANALYTICS=Disable EULA=Disable REBOOT=Disable | MsiExec.exe /X {26A24AE4-039D-4CA4-87B4-2F64180341F0} /q |
Detection Method for Java Application
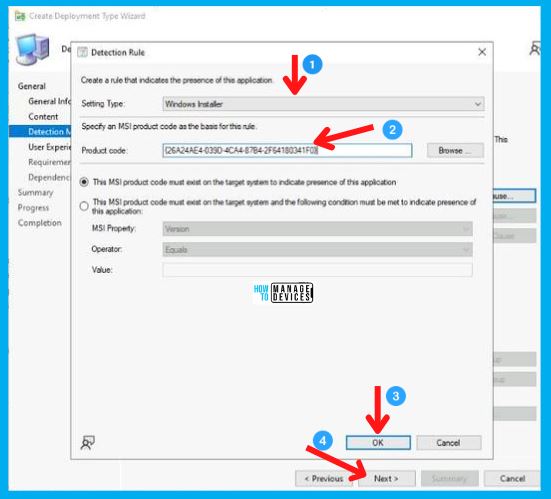
Now in the Detection Method Tab, click on Add Clause, and a new Detection Rule page will pop up. Fill all the details very carefully as mentioned below:
- Select Windows Installer in the Setting Type.
- Copy the product code retrieved from the UninstallString mentioned below in the Product Code field:
- {26A24AE4-039D-4CA4-87B4-2F64180341F0} and click OK on Detection Rule page.
- After this, click Next on Detection Method Tab, as shown in the image below.
The following table gives you a quick understanding of the Java Detection method that you can use in SCCM. Again a similar kind of method must be used for all the EXE application deployments using SCCM. You can use either of the following options as a detection method for Java JRE installation.
| Setting Type | Hive/Production Code | Key | Value | Data Type |
|---|---|---|---|---|
| Windows Installer | {26A24AE4-039D-4CA4-87B4-2F64180341F0} | NA | NA | NA |
| Registry | HKEY_LOCAL_MACHINE | SOFTWARE\JavaSoft\Java Runtime Environment\ | CurrentVersion | Version |
Now in the User Experience Tab, specify Install for the system in Installation behavior; in the Logon requirement, choose Whether or not a user is logged on and Set Installation Program Visibility to Normal. Also, provide the Maximum allowed run time and Estimated installation time as shown below and click on Next.
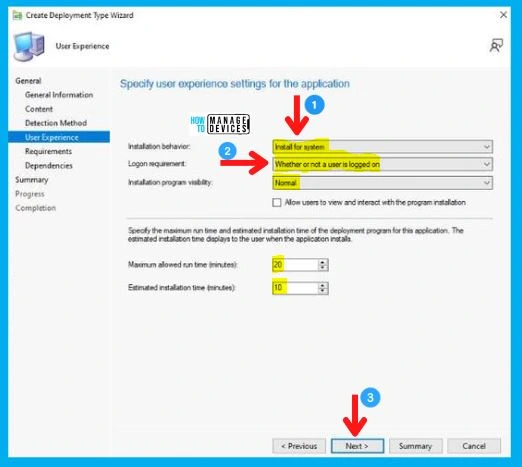
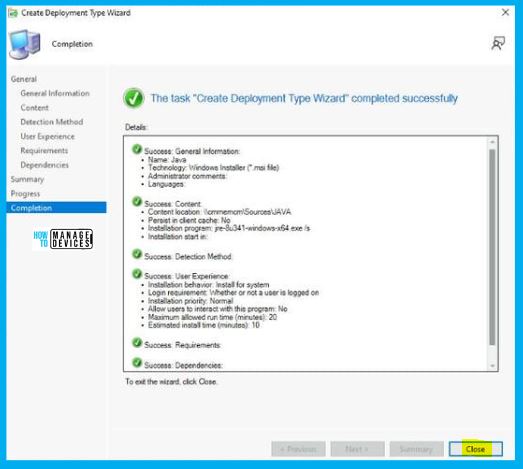
Click on Next in the Requirement, Dependencies, and Summary Tab. After this, in the end, Click on Close in the Completion Tab as shown below.
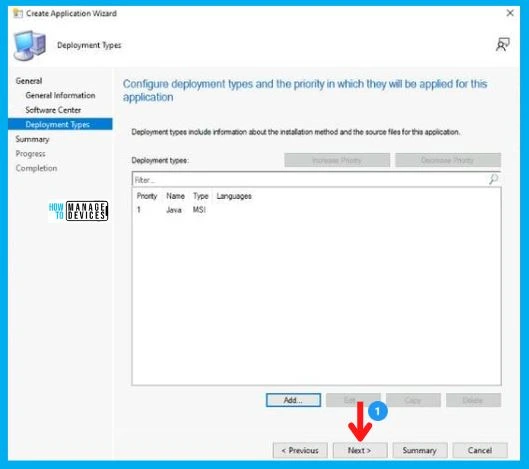
Then back in the Create Application Wizard, click Next in Deployment Tab.
After this, click Next on the Summary Tab and end this Create Application Wizard by clicking on Close in Completion Tab.
Distribute Java Application to the SCCM DP
After the creation of the Application, it will appear in the Application Node. To begin with, the distribution right-click on the Java Application and click on Distribute Content, as shown in the picture below.
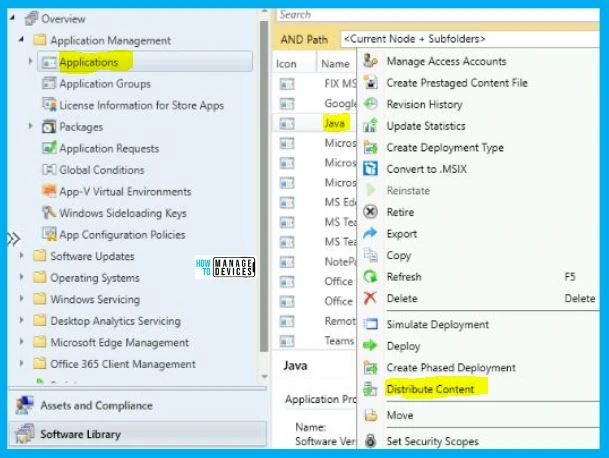
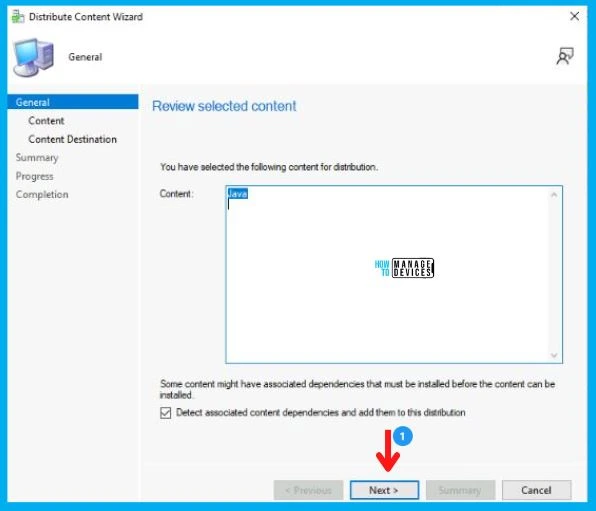
Now the Distribute Content Wizard will open, and click Next in the General Tab. Then select the Application Name in the Content Tab and Click on Next, as shown in the image below.
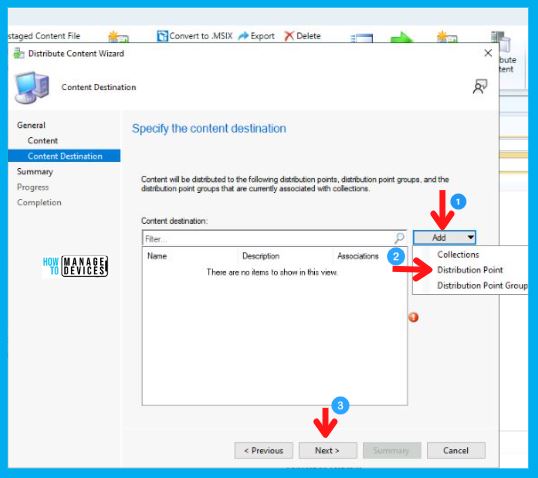
After this, in the Content Destination Tab, Click on Add and select the Distribution Point option.
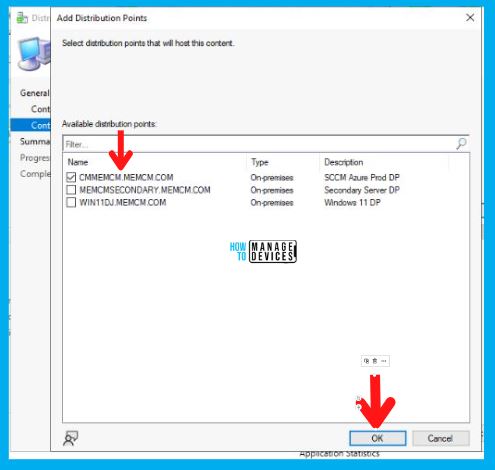
Then Add Distribution Point page will pop up, and choose the Distribution Point on which you want to distribute the Application.
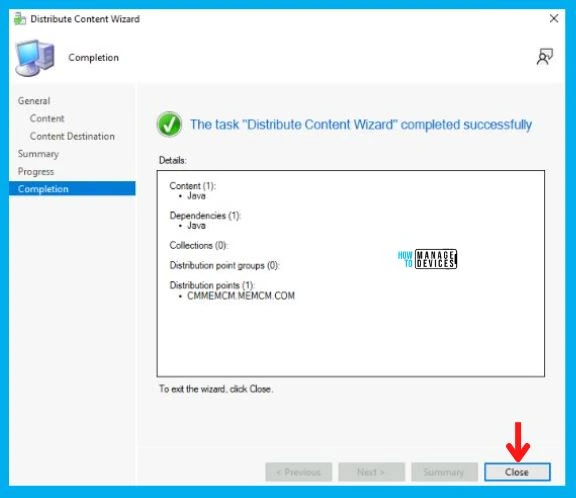
After this, Click Next on Summary Tab and complete this Distribution process by clicking Close on Completion Tab.
Deployment of Java Using SCCM
So far, we have accomplished two tasks, i.e., Application Creation and Application Distribution to the DP. Now all that is left is the Deployment of the Java Application on the All Windows 10 Device Collection.
- As you can see, your Application is displaying in Application Node, Right-click on Java Application and select Deploy.
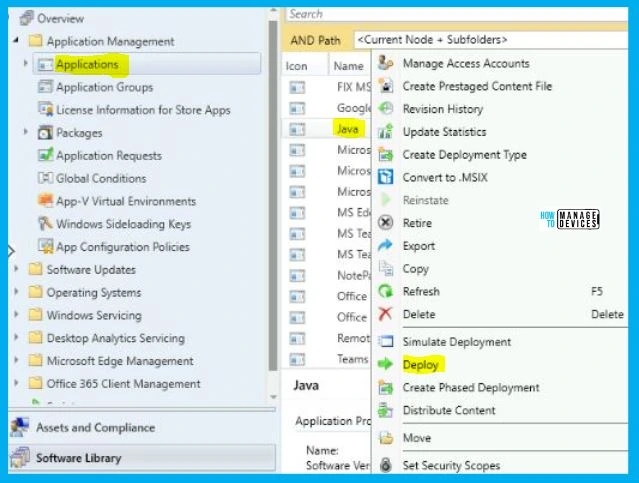
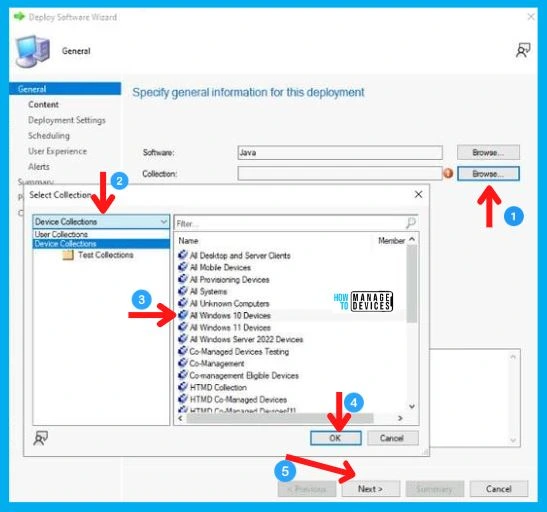
After this, Deploy Software Wizard opens, and in the General Tab, enter the Name of the Application and click on Browse to select the Collection.
- Now the Select Collection page will pop up; and choose Device Collection from the drop-down menu, and then
- Select your targeted Device Collection and click on OK, and then Next.
- Here I choose All Windows 10 Devices.
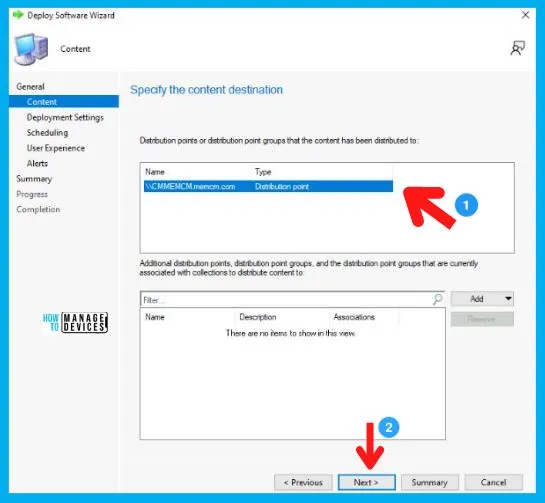
Now in the Content Tab, select the Distribution Point on which the Application is distributed and click on Next.
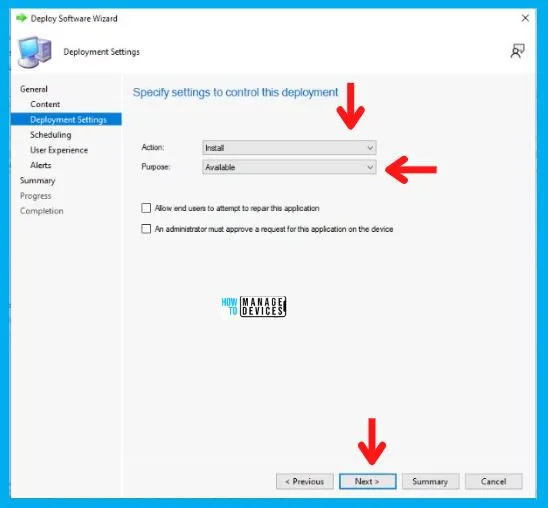
Now in the Deployment Settings Tab, select:
- Install in the Action box
- And choose Available in the Purpose category.
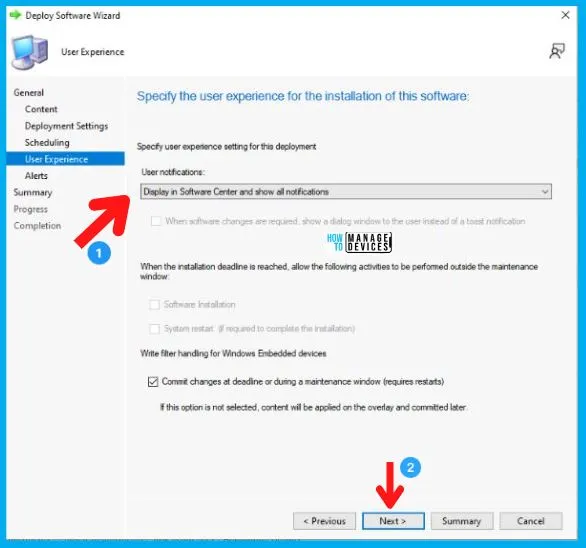
In the Scheduling Tab, enter the time details if you want it to be available at a specific time; otherwise, leave it as it is and click Next. After this, in the User Experience Tab,
- Select Display in Software Center and shows all notification options in the User notifications, and click on Next as shown below.
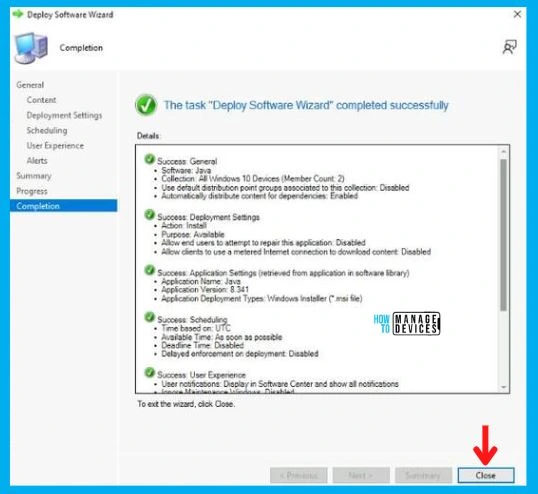
In the Alerts and Summary Tab, click on Next and to end the process, click on Close in the Completion Tab.
At Client Machine
In this section, we will check the end-user experience for Java Application Deployment and Installation. The Java Application is Created, Distributed, and Deployed.
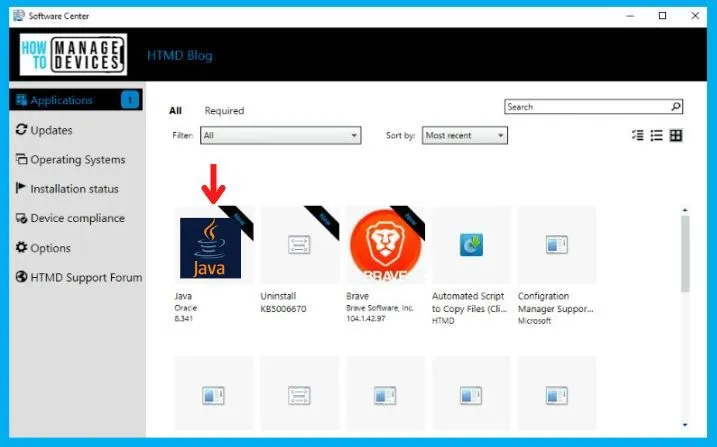
Now, if you check the Software Center of Win 10 device from the ALL Windows 10 Device Collection, you will see the application there in Available Mode, and the user can install it as per the requirement.
As you can see in the below screenshot, the Java application is installed successfully on Windows 10/11 devices. This proves that the above silent install and uninstall command and detection logic works fine for Java Application Installation using SCCM.
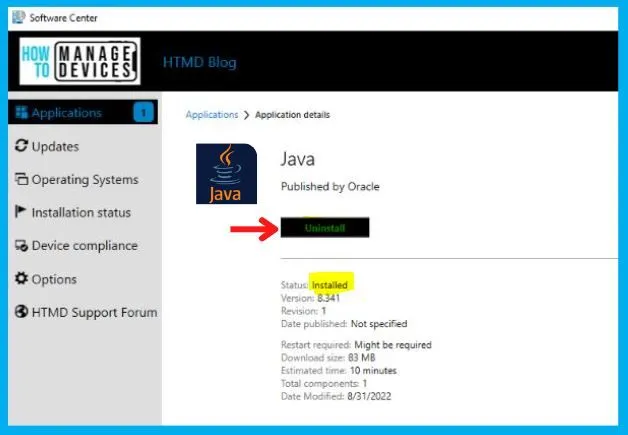
So here we have finally created, Distributed, and Deployed the Java Application as it is available in the Software Center as shown in the above image.
Conclusion
There are some Good and Tricky Questions in the comment hence the following note. This is the post for a pretty simple and straightforward Java deployment scenario. Sometimes using PSAppDeployToolkit helps to simplify complex Java JRE deployment scenarios.
To tackle complex deployment scenarios (as Anoop already mentioned in the comments), we would recommend using the best packaging engineer to customize the package and deploy it. You can also outsource this if you lack packaging resources to 3rd party solutions such as PatchMyPC, or ManageEngine.
Author
Abhinav Rana is working as an SCCM Admin. He loves to help the community by sharing his knowledge. He is a BTech graduate in Information Technology.

Hi Mr. Rana
Thanks for the great article.
Here are the some other install options that can be used:
jre-8u341-windows-x64.exe INSTALL_SILENT=Enable AUTO_UPDATE=Disable WEB_JAVA_SECURITY_LEVEL=H WEB_ANALYTICS=Disable EULA=Disable REBOOT=Disable
Regards.
Thanks for sharing, I have 2 questions;
– What if a browser is opened during installation? Will everything be installed correctly?
– How do you proceed exactly to update an existing installation of JRE?
Good Question: To tackle complex deployment scenarios, I would prefer to use the best packaging engineer to customize the package and deploy it.
Or use PSAppDeployToolkit or 3rd party solutions such as PatchMyPC, or ManageEngine.
I have been working Java lately and have deployed a few versions of JRE and JDK. I have found some odd behavior when attempting to uninstall, but luckily I have found some workarounds. To briefly explain, I have two deployments, one installs only when no users are logged on and the other installs when a user is logged on. They are the same scripts, just different sccm app configurations to install. On both scenarios I have to terminate IE11, Java.exe, and javaw.exe processes and then attempt the install. The odd behavior happens when attempting to uninstall in order to install a newer version. Java tries to reinstall itself which causes issues when you’re trying to automate this process. I scripted some logic to track the install process. If it does not complete within 90 seconds then I terminate the install and exit the script. I am wiling to share if there is interest.
You should mention that the registry entry changes with every version. If you input the current entry (which is the older version of JAVA) the update will not install correctly. I was having deployments fail until I looked closer into the registry entries. If the detection string is for {26A24AE4-039D-4CA4-87B4-2F64180341F0} per your instructions, the installation will fail if version 341 64-bit is already installed. If you are trying to deploy the latest version (currently 371), it will cause an install loop as that version was most likely already updated to 361 and SCCM will keep pushing the installation as it doesn’t detect it as installed per the detection method. Please update your instructions. Thanks