Let’s understand how to disable or enable Snap Layouts on Windows 11 PCs. The new feature snap layout on Windows 11 helps end-users multitask more efficiently by arranging the application windows in predefined layouts.
Six predefined snap layouts arrange applications intuitively and easily. The Snap Layouts on Windows 11 help avoid arranging application windows using the complex manual drag-and-drop process.
We have explained Windows 11’s new feature, Snap Layouts, and predefined six layouts to arrange applications on the desktop.
The snap groups are here to help end-users arrange applications automatically in 6 predefined snap layouts. This post will show how to disable or enable snap layout on Windows 11 PCs.
Table of Contents
How to Enable Snap Layouts on Windows 11
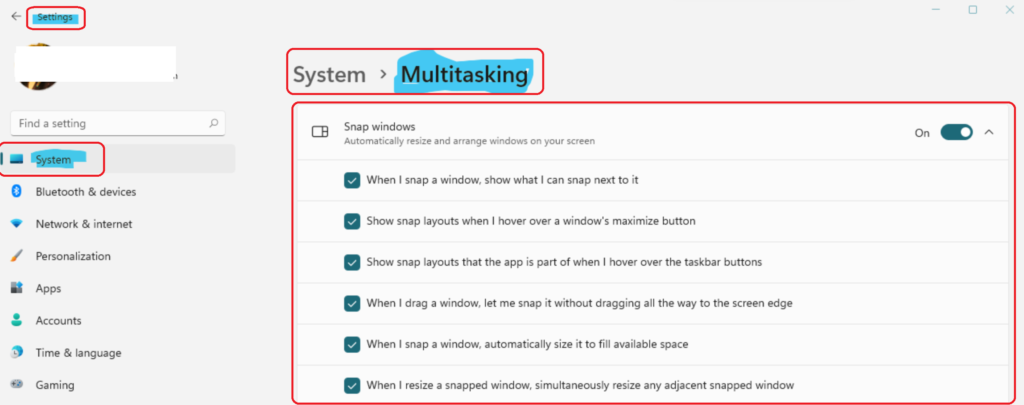
Learn how to enable snap layouts on Windows 11. You can follow the below steps to allow snap layouts on Windows 11. I think the new settings application on Windows 11 is very intuitive.
- You can open the settings application from the start menu button.
- Click on System.
- Go to Multitasking.
- Turn on the following option: Show snap when I hover over the Windows maximize button by selecting the check box, as you can see below.

- Windows 11 Snap Layouts New Feature | Six Layouts to Arrange Applications in Desktop
- Windows 11 New Features | Latest Improvements
- Windows 11 Minimum System Requirements Updated
How to Disable Snap Layouts on Windows 11
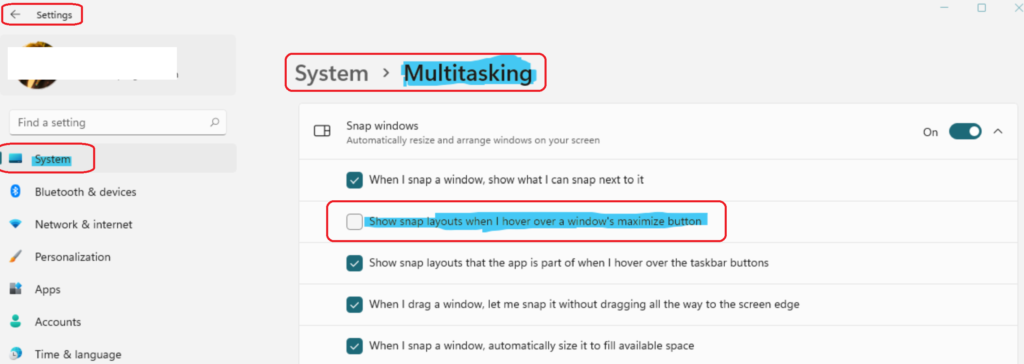
Learn how to disable snap layouts on Windows 11. To do so, follow the steps to disable the snap layout group settings.
- You can open the settings application from the start menu button and Click on System.
- Once you are in Systems, navigate to Multitasking.
From the Multitasking options, Turn Off the following option – Show snap when I hover over the Windows maximize button by removing the checkmark from the box, as you can see below, to disable the snap layouts option.

How to Enable Multitasking on Windows 11
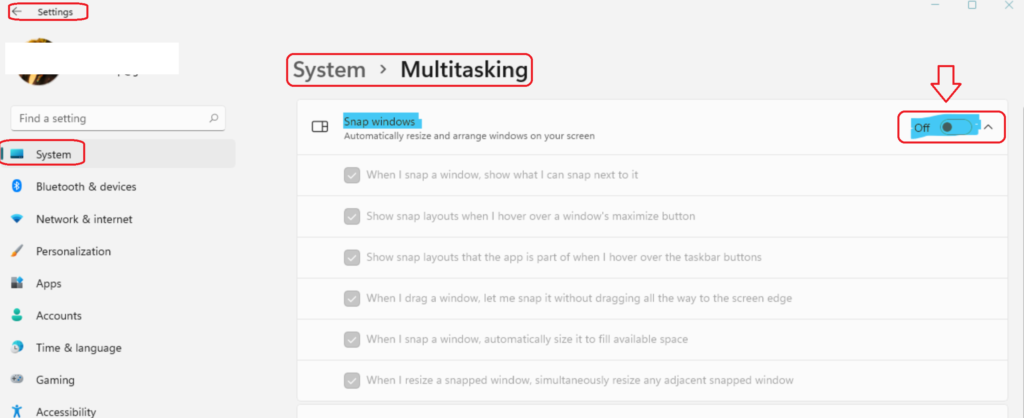
Now, let’s check how to enable Multitasking on Windows 11. If the multitasking option is disabled (like in the screenshot below), snap layouts won’t work. So, it would be best to ensure the multitasking switch is ON from the settings app.
Open the Settings app from the Windows 11 start button.
Navigate to the System tab from the Settings application. From the System tab, you can navigate to the Multitasking option to switch on the button.

Resources
- Windows 11 Snap Layouts New Feature | Six Layouts to Arrange Applications in Desktop
- Windows 11 Version Numbers Build Numbers Major Minor Build Rev | Easy Way to understand | Updated List
We are on WhatsApp. To get the latest step-by-step guides and news updates, Join our Channel. Click here –HTMD WhatsApp.
Author
Anoop C Nair has been Microsoft MVP for 10 consecutive years from 2015 onwards. He is a Workplace Solution Architect with more than 22+ years of experience in Workplace technologies. He is a Blogger, Speaker, and Local User Group Community leader. His primary focus is on Device Management technologies like SCCM and Intune. He writes about technologies like Intune, SCCM, Windows, Cloud PC, Windows, Entra, Microsoft Security, Career, etc.

The answer is wrong correct option to unselect is:
“Show snap layouts that the app is a part of when i hover over the taskbar buttons”
(Don’t mind my English)
Taskbar icons? I don’t have an experience that way. Can you give more clarity, please?
This does not work on my laptop. Every time I scroll down on a page, my screen automatically snaps to a second desktop no matter what.