Let’s learn how to Enable or Disable System Notifications in Edge Browser using the Microsoft 365 Admin Center Configuration Policy. As you all know, Edge is one of the best browsers, and it has many settings that can be useful for administrators to allocate the best user experience.
This allows users to enjoy the browsing experience in a safe environment. Microsoft 365 admin centre is the best way to manage Microsoft Edge settings by creating a configuration profile. Allow System Notifications is one of the essential settings in the Microsoft 365 Admin Center Configuration Policy.
The System settings notifications for Edge are essential to a browser. These notifications also inform users of system-related notifications such as updates and important system reminders. Microsoft 365 Admin Center Configuration Policy allows many settings options for Edge, such as ensuring security and compliance.
System settings notifications are very essential for a user or organization. System notifications in Microsoft Edge are alerts displayed on the user’s desktop or browser screen to notify the users of crucial things. This post is a guide for Allow System Notifications in Edge using Microsoft 365 Admin Center Configuration Policy, so let’s look into that.
Table of Contents
What is AllowSystemNotifications?

AllowSystemNotifications is one of the critical sections in Microsoft Edge. This setting allows you to control system notifications through the Edge browser. You can enable or disable this setting through Microsoft 365.
Enable Disable System Notifications in Edge Browser using the Microsoft 365 Admin Center Configuration Policy
Above, we discussed an overview of Allow System Notifications in Edge using the Microsoft 365 Admin Center Configuration Policy. This is an essential method for your organization. Allowing system notifications in Edge is beneficial for being aware of our system.
Follow the below steps to learn how to Allow System Notifications in Edge using the Microsoft 365 Admin Center Configuration Policy.
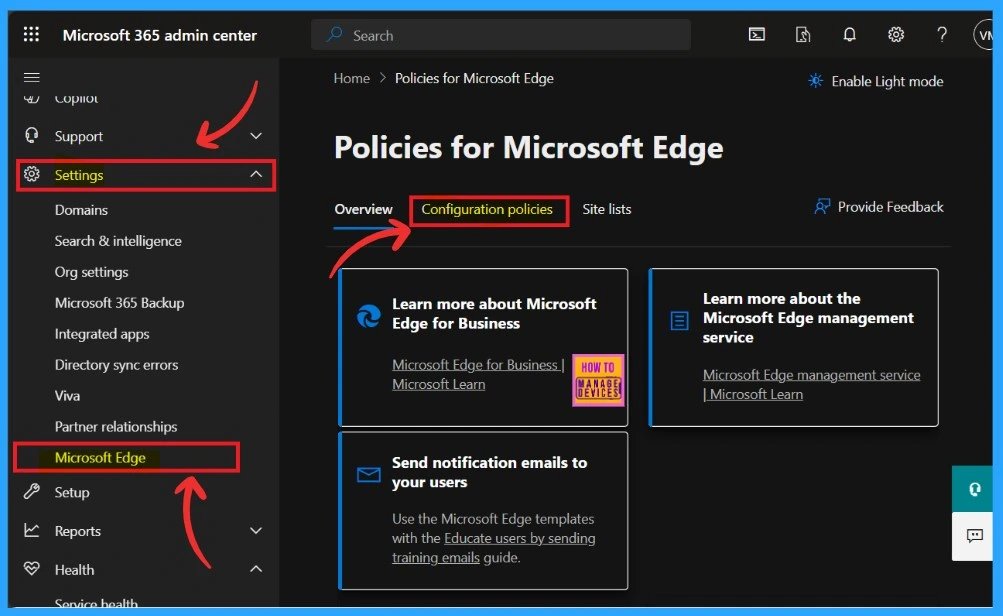
- Go to Microsoft 365 Admin Center > Settings > Microsoft Edge
- Then click on the Configuration Profile
- Enable Additional Search Box in Edge Browser using Microsoft 365 Admin Center Policy
- Enable AI Gen Themes in Edge Browser using Microsoft 365 Admin Center Configuration Policy
- Enable Accessibility Image Labels in Edge Browser using Microsoft 365 Admin Center
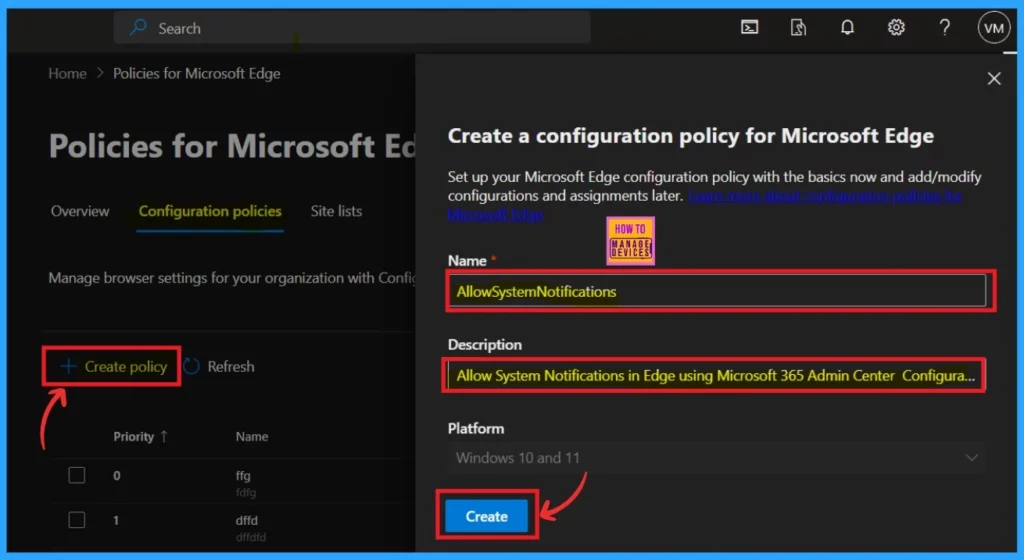
Then, you will get a window to create a configuration policy for Microsoft Edge. To do so, click on the Create Policy option. When you click on that, you get a window where you have to add Name and Description.
- Here, I added the Name AllowsystemNotifiations.
- In the description– You can describe the policy in a simple word to help you understand it later.
- Then click on the Create option.
- The platform is fixed as Windows 10 and 11.
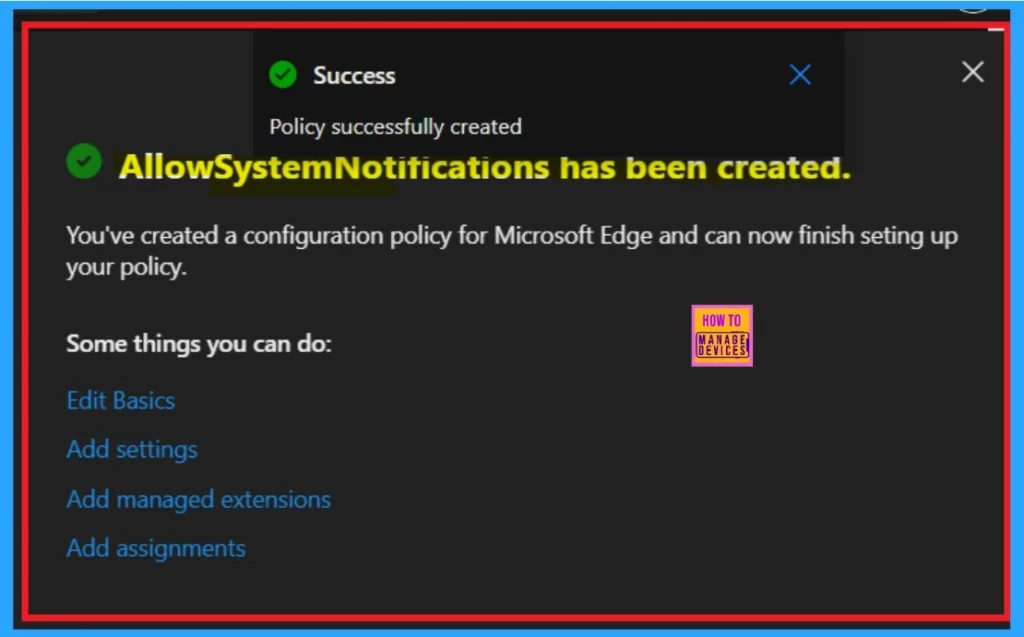
After clicking Create, you will suddenly be informed that the policy was created successfully. Then, you can edit the essential details you entered during policy creation (like Name and Description). Also, you can add settings and manage extension options.
- Now you can close the Settings Window.
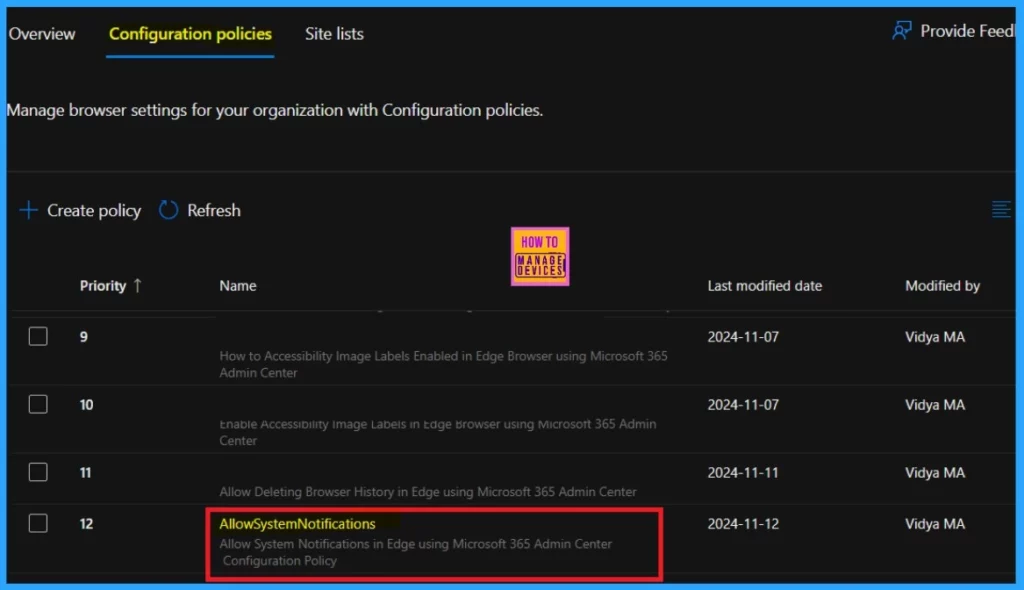
Now that you are on the Configuration profile, a list of policies will appear. You can select the policy to allow system notifications. Click on that to learn more about the policy.
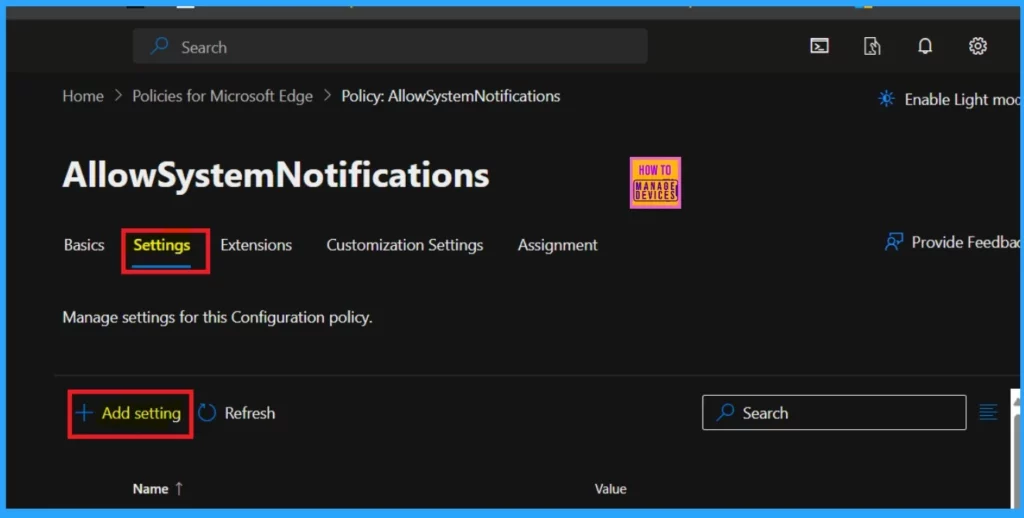
Now, you have to go through five steps: Basics (which you have already done by adding Name and description), Settings, extensions, Customization settings, and assignments. After Basic, you have to select the settings.
- Then, click on the Add Settings option.
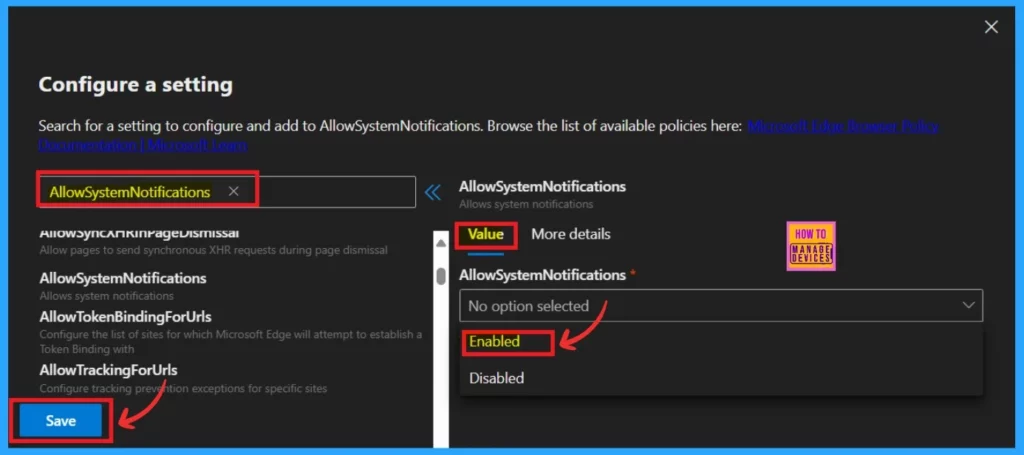
In the Add setting option, select the policy name AllowsystemNotifiations from the Additional setting option. There, you can access the value tab( see the screenshot below). This is an important step, so you can’t skip it. Here, you can select whether the policy should be enabled or disabled.
- Click on the Value tab and the drop-down arrow.
- You can select the Enabled or Disabled option according to your policy preference. (I selected the Enabled option here.)
- Click on the Save option.
- Near the value tab, you can see an option called More Details.
- This option provides more information about the policy, as shown in the table below.
| More Details |
|---|
| According to Microsoft 365, ”This setting controls whether Microsoft Edge can use your computer’s system notifications or if it is its internal notification system. True or not set- Edge can send notifications through your computer’s system. False- Edge will not use system notifications. Instead, it will show notifications in its own internal Message Center.” |
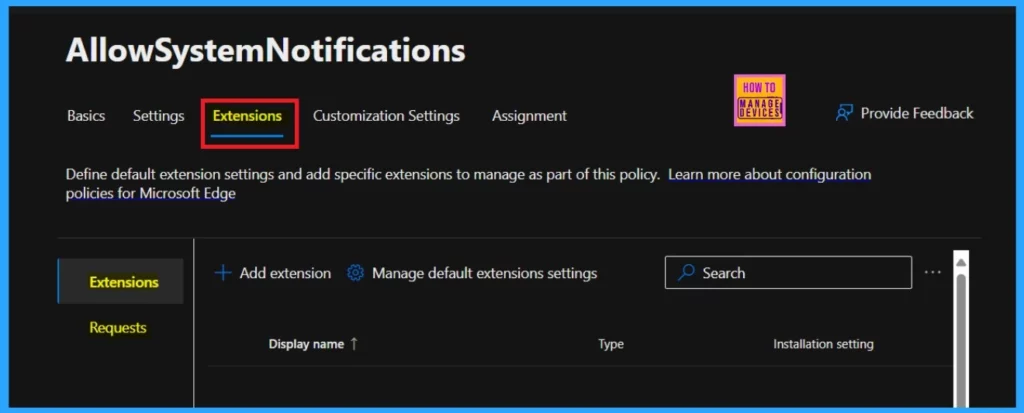
The next step is extensions. This section allows administrators to manage the extensions for Microsoft Edge. This section is not necessary; it only adds specific extensions to manage as part of this policy. The add extension option will help you to add extensions. If you want that, click on the Add extension.
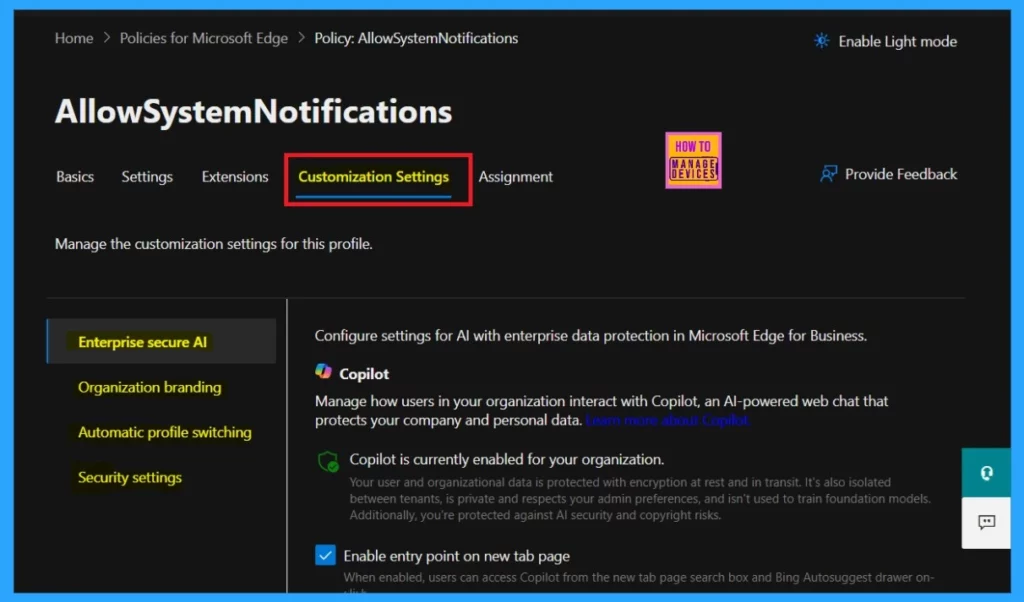
The next step is customization settings. This section will help manage the customization settings for this profile. This is a mandatory option, and it includes four main categories in the table below.
| customization settings | Info |
|---|---|
| Enterprise secure AI | This section includes Managing how users in your organization interact with Copilot and this AI-powered web chat that protects your company and personal data. |
| Organization branding | This option allows you to Configure custom branding for Microsoft Edge using your existing Microsoft 365 assets or edit and upload your assets. |
| Automatic profile switching | It allows Automatic profile switching to help enforce context separation between work and personal browsing. |
| Security Settings | This option allows you to configure settings to protect against security vulnerabilities and improve your browser’s security landscape. |
The final step is called Assignment; this is not a mandatory option because it’s essential. You created a policy, right? Now, you have to assign it to a group of members, or this step helps you allow the policy to a specific group you want to assign.
- Click on the Assignment tab and select the Select Group option.
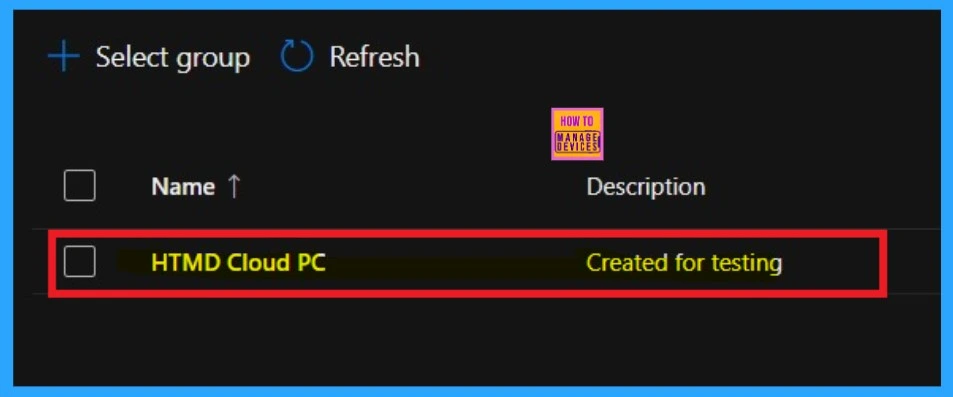
- Select a group to which you want to assign the policy.
- Here, I selected HTMD Cloud PC.
- Then Click the Select Button
- Then, it will show a notification that groups have been updated successfully.

When you close the adding the group section window, you are on the assignment page. There, you can see the selected group for the policy has been created for testing.
Need Further Assistance or Have Technical Questions?
Join the LinkedIn Page and Telegram group to get the latest step-by-step guides and news updates. Join our Meetup Page to participate in User group meetings. Also, Join the WhatsApp Community to get the latest news on Microsoft Technologies. We are there on Reddit as well.
Author
Anoop C Nair has been Microsoft MVP from 2015 onwards for ten consecutive years! He is a Workplace Solution Architect with more than 22+ years of experience in Workplace technologies. He is also a Blogger, Speaker, and leader of the Local User Group Community. His primary focus is on Device Management technologies like SCCM and Intune. He writes about technologies like Intune, SCCM, Windows, Cloud PC, Windows, Entra, Microsoft Security, Career, etc.
