In this post, you will learn how to enable or disable Developer Mode in Windows 11. The developer mode helps you sideload apps, install or test apps, change developer specific settings.
If you are writing software with Visual Studio on a computer for first time, you will need to enable Developer Mode on both the development PC, and on any devices you’ll use to test your code.
Opening a UWP project when Developer Mode is not enabled will either open the For developers settings page, or cause this dialog to appear in Visual Studio.
When you enable Developer Mode on desktop, a package of features is installed that includes:
- Windows Device Portal. Device Portal is enabled and firewall rules are configured for it only when the Enable Device Portal option is turned on.
- Installs, and configures firewall rules for SSH services that allow remote installation of apps. Enabling Device Discovery will turn on the SSH serve
If you are using your computer for ordinary day-to-day activities such as games, web browsing, email or Office apps, you do not need to activate Developer Mode and in fact, you shouldn’t activate it.
- ZoomIt Free Presentation Tool for Windows
- Join Windows Insider Program from Windows 11 PC Step by Step Guide
- Check Empty RAM Slots Available in Windows 11 Laptop
Enable or Disable Developer Mode using Windows Settings
Enabling Developer mode requires administrator access. If your device is owned by an organization, this option might be disabled.
In Windows 11 device, Click on Start button, and then select Settings.
Press the Windows + I keyboard shortcut to directly open Windows Settings.
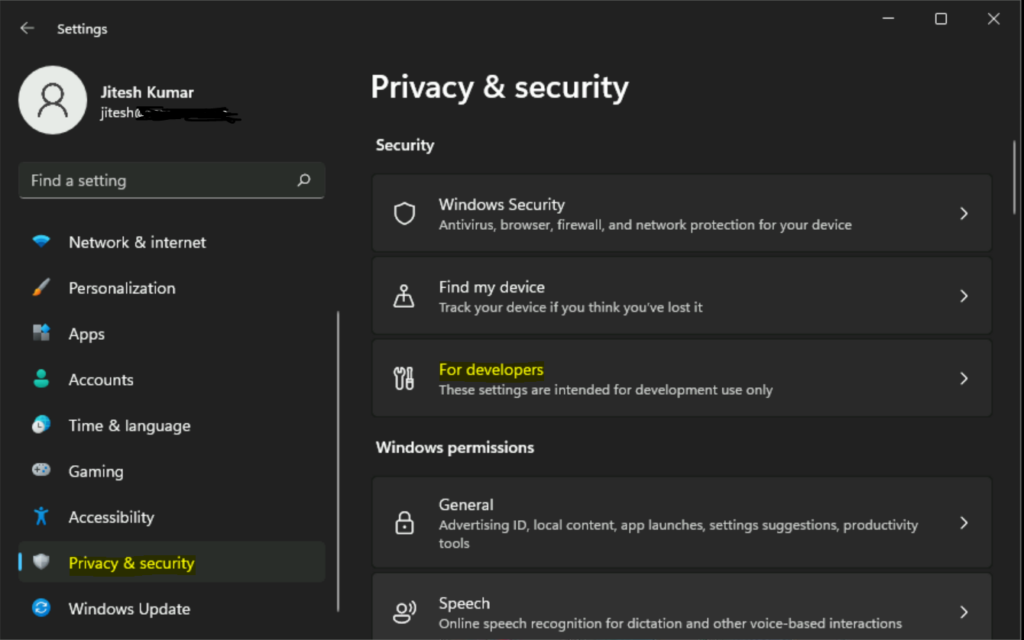
Click on Privacy & security on the left side, and click on For developers.

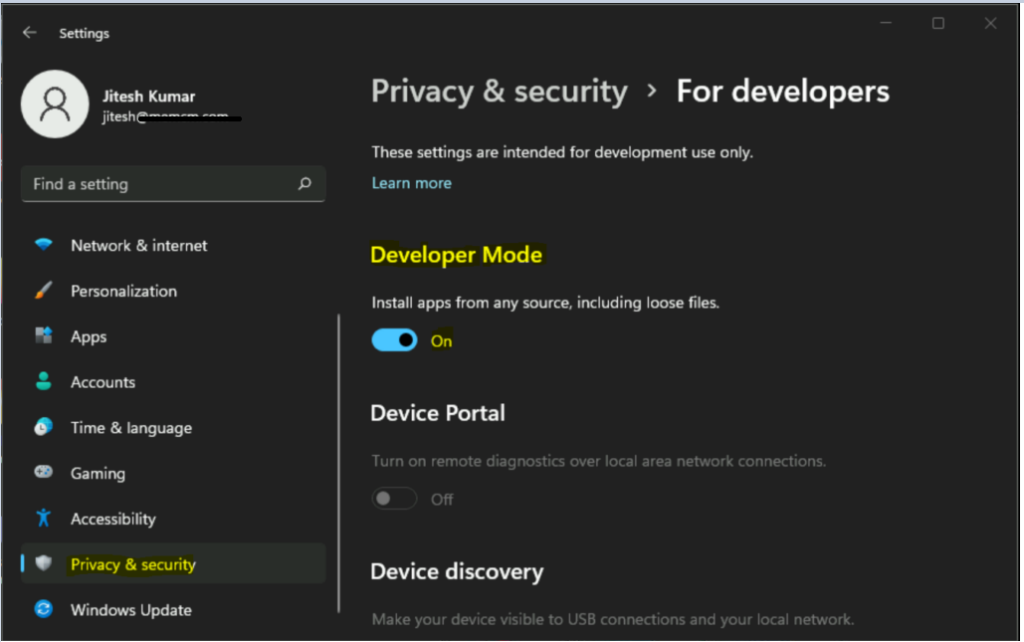
Toggle switch to turn On or Off Developer Mode on the right side.

If you turned on Developer Mode, A prompt will be appear to confirm your selection. Click on Yes.

Once done, You can close Settings window. You can go to the For developers page at any time to enable or disable Developer Mode.
Enable or Disable Developer Mode using Group Policy
When you want to enable developer mode on multiple Windows 11 computers that are part of an AD domain, the group policy is the best option.
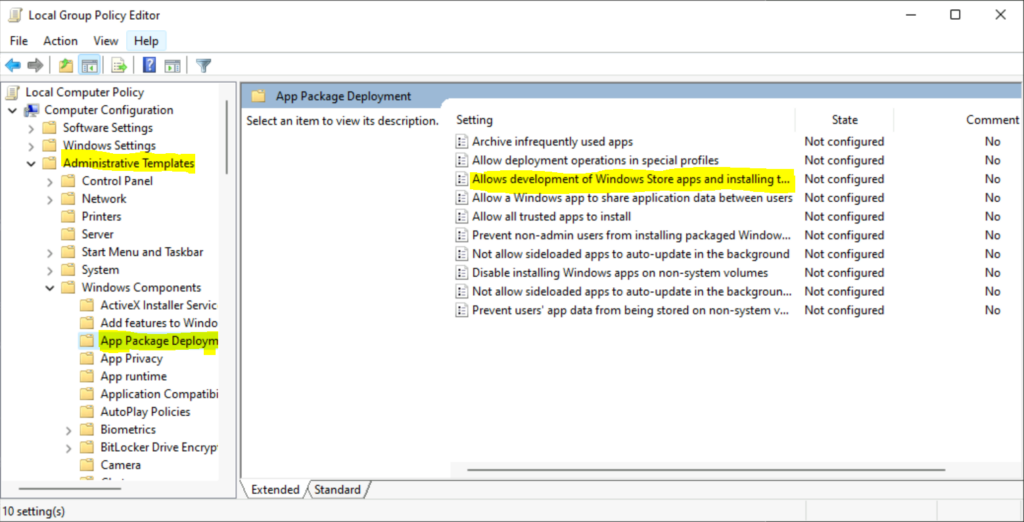
In the Group Policy Management editor or Local Group Policy Editor (gpedit.msc), navigate to following settings Computer Configuration > Administrative Templates > Windows Components > App Package Deployment.

From the list of policy settings, right-click the setting named Allow development of Windows Store apps and installing them from an integrated development environment (IDE) and select Edit. The policy settings include –
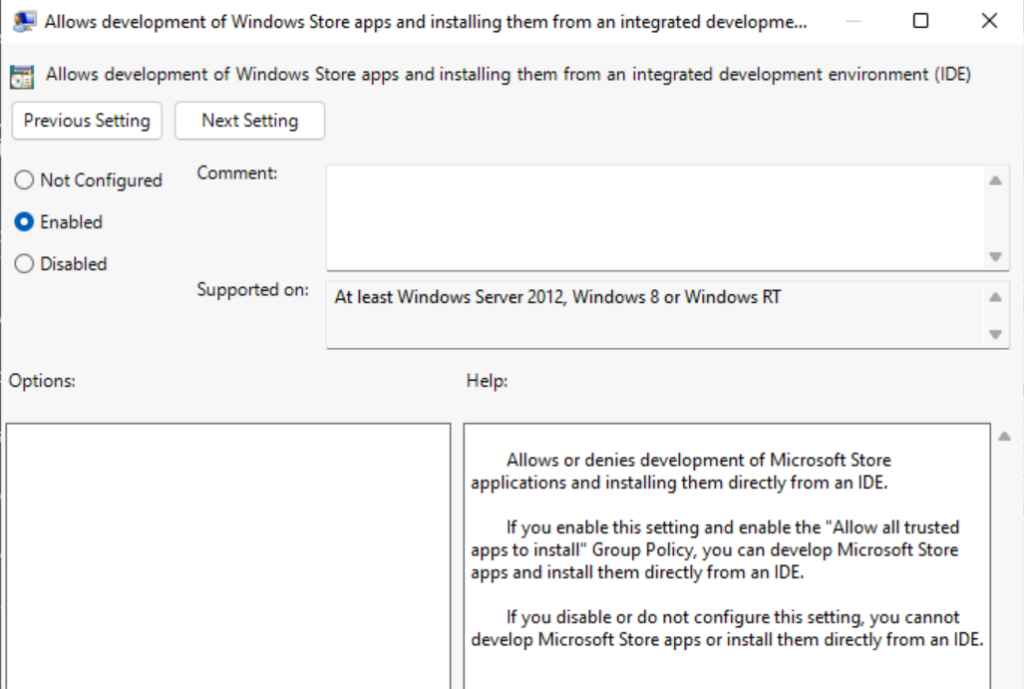
- Allows or denies development of Windows Store applications and installing them directly from an IDE.
- If you enable this setting and enable the “Allow all trusted apps to install” Group Policy, you can develop Windows Store apps and install them directly from an IDE.
- If you disable or do not configure this setting, you cannot develop Windows Store apps or install them directly from an IDE
By default, It’s set to Not Configured. To Always enable developer mode, Select Enabled or to disable developer mode, Select Disabled. Click Apply and OK.

Close the Local Group Policy Editor. If you had applied the policy for manually, Restart Windows Explorer or restart your computer to apply the changes.
If it’s applied based on OU, the computers will download the policy based on the Group Policy specified refresh interval.
Enable or Disable Developer Mode using Registry
Let’s follow the steps below to turn on or off developer mode –
To add or import a registry value. Open Notepad, Copy and paste the registry value below into the text editor.
Enable Developer Mode
Windows Registry Editor Version 5.00

[HKEY_LOCAL_MACHINE\SOFTWARE\Policies\Microsoft\Windows\Appx] "AllowDevelopmentWithoutDevLicense"=dword:00000001
Disable Developer Mode
Windows Registry Editor Version 5.00

[HKEY_LOCAL_MACHINE\SOFTWARE\Policies\Microsoft\Windows\Appx]
"AllowDevelopmentWithoutDevLicense"=dword:00000000
Important – We recommend you create a backup before editing the registry.
It will look like in the following syntax, when you see the file.

In the File menu, Select Save As and click Browse to your preferred folder or location. In the File name box provide the appropriate name “FileName.reg” with .reg extension and Choose Save as type “All” from drop-down list. Click Save.
The registry file will appear on your saved location. To start the execution, Double click or Right click and select Merge option on the saved .reg file content to merge into the local registry.
A warning box with the following messages prompted, Click Yes to continue.

Once Information in path of .reg file has been successfully entered into the registry below prompt will be appear. Click OK.
