Let’s learn how to enable God Mode in Windows 11. All the settings are available in a single place and are easier for the users to use the PC easily. When you are active in God Mode, it makes your experience simple, effortless, and effective. Microsoft aims to get rid of Control Panel and replace it with the settings app.
The God Mode folder contains over 200+ control panels and other settings, categorized into 34 numbers. Since Windows 8, Microsoft pushed the settings app to replace the most used Control Panel. Windows 11 brought us the best version of the settings app in terms of usability and function through its UI upgrade.
However, the setting app is not a perfect replacement for the classic Control Panel. You can access all the system settings quickly by enabling the God Mode. According to many users’ the settings app can not compare to the ease and usability of the classic Windows control panel.
In God Mode, you can get an easy-to-use experience—Microsoft’s efforts to improve the Windows 11 settings app and provide an advanced system setting. To know how to enable the usage of God Mode, follow the steps provided in this article.
What is God Mode in Windows 11?
God Mode is simply a folder containing shortcuts to almost all options available in the Control Panel. It is useful because it makes all those shortcuts quickly available without having to navigate the potentially confusing interface of the control panel.
How to Enable God Mode in Windows 11
Enabling God Mode on Windows 11 is easy. You can have the advanced system settings with just a click away. When you enable God mode is easy enough to do once you follow the steps to enable it. It is also a risk-free process to find important settings front and center. Follow the steps to enable God Mode.
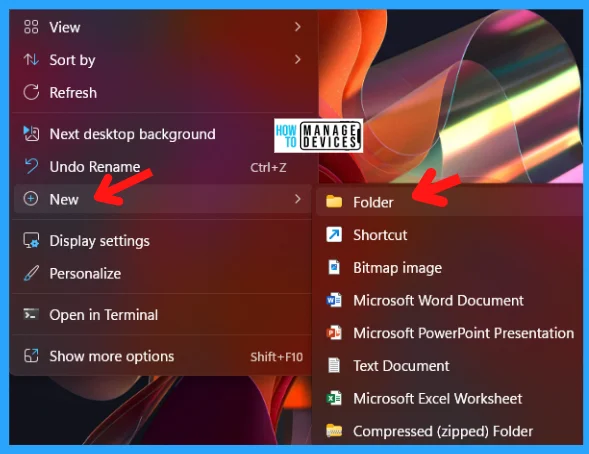
Step 1: Create a New folder on your desktop. To perform this, right-click on an empty area of your desktop, then hover over New and choose Folder from the options.
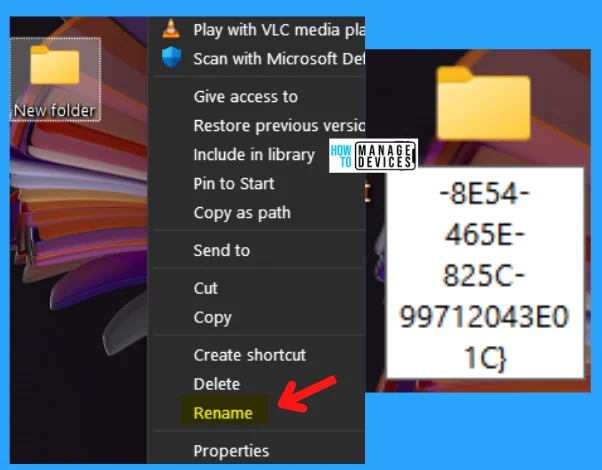
Step 2: Rename the newly created Folder. To perform this, right-click on the Folder and select Rename from the options, then copy and paste the following to rename the Folder.
GodMode.{ED7BA470-8E54-465E-825C-99712043E01C}
NOTE! You can replace any name with GodMode as per your choice.
Step 3: After renaming, press Enter the Folder is created and looks like a control panel icon with no name. Now refresh the desktop and double-click on the Folder to access all the settings. This Folder contains 208 sets under 34 categories. The God Mode folder image and the list are represented in the table below.
NOTE! The number of settings and their categories may vary according to your Windows version.
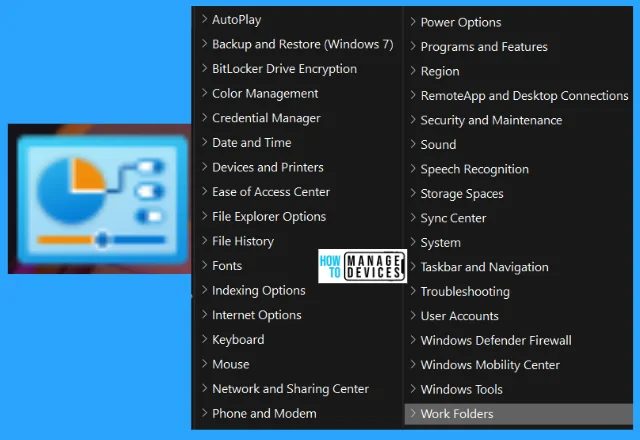
| Settings Categories | Details |
|---|---|
| Auto Play | This category saves all the auto-play settings in it |
| Backup and restore (Windows 7) | This category saves the backup and restores files from Windows 7 |
| BitLocker Drive Encryption | This is used to manage Bitlocker |
| Color Management | This is used to manage the color of your device |
| Credential Management | This is used to manage the web credential and Windows Credential settings |
| Date and Time | This is used to manage the date and time settings manually |
| Devices and Printers | This is used to manage settings related to devices and printers |
| Ease of Access Center | This is used to access the ease center to access various settings |
| File Explorer Options | This is used to access the file explorer and its related settings |
| File History | This is used to view the file movement history |
| Fonts | This is used to manage the device fonts settings |
| Indexing Options | This is used to change the Windows search system |
| Internet Options | This is used to manage the settings related to the internet |
| Key Board | This is used to manage all the settings relating to the keyboard |
| Mouse | This is used to manage the mouse settings |
| Network and Sharing Center | This is used to manage all the network connections |
| Phone and Modem | This is used to manage the phone and modem settings |
| Power Option | This category is used to access all the power options of Windows |
| Program and Features | This is used to install, uninstall, and manage the programs |
| Region | This is used to maintain the region settings |
| Remote App and Desktop Connections | This setting is used to access remote desktop connections over a network |
| Security and Maintenance | This is used to keep all the security settings |
| Sound | This is used to manage all the sound-related issues |
| Speech Recognition | This is used to recognization the speech |
| Storage Spaces | This is used to manage storage spaces in your PC |
| Sync Center | This is used to show the sync details |
| System | This shows the system settings |
| Taskbar and Navigations | This is used to manage taskbar settings etc |
| Troubleshooting | This is used to fix bugs and issues related to your PC |
| User Accounts | This is used to manage the user account control |
| Windows Defender Firewall | This is used to manage the firewall settings |
| Windows Mobility Center | This is used the access the commonly used mobility program |
| Windows Tools | This is used to access all the Windows tools in a place |
| Work Folder | This is used to manage work folders |
NOTE! In some cases, the Settings app may replace the setting you want to open, and the shortcut be open that app instead of the classic Control Panel.
Though it is a standard folder, you can easily copy settings shortcuts directly to your desktop for quick access. Also, you can perform the drag-and-drop operation for the settings you want to access now from your desktop.
Fix Common Bugs and Issued in Windows 11
If your device has a problem, it is very important to fix it immediately. You can troubleshoot the issues like sounds, network, printing, searching, and bluescreen issues with the help of the Troubleshooting section available in the God Mode folder.
Various troubleshooting options are there, which help you quickly diagnose and fix the issues in your Windows 11 device.

Change System Settings in Windows 11
The Windows 11 Settings app has a dedicated section for system configuration, including allowing remote access to your PC, updating the workgroup name, managing user profiles, etc. But the Settings app is not easy to navigate all the time.
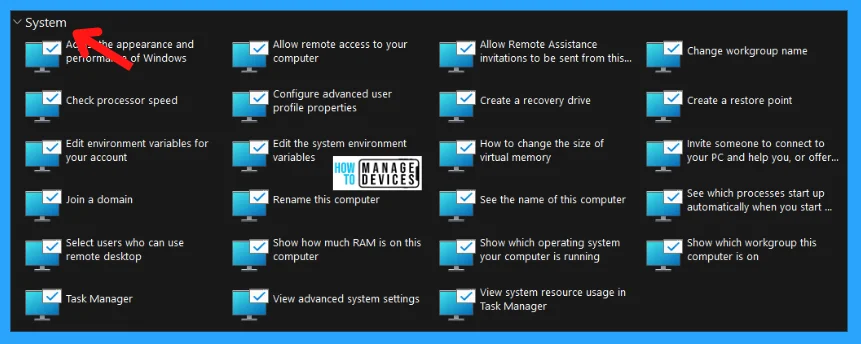
In the God Mode folder, you can search for the System section to view all related options. It is very easy to change the size of virtual memory, update system variables, personalize your Windows PC, and many more with just a click.
Also, you can learn about your PC’s RAM and processor specifications by showing how much RAM is on this computer, Creating a recovery drive, and checking processor speed options. The System section is illustrated in the image below.
Configure Advanced Settings in Windows 11
Suppose you are used to the advanced Windows settings such as defragmenting your drives, formatting disk partitions, or even setting up ODBC data sources. In that case, all come under the Windows Tools settings group in the Windows 11 God Mode folder.

Here you can access the following advanced settings with just a single click through the God Mode folder you created on your desktop for quick access to settings.
- Change color profiles for displays, printers, and scanners
- Manage Web & Windows Credentials
- Change device installation settings
- Configure USB game controllers
- Restore File History
- Update Indexing preferences
- Configure various Network & connectivity settings
How to Disable God Mode in Windows 11
The God Mode folder is very useful for all users. If you want to disable it, select the God Mode folder and press the shortcut key Shift + Delete to delete the Folder permanently.
A message appears during the deletion process: “Are you sure you want to delete this folder permanently?” click Yes to remove the Folder.

I hope the information on Enable God Mode in Windows 11 is helpful. Please follow us on HTMD Community and visit our website HTMD Forum if you like our content. Suggest improvements, if any, and we love to know which topic you want us to explore next.
Author
Alok is a Master of Computer Applications (MCA) graduate. He loves writing on Windows 11 and related technologies. He likes to share his knowledge, quick tips, and tricks with Windows 11 or Windows 10 with the community.

