Let’s learn Enable Live Caption Feature on Windows Devices and How to Use it. Windows 11 always introduces great updates; this time, windows updated live Caption with new features. The live Caption is now available in Windows 11 version 22H2. Live captions surely give you a wonderful experience in Windows.
Here, you will get the complete guide for live Caption and how to enable and use it correctly. It is very easy to access inside your Windows 11. The live Caption will help some people who prefer subtitles for audio and videos.
Live caption features on Windows 11 is very great. When you need captions for audio, it will be visible on your PC. It’s very user-friendly, so you can read captions while working on any other app. You can style captions on your PC, which offers a nice presentation.
Live Caption’s latest updates are more useful; they provide new features for their users. Windows is introducing this new feature for users, especially those who are deaf or hard of hearing. If you don’t get this new feature, ensure you are updated.
What are the Advantages of Live Caption on Windows 11
Live Caption is very important for users who are deaf, or maybe you prefer subtitles for videos while watching online content. It helps the users to understand the audio very well. It can be easy to move around the caption bar. The main advantages of live captions are given below.
1. It is very easy to enable
2. Personalize the captions
3. Available in multiple languages
4. Easy-to-use microphone
5. Style captions to your preference
6. After downloading, it doesn’t need an internet connection
How to Enable Live Caption on Windows PC
Live captioning is very easy to enable in your Windows. You are using live Caption for the first time, so you must download the language file used for speech detection. You can use the quick access method for live captioning by Win+Ctrl+L. The following steps will guide enabling your Live Caption on Windows PC.
- Select Settings from Start Menu

Live Caption can be easily enabled from Accessibility Option. The accessibility Option will be available on the Settings Menu of your Windows 11 PC. Live Caption detects any speech audio played in your system. Live Caption will give the complete audio in text form.
- Start Menu > Settings
- Select the Accessibility tab from the Settings Menu
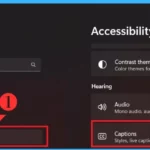
- Click on Caption from the Accessibility tab

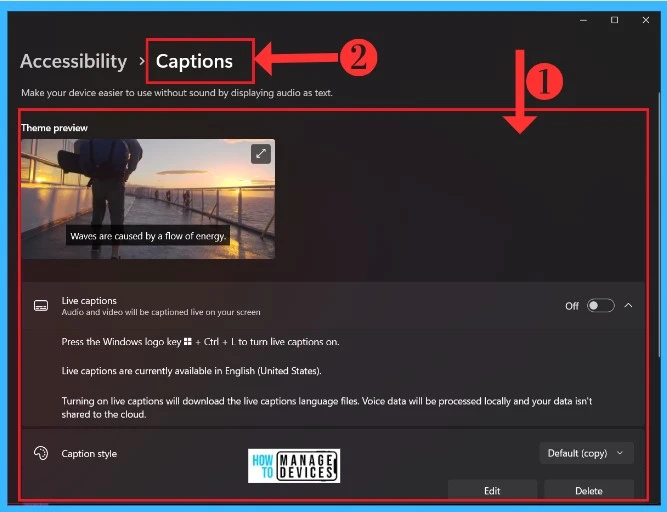
Live Caption
Live Caption on Windows 11 helps detect and display speech data from your conversation and other online audio and videos. You can easily personalize Live Caption as the best option for their users. The live Caption provides a theme preview window so you can easily personalize your Caption to your preference.
- The live Caption option is Disabled by default.
- Microsoft Edge Drop to Share files in Windows, Android, and iOS
- Custom Search Box on the Taskbar of Windows 11
How to Downloading Live Caption
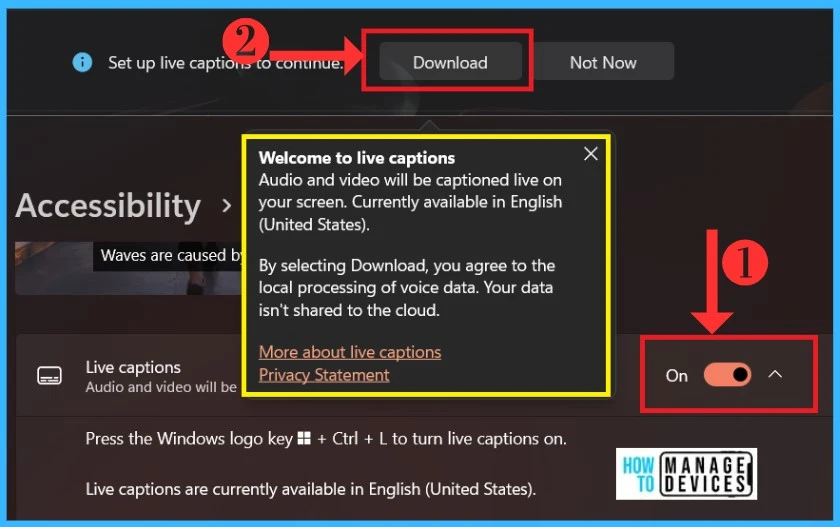
The live Caption is very easy to download on your Windows 11 PC. It is very safe to use. Live Caption protects user privacy. It helps you save your speech data on your device and does not send any data to the cloud. After Enabling the Live Caption, You will get the Downloaded option.
- By selecting Downloaded, you agree to the local processing of voice data.
Note! – You don’t need to connect to the internet once you download it.
Note! – The Live Caption is currently available in English (United States)
Caption Style in Live Caption
Nowadays, live captioning plays a very important role in videos and audio; it helps many people understand the audio even if they don’t know the language properly. Many languages are available in the live Caption but are currently available in English only.
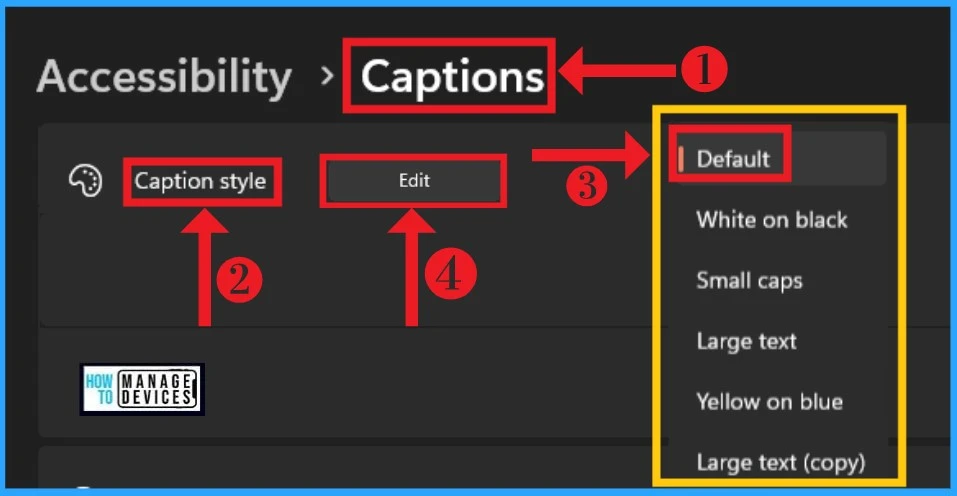
The main attraction of live Captions is you can style your captions by your preferences. Caption style options come under two categories the Defaulted format and the other one is Edit. There are many options inside the default and Edit options. The defaulted options are given below the table.
| Default Options in Caption Style | Used to |
|---|---|
| White on black | Used to display defaulted white color in caption letters on black Background |
| Small Captions | Used for Large-size Text in captions |
| Large Text | Used for large-size Text in captions |
| Yellow on Blue | Used to display Yellow color in caption letters on blue Background |
| Large Text Copy | Allows Large size for caption |
Edit Option on Caption Style
Caption styles are the new features in the live Caption; There are two options available in caption style. One of the most important is the Edit options. In the Edit option, You can style captions’ look, size, and colors. You can easily get the Edit option from the caption style window (the above screenshot).
The Edit option gives you an attractive look for captions. You can style captions entirely look, and also you can set the size of the Text. Three features are coming under the edit option, given below the list.
- Text
- Background
- Window
1. Text on Edit Option
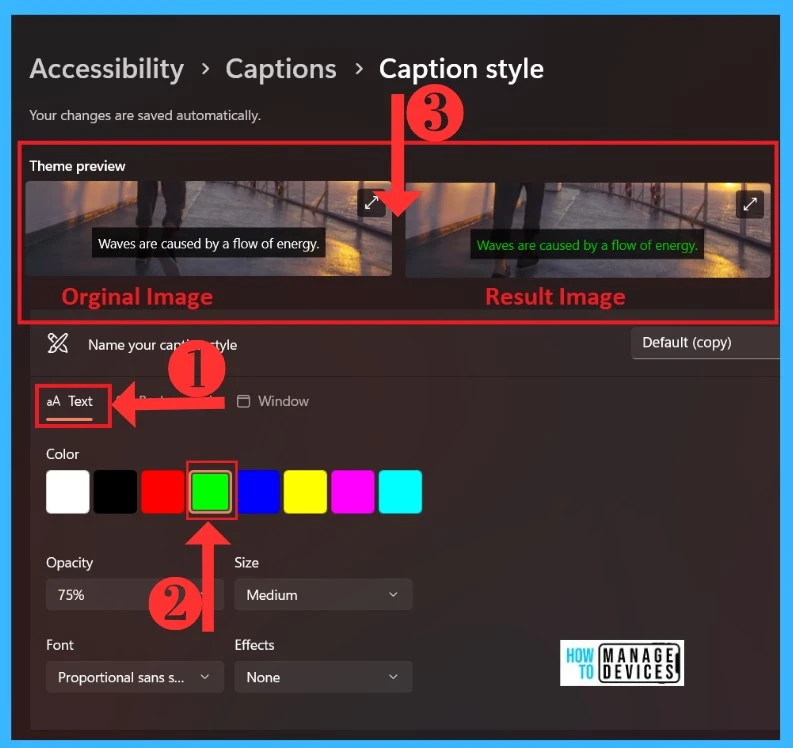
The Text feature in live captions is the first feature shown in the caption-style window. The live Caption is all about the Text shown in the Caption. This option will help you to style your text words. You can change the size and color of the Text; the theme preview window will help to understand what it looks like. The below list shows the features of a Text.
- Color – You can add colors to the Text
- Opacity – It will help you to adjust transparency in your Text
- Size – You can select the size of the Text
- Font – This option is used to modify your text format
- Effect – It changes the particular style of the word
2. Background
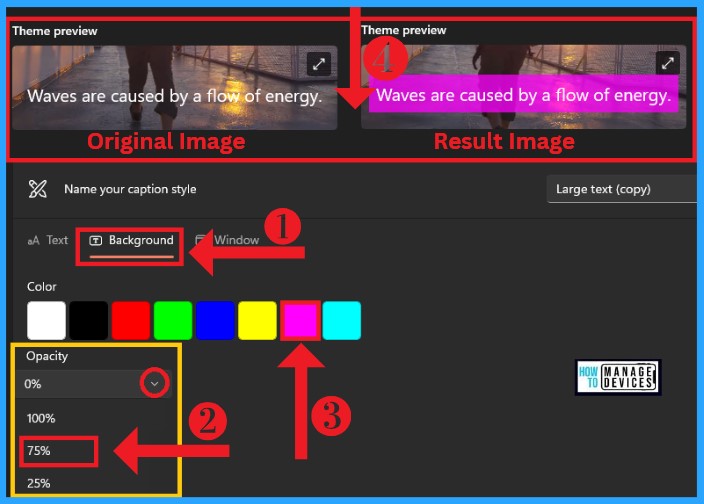
The Background is the second feature that is shown in the caption-style window. This feature helps the overall look of the Text. The Background style is eye-catching, which will change the entire look of the captions.
Background styling options are available in two types. One feature is Coloring; you can set the background color of the Text by using color options. You can also set the Background color transparency by using Opacity.
3. Window
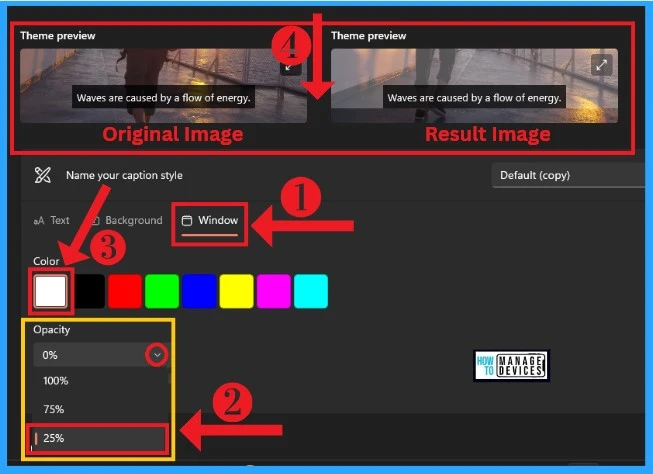
The Window option is useful for the caption window screens. The window is the 3rd feature of the Edit option; Window options are completely customizable. In Windows, two categories are available: color and Opacity.
- A Color option helps to Color the Window screen, you can select colors, and Size options will be available. The theme preview will help you with guidance for easy understanding.
- The second one is Opacity which will use color transparency. You can set the ratio of transparency as your preference. The below image will help you to understand better.
Live Caption Results
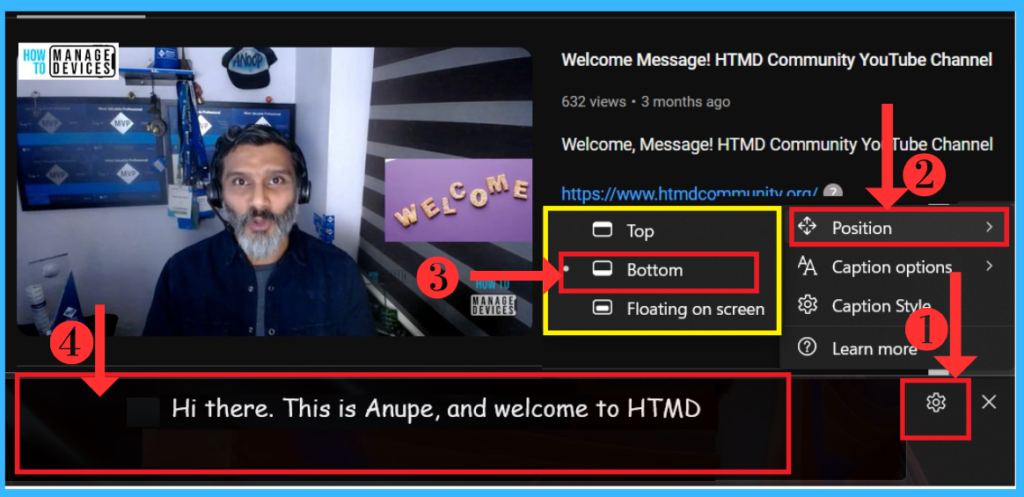
The Live caption Windows are a very exciting feature for their users. The live caption panel has a setting option, so you can easily change the setting options by your preference. In Position, you can select the Position of your Caption displayed on your windows; if you choose the Bottom Position, the Caption will be shown at the Bottom of the Window.
With the option of “floating on the screen, “ you can Drag the captions box where you want to show them in the window and resize the caption box. The below image will give help you to understand better.
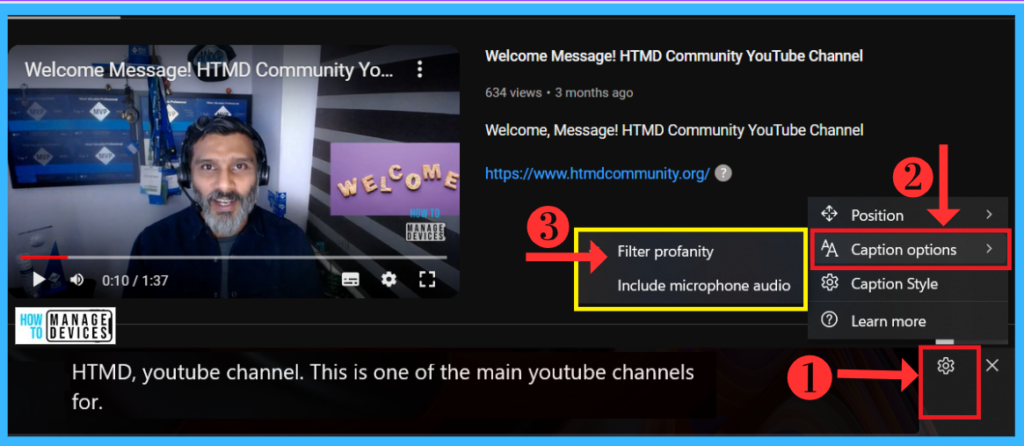
Caption Options in Settings
The Caption option is the second option in Settings shown in Windows live caption panel. As mentioned in the above image, You can change the Caption with these settings. The caption option includes two options which are filter Profanity and include Microphone audio.
In the caption option, filter profanity is needed to help hide Captioning offensive or abusive words from videos and audio. The other one includes a microphone; you can add your microphone to use your words to transcribe captions.
I hope the information on Enable Live Caption Feature on Windows Devices and How to Use it is helpful. Please follow us on HTMD Community and visit our website HTMD Forum if you like our content.
Author
Krishna. R is a computer enthusiast. She loves writing on Windows 11 and related technologies. She likes to share her knowledge, quick tips, and tricks with Windows 11 or Windows 10 with the community.
