Today, I will show you how to Enable Split Screen Feature in Microsoft Edge using the Microsoft 365 Admin Center Policy. Microsoft Edge policies empower administrators to tailor the browser’s functionality within an organization. One such policy is the ability to enable or disable the split-screen feature.
The Split Screen options allow you to view two websites simultaneously in a single tab on your Edge Browser. This feature is simple to enable and use, making it available to everyone. It is specifically advantageous for users who want to work more efficiently. The split-screen option enhances the overall performance of the Edge browser.
Administrators can control the split screen features in Edge for specific user groups or the whole organization. This helps create a more focused and secure browsing experience. They usually manage these settings using Group Policy Objects (GPOs) or other management tools.
The split screen feature is located at the bottom of your screen or can be accessed by swiping up from there. This step-by-step guide explains how to Enable the Split Screen Feature in Microsoft Edge using the Microsoft 365 Admin Center Policy.
Table of Contents
What is the Keyboard Shortcut for Enabling the Split Screen Feature?
To enable the Split Screen, press the Windows key + Left Arrow or Right Arrow to break the active window to the left or right half of the screen. Press the Windows key + Up Arrow to maximize the window.
SplitScreenEnabled – Enable the Split Screen Feature in Microsoft Edge
The split screen feature lets users view two web pages next to each other in one browser window. This helps improve productivity for tasks like research or comparison. However, it can also distract or pose security risks in some settings. Follow the steps given below to enable the Split Screen Feature in Microsoft Edge.
- Login to Microsoft 365 Admin Center
- Go to Settings
- Select Microsoft Edge
- Click Configuration Policies
- Click on + Create Policy
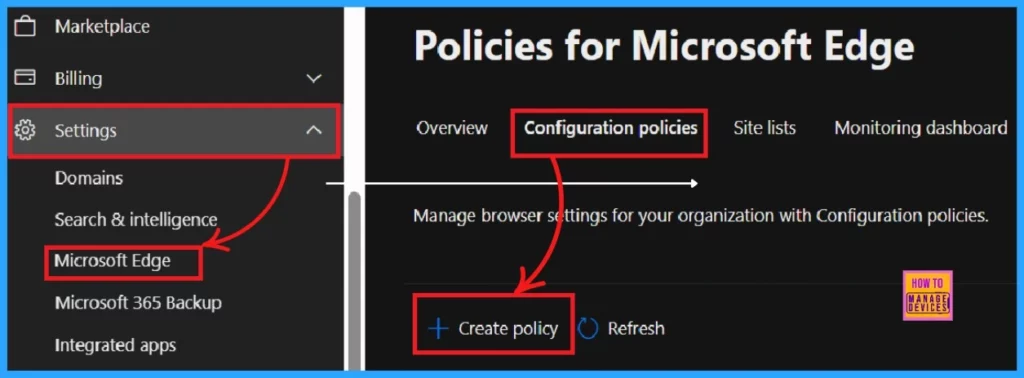
After clicking on the + Create policy, we will enter into a new window where we can see different tabs to create a Configuration policy.
| Steps to Create a Configuration Policy |
|---|
| 1. Basics |
| 2. Settings |
| 3. Extensions |
| 4. Assignments |
| 5. Finish |
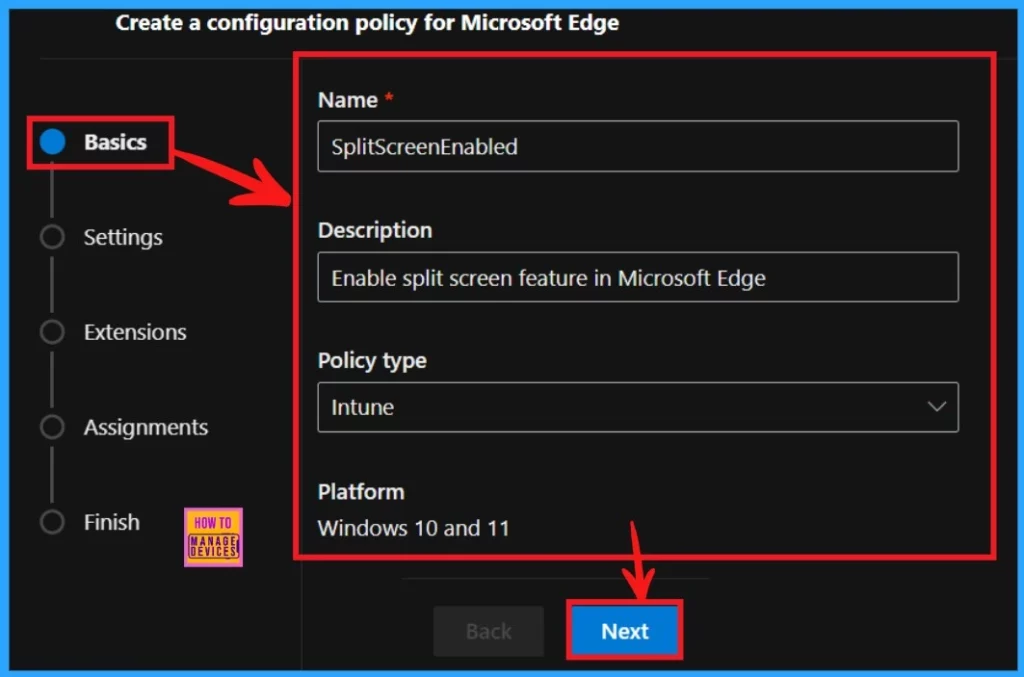
Basics is the first step to add the policy’s Name, Description, Type, and Platform for later identification. Once you have entered all the details, click on the Next button. Please refer to the screenshot below for this policy’s Basics.
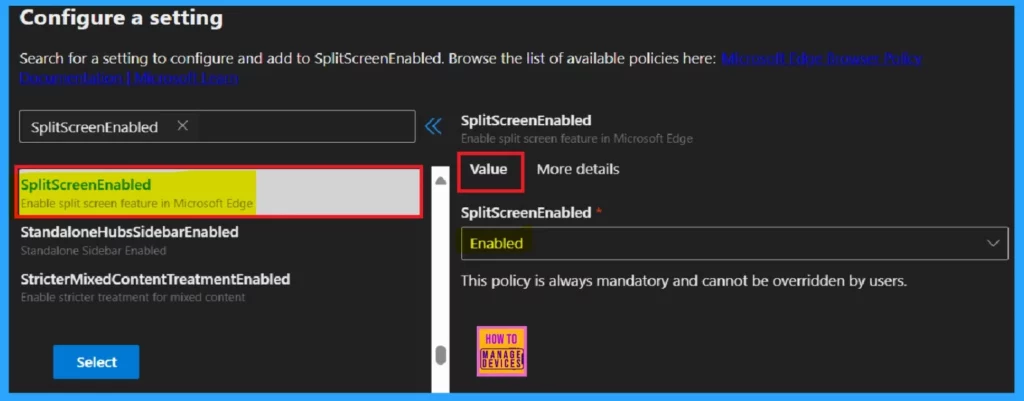
Now we are on the second step Settings where we can assign a configuration policy for Microsoft Edge. This is most important section in to create the Policy. When we click on + Add Settings, will enter into Configure a setting page where can search the policy name under Additional settings. Here, I select SplitScreenEnabled policy which is shown on the right side of the window.
The left pane of the Setting window shows the Value and More details options. We should add the Value which is mandatory.
- To add Value, click the drop-down arrow and select enabled or disabled for your policy need.
- Here I select enabled
| Enable | Disable |
|---|---|
| If you enable or don’t configure this policy, users can use the split screen feature in Microsoft Edge. | If you disable this policy, users can’t use the split screen feature in Microsoft Edge. |
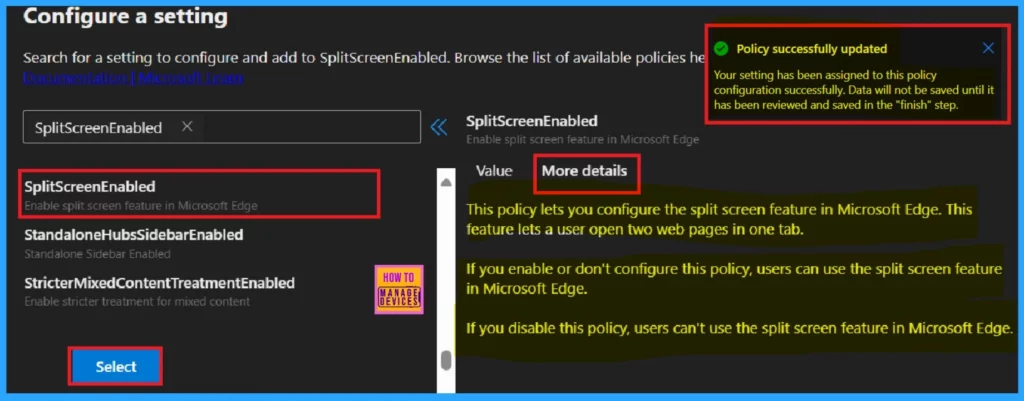
On the More details, you can understand the other informations about the policy which you want to configure. With this details you can understand what changes can be happen after enabling or disabling the selected policy.
- After through study of More details, click Select button.
- You will get a notification on the portal as Policy successfully updated.
Note: Your setting has been assigned to the policy configuration successfully. Data will not be saved until has been reviewed and saved in the Finish step.
After clicking the select button, you can see the selected policy name and value. Here you must click on the checkbox near the Policy name and click on the Next button.
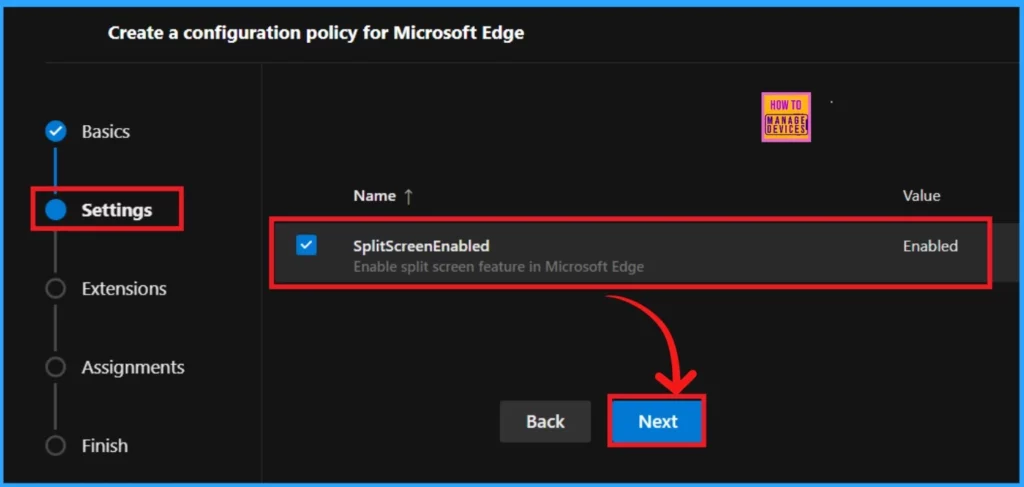
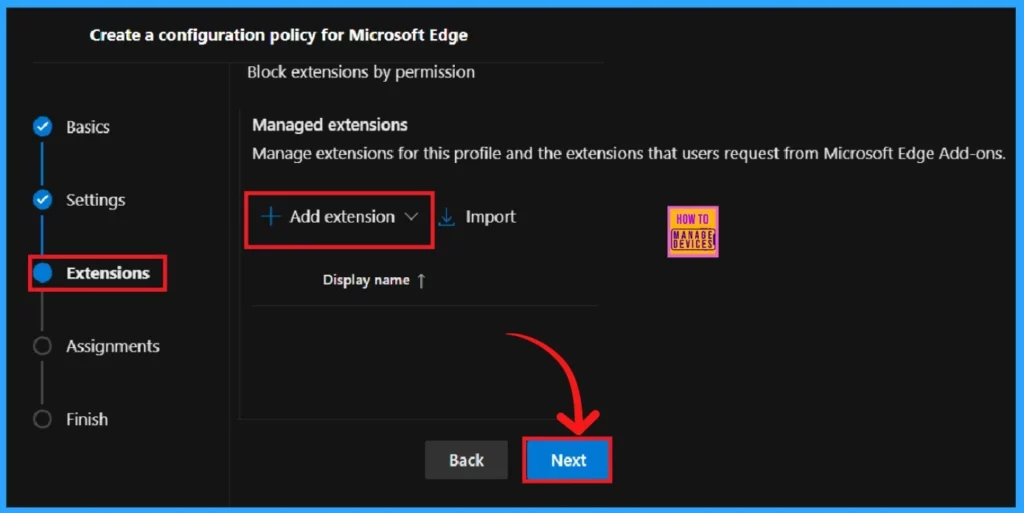
On the third step, Extensions, you can see the policy’s extensions, such as installation settings, Permissions, and URLs. To add an extension, click the + Add extension button. Otherwise, you can skip this section.
- Hit Next for further process.
On the Assignments tab, which is the fourth step in configuring a policy, you can select the groups to which the policy is assigned and which user or device is assigned it.
- Click on the +Select group
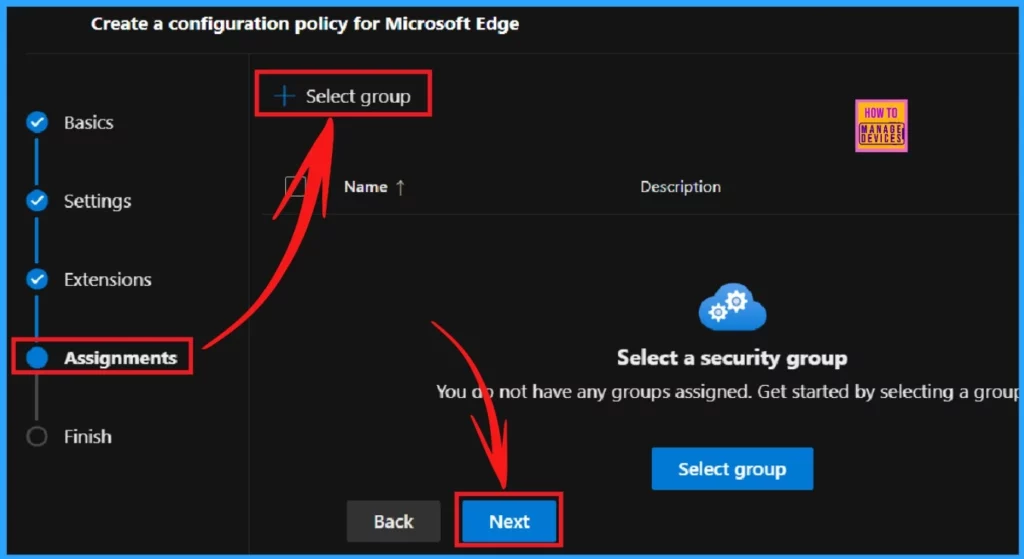
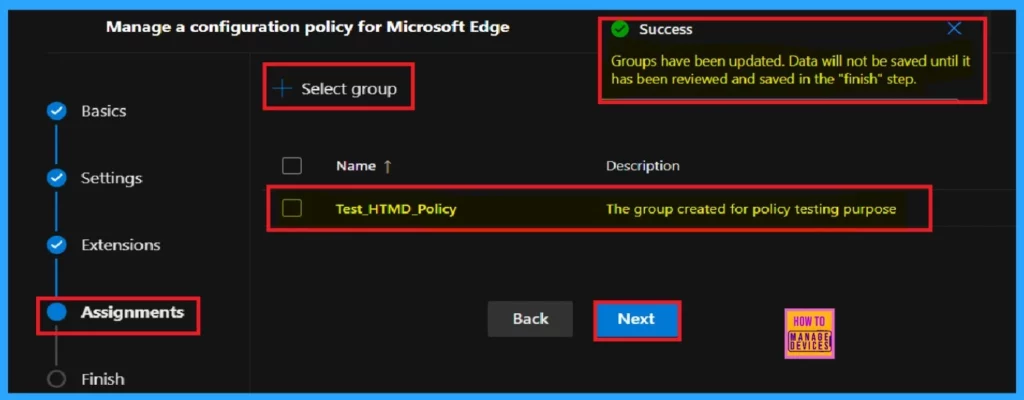
+Select Group navigates you to a pop-up window where you can select the group from the Microsoft Entra group provided by default. Here, I selected the Test_HTMD_Policy group from the list. Click on the select button to get a notification on this page saying, Group has been updated.
- Click Next
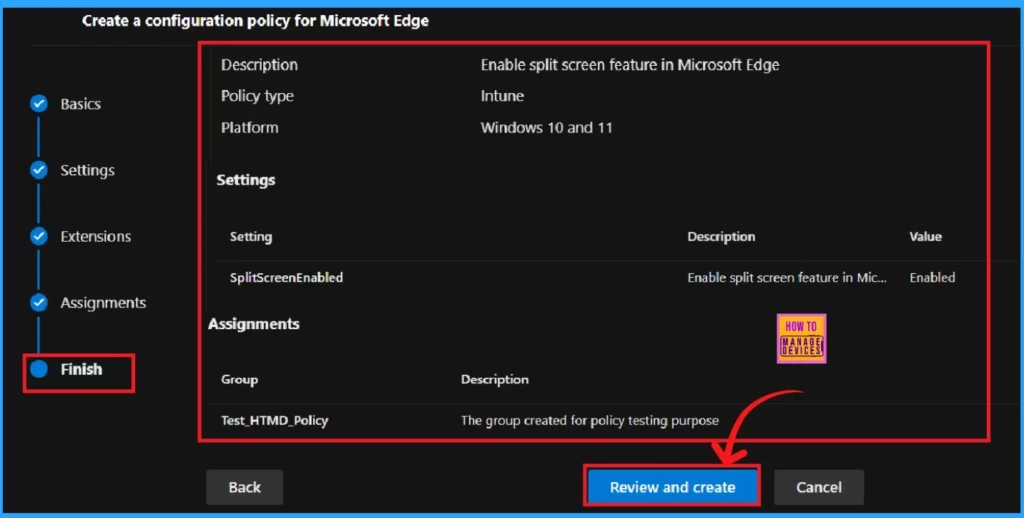
The Finish step is the final stage in creating your policy. In this section, you can review all the details you provided in the previous steps. If you need to make any changes, simply click the back button to return to the last window. Once you have verified that all details are correct, click on Review and Create to proceed.
End Result
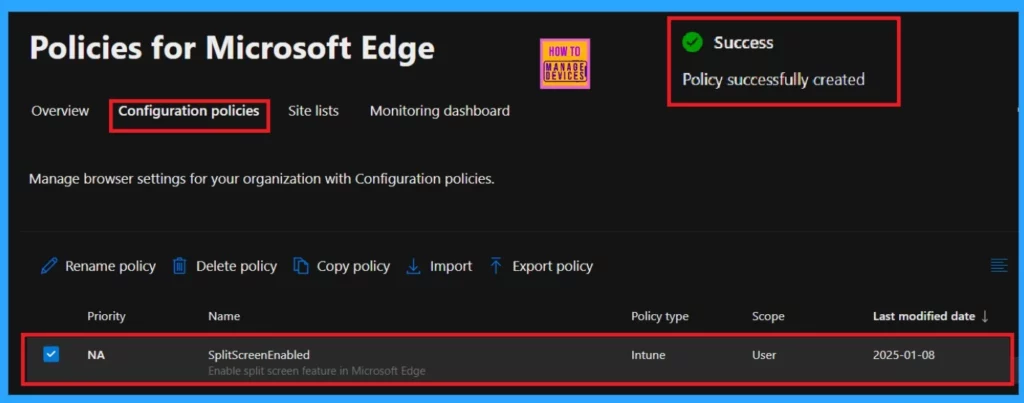
Once you click Review and Create, a notification confirms that the policy was created successfully. However, you must wait longer to deploy it to the assigned group. Alternatively, you can sync the policy through the company portal.
After syncing, the new policy will appear on the Policies for Microsoft Edge page (see the image below).
End User Experience
To see the end-user result, you should open Microsoft Edge. Then go the Settings and More (… dots) in the right upper pane.
- Click on Settings
- Select Appearance
- Scroll down to Customize browser

Client-Side Verification
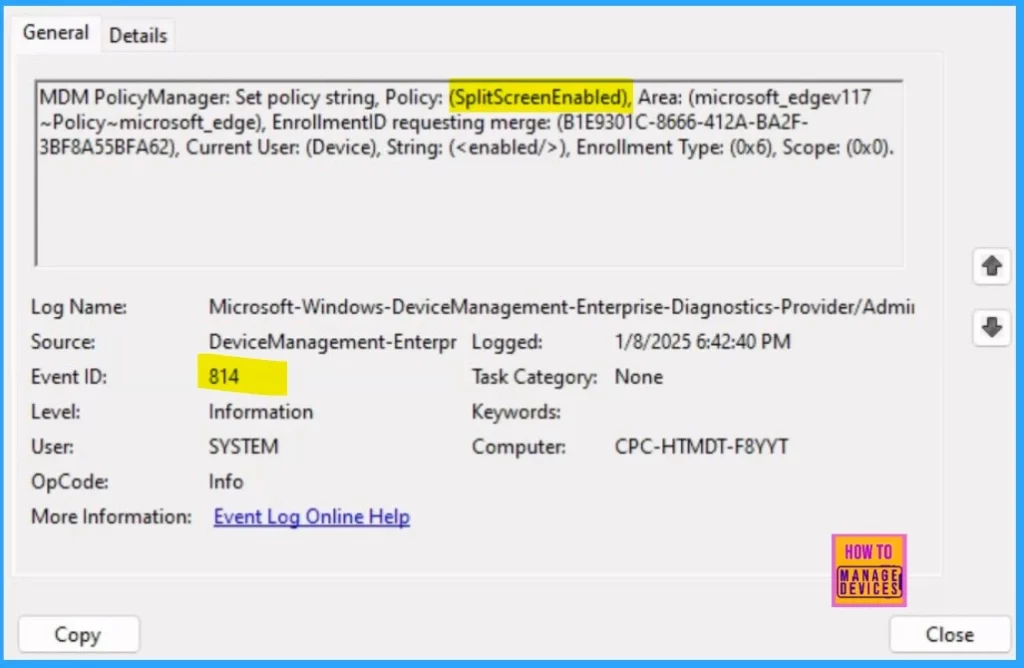
The Event Viewer uses event IDs to identify specific events that can happen on a Windows computer. Event IDs 813 and 814 indicate the successful application of string or integer policies. To verify this, navigate to the Event log path: Applications and Services Logs > Microsoft > Windows > Devicemanagement-Enterprise-Diagnostics-Provider > Admin.
MDM PolicyManager: Set policy string, Policy: (SplitScreenEnabled), Area: (microsoft_edgev117~Policy~microsoft_edge), EnrollmentID requesting merge: (B1E9301C-8666-412A-BA2F-3BF8A55BFA62), Current User: (Device), String: (), Enrollment Type: (0x6), Scope: (0x0).
Need Further Assistance or Have Technical Questions?
Join the LinkedIn Page and Telegram group to get the latest step-by-step guides and news updates. Join our Meetup Page to participate in User group meetings. Also, Join the WhatsApp Community to get the latest news on Microsoft Technologies. We are there on Reddit as well.
Author
Anoop C Nair has been Microsoft MVP for 10 consecutive years from 2015 onwards. He is a Workplace Solution Architect with more than 22+ years of experience in Workplace technologies. He is a Blogger, Speaker, and Local User Group Community leader. His primary focus is on Device Management technologies like SCCM and Intune. He writes about technologies like Intune, SCCM, Windows, Cloud PC, Windows, Entra, Microsoft Security, Career, etc.
