In this post, Set the Minimum Encryption Key Size for Bluetooth in Intune Using the Setting Catalog. As you know, the setting catalog is one of the best features in Intune; it will work efficiently on all devices and organizations.
You all know that we are using Bluetooth and its benefits. So, we have to make sure the security of Bluetooth devices because they connect to different devices. With the setting catalog is very easy to set a Minimum encryption to the Bluetooth device.
Bluetooth encryption protects data sent between devices. The size of the encryption key determines how strong the encryption is. Also, Windows allows all Bluetooth traffic, but organizations may want to set a minimum key size to ensure only secure devices are used, especially in high-security settings.
The minimum encryption key size ensures that all Bluetooth communications are protected. Setting this policy through the Setting Catalog is easy. This post will provide the complete guide for Setting the Minimum Encryption Key Size in Bluetooth in Intune Using the Setting Catalog.
Table of Contents
What are the Advantages of Minimum Encryption Key Size in Bluetooth?
Setting a minimum encryption key size for Bluetooth improves security by making sure data is well protected. There are multiple levels of encryption strength when pairing Bluetooth devices.
This policy helps prevent weaker devices cryptographically being used in high security environments.
Set Minimum Encryption Key Size for Bluetooth in Intune via Setting Catalog
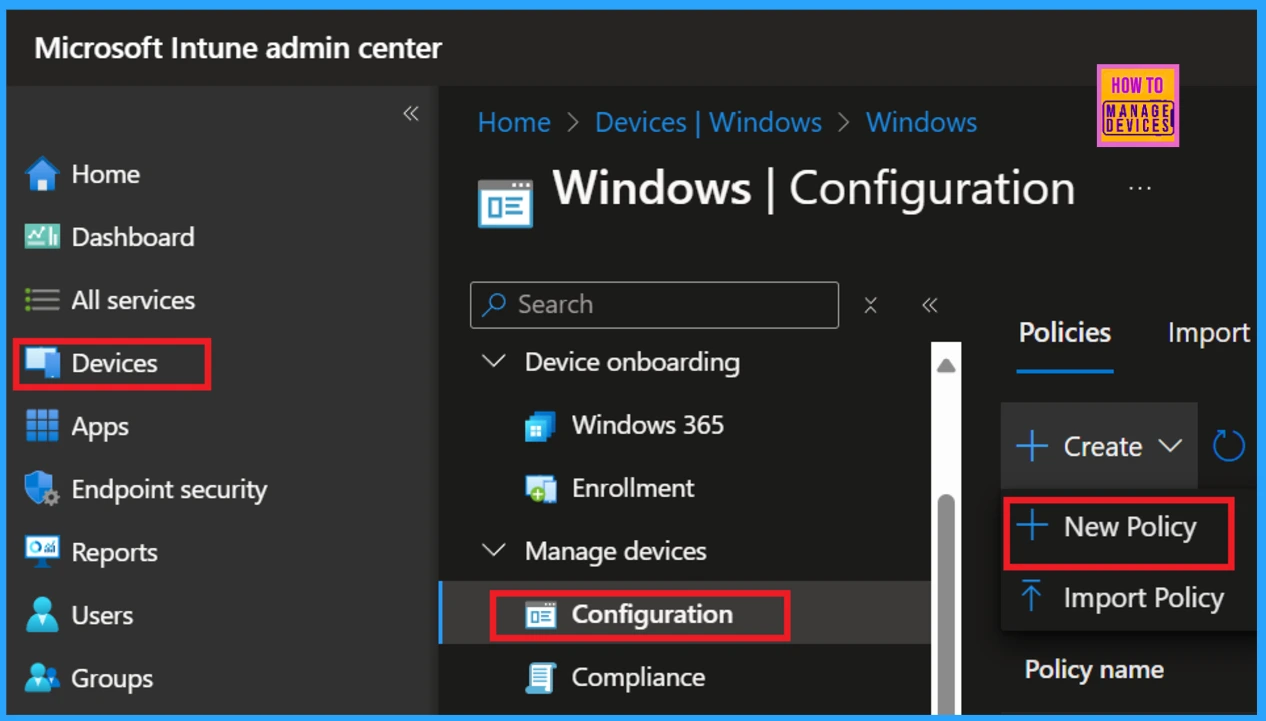
In the previous section, we discussed the minimum encryption key size for Bluetooth settings in the Intune configuration. Now, let’s go over how to implement this in the Intune portal. First, log in to the Intune portal using your credentials. Once you are logged in, navigate to Device > Configuration > Create > New Policy.
- Easily Disable Bluetooth using Intune How to Guide
- How to Allow Adding Non Microsoft Accounts Manually Using Intune Setting Catalog
- How to Allow Importing of Autofill Form Data in Microsoft Edge Via Setting Catalog in Intune
Create Configuration Profile
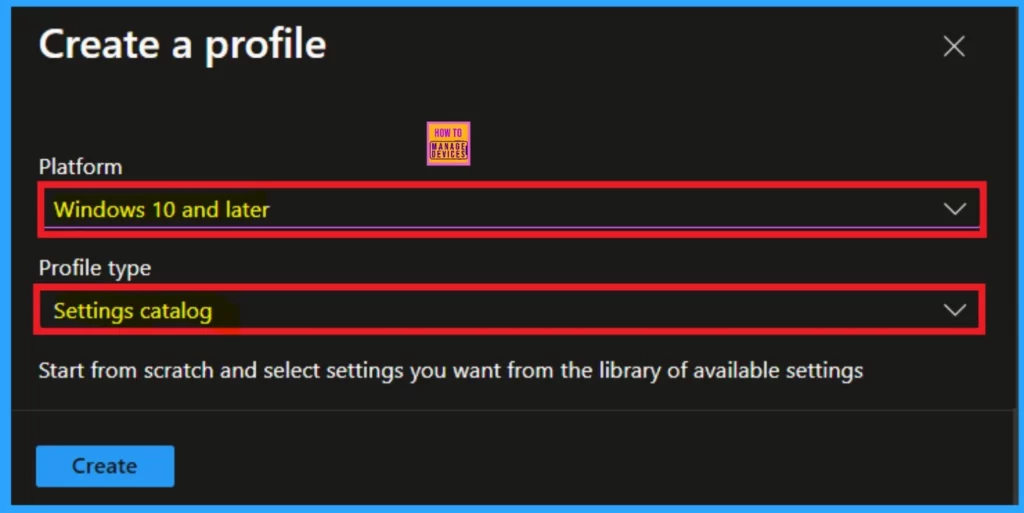
After clicking on New Policy, you will need to proceed to the Create Profile section. Here, enters the required information for the platform you want to configure. I chose “Windows 10 and later,” and then I selected “Settings Catalog” as the profile type. Once you have completed these steps, click on the Create option.
Basics
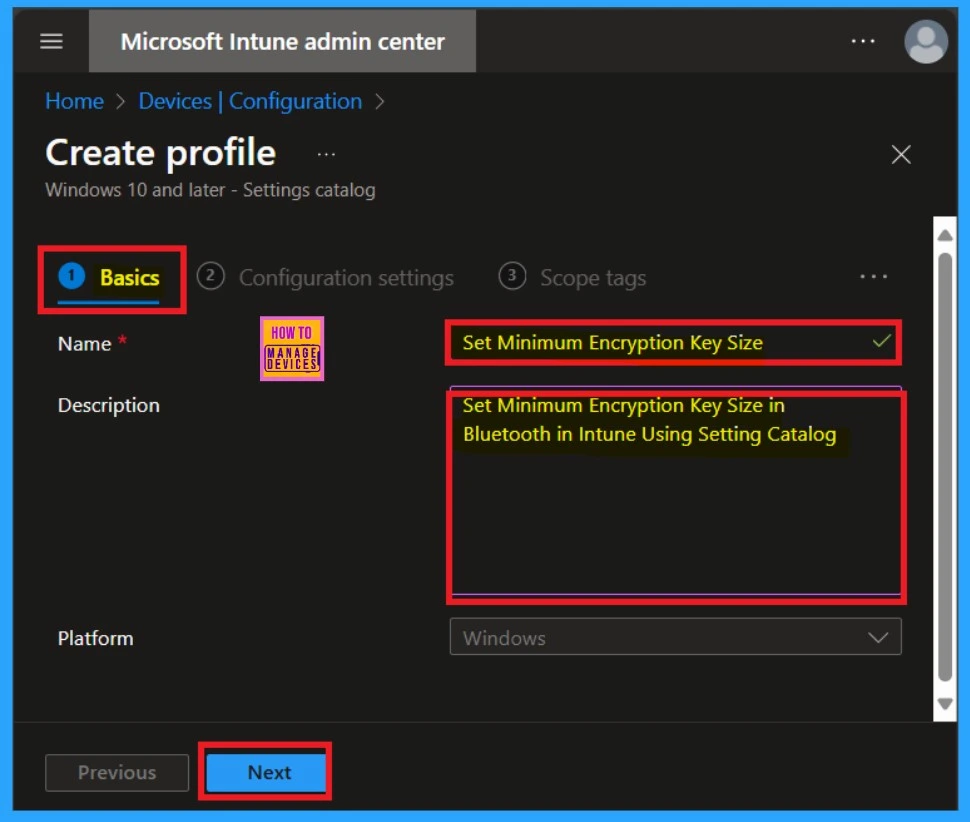
The Basics tab is the first one you need to work with. As the name suggests, this section is used for entering the basic details of a policy. Here, you will need to enter the Name and Description of the policy, which you can choose any kind of name that you can understand the policy later.
- The platform is already set to Windows.
- Once you’ve completed this, click on the “Next” button.
Configuration Settings
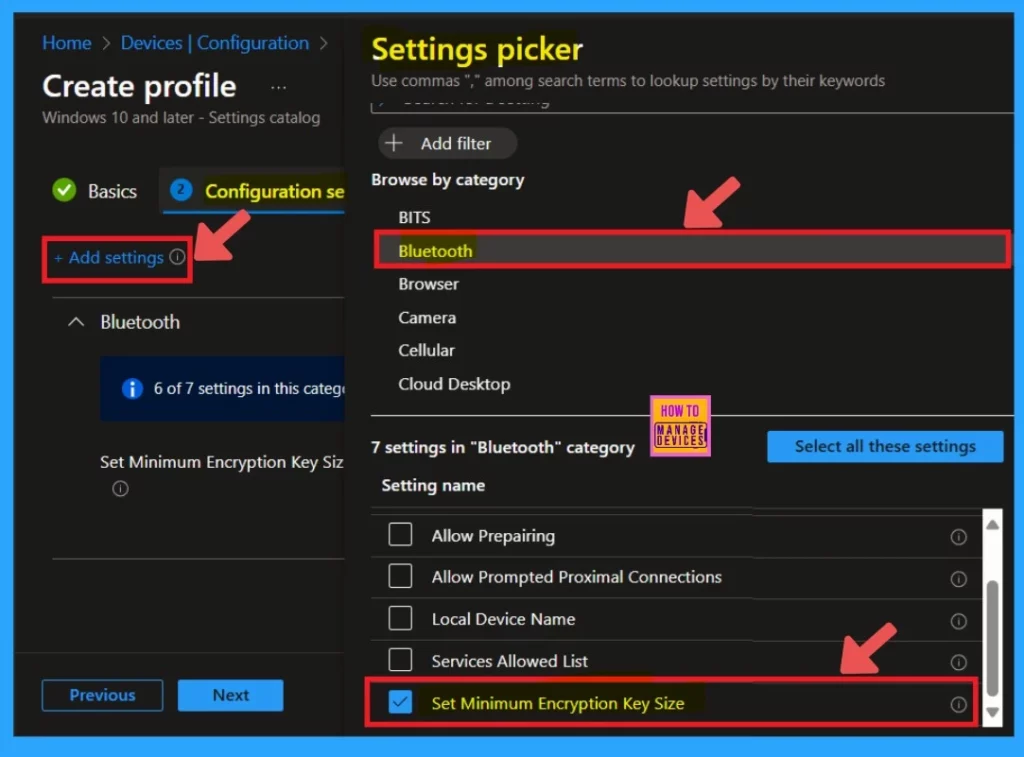
In a policy, the Configuration setting is critical. After the basic tab, you will get the configuration settings. You can see the Add setting option in the settings tab, which looks like a hyperlink; click on that. When you click on Add settings, you will see the settings picker option. Here, you have to select the setting category. I selected Bluetooth as the setting category; you will see the Settings Name when you click Bluetooth.
- Here, I selected “Set minimum, encryption key size.” When you selected the check box, it got ticked.
- Now, you can close the Setting Picker window and return to the Configuration settings.
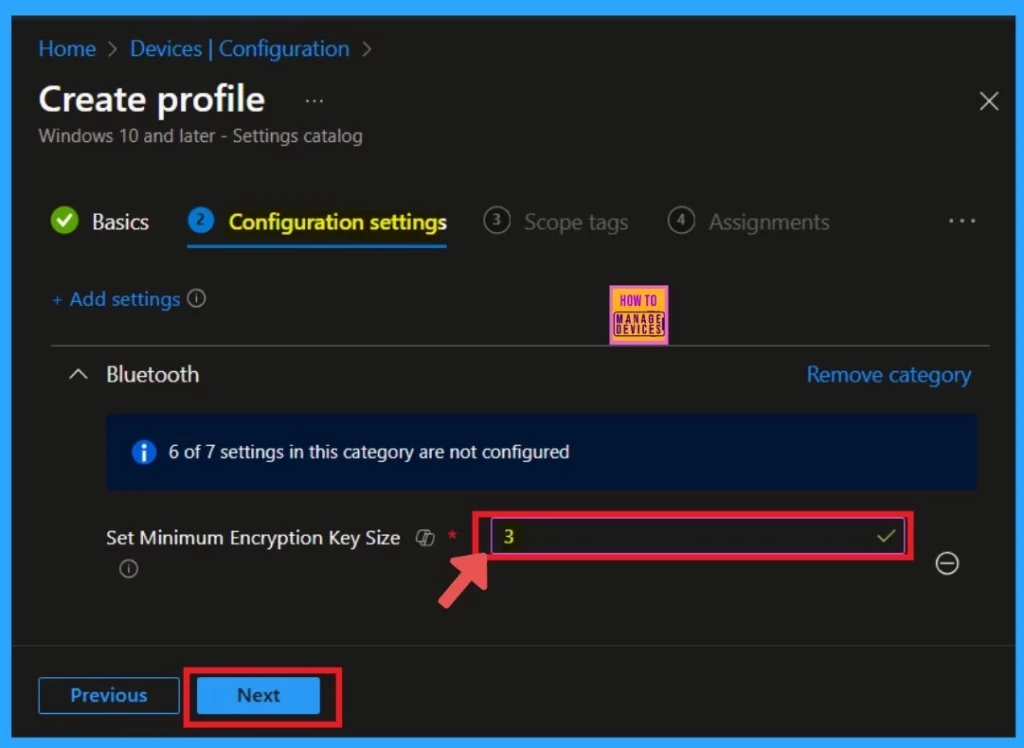
Now, you are back in the configuration settings, correct? Here, you will find the option to set the minimum encryption key size. You need to enter a key size that meets your requirements. The default value is 0, but you can specify a value between 1 and 16 to enforce a specific encryption key size.
- In this example, I will enter the key size value as 3.
- Now click on the Next.
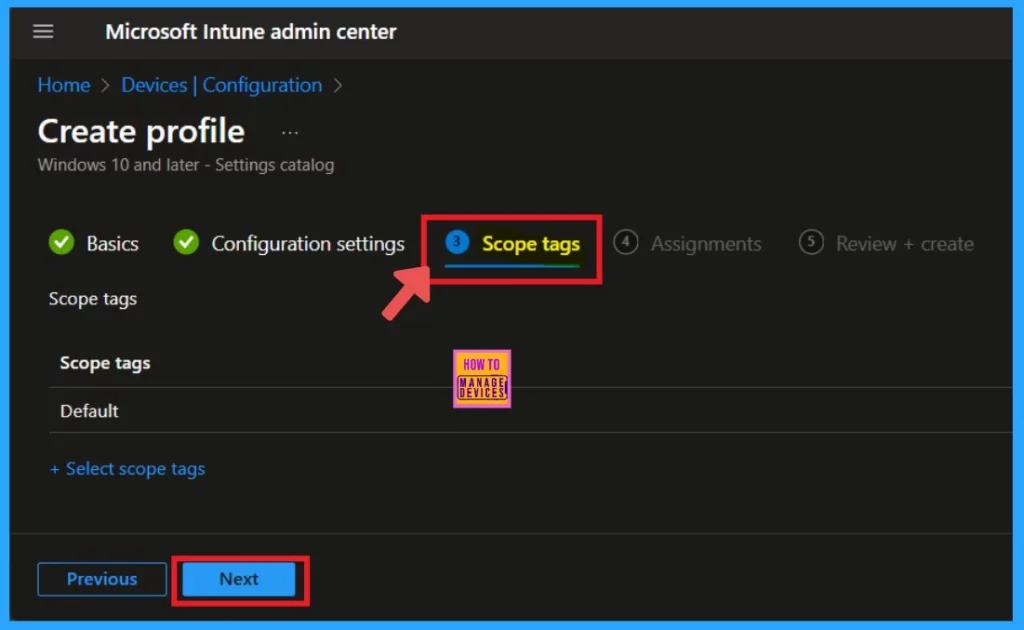
Scope Tags
After configuring the settings, you will see the option to add a scope tag to the policy.This step is not mandatory, so I will skip it. However, if you want to add a scope tag, click on “Select Scope Tag” and fill in the required information. Here I skip this Section and click on the Next.
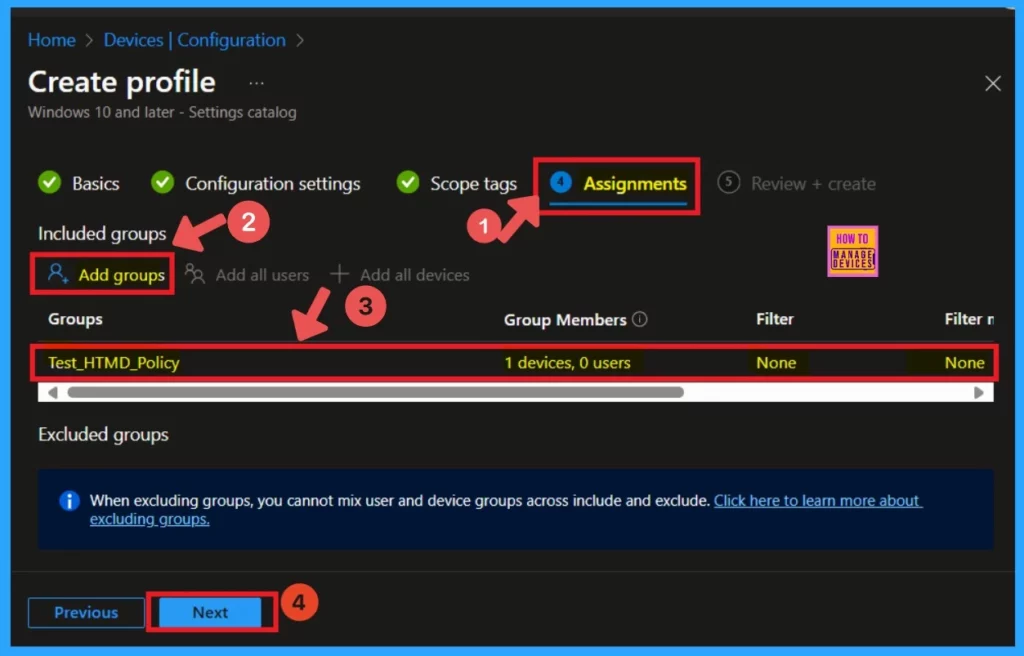
Assignments
The Assignment section is a very important step in policy creation. Here, you can add groups to the policy. Our aim is to set up a specific group for a required policy, right? So here you have to do that: click on the Add groups under the include group and select the group that you want or create a new group.
- After that, select the group option, and, you can click on Next.
- Before assigning a cloud policy, first check that the policy is applicable, and refer to the table below for the edition.
| Applicable OS | Editions | Scope |
|---|---|---|
| Windows 10, version 2004 [10.0.19041] and later | Pro | Device (Allowed) |
| XXXX | Enterprise | User( Not allowed) |
| XXXX | Education | XXXXX |
| XXXX | Windows SE | XXXXXX |
| XXXX | IoT Enterprise / IoT Enterprise LTSC | XXXXX |
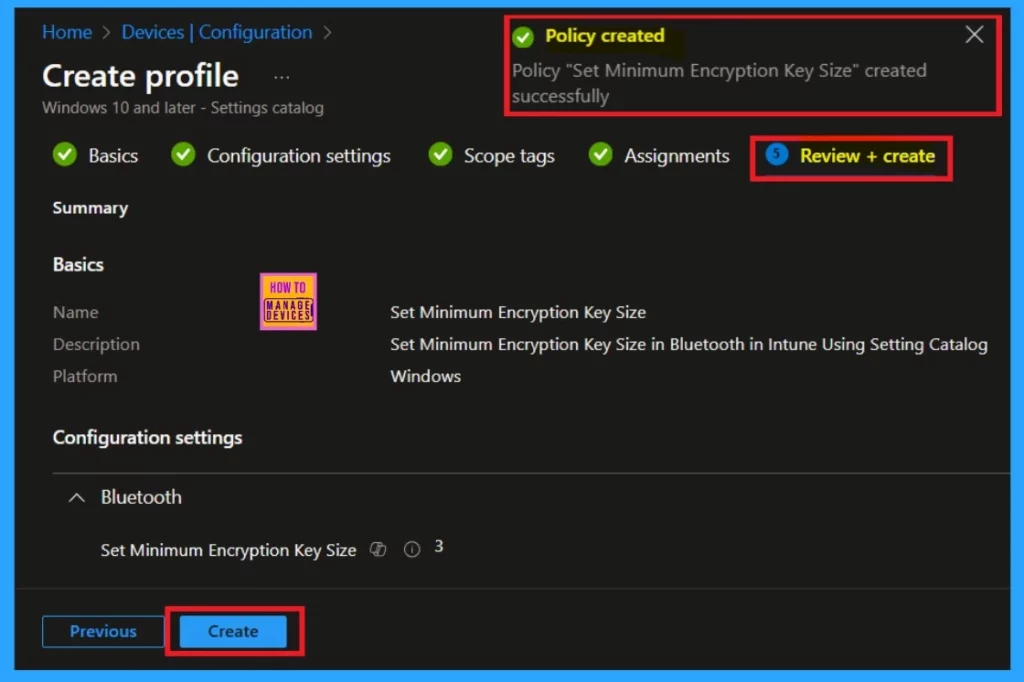
Review+Create
The “Review + Create” option is the final step in the policy creation process. In this stage, you will see a summary of the policy you are creating, including the policy name, descriptions, platform, and other details. Additionally, all the policy settings will be displayed for your review.
Once you have confirmed everything is correct, click the “Create” button. It notify you that your policy has been successfully created.
Monitor Status
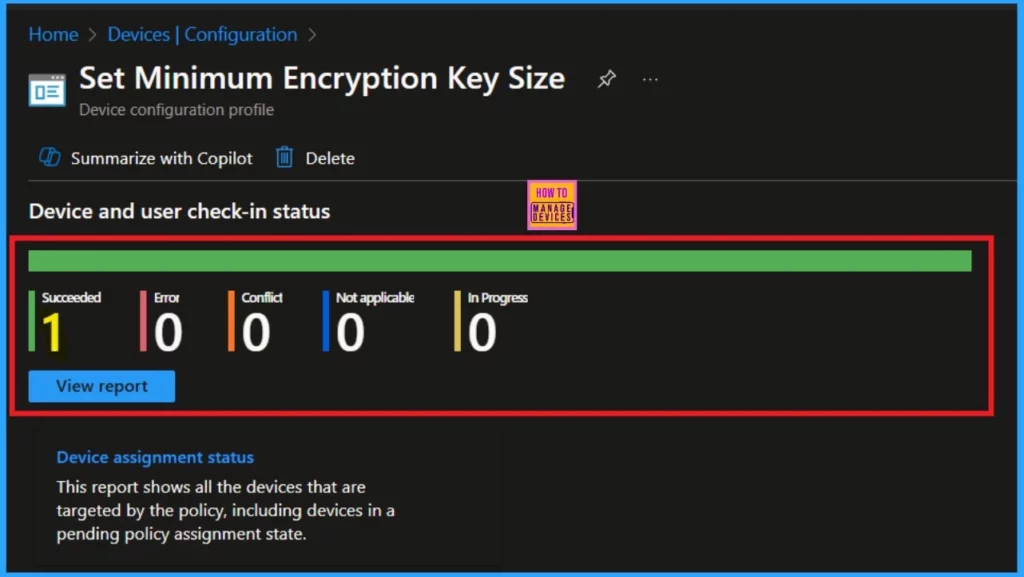
Monitoring the status is very important in this section, as it will inform you whether your policy has actually been created. As you may know, the process of creating a policy typically takes an 8 hour waiting period. You can use the Company portal Sync option to reduce the waiting period.
- After that you can check the monitoring status again.
- For checking Monitoring status Device > Configuration > Search the policy name(Set Minimum Encryption Key Size ).
Client Side Verification
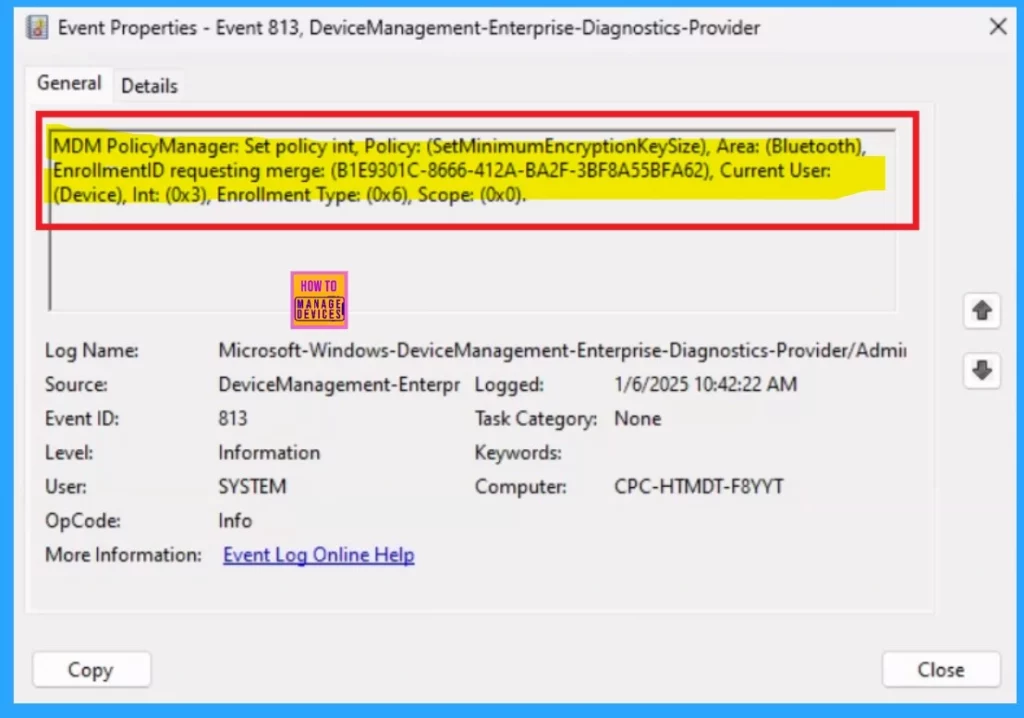
The next step is client-side verification, which can be done using the Event Viewer. To navigate through the Event Viewer, follow this path: Applications and Services Logs > Microsoft > Windows > Device Management > Enterprise Diagnostic Provider > Admin.
Here, you will find a list of policies. It can be challenging to locate the specific result you need, so I recommend using the “Filter Current Log” option in the right pane.
- Enter “813” in the Event ID field and click Ok.
- Additionally, you can filter the policies based on when they were created, such as within the last hour or 24 hours
| Policy Detailes |
|---|
| MDM PolicyManager: Set policy int, Policy: (SetMinimumEncryptionKeySize), Area: (Bluetooth), EnrollmentID requesting merge: (B1E9301C-8666-412A-BA2F-3BF8A55BFA62), Current User: (Device), Int: (0x3), Enrollment Type: (0x6), Scope: (0x0). |
Need Further Assistance or Have Technical Questions?
Join the LinkedIn Page and Telegram group to get the latest step-by-step guides and news updates. Join our Meetup Page to participate in User group meetings. Also, Join the WhatsApp Community to get the latest news on Microsoft Technologies. We are there on Reddit as well.
Author
Anoop C Nair has been Microsoft MVP for 10 consecutive years from 2015 onwards. He is a Workplace Solution Architect with more than 22+ years of experience in Workplace technologies. He is a Blogger, Speaker, and Local User Group Community leader. His primary focus is on Device Management technologies like SCCM and Intune. He writes about technologies like Intune, SCCM, Windows, Cloud PC, Windows, Entra, Microsoft Security, Career, etc.
