Today, let’s discuss something related to Allow Adding Non Microsoft Accounts Manually Using Intune Setting Catalog. Microsoft accounts are websites where users can manage their identities. Microsoft accounts allow us to sign into websites that support services using a single set of credentials, the same as an email address.
A Microsoft account, or MSA, is a unified sign-on personal user account for Microsoft customers to log in to consumer Microsoft services. Microsoft accounts allow two different methods for creating an account: using an existing e-mail address or signing up for a Microsoft e-mail address.
Some features of Microsoft accounts include updating user information such as first and last names and addresses and settings such as preferred language or preferences for email communications. We can also change or reset our user passwords.
Sometimes, you must know how to add a non-Microsoft account to your PC. Microsoft accounts give you the benefit of syncing your settings to many devices. However, some users prefer to let it go for a more secure and private experience of a local offline (non-Microsoft) account. Now, we will see step-by-step guidance on how to allow the manual addition of non-Microsoft accounts.
Table of Contents
What is Microsoft Account Dashboard?

On our Microsoft account dashboard, we can manage our personal information and security settings, track our subscriptions and order history, and handle our payment and billing options.
We can also organise our family’s digital life, track the health and security of our devices, and browse or redeem rewards. Microsoft account dashboard areas: Your info, Privacy, Security, Rewards, Payment & billing, Services & subscriptions, and Devices.
Allow Adding Non Microsoft Accounts Manually Using Intune
By creating a policy to Allow Adding Non Microsoft Accounts Manually users get a flawless experience. The policy Specifies whether the user is allowed to add email accounts other than MSA.
The most controlled value is 0. Please note that this policy only blocks UI/UX-based methods for adding non-Microsoft accounts. Even if this policy is implemented, you will still be able to provide non-MSA accounts with email 2 CSP.
Policy CSP – Account–AllowAddingNonMicrosoftAccountsManually
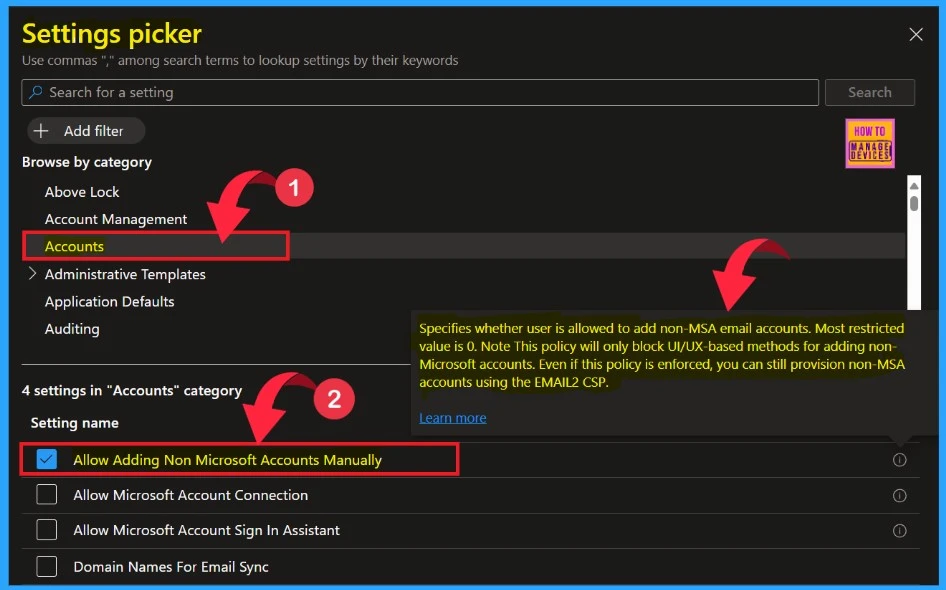
This policy will only block UI/UX-based methods for adding non-Microsoft accounts. Even if this policy is enforced, we can still provision non-MSA accounts using the EMAIL2 CSP.
./Device/Vendor/MSFT/Policy/Config/Accounts/AllowAddingNonMicrosoftAccountsManually
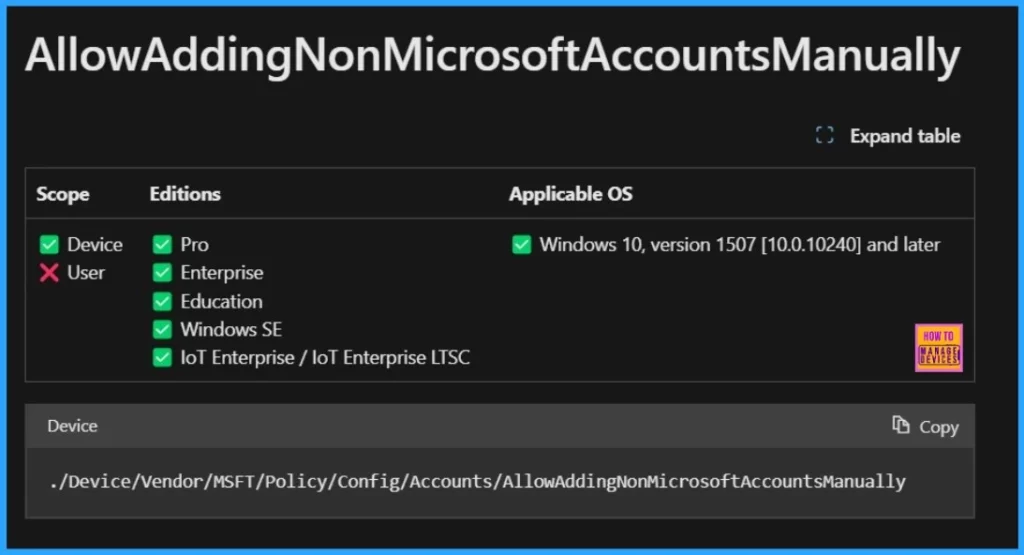
- We can see the Description framework properties in the below table.
| Property Name | Property Value |
|---|---|
| Format | int |
| Access Type | Add, Delete, Get, Replace |
| Default Value | 1 |
- We can see the Allowed values in the below table.
| Value | Description |
|---|---|
| 0 | Not allowed |
| 1(Default) | Allowed |
- Best Method to Allow Telemetry or Diagnostic Data with Intune
- Intune Allow or Block Accounts to Add in Android Personally Owned Work Profile
- Microsoft Intune Vs Jamf macOS Device Management Enhancements
Allow Adding Non Microsoft Accounts Manually
To create the Allow Adding Non Microsoft Accounts Manually policy through Intune, follow the steps below to add the new policy. First, we must use our administrator credentials to sign in to the Microsoft Intune Admin Center.
- Go to Devices > Windows >Configuration > Create > +New Policy
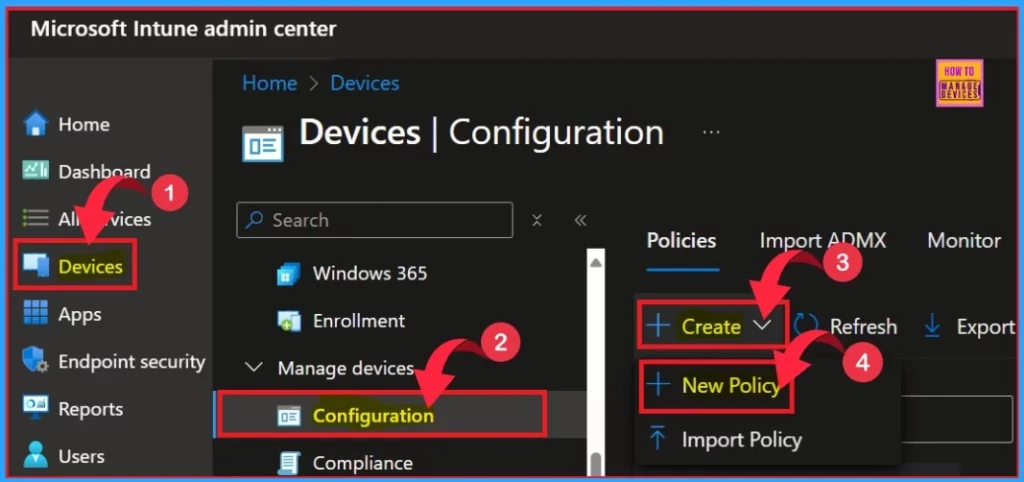
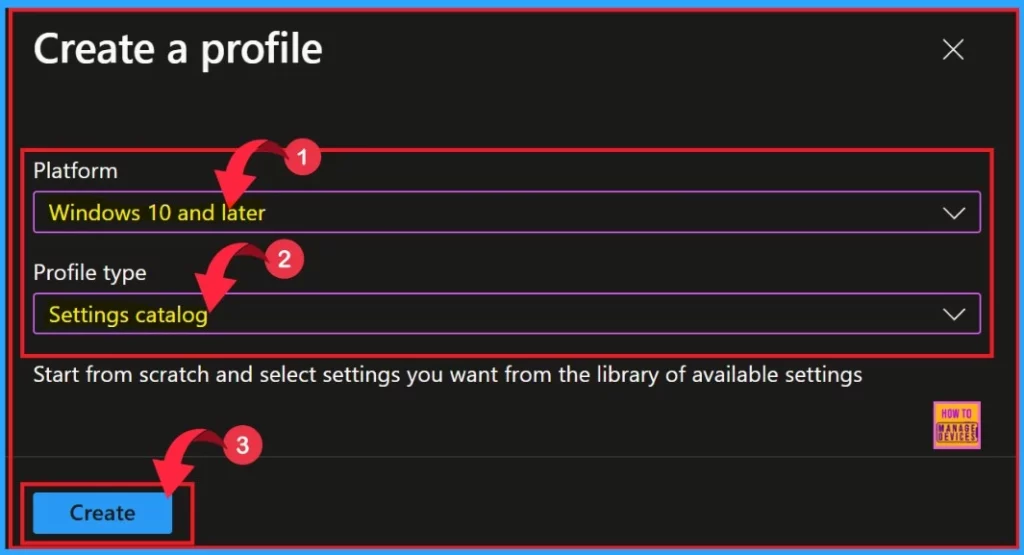
By clicking New Policy, a new window will open. We need to enter the suitable platform and the profile type of the policy from the drop-down.
| Platform | Profile type |
|---|---|
| Windows 10 and later | Settings catalog |
- After selecting the platform and profile type, click on the Create button.
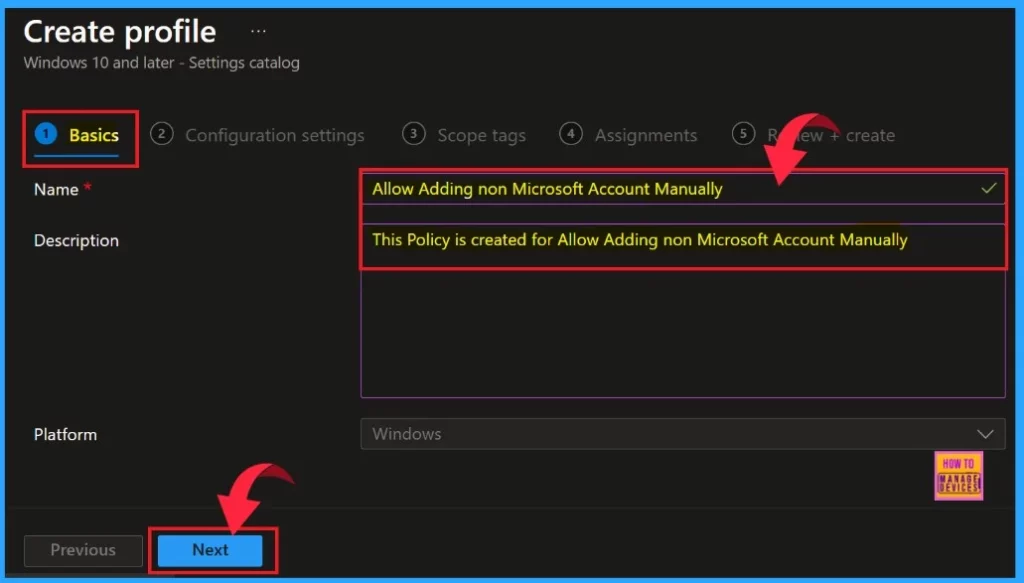
We will get a new window with several tabs. Under the Basics tab, we must type the name of the configuration policy. Here, our policy is Allow Adding Non-Microsoft Accounts Manually. In the Description box, we can briefly describe the policy.
Name of the policy is ‘Allow adding non Microsoft Account Manually’ and description is ‘This Policy is created for allow adding non Microsoft Account Manually.’
- Click Next
Configuration Settings
The next section is Configuration Settings, which is an important part of policy creation. You can choose which settings to configure using the settings catalog. Click on + Add settings to browse or search the catalog for the settings you want to configure.
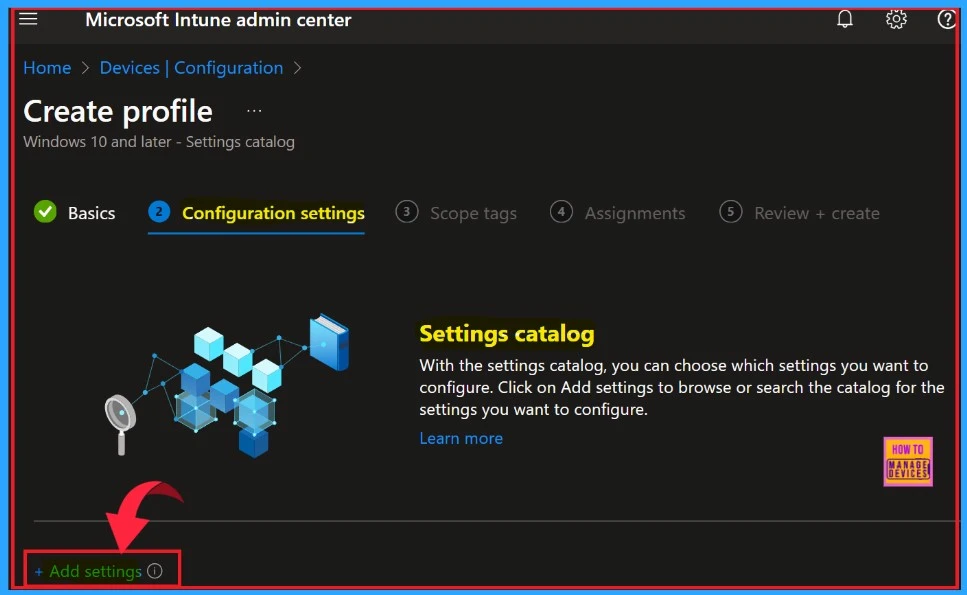
Then, click on +Add settings. We will get a settings window to select the settings. You can search for settings to make it easier or browse by category. Here, we can choose Accounts settings and Allow Adding Non Microsoft Accounts Manually.
- Report Button Not Removed in Classic Outlook After Setting Use a Non Microsoft Add in Button
- Allow Manual Start of Microsoft Account Sign In Assistant Using Intune Settings Catalog
- Microsoft Introduces HTML Formatting in Noncompliance Email Notifications in Intune
Configuration Setting
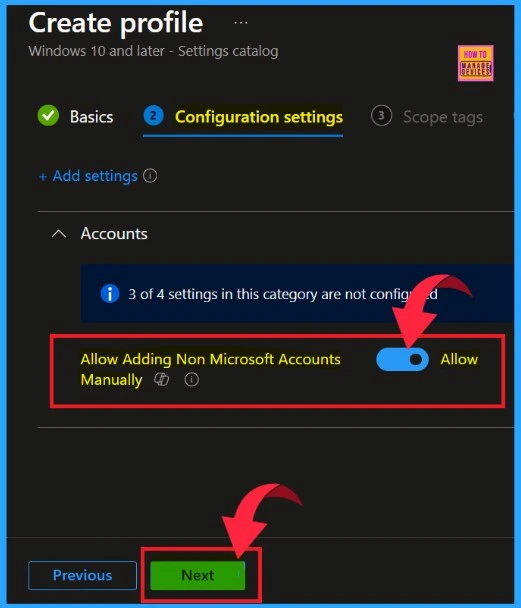
After selecting the policy, you can see it on the configuration page. There is a toggle switch showing allow the Allow Adding Non-Microsoft Accounts Manually. Then click on the Next button.
Scope Tags
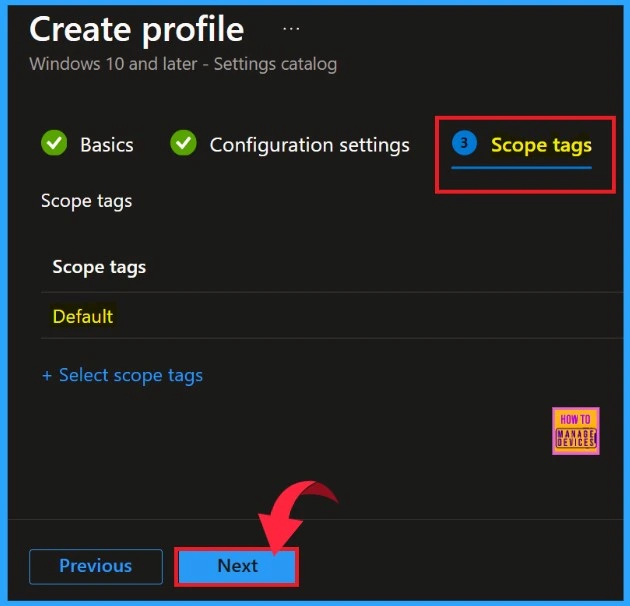
Next step is the Scope tags. You can skip this tab, because completing this section is not mandatory to create a policy in intune. Click on the Next button to continue.
Assignment
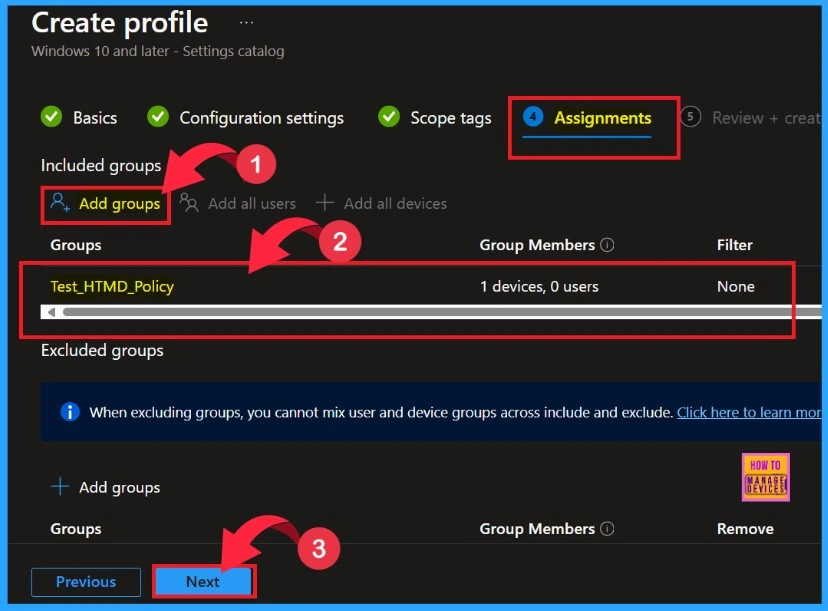
In the Assignment section, we need to choose the group to which we will assign the policy. Click on the + Add groups from the Included groups button and select your groups from the group list. Click the Select button and the selected groups will be shown on the Assignment tab. Then click the Next button.
Review + Create
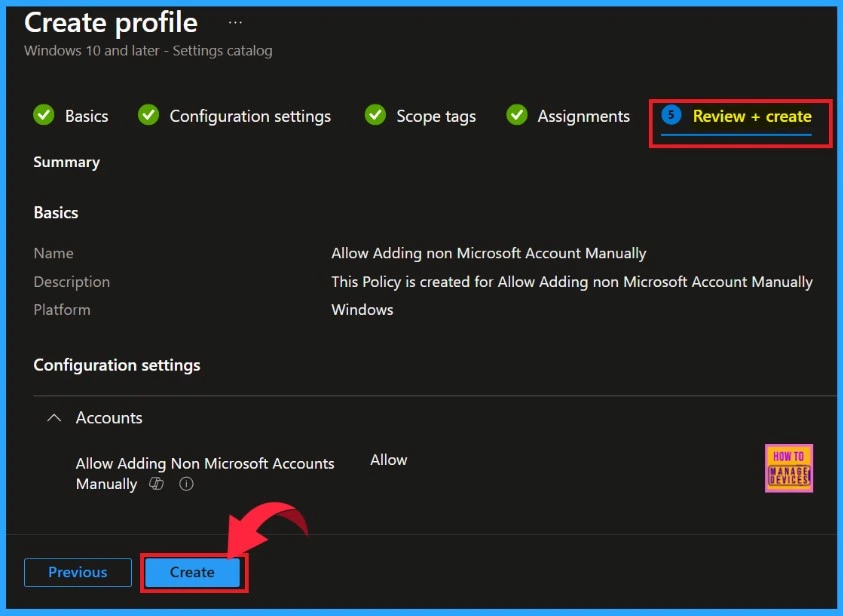
The “Review + Create” tab is designed to help users review and manage their settings. This page provides a summary of your policy, allowing you to navigate through each section easily. After you have completed all the necessary steps, then click the “Create” button.
Status of policy
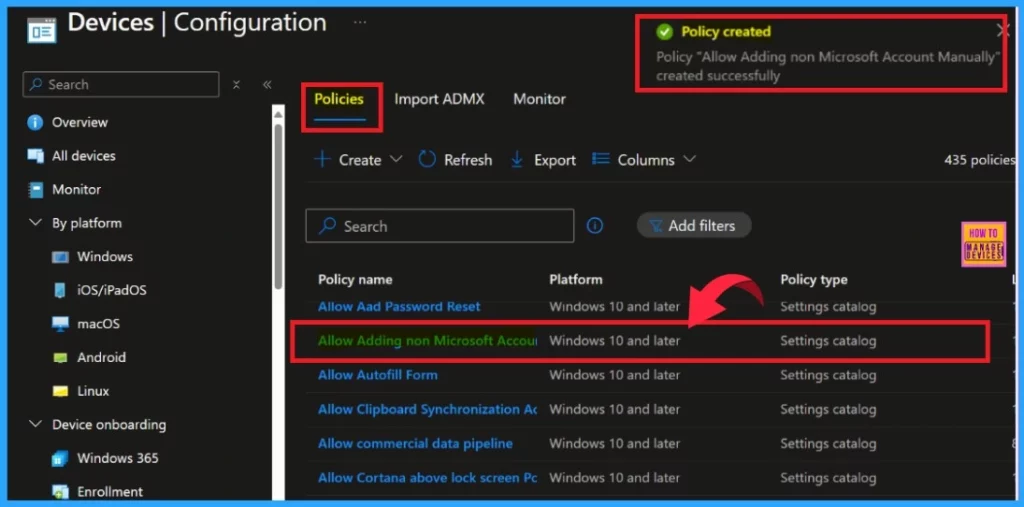
After Clicking the create button, we will receive a notification confirming that the policy has been created successfully. After receiving the notification, check the policy on the Intune Portal. To access it, go to Devices and Configuration, search for your policy, and open it.
Device Monitor
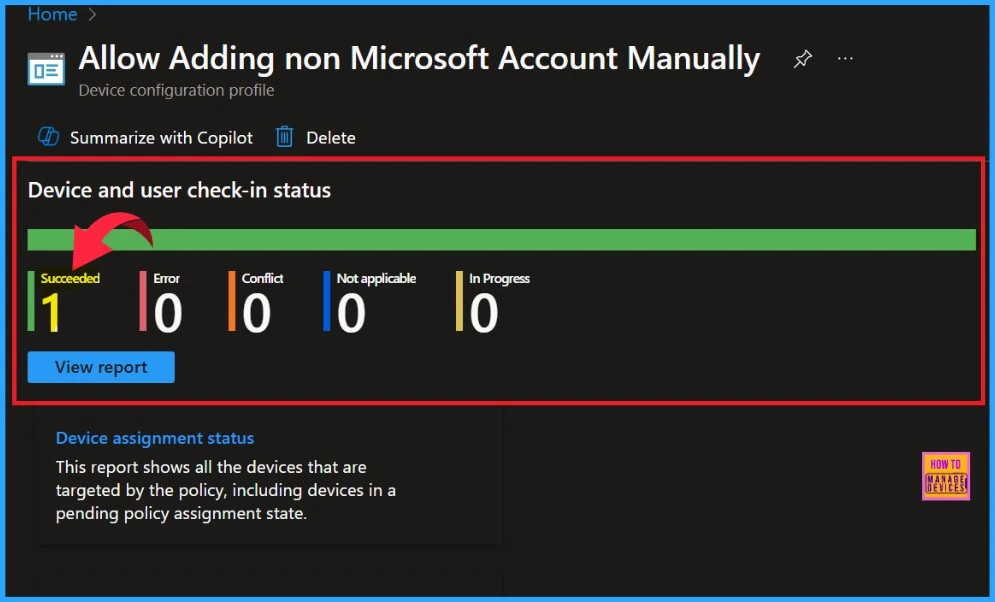
the Allow adding non Microsoft account manually policy has succeeded, we can see 1 device marked as successful. The screenshot below provides additional details.
End User Experience – Event Log
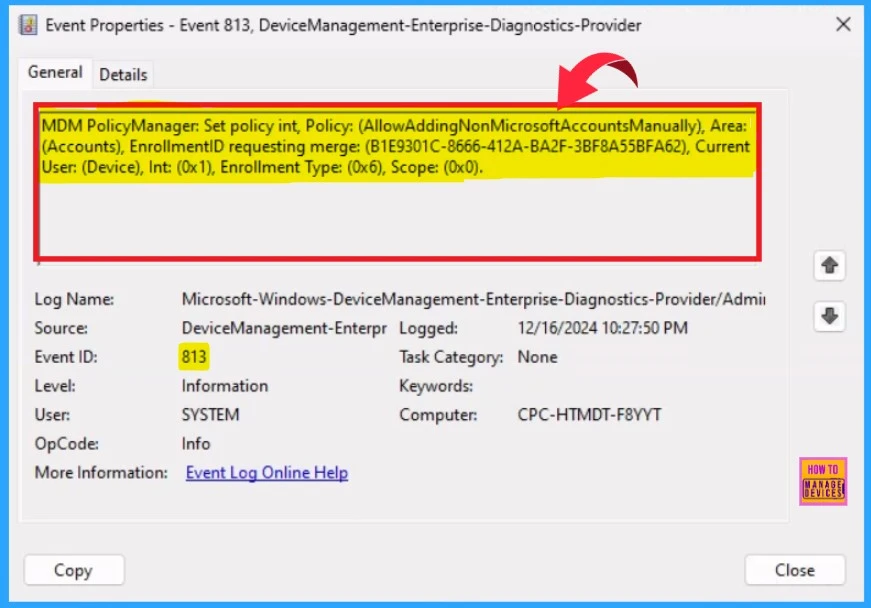
The Intune event ID 813 ensures that a string policy is applied to Windows 10 or 11 devices, showing the exact value of the policy being enforced.
We can check the Event log path to confirm this – Applications and Services Logs – Microsoft – Windows – Devicemanagement-Enterprise-Diagnostics-Provider – Admin.
Need Further Assistance or Have Technical Questions?
Join the LinkedIn Page and Telegram group to get the latest step-by-step guides and news updates. Join our Meetup Page to participate in User group meetings. Also, Join the WhatsApp Community to get the latest news on Microsoft Technologies. We are there on Reddit as well.
Author
Anoop C Nair has been Microsoft MVP for 10 consecutive years from 2015 onwards. He is a Workplace Solution Architect with more than 22+ years of experience in Workplace technologies. He is a Blogger, Speaker, and Local User Group Community leader. His primary focus is on Device Management technologies like SCCM and Intune. He writes about technologies like Intune, SCCM, Windows, Cloud PC, Windows, Entra, Microsoft Security, Career, etc.
