Let’s discuss How to Show or Hide Switch Account Option in Windows Start Menu using Intune Policy. Switch Account option allows you to change to another account without signing out. This options is accessible when you click on your profile picture in the Start Menu.
With the Microsoft Intune settings catalog, you can easily implement this policy in Windows devices. Switching Account is a necessary and in some cases and it also create many issues. When users repeatedly switch accounts it creates Multiple active sessions start consuming memory and CPU.
Let me explain with an example. If your organization, use managed Windows PCs and the users switching accounts repeatedly. Due to this, some left personal files or sessions open. By enabling this policy you can prevent Switch Account.
By enabling this policy, users’ experience is simplified by reducing login confusion. Admins can track who used the device and when and troubleshooting is lesser. With this policy you can stronger the security posture of your organization.
Table of Contents
Hide Switch Account from Start Menu Using Intune Policy
As mentioned above, this policy helps to prevent Switching Accounts. This policy provides many security controls by Stops users from accessing other accounts, especially in shared or kiosk-style setups. This policy is basically implemented for unauthorizes user switching.
- Enable or Disable Microsoft Account Connection Policy using Intune
- Intune Allow Microsoft Accounts to be Optional Policy
- Create Intune Policy to Block Microsoft Accounts
Configure Switch Account Policy
You can easily Switch Account Policy using Intune. The Publish User Activity Policy is a setting that allows Windows to track and store user activities across devices. To start configuring this policy, open Microsoft Intune admin center.
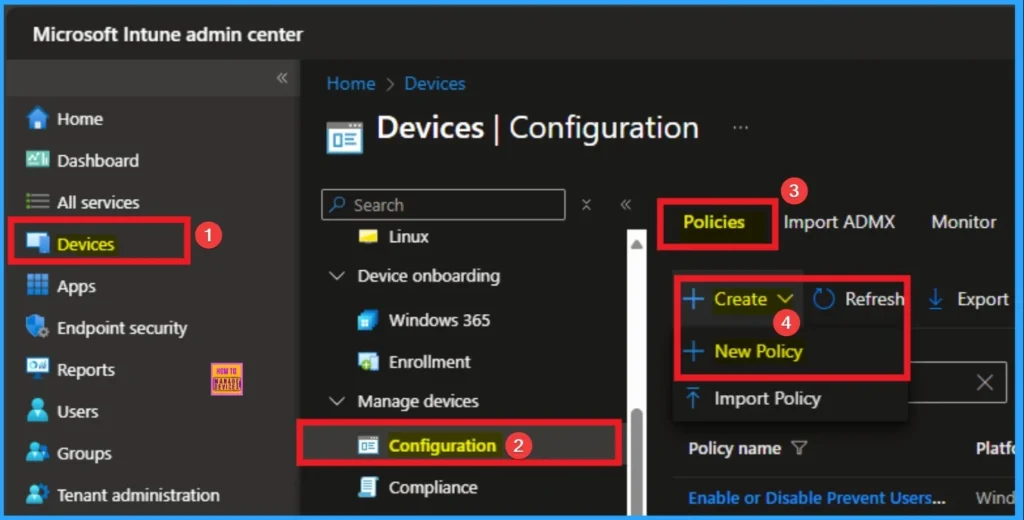
- Go to Devices > Configuration
- From Policies, click on the + Create button and select +New Policy
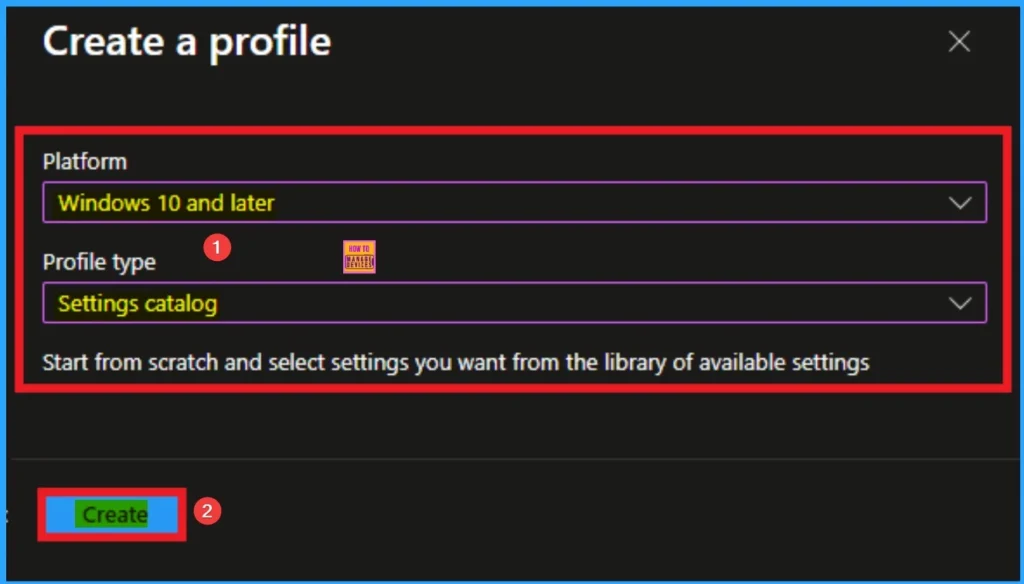
To create a policy you have to specify profile type and Platform. From this window you can select that. Here, I choose Windows 10 and later as Platform and Profile type as Settings catalog. Then click on the Next button.
Policy Beginning Stage
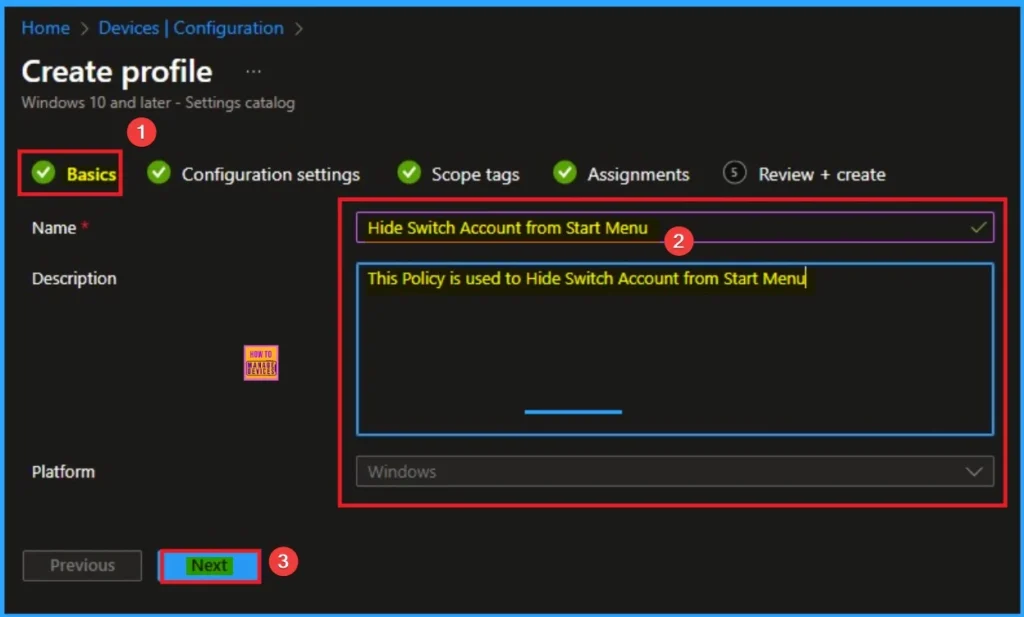
Basic tab, helps you to add the Name and Description for the policy that you want to create. The Name is the Mandatory file, and you must enter the Name here. The Description is optional,and it is better to give the Description.
- Name – Enable or Disable Switch Account Policy
- Description – This policy is used to Enable or Switch Account Policy
- Click on the Next button.
Configure Settings
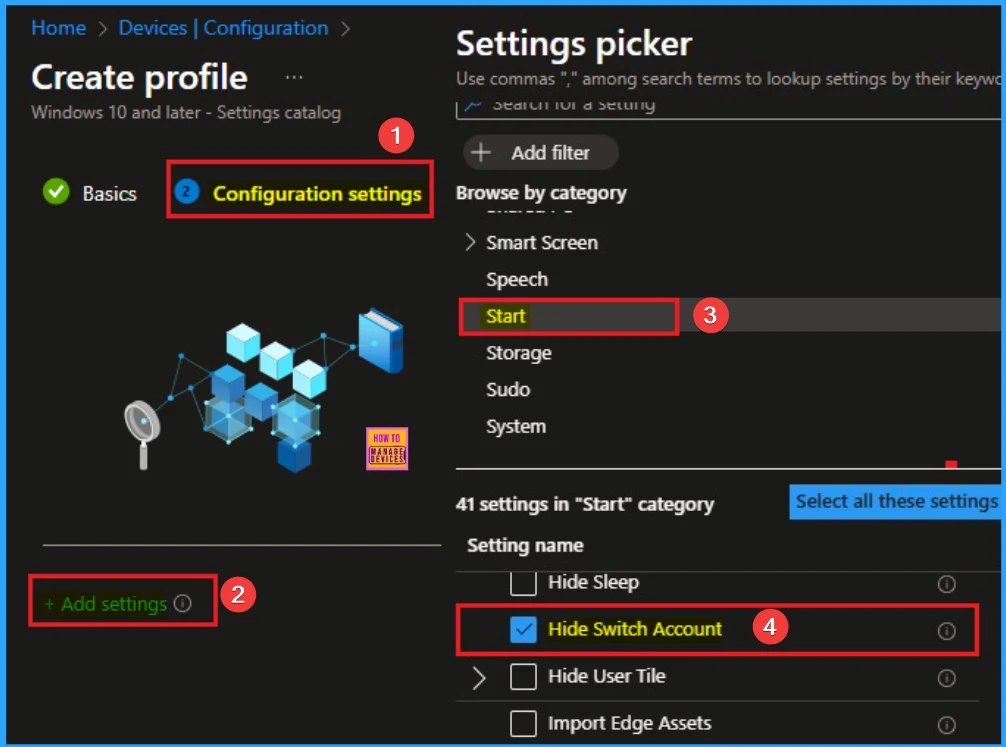
The Configuration tab is very crucial it helps you to select a specific setting. On the Configuration tab, click on the +Add settings hyperlink, and then you will get the Settings Picker. From the Settings Picker, you can choose settings quickly by browse by category or Search bar.
- Choose the Start Settings category
- Select Hide Switch Account settings
- Then close the Settings Picker window
Disable Hide Switch Account
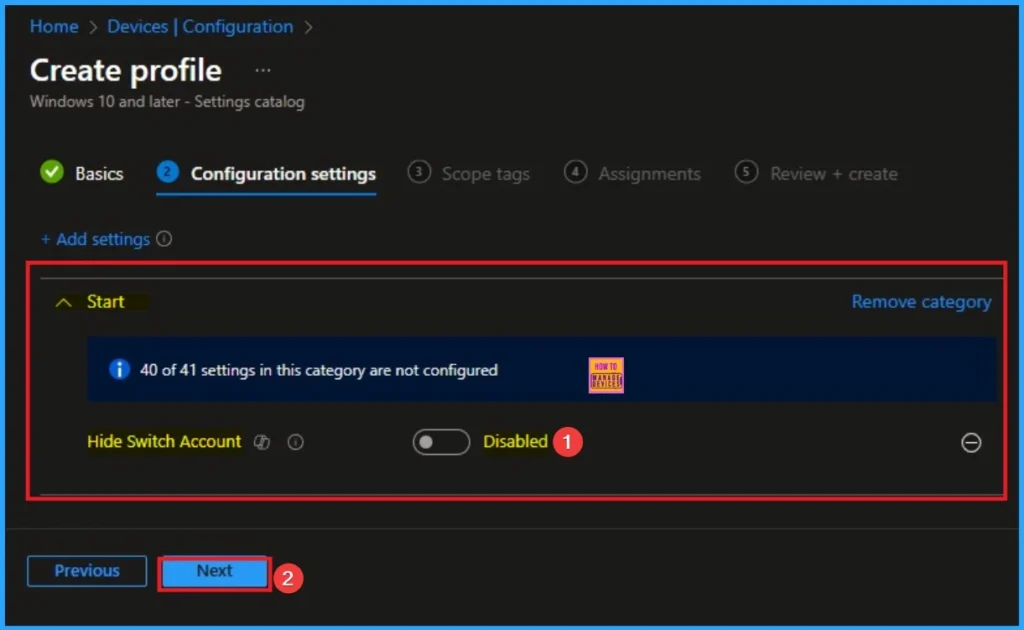
By default, Hide Switch Account policy is disabled , which means that, you can’t hide switch account option. By disabling this policy you can allows multiple users to log in without signing out. If you continue with this, click on the Next button.
Enable Hide Switch Account
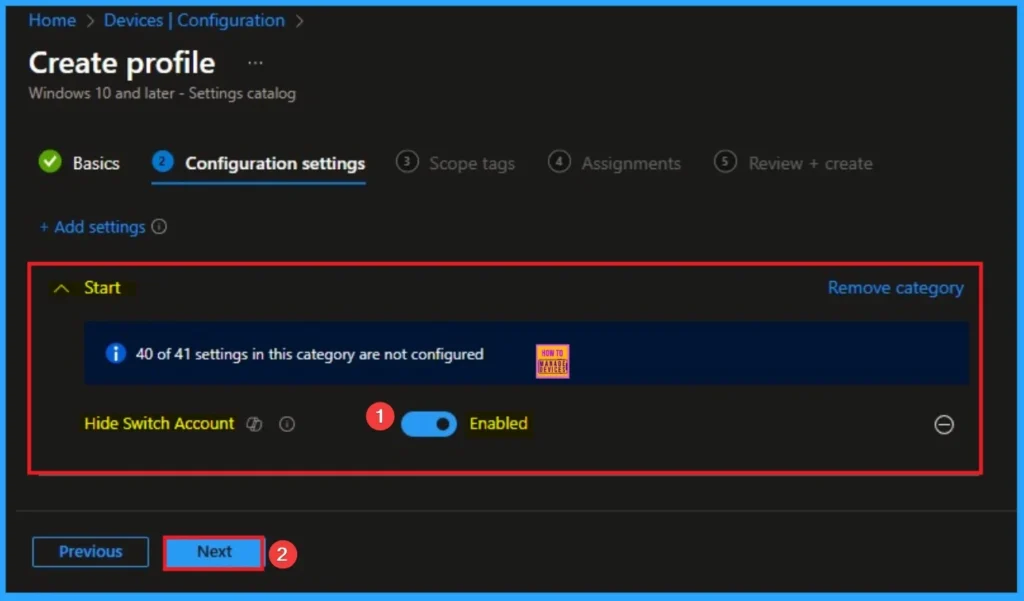
By enabling this policy you can avoid multiple users log in. Also ensures policy compliance by keeping the device in the assigned user session. Click on the Next button to Continue. Here I choose Enable Value.
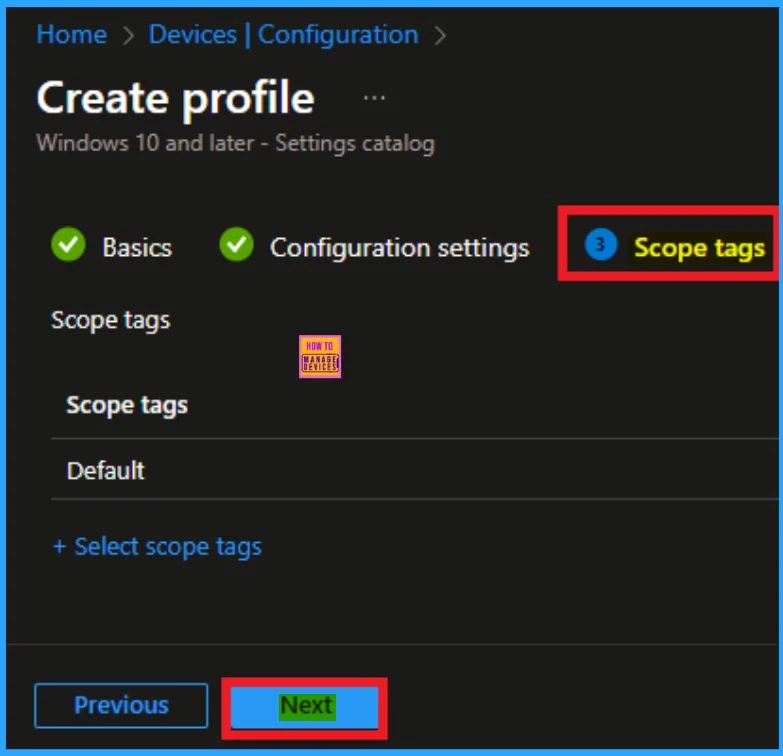
Scope Tags
On the scope tag, you can add the scope tag so simply skip this section. This is not a mandatory tab, and this is completely up to your choice. Here I skip this section. So click on the Next button.
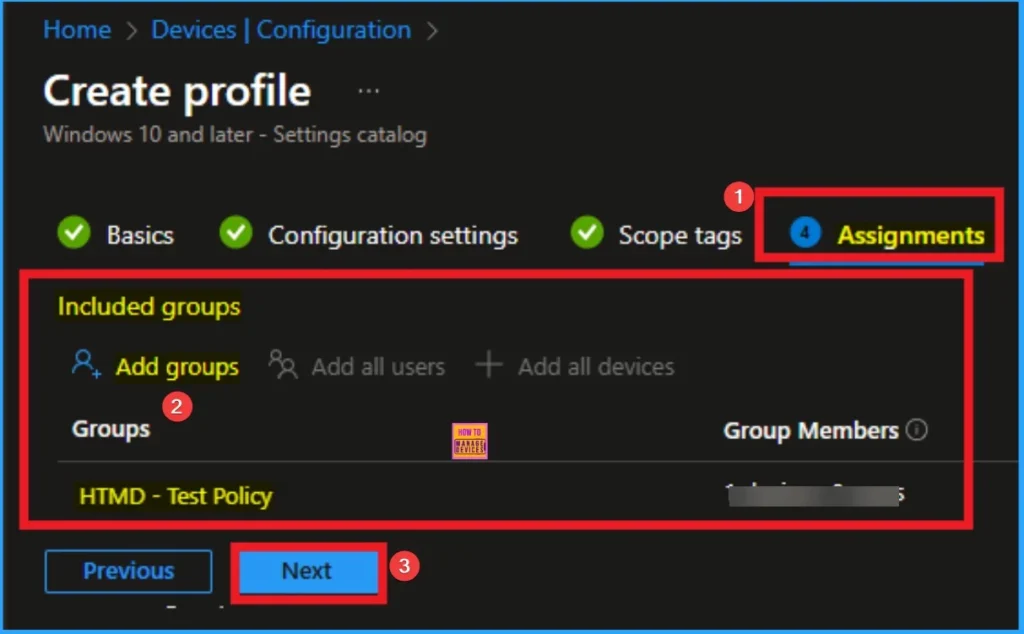
Assignments Tab
The Assignment tab is a very crucial section that determines which groups can be choose to assign the Hide Swich Account. Click on the +Add groups option under Included groups. Select the group from the list of groups and click on the Select button. Then the selected group is shown on the Assignment tab.
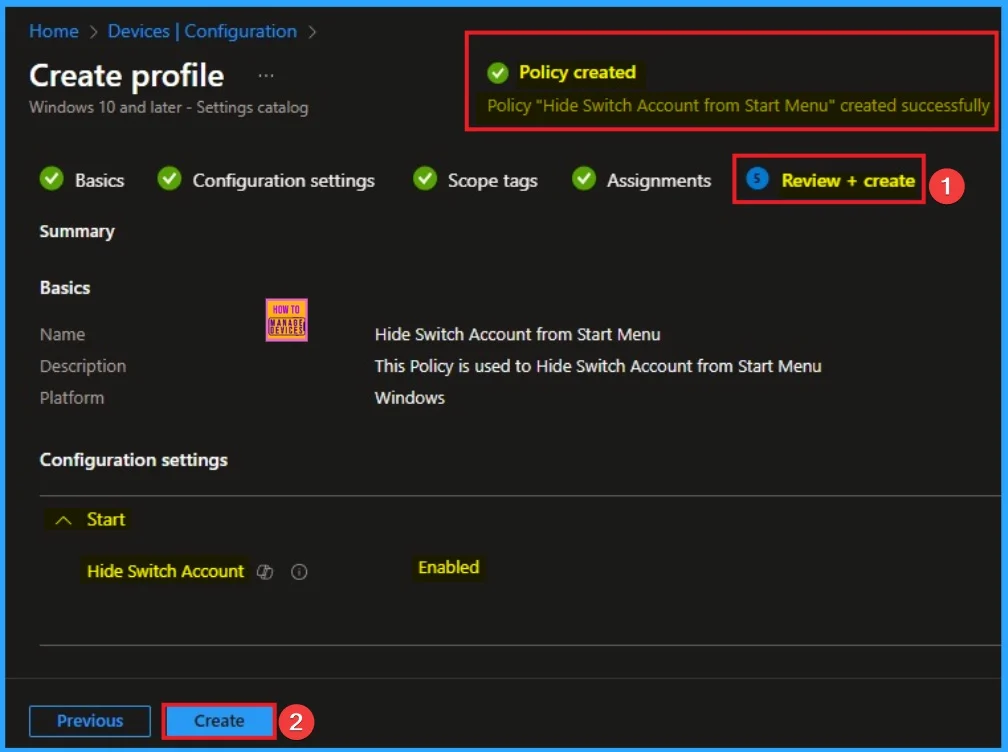
Finalise Policy
The Review + Create tab is the last stage of the policy creation. On this tab, you can verify the details and continue. If you want to make any changes, click on the previous button. Otherwise, click on the Create button. Then you will get the success notification.
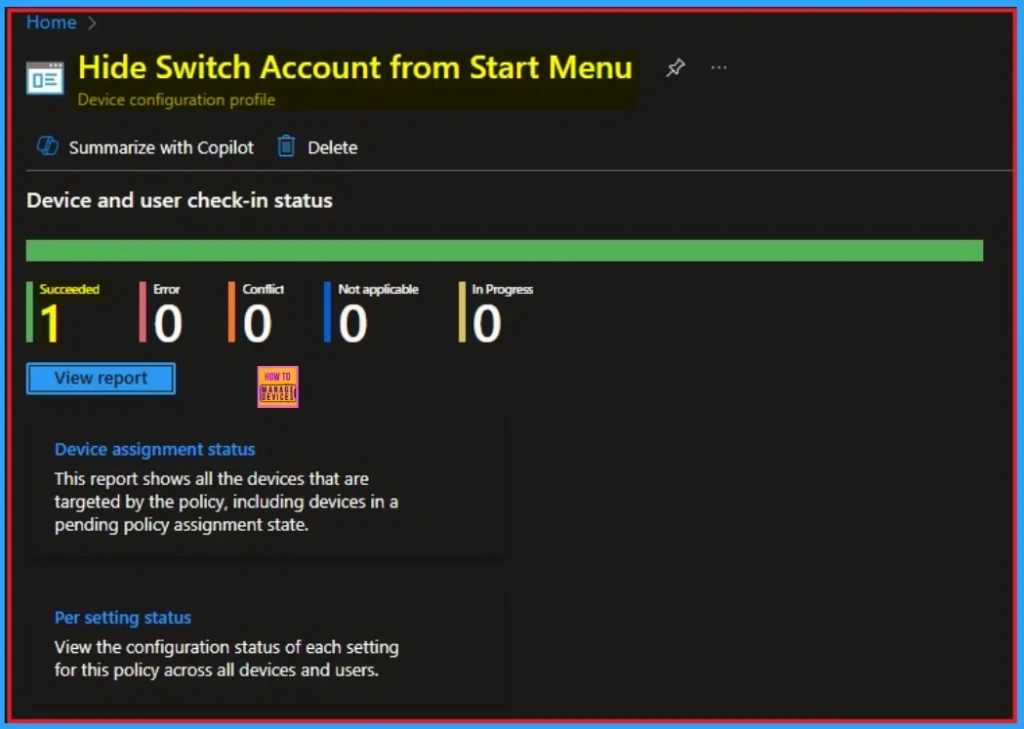
Device Check-in Status
When the policy is created successfully, you can sync the device on the Company portal for faster deployment. After syncing is completed, you can check the status on the Intune Portal. Go to Devices > Configuration and search for the policy.
- Here the Policy succeeded as 1
Client-Side Verification – Event Viewer
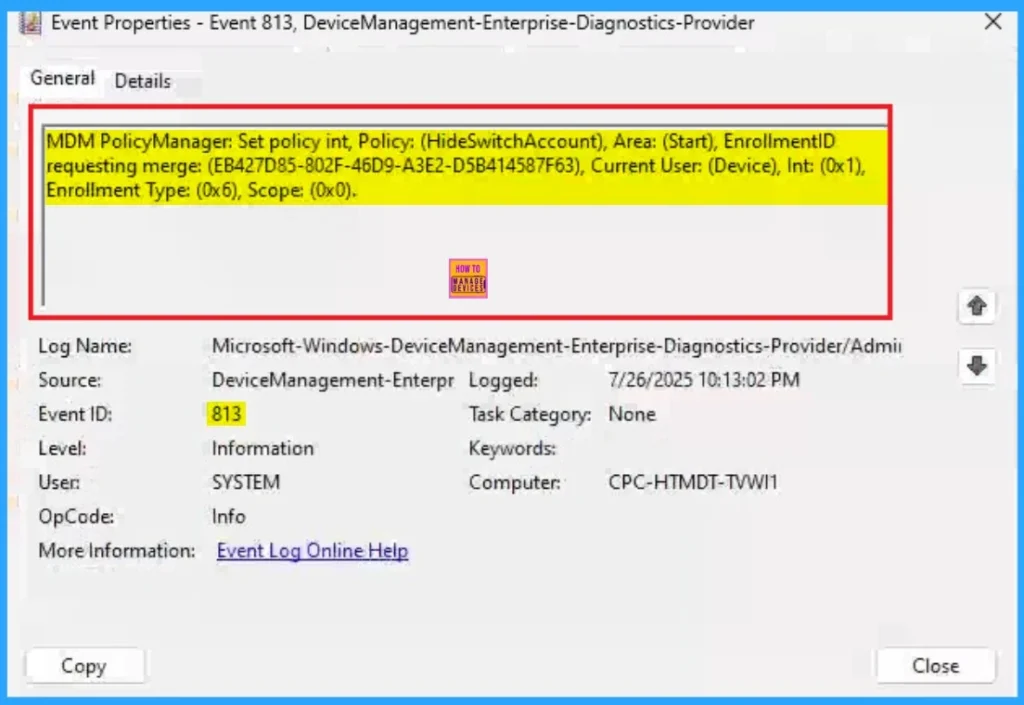
Event Viewer helps you to check if the policy suceeded or not. Event Viewer can be used as a client side verification. Here first go to the Event Viewer and check the Event ID that is usually in 813 or 814. Navigate to Applications and Services Logs > Microsoft > Windows > Device Management > Enterprise Diagnostic Provider > Admin.
- Here the success ID is 813
MDM PolicyManager: Set policy int, Policy: (HideSwitchAccount), Area: (Start), EnrollmentID
requesting merge: (EB427D85-802F-46D9-A3E2-D5B414587F63), Current User: (Device), Int: (0x1),
Enrollment Type: (0x6), Scope: (0x0).
Windows CSP Details
The CSP page shows the basic information of Switch Account. Enabling this policy hides “Switch account” from appearing in the user tile in the start menu. The available values are don’t hide and hide. The applicable voice is Windows 10, version 1703 [10.0.15063] and later.
| Property name | Property value |
|---|---|
| Format | int |
| Access Type | Add, Delete, Get, Replace |
| Default Value | 0 |

How to Remove Hide Switch Account Policy
If you want to remove the Hide Switch Account policy on the Intune portal, it is a very easy process. To do this, open the policy from the Configuration tab., and click on the Edit button on the Assignment tab. Click on the Remove button on this section to remove the policy.
For more detailed information, you can check our previous post – Learn How to Delete or Remove App Assignment from Intune using by Step-by-Step Guide.

How to Delete Hide Switch Account Policy
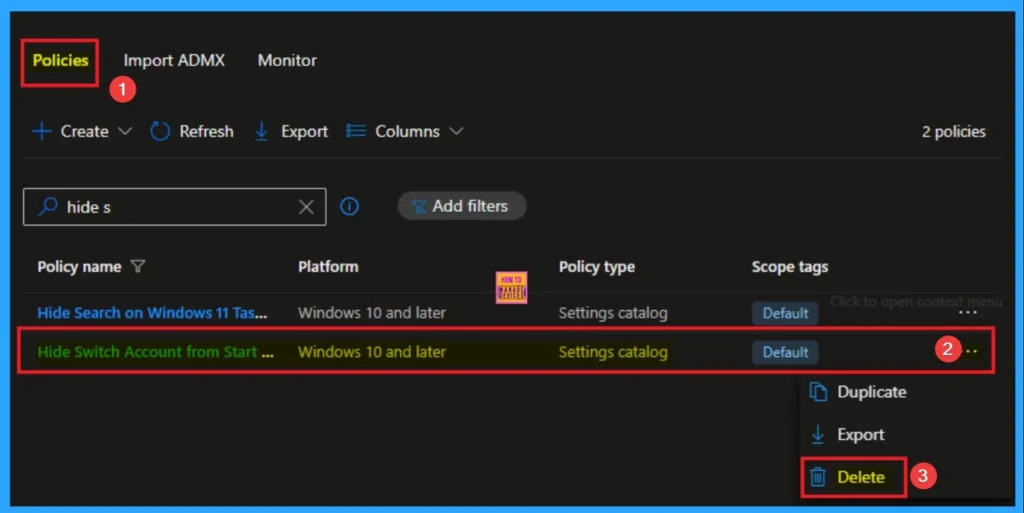
Intune allows you to easily delete a policy within the Intune Portal. Policy deletion is necessary in an organization due to different reasons. To delete the policy, click on the 3-dot option and then click on the Delete button.
For more information, you can refer to our previous post – How to Delete Allow Clipboard History Policy in Intune Step by Step Guide.
OMA URI Settings
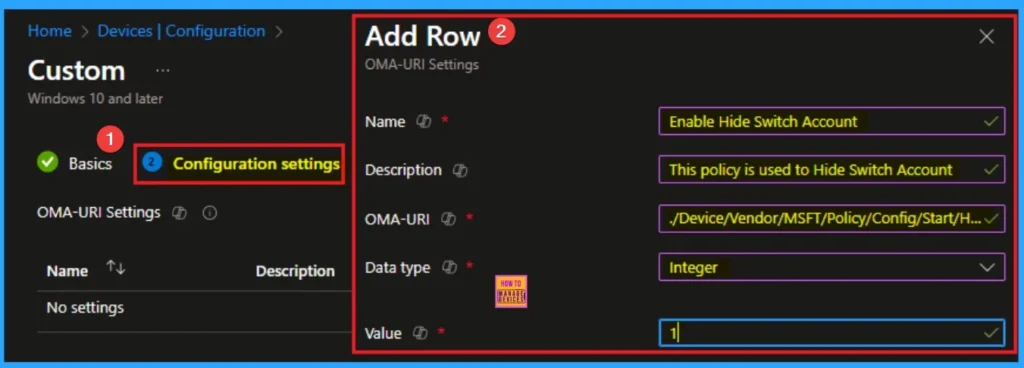
It can be easily configured throug CSP. You can create OMA URI Settings by Sign in Intune Portal. Devices > Configuration. Click on Create to start a new policy. Choose the platform as Windows 10 or later. For the Profile type, select Templates, then choose Custom. Provide a name for the policy, such as Allow Search Engine Customisation and add a description if needed.
| Steps |
|---|
| Click on + Add under OMA-URI Settings to configure the specific setting. |
| To Configure the OMA-URI Setting Enter Name and Description |
| Enter the following OMA-URI path: ./Device/Vendor/MSFT/Policy/Config/Start/HideSwitchAccount |
| Enter the value 0 – (Default) Don’t hide 1 – Hide |
| After entering the above details, click the Save button. |
Need Further Assistance or Have Technical Questions?
Join the LinkedIn Page and Telegram group to get the latest step-by-step guides and news updates. Join our Meetup Page to participate in User group meetings. Also, Join the WhatsApp Community to get the latest news on Microsoft Technologies. We are there on Reddit as well.
Author
Anoop C Nair has been a Microsoft MVP for 10 consecutive years from 2015 onwards. He is a Workplace Solution Architect with more than 22+ years of experience in Workplace technologies. He is a Blogger, Speaker, and Local User Group Community leader. His primary focus is on Device Management technologies like SCCM and Intune. He writes about technologies like Intune, SCCM, Windows, Cloud PC, Windows, Entra, Microsoft Security, Career, etc.

