Let’s learn how to set Out of Office in Outlook. Businesses and individuals use Outlook to manage their email communication effectively. Out-of-office is the best feature for those who are using Microsoft Outlook. “Out of Office” As the name suggests, this feature is full of use when you are away from the office or home.
It is a significant feature in Outlook, usually helpful for those who are not available at the time or away from the office. We are all having a busy day, and sometimes, we can’t send emails on time. Out-of-office is the best solution for this.
This highly customizable option allows the user to set the duration of their absence. You can also send an Automatic replay and choose the time and date you would like to send that mail. This feature is critical in ensuring smooth communication and setting expectations when the user is unavailable.
In this article, you can learn how to set the Out of Office option in Outlook for Windows. This is a powerful feature for managing email communication during one’s absence. Out-of-office is letting others know you are away from the office or home. It’s beneficial for messaging and replies on iOS or Android.
What are the Advantages of Out-of-Office in Outlook?

The first advantage of the Out of Office feature is its ability to send automatic replies to incoming emails. This ensures that even in your absence. There are many other Advantages to this option, which are given below.
1. Out of Office can control who receives the automatic replies
2. It allows you to block your calendar for the specified period automatically
3. The Out of office will help to manage expectations and maintain clear communication
4. This feature is particularly beneficial during periods of unavailability, such as vacations or business trips
How to Set Out of Office in Outlook
There are 2 ways to open Automatic replies in Outlook. If you use Outlook through a Browser, you can select the automatic replies in the following way. Open Outlook through the browser; after opening Outlook, click on the File Tab in the upper left corner of the Outlook window and click on Automatic Replies.
Note: The Automatic replies notify others that you are on vacation or not available to respond to email messages.
- Open Outlook through a Web Browser
- Automatic Reply is turned off by default
- Click on the file tab
- Select Automatic Replies
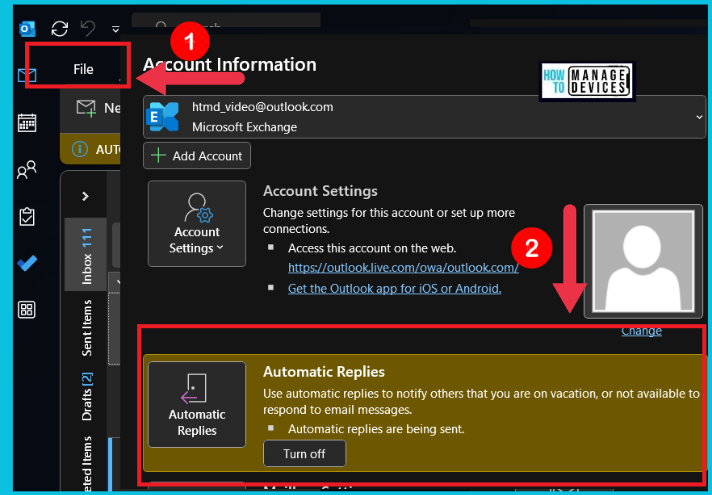
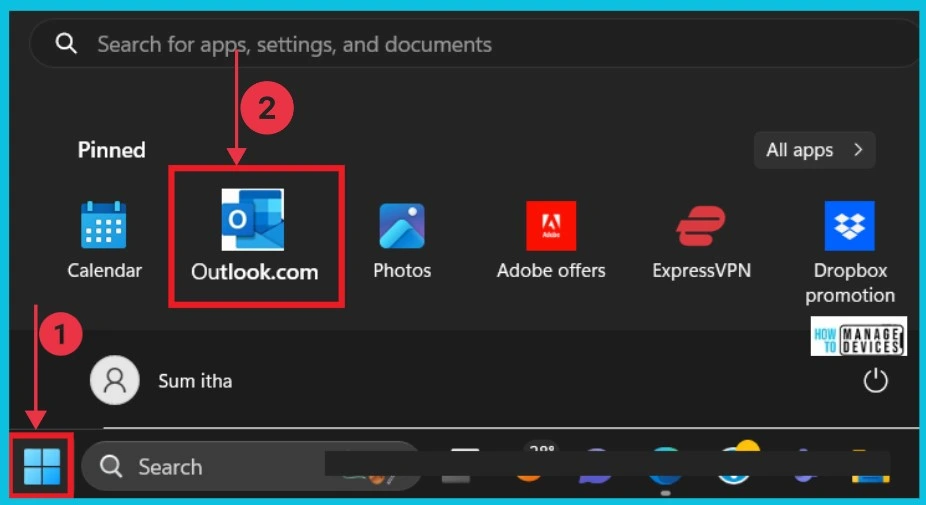
You can use Outlook through the Application on your system for this. Select your Outlook application on your Windows system through the Start Menu. First, click on the Start menu. From the Start menu options, click on Outlook.
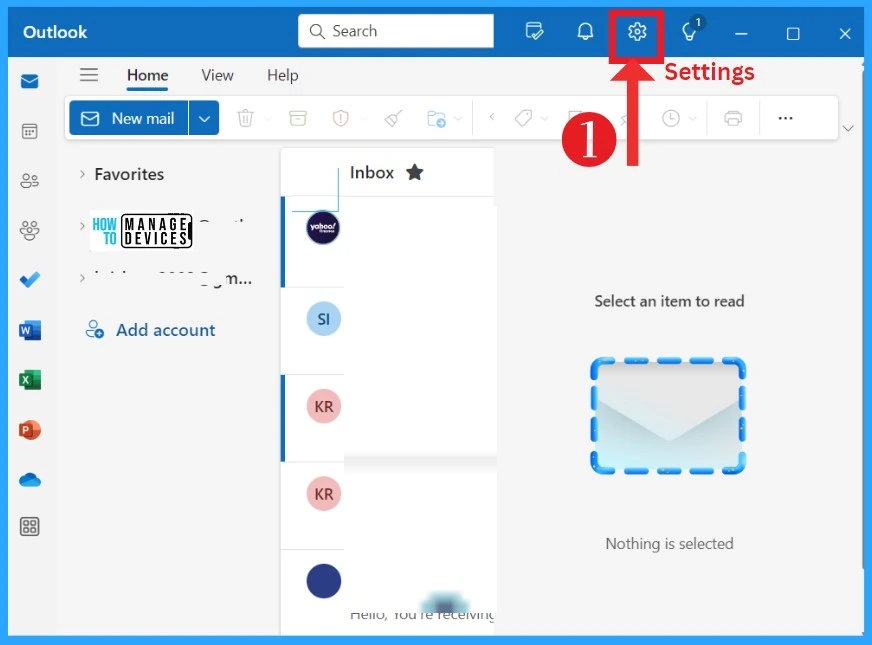
When you open the Outlook App, you can see many options; from that option, select Settings for Automatic Reply. If you open Outlook through the Web, you must click on the file for the automatic reply. Here, the option will be in Settings.
- Fix Outlook Desktop Crashes Issue when sending Emails
- How to Recall an Email in Outlook Microsoft 365
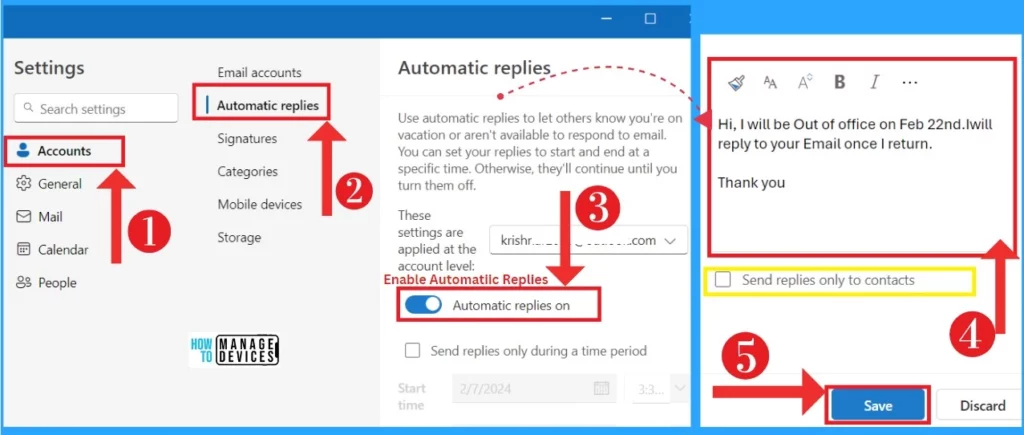
In the setting, you have to select Automatic Replies. Use automatic replies to let others know you’re on vacation or aren’t available to respond to emails. You can turn off this option when you are available. Otherwise, they’ll continue until you turn them off.
- Click on the Automatic Reply
- Enable the Automatic replies option by Toggling the pane to the Right
- Enter the Message that you want to send as the reply when you are not available
- You can choose the option” Send replies only to contacts“
- Save the replies
- Turn On or Off Smart Suggestions in the New Outlook App on Windows
- New Free Outlook Inbox App for Windows 11 First Look
How to Set Time Periods in Automatic Replies
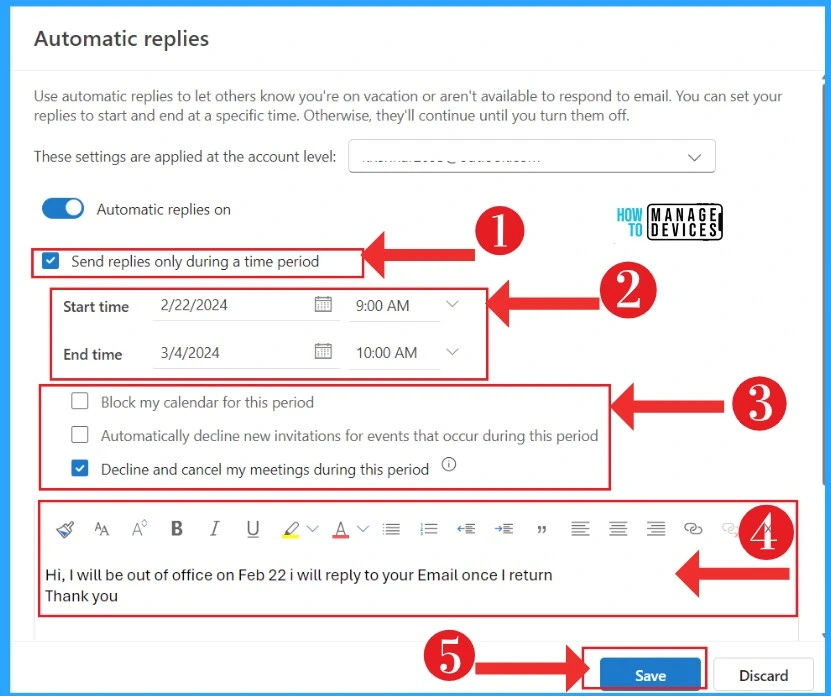
You can set your replies to start and end at a specific time. The automatic replies will be sent to those periods. This option also allows you to decline events and meetings automatically.
- Enable the Send replies only during a time period by toggling the pane to the Right
- Set a Start Time for Automatic replies ( Here, I set it 2-02-2024, at 9. AM)
- Set an End Time (Here, I set it 3-04-2024 at 10. AM)
- You can block or decline the following options ( here, I selected “Decline and cancel my meetings during this period”)
- Enter the message or reply that you want to send when you are not available
- Save your Automatic reply settings
| Block/Decline Options | Used to |
|---|---|
| Block my calendar for this period | To clear appointments from your calendar |
| Automatically decline new invitations for events that occur during this period | New invitations you’re invited to will be declined |
| Decline and cancel my meetings during this period | Existing meetings you organized will be cancelled |
Note: You can style the letters that you are entering through bold, Color, and align if you want
We are on WhatsApp now. To get the latest step-by-step guides, news, and updates, Join our Channel. Click here. HTMD WhatsApp.
Author
Krishna. R is a computer enthusiast. She loves writing about Windows 11 and Intune-related technologies and sharing her knowledge, quick tips, and tricks about Windows 11 or 10 with the community.
