Let’s learn How to Install Microsoft Windows Defender Application Guard. It provides Hyper-V isolation on Windows 10 and Windows 11, to protect users from potentially harmful content on the web.
For Microsoft Edge, Application Guard helps to isolate enterprise-defined untrusted sites, protecting your company while your employees browse the Internet. Application Guard, by default, offers native support to both Microsoft Edge and Internet Explorer.
Before installing and using Microsoft Defender Application Guard, you must determine which way you intend to use it in your enterprise. You can use Application Guard in either Standalone or Enterprise-managed mode.
It’s important to check the recommended System requirements for Microsoft Defender Application Guard to review the hardware and software installation requirements for Microsoft Defender Application Guard.
App and Browser settings are additional features available with the free and best Windows 11 Antivirus solution called Microsoft Defender. You’ll have exploit protection, and you can customize protection settings for Windows devices.
Microsoft recently announced new security features for Windows 11 that will help protect hybrid work, with the great addition of Pluton, Default App Control, Default Cred Protection, Phishing, and Personal Data Encryption. Here’s a look at New Security Features for Windows 11.
- Configure Potentially Unwanted Applications PUA Protection in Microsoft Edge using Intune
- Best Antivirus for Windows 11 Microsoft Defender | App Browser Protection | Firewall Protection
- Protect Devices with Windows 11 Smart App Control
Install Microsoft Windows Defender Application Guard
Application Guard functionality is turned off by default. However, you can quickly install it on your employee’s devices through the Control Panel, PowerShell, or MDM solution.
Let’s follow the steps to install Microsoft Defender Application Guard, and You must be signed in as an administrator.
- On your Windows 10 or Windows 11 device, Click on the Start button.
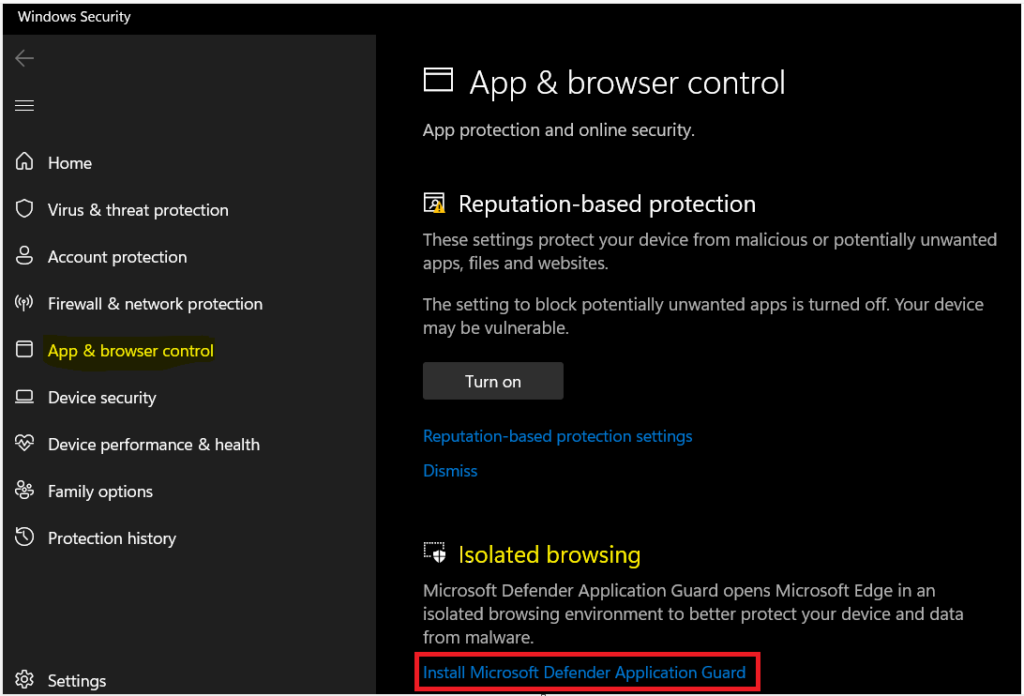
- Type Windows Security in the search box. Click on App & browser control directly from search results OR Open Windows Security, and click on App & browser control.
- Under Isolated browsing, Click on Install Microsoft Windows Defender Application Guard.

If UAC prompts you, select Yes to continue. Here, under Windows Features, Check Microsoft Defender Application Guard, and click on OK.
Note – You can also access the Control Panel and click on the Programs and Features. Click on the Turn Windows features on or off.

Once completed, Please wait. Windows Features started searching and installing the required components.

When the installation has been completed, you are prompted to restart your computer. Click on Restart now to restart the computer and finish installing.

Enable Microsoft Defender Application Guard using PowerShell
You could run the following PowerShell command from Windows Terminal or Terminal application to Microsoft Defender Application Guard.
Type the following command and press Enter.
Enable-WindowsOptionalFeature -Online -FeatureName Windows-Defender-ApplicationGuard
Note – When the installation has been completed, you need to restart your Windows 11 computer to apply the changes.

Enable Microsoft Defender Application Guard using DISM
Let’s follow the steps to enable Microsoft defender application guard using dism –
The Deployment Image Servicing and Management tool (DISM) helps configure Windows and Windows images. DISM can enable Windows features while the operating system is running.
- To enable the Microsoft Defender Application Guard using DISM, Open PowerShell, or Command prompt as Administrator.
- Type the following command and press Enter.
Dism /online /Enable-Feature /FeatureName:Windows-Defender-ApplicationGuardNote – When the installation has been completed, you need to restart your Windows 11 computer to apply the changes.

End Users Experience – Microsoft Edge Application Guard Windows
Here’s how you can start a Microsoft Edge session using Windows Defender Application Guard –
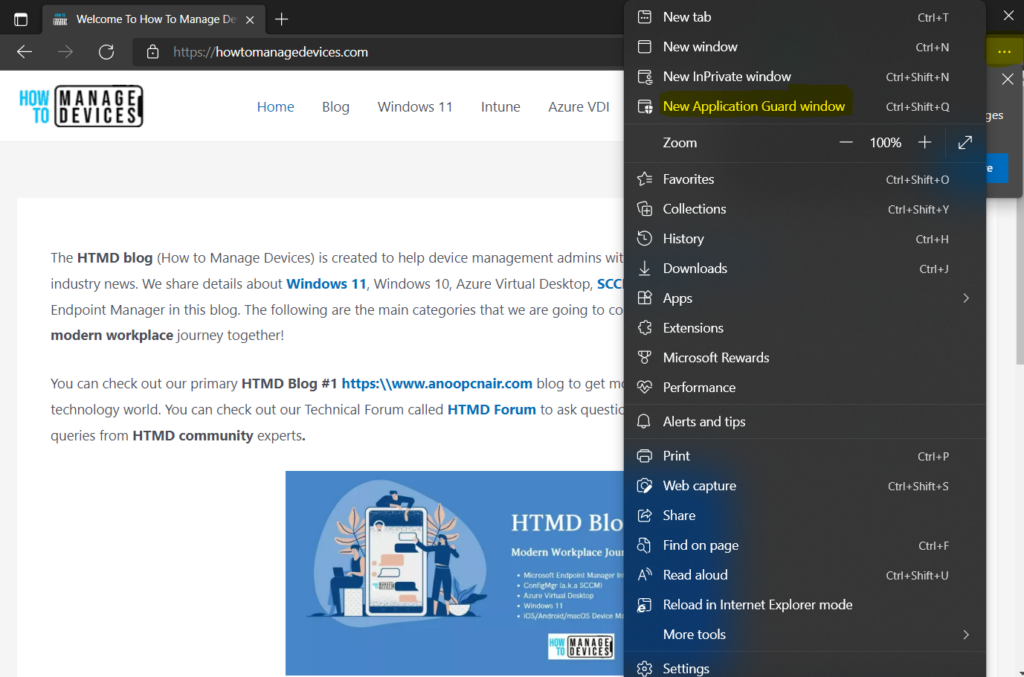
- Open Microsoft Edge. Click on the three-dot menu at the top-right corner.
- Select the New Application Guard window option

Here you will experience for the first time a new virtualized environment that will be created automatically to isolate the web browsing session.

A new edge web session will be created at the bottom when the option is selected. The Application Guard icon is visible on the right side of the address bar.
You can browse the application guard for Microsoft edge. This helps keep your computer safer by creating a separate browsing environment.

