Let’s Know RAM Information in Windows 11 using Various Ways. RAM (AKA Random Access Memory) is an essential component of a device. Knowing the exact RAM specification comes in handy in several situations. When troubleshooting problems in Windows PCs, RAM information may help a lot.
Knowing the RAM information will help when planning to have their next PC. Windows 11 provides various ways to check the RAM information. Knowing the RAM information is very helpful if you are facing any issues showing error messages about low memory.
Without knowing your RAM information, it is not suggested to buy more memory, always double-check the RAM information to know how much memory you have currently and how much you need. In this age of thinner & lighter devices, modern laptops have their RAM permanently soldered to the motherboard, so upgrading it means buying a new one.
This topic is all about viewing information about the RAM installed in your system. It’s usage and many things, so let’s learn the various ways to collect RAM information, including using third-party applications. All the possible ways are defined for reference.

- 4 Methods Enable or Disable Virtualization-Based Security VBS on Windows 11
- How to increase Virtual Memory in Windows 11
- Check Empty RAM Slots Available in Windows 11 Laptop
What is RAM Information?
RAM stands for Random Access Memory, and it is a type of super-fast storage that your device uses to keep the data it needs for a short term. Let’s say the hard drive is a library and the RAM is like the desk where you bring books to read and some stuff to spend time for a while. Having more RAM it increases the size of your desk. The detail about that memory is called RAM Information.
What is the Minimum Requirement of RAM?
The most asked question is what RAM is required, and the answer is the same every time. Generally, 4GB of RAM is enough for normal use, and increasing the RAM capacity depends on user requirements.
Let’s say 8GB of RAM is fine for most general-use PCs. This should be adequate for general use, like a web browser, checking emails, and viewing the occasional Microsoft Word document. 16GB of RAM is preferred for workstations and any gaming, and you want 32GB for high-end gaming and professional multimedia editing setups.
How to Check RAM Information in Windows 11
The step-by-step process of checking RAM information on Windows 11 is described hereunder, and the ways to find the RAM information are listed below:
- Using Settings App to Check RAM Information
- Using Task Manager to Check RAM Information
- Using Windows Terminal to Check RAM Information
- Using System Information to Check RAM Information
- Using DirectX Diagnostic Tool to Check RAM Information
- Using CPU-Z Utility to Check RAM Information
Using Settings App to Check RAM Information
As you know, most settings are stored inside the Windows Settings app. You can also use the Settings app to make certain changes to any settings. Here, you can use the Settings app to check RAM information in Windows 11.
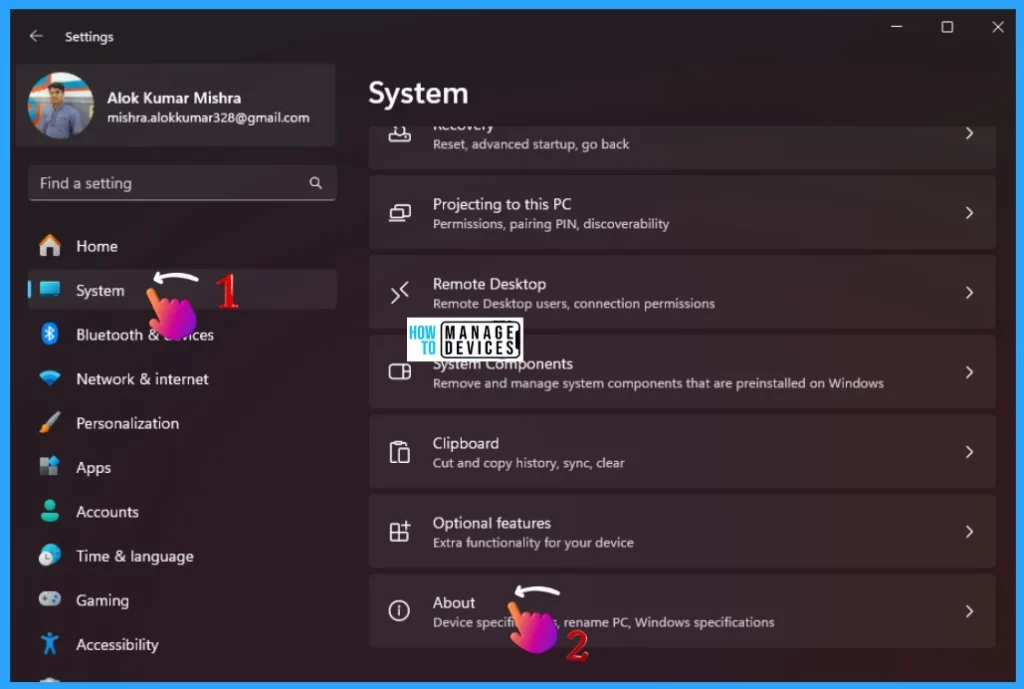
To do so, press Win key + I to open the settings window, then click on the System option present in the left panel, and after clicking the sub-options under System are shown in the right panel, scroll down and click on About.
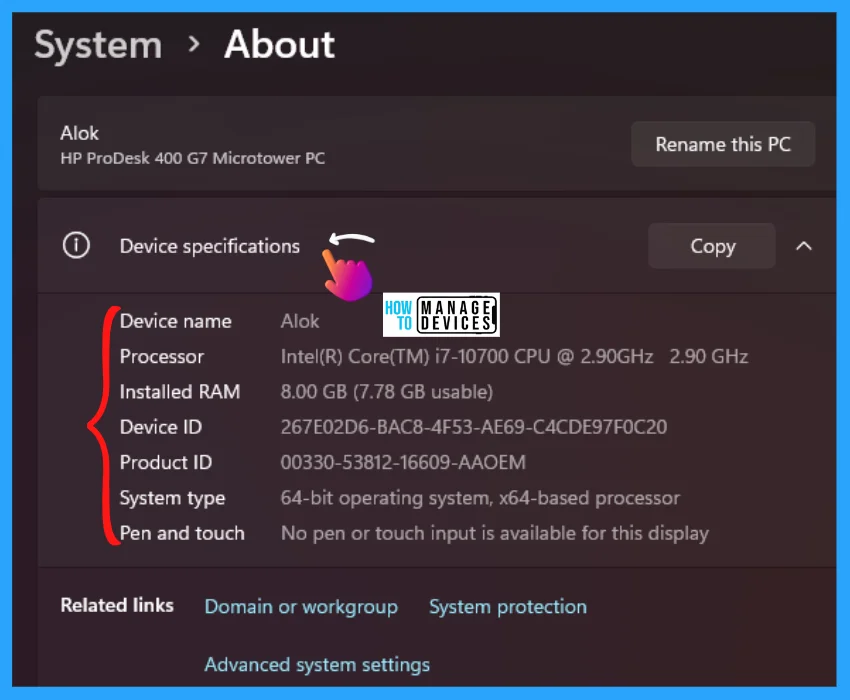
In the about section, expand the Device Specification by clicking the arrow button beside it. Now you can check the RAM Information in it.
Using Task Manager to Check RAM Information
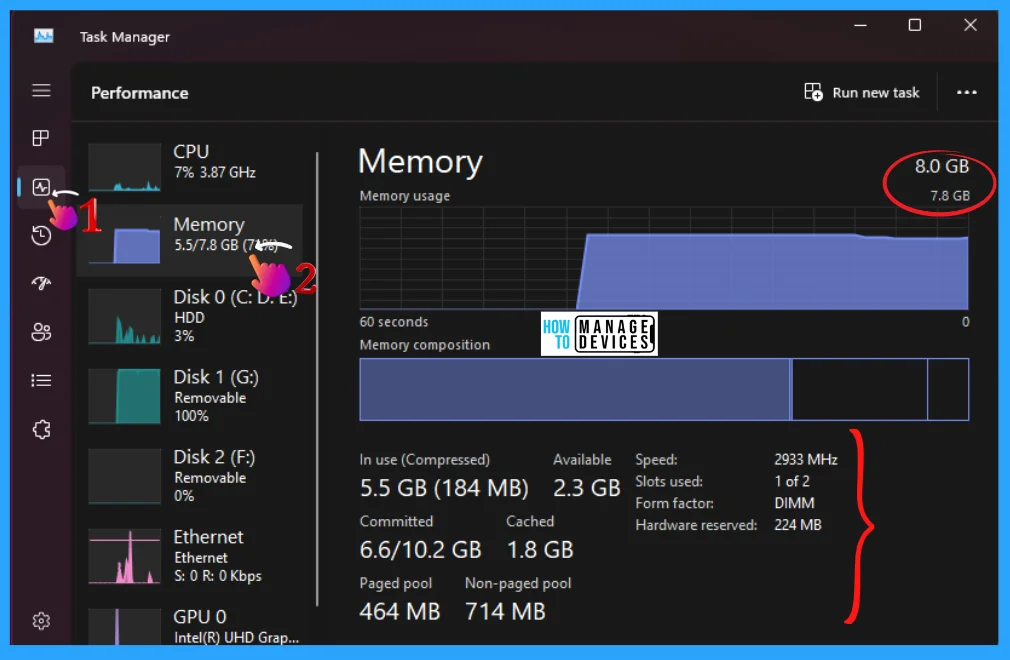
Like the Settings app, you can check system uptime using Task Manager. To do so, open Task Manager by pressing the hotkey Ctrl + Shift + Esc, now click on the Performance Icon (performance option in Windows 10), then click on the Memory option showing, and you can see the information regarding the RAM of your PC, shown in the image below.
Using Windows Terminal to Check RAM Information
You can use Windows Terminal to check RAM Information like you used another process above. To do so, press Win Key + X or right-click on Windows Key to open the power menu, then select Windows Terminal. When the Windows Terminal opens, type and execute the following command.
systeminfo
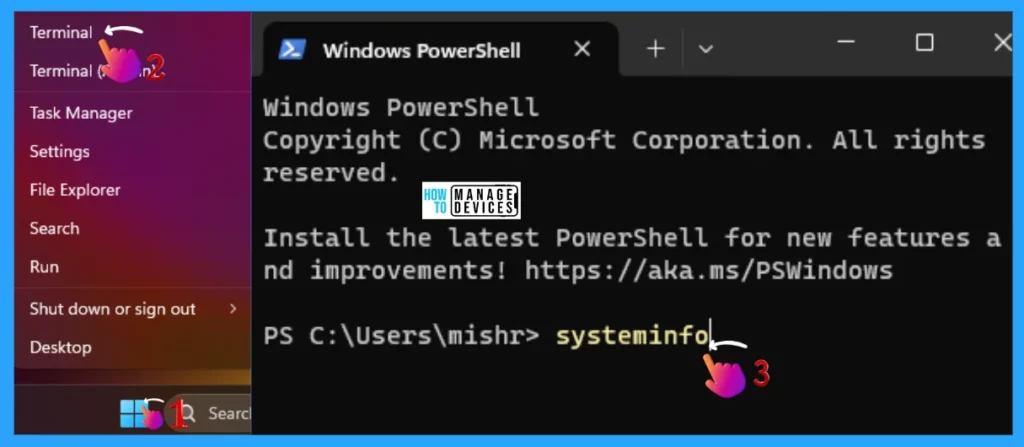
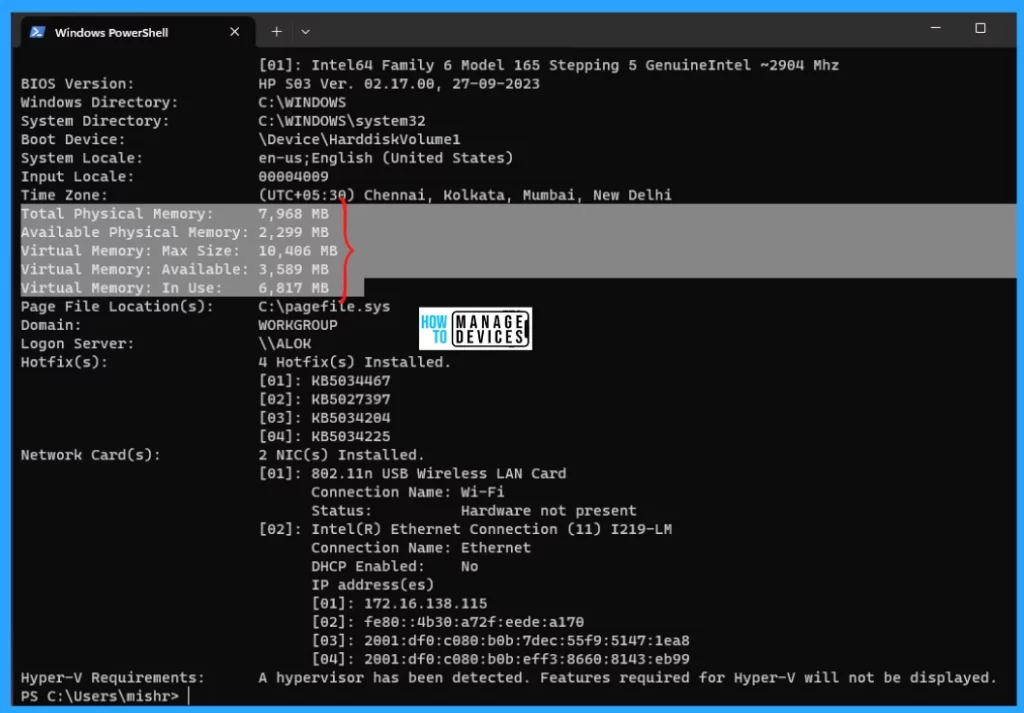
This command is used to show the details information about your system. After the command is executed, scroll down and find the Physical Memory section, where you can find the information about RAM. It shows other information like available RAM, Virtual memory, etc., as shown in the image below.
Using System Information to Check RAM Information
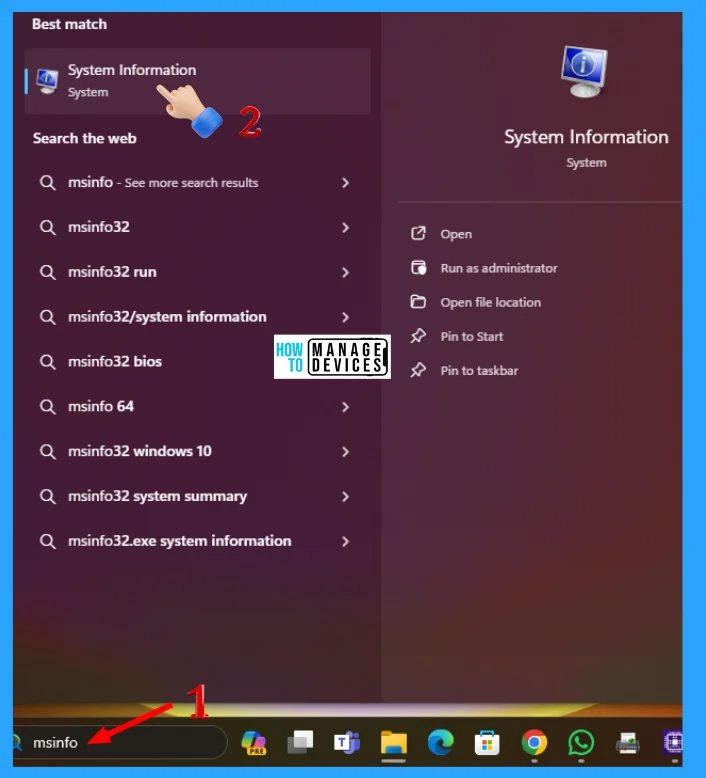
You can use the System Information app to check RAM information. Type msinfo in the Search bar on the Taskbar, then select the appropriate option to open the System Information App.
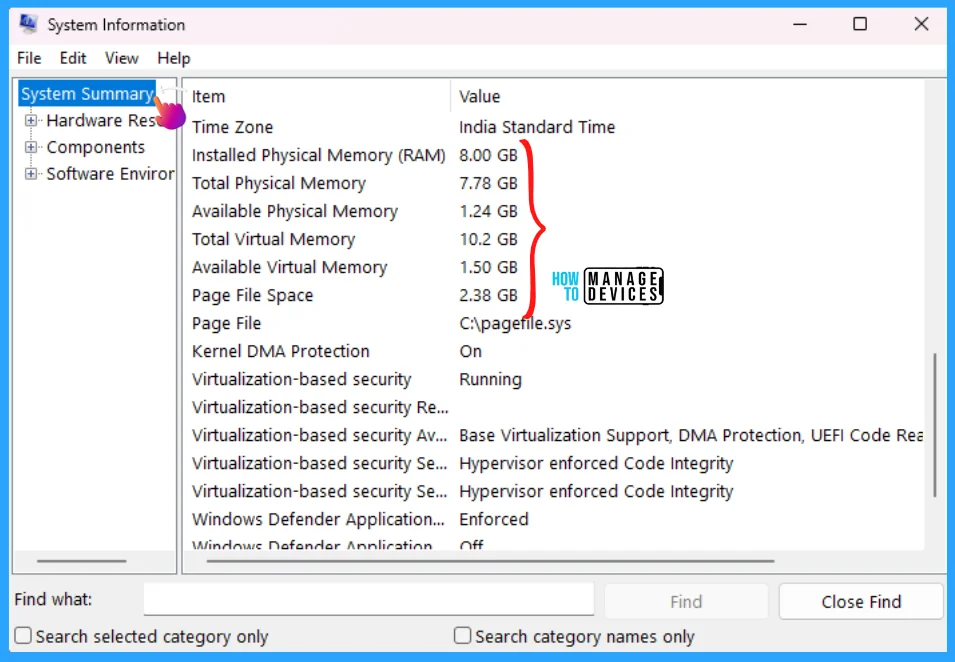
When the System Information window opens, select the System Summary section on the left panel, and all the details of your device are shown in the right pane, scroll down a little where you can find the Installed Physical Memory and Total Physical Memory details, which shown the list of the total amount of RAM installed on your device.
Using DirectX Diagnostic Tool to Check RAM Information
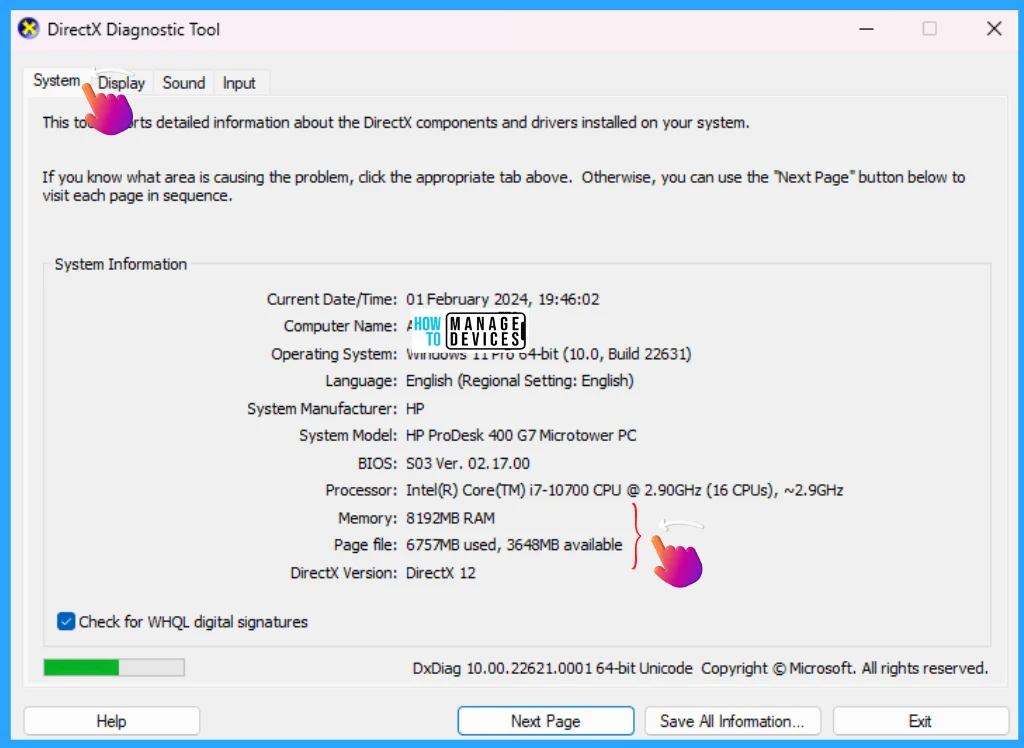
DirectX Diagnostic Tool also holds a lot of information relating to your device. You can use it to find details about DirectX drivers & components. You can also find other information such as motherboard, RAM, processor, graphic card, audio, etc.
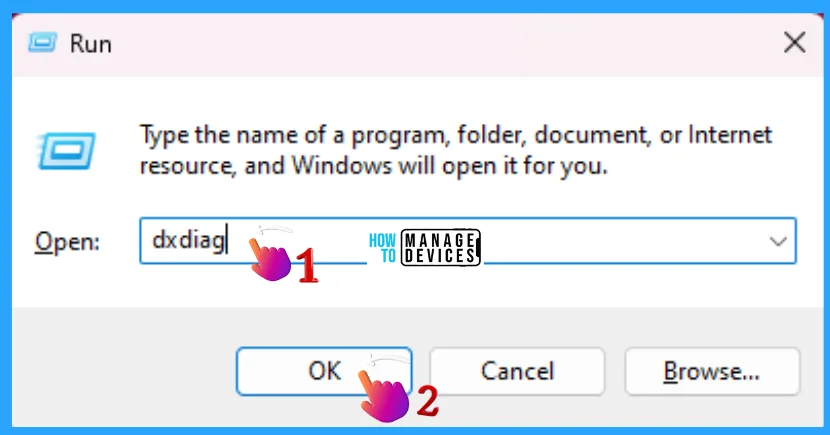
To check RAM information using the DirectX Diagnostic Tool, press Win Key + R, it helps to open the run dialog box, then type dxdiag and hit Enter or click OK.
After executing the run command, the DirectX Diagnostic Tool opens. Then click on the System tab (by default, the System tab opens). Here, you can check the memory information to find your installed RAM.
Using CPU-Z Utility to Check RAM Information
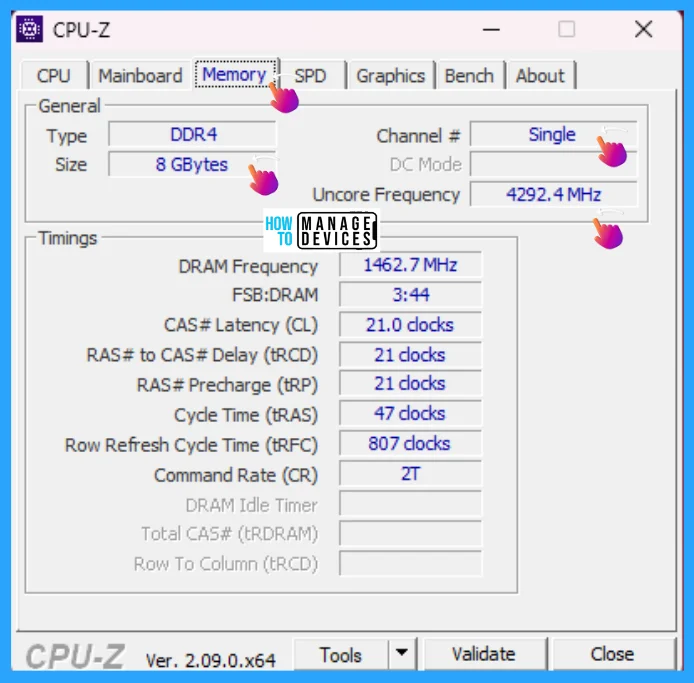
You can also use the third-party app CPU-Z utility to determine the RAM information. You can download the Windows version to check the RAM details. The information is matched with the Windows 11 Task Manager report shown above. You can also know the available RAM Slots using this application.
- Launch the CPU-Z utility.
- Click on the Memory tab to see the detailed information on RAM.
I hope to Know RAM Information in Windows 11 Using Various Ways is helpful. Please follow us on the HTMD Community and visit our website HTMD Forum, if you like our content. Suggest improvements, if any, and we love to know which topic you want us to explore next.
We are on WhatsApp. To get the latest step-by-step guides and news updates, Join our Channel. Click here –HTMD WhatsApp.
Author
Alok is a Master of Computer Applications (MCA) graduate. He loves writing on Windows 11 and related technologies. He likes to share his knowledge, quick tips, and tricks with Windows 11 or Windows 10 with the community.
