Let’s Learn How to Install Wireshark in Windows 11. Wireshark is kind of a software tool used to scrutinize network traffic through a network interface. It is completely free and open source for everyone. This software is widely used to analysis of data packets in a network.
Wireshark was created in 1997 by Gerald Combez. The original name of Wireshark is Ethereal, which was changed in 2006 to avoid copyright issues. The software is written in C and C++ and was initially released in July 1988 as version 0.2.0. The current stable release of Wireshark is version 4.0.10. It supersedes all previous releases.
This is a developing tool created to analyze network packets closely. Wireshark, a packet analyzer, is used for various purposes such as troubleshooting networks, understanding the communication between two systems, protocol developments, etc.
Wireshark is equally liked by System Administrators, Network Engineers, Network Enthusiasts, Network Security professionals, and Back Hat Hackers. It is a cross-platform software that runs on Linux, Windows, macOS, and any other OS.

- Microsoft is Planning to Remove VBScript from Windows Permanently
- Azure Networking Services Training | Azure Tips
How to Download Wireshark in Windows 11
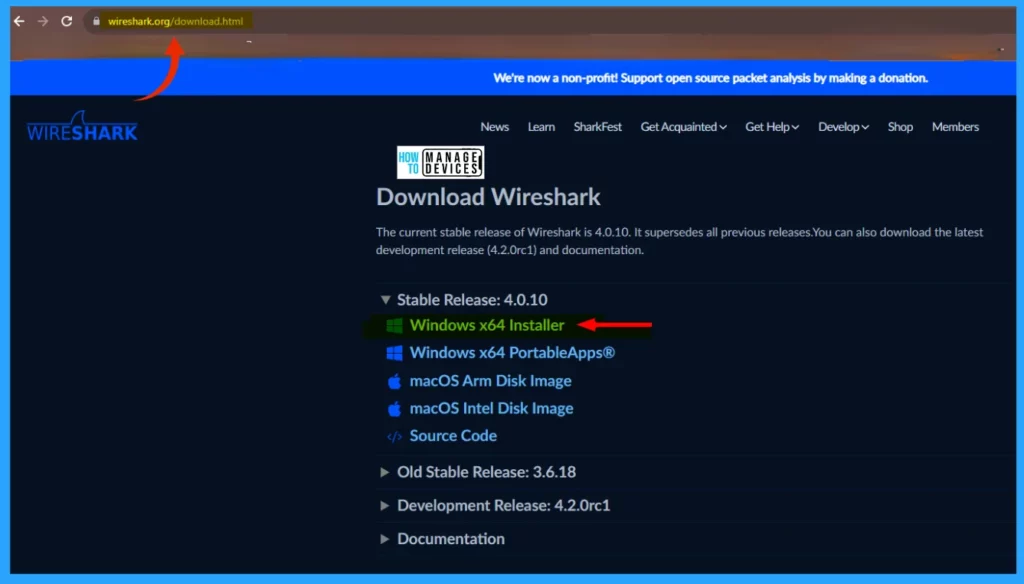
You can install the Wireshark in Windows 11, it is free for everyone. To download Wireshark, go to the official website wireshark.org/download.html using any browser, and you will find the download link that is appropriate to your operating system as shown in the image below. Click the link to download the application.
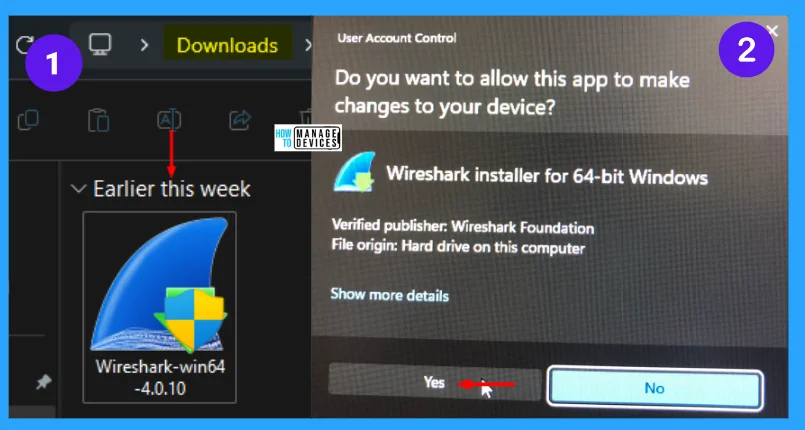
By clicking the link as said above, the download starts and takes a little time to complete. The executable file is downloaded successfully and stored in the default Downloads folder.
How to Install Wireshark in Windows 11
Open the folder, and double-click on the executable file for further course of action. Then the User Account Control (UAC) window opens, and it asks your permission to allow the wireshark app to make changes to your device. Click on Yes to allow its request and continue.
Then the Wireshark 4.0.10 64-bit Setup wizard started. This wizard will guide you through the installation of Wireshark. Before starting the installation, make sure Wireshark is not running. Now click on the Next button to continue.

The next window shows the License Agreement that says, please review the license terms before installing Wireshark. Wireshark is distributed under the GNU General Public License. It is not an end-user license agreement (EULA). It is provided here for informational purposes only.
Here Back button is used to return to the previous window & Cancel button to stop the operation. But you click on Noted to continue, as illustrated in the image below.

As shown in the image below, the following window is the Donation window to Wireshark for hosting SharkFest. The Wireshark Foundation wants to help as many people as possible understand their networks as much as possible. Your donation helps to support Wireshark and host SharkFest. Click the Next button.

The next window appears to Choose Components. These built-in features/components are available for installation, you can choose any of them you want to install, or you can install all of them if you want. The components are listed below:
- Wireshark
- TShark
- Plugins & Extensions
- Tools
- Documentation

Then the next window is Additional Tasks. This window helps to create shortcuts in your device after installation of the Wireshark and the Associate File Extensions, which associate trace file extensions with Wireshark-allowed extensions. Now click on Next to continue, and the shortcut options are listed below:
- Wireshark Start Menu Item
- Wireshark Desktop Icon
- Wireshark Quick Launch Icon

Now it moves to the next window Choose Install Location. In this window, it asks to choose a directory in which to install Wireshark. The default destination folder is program files where the OS is installed, but you can Browse, if you want to choose a different location and click Next to continue.

Then the Packet Capture window opens, Wireshark requires either Npcap or WinPcap to capture live network data. If no component was installed previously, install Npcap, check the box Install Npcap 1.71, and click on Next to continue.
NOTE! If your system has crashed during a Wireshark installation, you must run the command ‘net stop npcap’ as Administrator before upgrading Npcap, so that it doesn’t crash again.

Now the USB Capture window opens, USBPcap is required to capture USB traffic. It depends on you whether you like to install it or not if you want to install then check the box near Install USBPcap 1.5.4.0 or leave it and click on Install to continue. This is an experimental system also not recommended to install.

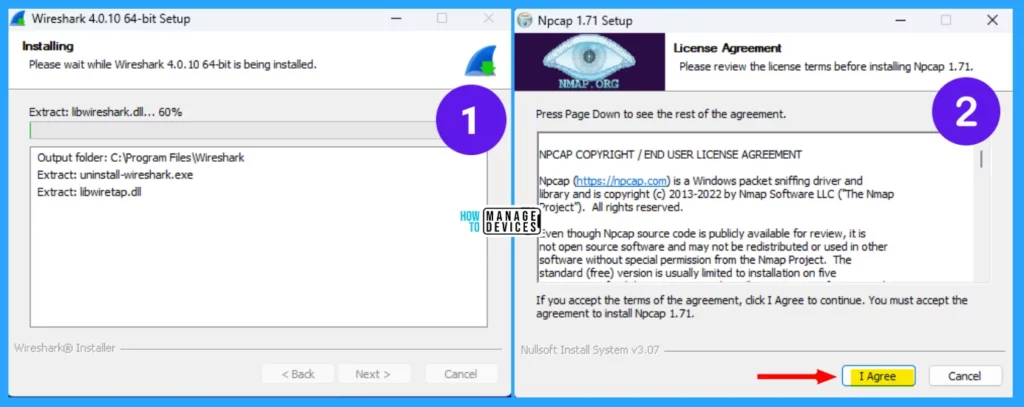
After clicking on Install, the installation starts. After a few times of installation progress, another window opens as Npcap 1.71 Setpu License Agreement. If you check the option USBPcap 1.5.4.0, then after Npcap installation, the USBPcap also started to install.
Please review the license terms before installing Npcap 1.71. If you accept the terms of the agreement, click I Agree to continue. You must accept the license agreement to install Npcap1.71. Click on I Agree.
Now the Installation Options of Npcap 1.70 Setup open. There are some options to review them carefully before installation, check them if required, and hit Install.

The Npcap 1.71 Setup installation process started in the Installing window. Another window appears as shown in the image below as Installation Complete indicates the Npcap is installed successfully, click on Next to continue.
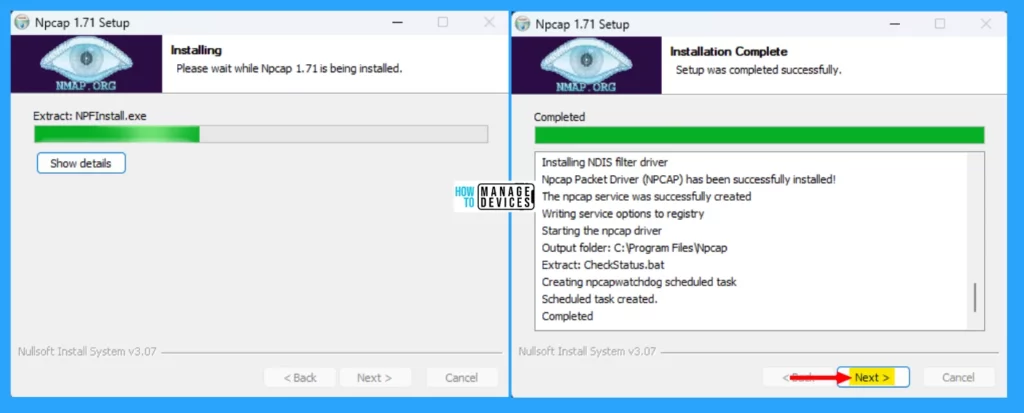
The Npcap is successfully installed on your device. The Finished window appears next. There is a button as Finish, click on it to close the Npcap 1.71 Setup installation wizard.

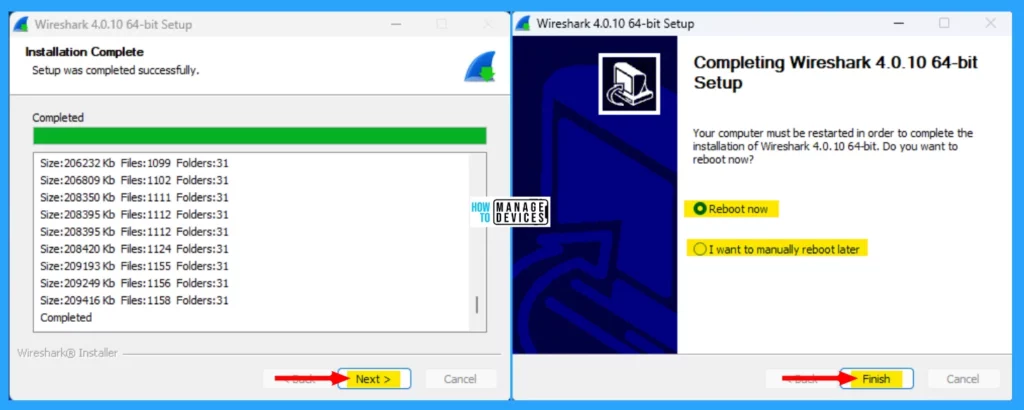
After the complete installation of Npcap the rest of the Wireshark installation started and the Installation Complete window appears and says Setup was completed successfully. Then click on Next to move to the next window.
Now the Wireshark 4.0.10 64-bit Setup wizard shows the completion of setup. Your computer must be restarted in order to complete the installation of Wireshark. There are two options you can restart your window immediately or you can restart it later, then click on Finish to complete the installation process.
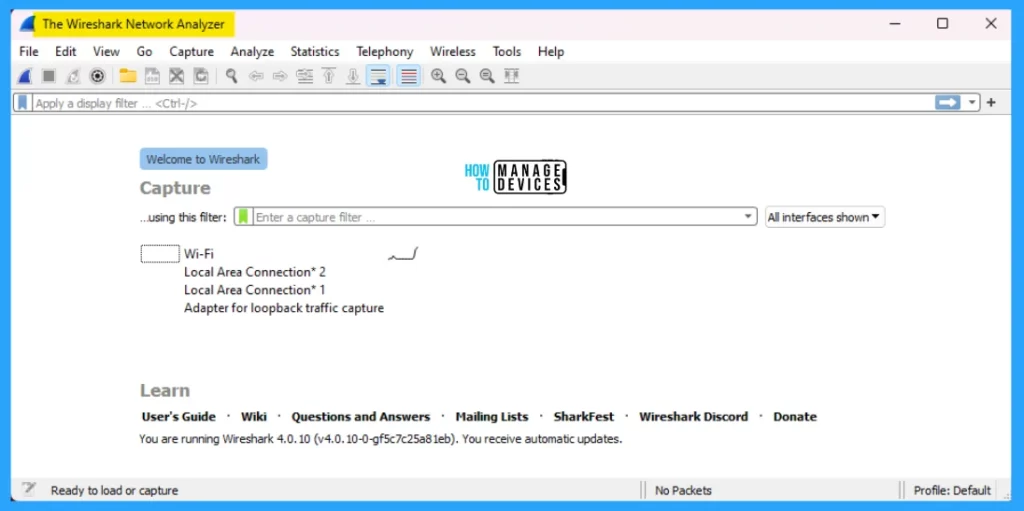
As per your given choice, the shortcuts are created in your device, double-click on the shortcut on the desktop. You can now see The Wireshark Network Analyzer interface opens with some tabs listed below, which we discuss in detail in the next article.
- File
- Edit
- View
- Go
- Capture
- Analyze
- Statistics
- Telephony
- Wireless
- Tools
- Help
Wireshark Features
Wireshark basically analyses the data packets flowing in the network and provides valuable information about the network’s behavior, performance, and security. It captures data and represents it in a human-readable format to the user. Some basic features of the wireshark are listed below.
- It is a multi-platform software that runs on Windows, Linux, MacOS, etc.
- It is a standard three-pane packet browser.
- It deeply inspects hundreds of protocols.
- You can read live data from different types of networks.
- The sort and filter option helps to provide the user with an easy view of the data.
- VoIP analyzation.
- Capture raw USB traffic.
- Settings like timers and filters are used to filter the output.
- Capture on the PCAP (an application programming interface used to capture the network).
- PcapNg and Libpcap capture formats are used for storing the capture.
Capture Network
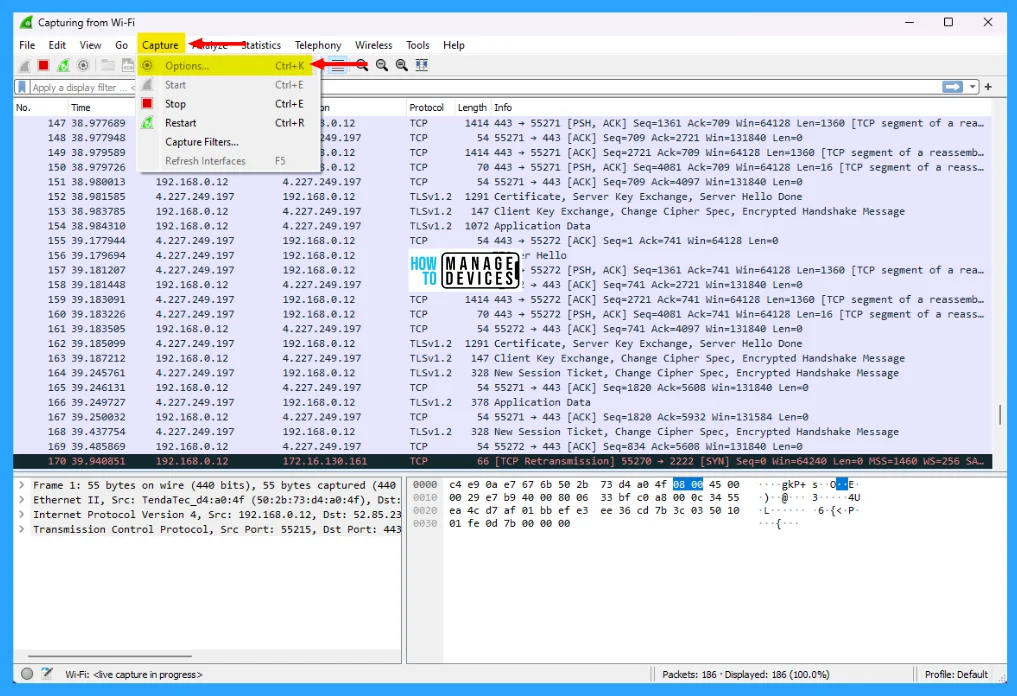
To start capturing a network, select the particular network, whether WIFI or Ethernet (or any others). Then move to the Capture tab and select the Options. Now the Capturing from selected network packets is shown in different colors, as illustrated below.
Color Coding in Wireshark
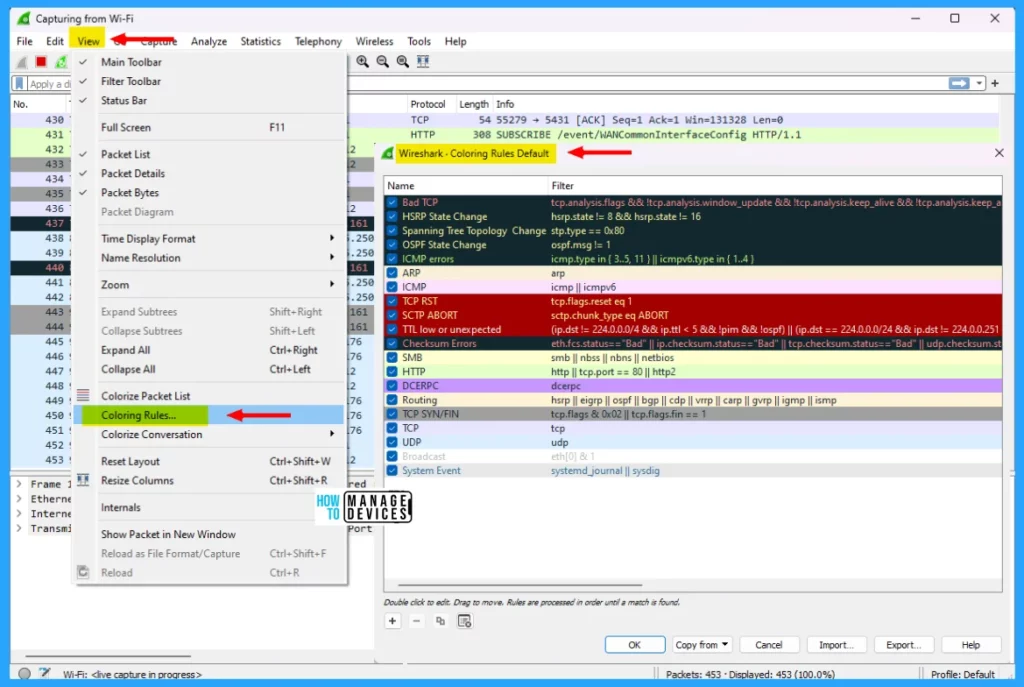
Color coding is to highlight the different packets based on particular factors. This system helps users to find the packets according to their colors. As the representation colors are like, UDP is represented in Light Blue, ICMP is with Light Pink, TCP traffic in Purple, and Error Packets with Black, etc.
Wireshark uses 20 different colors to indicate various parameters by default. Users can modify any changes to them using settings as per requirement. This can be disabled by turning off the Colorize Packet List field. To view all default color options, Click on the View tab, then move to Coloring Rules and click on it. The Coloring Rules Default of the Wireshark window appears.
Basic Work of Wireshark
As previously said, Wireshark is the leading network traffic analyzer. This tool helps System Administrators and IT Professionals troubleshoot network errors in real time. It quickly finds out the root causes, like any suspicious activity, packet drops, etc.
Most network administrators use Wireshark to solve the latency (delay in network communication) issue caused by equipment used to route traffic around the world to monitor data. Administrators need to know deeply and understand protocols such as TCP/IP and DHCP to use Wireshark better. The work of Wireshark is listed below.
- Wireshark is a network analyzer that captures and examines network traffic.
- It operates to read packets from a capture file.
- Then decode them, analyze packets, and provide detailed information on protocols, conversation, and network manners.
- Supports various filters and display options that allow users to focus on specific packets or protocols.
- Provides powerful GUI for inspecting packet contents, analyzing network performance, troubleshooting issues, and identifying potential security vulnerabilities.
- Its functions make it an essential tool for network admins, analysts, and security professionals.
I hope the Learn How to Install Wireshark in Windows 11 information is helpful. Please follow us on the HTMD Community and visit our website HTMD Forum, if you like our content. Suggest improvements, if any, and we love to know which topic you want us to explore next.
We are on WhatsApp. To get the latest step-by-step guides and news updates, Join our Channel. Click here – HTMD WhatsApp.
Author
Alok is a Master of Computer Applications (MCA) graduate. He loves writing on Windows 11 and related technologies. He likes to share his knowledge, quick tips, and tricks with Windows 11 or Windows 10 with the community.
