Let’s learn Notification Settings of Windows 11 Full Review. You have to manage and finetune Windows 11 Notification Settings to give better end-user experiene. Nowadays, most electronic devices send you notifications in one form or another.
In recent years, newer operating systems started sending more notifications than previous versions. Windows Notification is a portion of the taskbar that provides Notifications and status, and it also provides a temporary source for notifications and status.
You can easily select the date and time in the taskbar to open the Notification Center (You can also swipe in from the right edge of your screen or press the Windows logo key + A). Select the Notification to read more or take action.
This post will help you to learn Global Vs. Applications Vs. Settings Specific Windows 11 notification settings. There are global notifications that are a global setting for all the notifications within the operating system. You can override global notifications with App Specific or individual Settings Specific notifications.
- Disable Hide Upgrade to Windows 11 is Ready Notification on SCCM Managed Devices
- Turn Off All Windows Update Notifications using Display Options for Update Notifications
Advantages of Notifications in Windows
A notification is a message, sound, or symbol on your computer telling you someone has sent you a message or put something new for you to look at on a website. The following are the Advantages of Windows Notification.
- Notifications provide a temporary source of information for Notification and status
- Select the date and time in the taskbar to open the Notification Center and Select the Notification to read more or take action
- Notifications provide asynchronous information only
- Effective notifications that help users to promote a good user experience
A structured Windows notification strategy allows the users to create a schedule. Windows 11 Notifications helps to imply a making aware of something by giving knowledge of it. You can also easily clear a specific notification by selecting the X next to the Notification; if you want to clear all your notifications, choose the Clear all notification button.
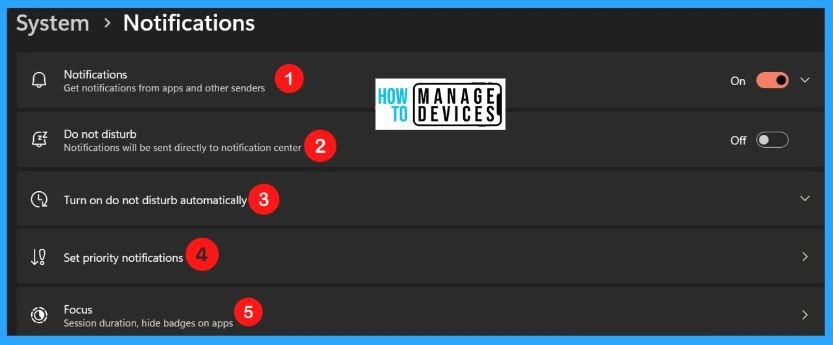
Global Notification Settings in Windows 11
There are two types of notifications. One is Global Notification, and the second is Apps-specific notifications—global Notification Settings for Windows 11, including the following.
- Notifications
- Apps-specific notifications
- Turn on do not disturb automatically
- Set priority notifications
- Focus
The Global Notification settings in Windows 11 are shown below screenshot. The other types of notifications are Application and Individual Settings/Features specific notifications.
- How To Customize Windows 11 Taskbar Step By Step Guide
- Windows 11 New File Explorer Experience New Features Design Details
How to Disable/Enable Notifications on Windows 11
You can easily Disable or Enable Windows 11 Notifications. There are several different ways to accomplish this on Windows 11. They are as follows.
- Turn On or Off All Windows 11 Notifications via the Settings menu
- Turn On or Off Specific Windows Notifications via the Settings menu
- Turn On or Off Specific Windows 11 Notifications via Notification Center
Notification allows users to perform a task or change their behavior. Through the Notification center, you can easily find app notifications and Quick Settings in Windows 11, which also helps you quickly access commonly used settings and apps. Notification is a message displayed by an operating system or program unrelated to user activity on the computer.
Read More on Quick Settings -> Add Or Remove Windows 11 Quick Settings Icons And Notifications Options.
A. Turn On or Off All Windows 11 Notifications via the Settings Menu
Windows notifications help Windows users to get important alerts from the apps. You can easily Turn on or off all Windows 11 Notifications using the settings menu.
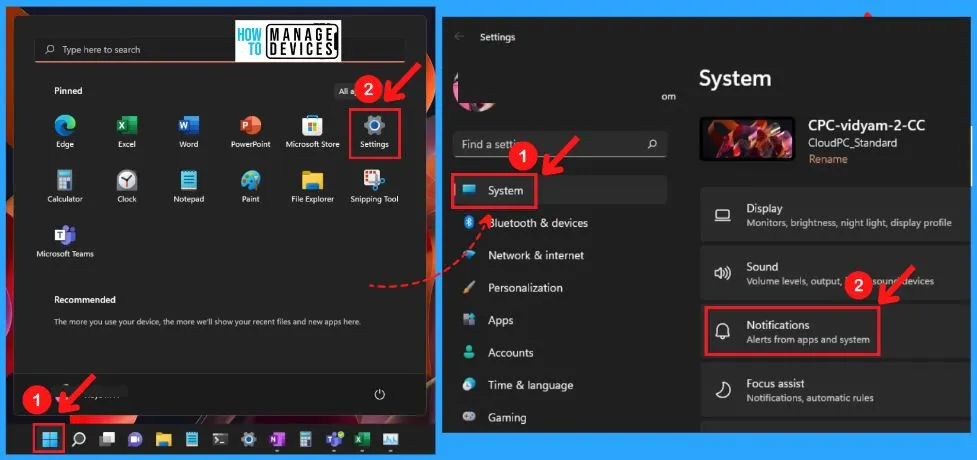
The following are the steps to Turn on or off all Windows 11 Notifications. The below screenshots show how to Turn on or off all Windows 11 notifications.
- Select Settings from the start menu, Alternatively, use (Windows key + I) to open up the settings menu on Windows 11
- Select System on the left side of the settings screen
- Click on the Notifications option on the right side of the system tab
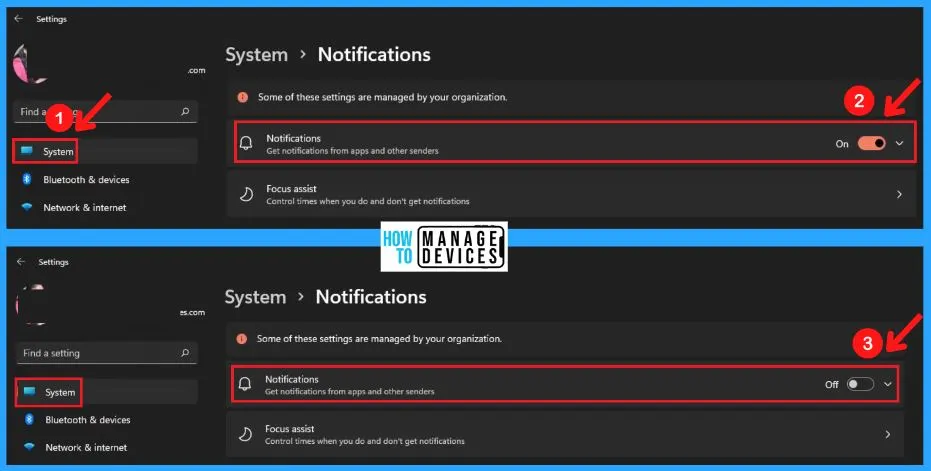
You can easily Enable or Disable the Notification by dragging the Notification pane circle to the right and left sides. If you want to Enable the Notification, Drag the Notification pane circle to the right side, and if you want to Disable the Notification, Drag the Notification pane circle to the left side.
- If you want to Enable the Notification, Drag the Notification pane circle to the right side (see the below screenshot)
- If you want to Disable the Notification, Drag the Notification pane circle to the left side (see the below screenshot)
Notification Dropdown Arrow in Windows 11
Windows Notification Dropdown arrow next to the notification pane contains the following. Notification Settings of Windows 11 helps to control the notification and give better experience for the users.
- Show Notification on the Lock Screen
- Show Reminders and incoming VoIP calls on the Lock Screen
- Allow Notification to Play Sounds
Unopened notifications are sent to the Notification Center in Windows 11, where the user may see them conveniently. Windows notification Provides prompt and timely alerts. Notification helps to Enhance user experience to increase loyalty and retention.
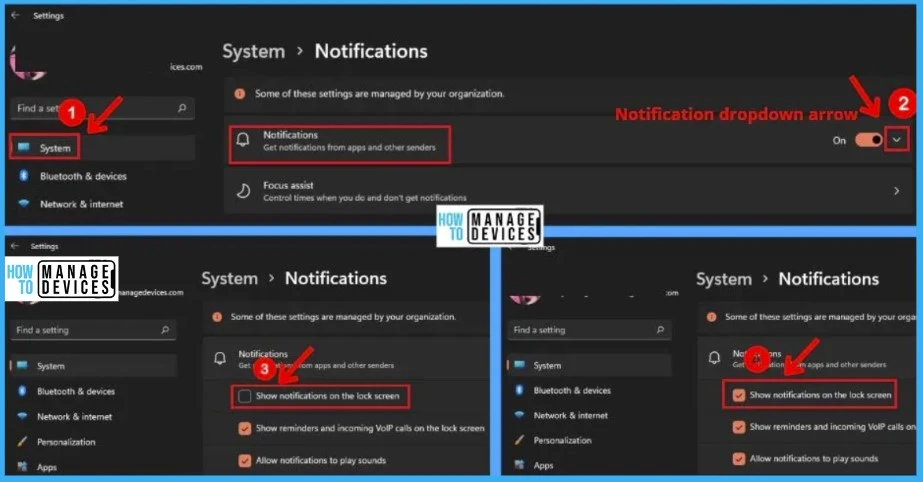
1. How to Show or Hide Notifications on Lock Screen
You can choose the “show notification on the lock screen” option on your Windows 11 pc. The below steps and screenshot show how to enable or disable the “Show notification on the lock screen” option on Windows 11.
- Select the settings option from the start menu
- Click on System from the left side of the settings page
- Click on Notification from the right side of the system tab
- Click the Notification dropdown arrow, and it will be expanded
- It will show the “show notification on the lock screen” option
- Check the square box next to the “show notification on the lock screen” option will turn on the show notification on the lock screen option
- Uncheck the square box next to the “show notification on the lock screen” option will turn off the “show notification on the lock screen” option in Windows 11
2. How to Turn On or Off Lock Screen Reminder and VoIP Calls Notifications in Windows 11
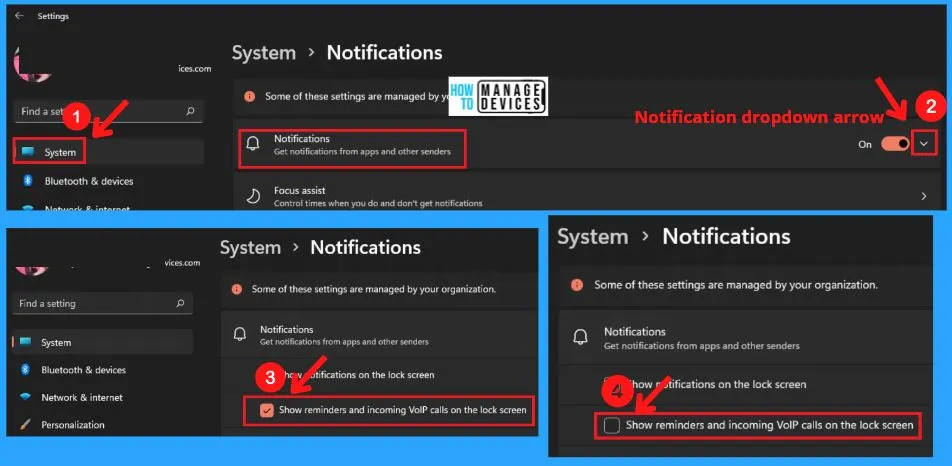
You can easily Turn on or off the lock screen reminder, and VoIP calls Notification in Windows 11. The lock screen is the screen you see when you lock your PC or when it locks automatically after you cannot use it for a while.
The lock screen will show Calendar reminders, and incoming VoIP calls notifications by default. The screenshot below shows how to Turn on or off the Lock screen reminder, and VoIP calls Notification in Windows 11.
- Select Settings from the start menu
- Click on System from the left side of the settings page
- Click on Notification from the right side of the system tab
- Click the Notification dropdown arrow, and it will be expanded
- It will show the “Show reminders and incoming VolP calls on the lock screen” option
- Check the square box next to the “Show reminders and incoming VolP calls on the lock screen” option will turn on Show reminders and incoming VoIP calls on the lock screen
- Uncheck the square box next to the “Show reminders and incoming VolP calls on the lock screen” option will turn off Show reminders and incoming VolP calls on the lock screen
Note! – The lock screen will show Calendar reminders and incoming VoIP call notifications by default.
3. How to Turn On or Off Allow Notification to Play Sounds
You can easily turn on or off playing a sound when a notification arrives from all or specific apps and senders for your account in Windows 11. Allow Notification to play sounds option includes the following.
- Turn On or Off Notification Sounds for All Senders in Settings
- Turn On or Off Notification Sounds for Specific Senders in Settings
1. Turn On or Off Notification Sounds for All Senders in Settings
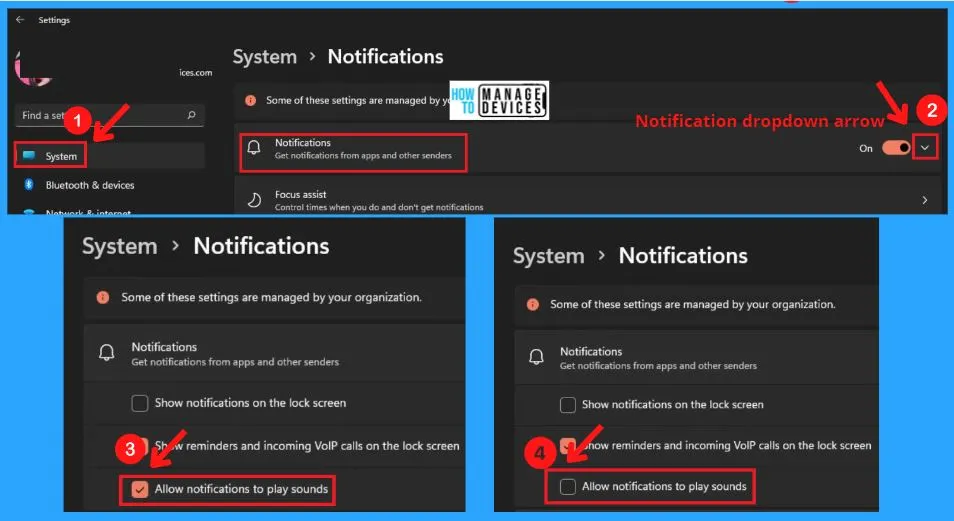
You can easily Turn On or Off Notification sounds for all senders in the settings option. Follow the below steps and screenshot to Turn On or Off Notification sounds for all senders in settings.
- Select Settings from the start menu or use (Win+I) to open settings
- Select System on the left side of the settings page
- Select Notification on the right side of the System tab
- Click the Notification dropdown arrow and then Check or select the “Allow notification to play sounds” option in Windows 11
- If you check (On) the “Allow notification to play sounds,” it means that the “Allow notification to play sounds” is Enabled
- If you uncheck (Off) the “Allow notification to play sounds,” it means that the “Allow notification to play sounds” is Disabled
2. Turn On or Off Notification Sounds for Specific Senders in Settings (Example: Calender App)
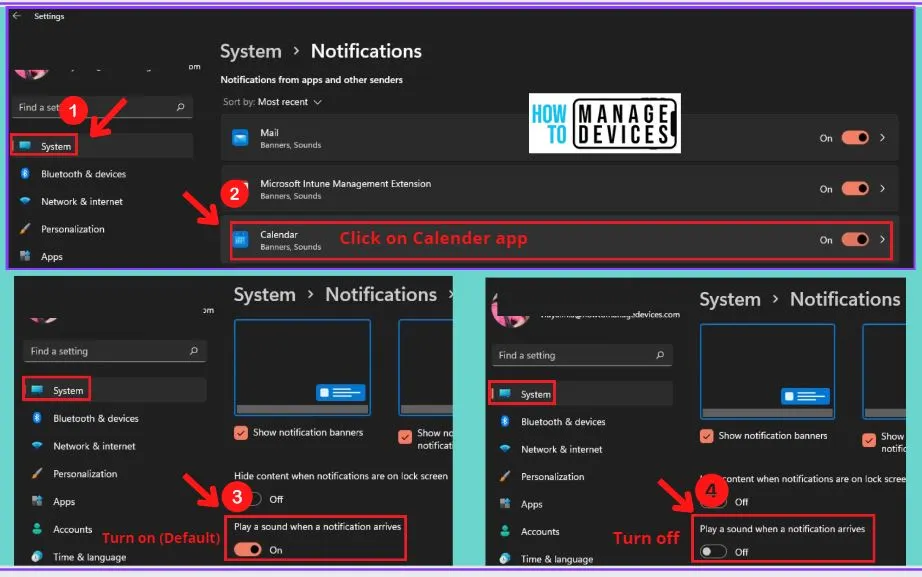
You can easily Turn On or Off Notification Sounds for Specific Senders in Settings on Windows 11. Follow the below steps and screenshot to “Turn On or Off Notification Sounds for Specific Senders in Settings.”
- Open settings from the start menu (Win+I)
- Select the system tab on the left side and click Notification on the right side of the system tab
- Under Notification from apps and other senders, Click on the apps that you want to turn on or off the notification sound (example: Calendar or some other apps)
- Go to “play a sound when a notification arrives” on the right side of the Calendar app
- Turn on (Default) “play a sound when a notification arrives” option by dragging the play a sound when a notification arrives pane circle on the right side
- Turn off the “play a sound when a notification arrives option” by dragging the play a sound when a notification arrives pane circle on the left side
Do Not Disturb for Notifications in Windows 11
You can easily Turn on or off “Do not disturb” for Notifications in Windows 11. The below steps and screenshot shows how to Turn on or off the Do not disturb Notification in Windows 11.
There are 3 different ways to Turn on or off “Do not disturb” notifications in Windows 11. They are as follows.
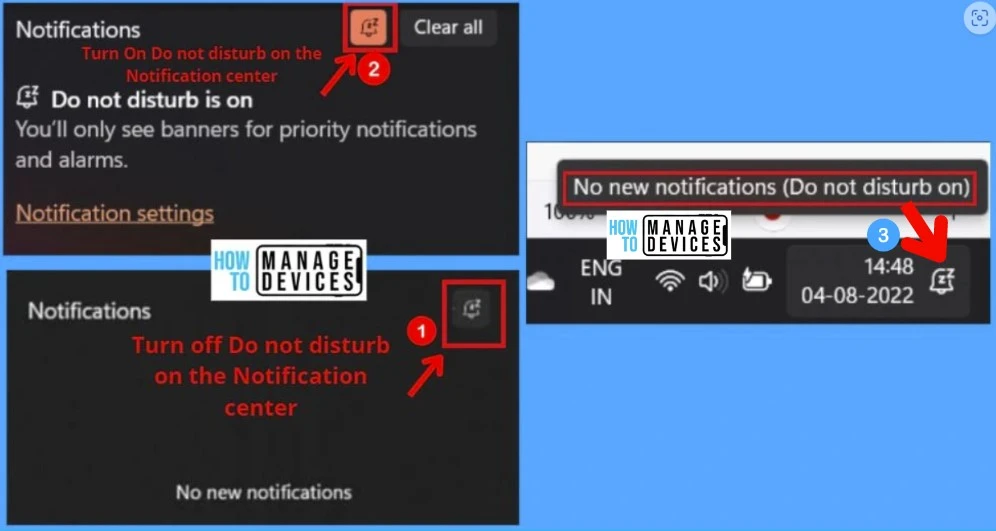
- Turn on or off Do not disturb Notifications using the Notification center
- Turn on or off Do not disturb Notifications using Settings
- Set up Rules to “Turn on do not disturb automatically” in Settings
1. Turn On or Off Do Not Disturb Notifications using Notification Center
You can easily Turn on or off Do not disturb notifications in Windows 11. With the help of the Do not disturb Notification, You can easily find the missed Notification in the Notification Center.
The below steps and screenshot show how to turn on or off Do not Disturb notifications in Windows 11 using the Notification Center.
- Press the Window key + A key to open the Notification Center
- Click on the “Do not disturb” bell button (on the top right corner of the Notification Center) to turn on or off the Notification in Windows 11
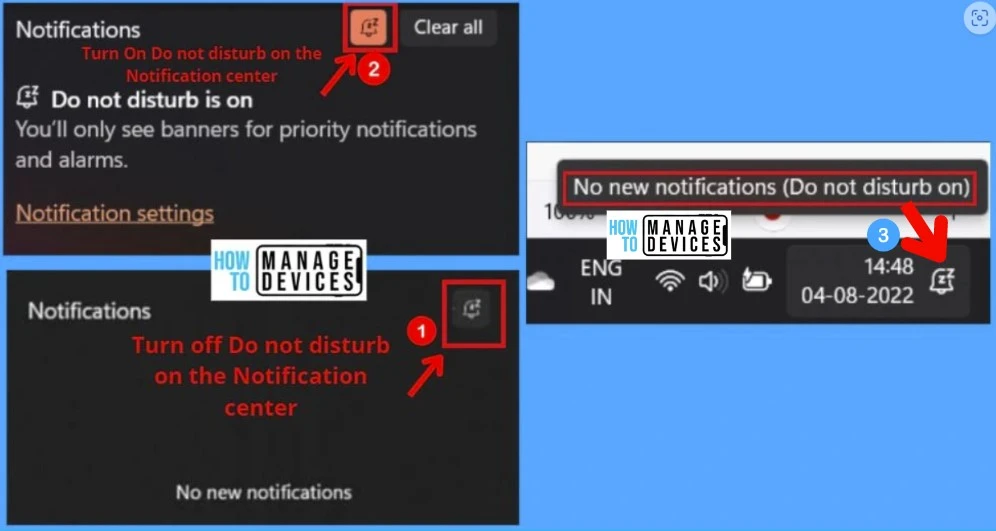
2. Turn On or Off Do Not Disturb Notifications using Settings
You can easily Turn on or off the Do not disturb Notifications using the settings option in Windows 11. The following are the steps to Turn on or off the Do not disturb Notifications in Windows 11.
- Select Settings from the start menu or use (Win+I) to open settings
- Select System on the left side of the settings page
- Select Notification on the right side of the System tab
- Turn On or Off (Default) the Do not disturb option by dragging the Do not disturb pane circle to the right and left sides
The below screenshot shows how to turn on or off the Do not disturb Notification in Windows 11.
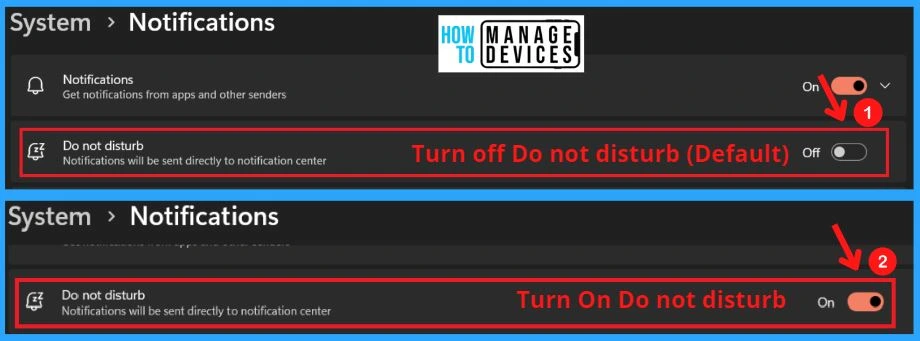
3. Turn On Do Not Disturb Automatically or Set Up Rules to “Turn On Do Not Disturb Automatically” in Settings
You can easily Set up rules to “Turn on do not disturb automatically” in settings. The following are the steps to set up rules for the “Turn on do not disturb automatically” Notification in settings.
- Select Settings from the start menu or use (Win+I) to open settings
- Select System on the left side of the settings page
- Select Notification on the right side of the System tab
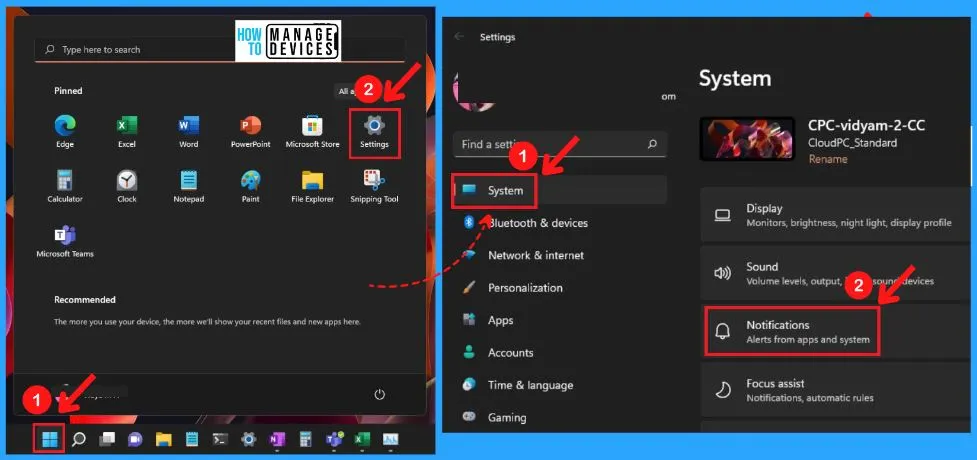
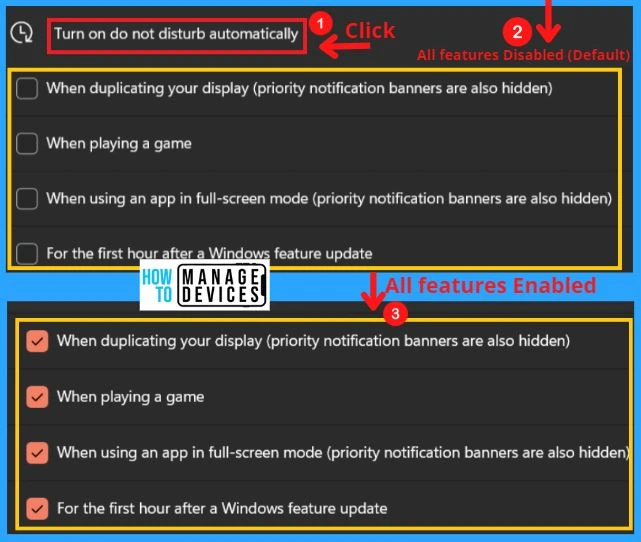
After selecting the Notifications from the system tab, Click on the “Turn on do not disturb automatically” option from Notification to expand it open.
- Click on the “Turn on do not disturb automatically” option from Notification to expand it open.
- “Turn on do not disturb automatically” includes the following
- During these times – (In this section, you can fix a notification time)
- Turn on – (Choose when you want do not disturb to Turn On automatically)
- Turn off – Choose when you want do not disturb to Turn Off automatically
- Repeat – (Choose how often to repeat this schedule)
- During these times – (In this section, you can fix a notification time)
“Turn on do not disturb automatically” Notification option includes the “During these times” option. The “During these times” notification option helps you to fix the notification time when you want to Turn on, Turn off and Repeat this schedule.
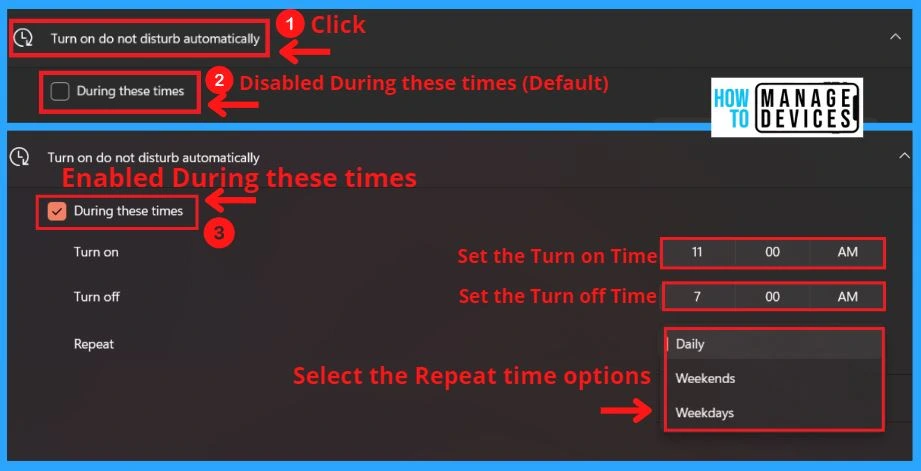
The “Turn on do not disturb automatically” option in Windows 11 includes the following points.
- When duplicating your display (priority notification banners are also hidden) – (When you are duplicating your display to an external monitor, You can Turn on this option will help you to stop notifications and also help you to hide priority notification banners)
- When playing a game – (Turn on this option will help you to hide notifications when you are playing a full-screen game)
- When using an app in full-screen mode (priority notification banners are also hidden) – (Turn on this option will help you to hide notifications when you are using an app in full-screen mode)
- For the first hour after a window feature update – (Turn on this option will help you to hide notifications during the first hour after a Windows feature update)
The below screenshot shows how to enable or disable all these features in Windows Notification.
Set Priority Notifications
Set priority notifications option in Windows 11 helps you to choose which notifications are allowed while do not disturb is on. All other notifications will be shown or remain in the Windows 11 Notification Center.
The “Set Priority Notifications” option in Windows 11 Notification includes the following.
- Set priority Notifications for Incoming calls and Reminders in the settings
- Add Apps to set priority Notification in settings
- Remove Apps from set priority Notification in settings
Note! – Alarms and other important app notifications are not affected by Set priority notifications settings.
1. Set Priority Notifications for Incoming Calls and Reminders in the Settings
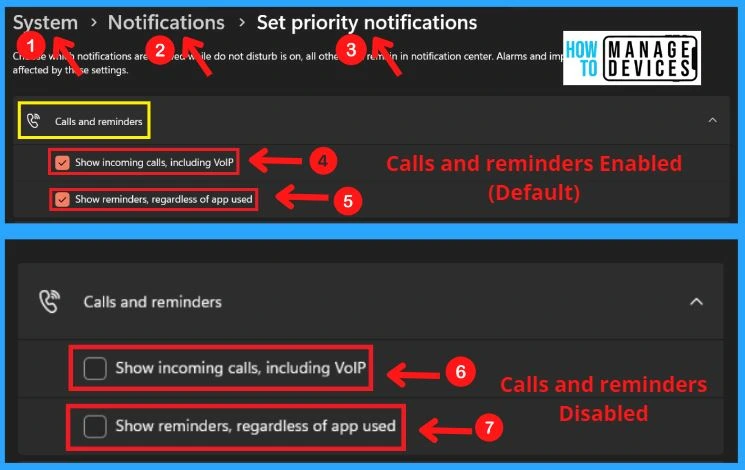
The Set Priority Notification includes 2 options. One is “Show incoming calls, including VoIP,” and the second is “Show reminders, regardless of the app used.”
- Show incoming calls, including VoIP
- Show reminders regardless of App used
The following are the steps to Set priority Notifications for Calls and reminders in settings. Open settings from the start menu. Click the System tab-> notification settings page.
- Click on “Set priority notifications” from the below screenshot
- Under Calls and reminders,
- Check (ON – Default) Show incoming calls, including VoIP
- Uncheck (Off) Show incoming calls, including VoIP
- Check (ON – Default) Show reminders, regardless of app Appd
- Uncheck (Off) Show reminders, regardless of app Appd
2. Add Apps to Set Priority Notification in Settings
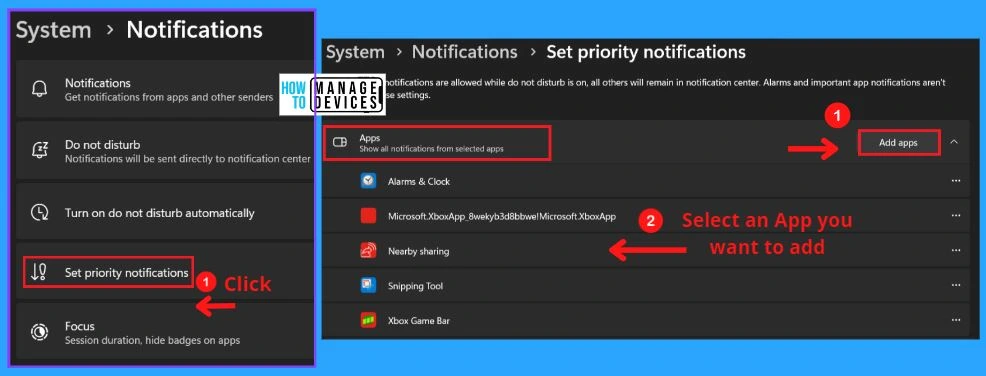
You can easily Add apps to Set priority Notifications in Settings. The following are the steps to Add Apps to Set priority Notifications in settings. You can use Windows 11 Keyboard shortcuts to perform these actions quickly.
- Open Settings from the Start menu (Win+I)
- Click on System on the left side of the settings page
- Click on Notification on the right side of the System tab
- Click on Set priority notifications
- Under Apps, Click on the Add apps button and select an app you want to add
3. Remove Apps from Set Priority Notification in Settings
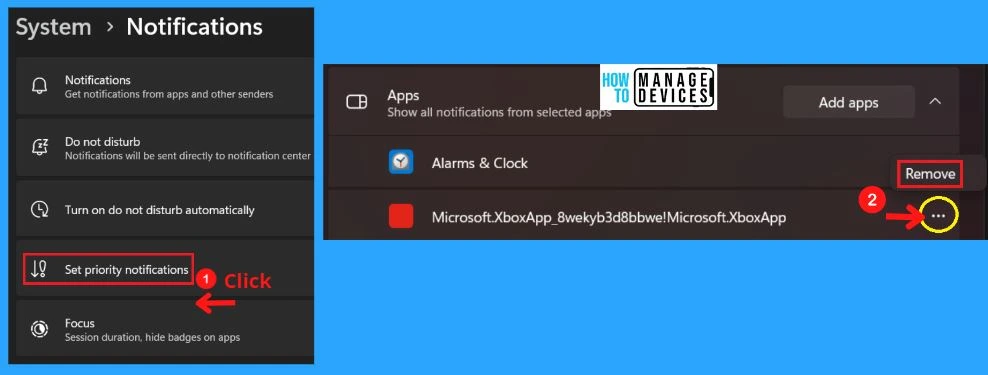
You can easily Remove apps from Set priority Notification in Settings. The following are the steps to Remove Apps from the Set priority Notification settings.
- Open Settings from the Start menu (Win+I)
- Click on System on the left side of the settings page
- Click on Notification on the right side of the System tab
- Click on Set priority notifications
- Under Apps, Click on the 3 dots button for the app App want to remove
- Click on Remove from the below screenshot
Windows 11 Focus
You also configure the Windows 11 Focus-related notifications from the same place as explained above. The default setting of the Focus session on Windows 11 is 30 minutes. Some of the focus control notifications are given below.
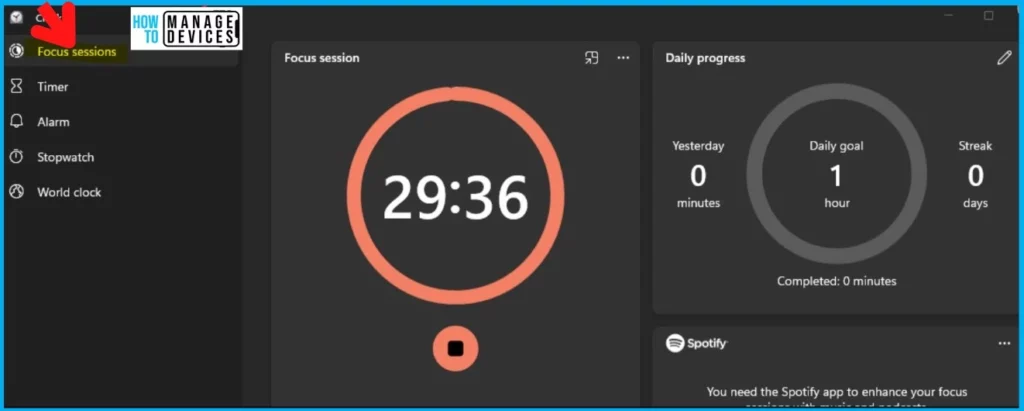
Focus helps you to give a new experience that enables everyone to stay in the moment. Focus also keeps you on track and minimizes distractions on your PC. Focus includes 2 focus sessions; they are as follows.
- Start focus sessions
- End focus sessions
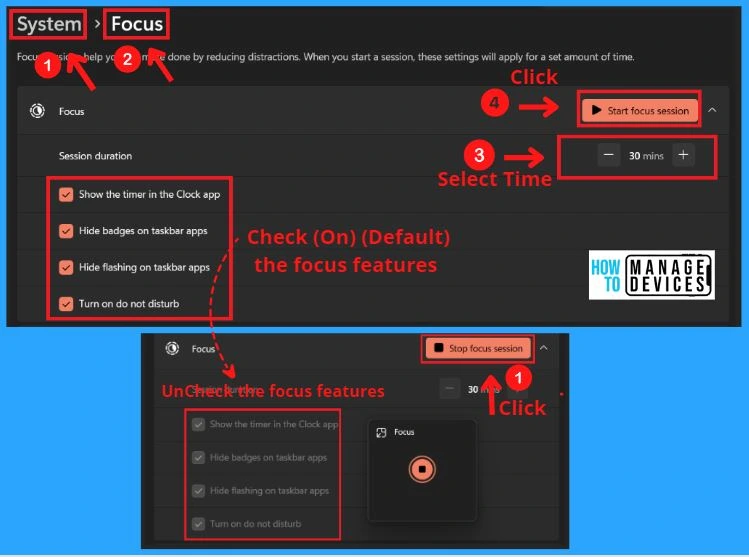
The following are the steps to Start and End the focus sessions using Windows settings.
- Open settings from the start menu(Win+)
- Click on the System on the left side of the settings page
- Click on Focus on the right side of the system tab. Focus includes the following.
- Show the timer in the clock app (Focus timer on desktop)
- Hide badges on taskbar apps (Badges are notifications that are contextual and Specific to individual apps, Show on the taskbar by default)
- Hide flashing on taskbar apps (It helps to hide flashing on taskbar apps)
- Turn on do not disturb (Make it easy to silence notifications)
- Select the Time duration for your Focus session
- Click on the Start focus session button from the below screenshot
- You can easily Stop the focus session by clicking the End focus session button from the below screenshot
NOTE! – More Details on focus configuration are available in the following post – Windows 11 Focus Settings to Reduce Notifications
B. Turn On or Off Specific Windows Notifications via the Settings Menu
You can easily Turn on or off specific windows Notifications through the settings menu in Windows 11. The following are the steps, and the below screenshot shows how to Turn on or off specific windows notifications in Windows 11.
- Press Windows key + I to open up the Settings menu or select settings from the start menu
- Select the System option from the available options on the left side of the settings page
- Click the Notification option on the right-hand side system tab
- Now you are inside the Notification settings page, scroll down to the “Notifications from apps and other senders” section
- Turn on or off the Notification on any app by dragging the ‘apps and other senders” pane from the left and right side

And also, click the specific App you want to turn on or off the Notifications. Turn on or off the Notification for that specific App by dragging the notification pane to the right and left sides.
- And also, click the specific app Appample: Mail) which you want to turn on or off the Notifications
- .Turn on or off the Notification for that specific App Appdragging the notification pane circle to the right and left side, as shown in the below screenshot
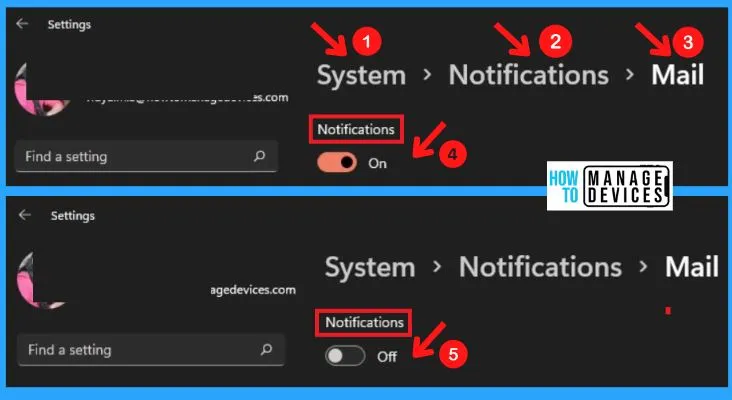
Click the Specific App entry in the List to Display and Adjust Additional Notification Settings for that App
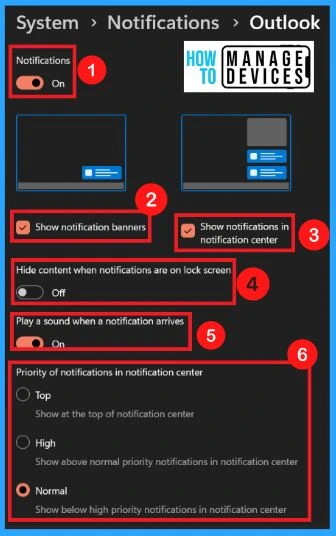
App additional notification settings for specific apps include the following. The below screenshot shows the other notification settings for particular apps.
- Notification
- Show Notification banners
- Show notifications in the notification center
- Hide content when notifications are on the lock screen
- Play a sound when a notification arrives
- Priority of Notifications in the notification center
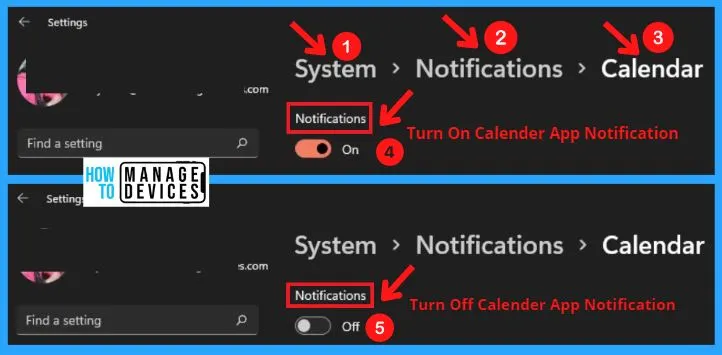
1. Notification
You can easily Turn on or off specific app notifications in Windows 11. The below steps and the screenshot shows how to Turn on or off specific app notifications in Windows 11.
- Press Windows key + I to open up the Settings menu or select settings from the start menu
- Select the System option from the available options on the left side of the settings page
- Click the Notification option on the right-hand side of the system tab
- Now you are inside the Notification settings page, scroll down to the “Notifications from apps and other senders” section
- Select the Specific App (example: Calender) which you want to turn on or off the Notifications
- Turn on or off the Notification for that specific App Appdragging the notification pane circle to the right and left side, as shown in the below screenshot
2. Show Notification Banners
You can easily Turn on or off “Show Notification Banners” from specific apps in Settings. The below steps and screenshot shows how to Turn on or off “Show Notification Banners” from particular apps in Settings.
- Select Settings from the start menu
- Select the System option from the available options on the left side of the settings page
- Click the Notification option on the right-hand side system tab
- Under Notifications from apps and other senders, click on the app App: Mail) you want. (see screenshot below)
- Check (on) (default) or uncheck (off) “Show notification banners” option are shown in the below screenshot

3. Show Notifications in the Notification Center
You can easily select the date and time in the taskbar to open the Notification Center, swipe in from the right edge of your screen, or press the Windows logo key + A to open the Notification center. You can see notifications in the Notification Center by enabling this option.
You can easily Turn on or off “show Notification in Notification Center” in Windows 11. The steps below and screenshot show how to turn on or off Notification in the Notification center in Windows 11.
- Select Settings from the start menu
- Select the System option from the available options on the left side of the settings page
- Click the Notification option on the right-hand side of the system tab
- Under Notifications from apps and other senders, click on the app App: Mail) you want. (see screenshot below)
- Check (on) (default) or uncheck (off) “show Notification in Notification center” option are shown in the below screenshot

4. Hide Content When Notifications are on the Lock Screen
You can easily Turn on or off the “Hide content of notifications from app on lock screen” settings. You can also choose the hidden content of app notifications on the lock screen for privacy.
The below steps and screenshot show how to Turn on or off the “Hide content of notifications from app on lock screen” settings.
- Select settings from the start menu
- Select the System option from the available options on the left side of the settings page
- Click the Notification option on the right-hand side system tab
- Under Notifications from apps and other senders, click on the app App: Outlook) you want
- Turn on or off the “Hide content when notifications are on lock screen” by dragging the “Hide content when notifications are on lock screen” pane to the right and left side
- If the “Hide content when notifications are on lock screen” pane circle is on the left side, It means the “Hide content when notifications are on lock screen” is Turned off
- If the “Hide content when notifications are on lock screen” pane circle is on the right side, It means the “Hide content when notifications are on lock screen” is Turned on
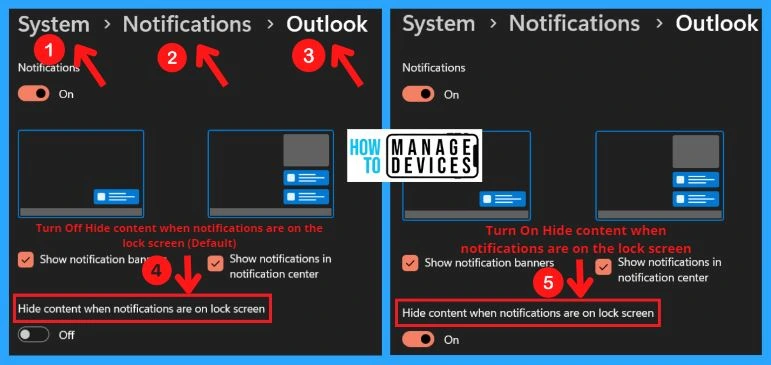
Note! – You can choose the hidden content of notifications from apps when on the lock screen for privacy
5. Play a Sound when a Notification Arrives
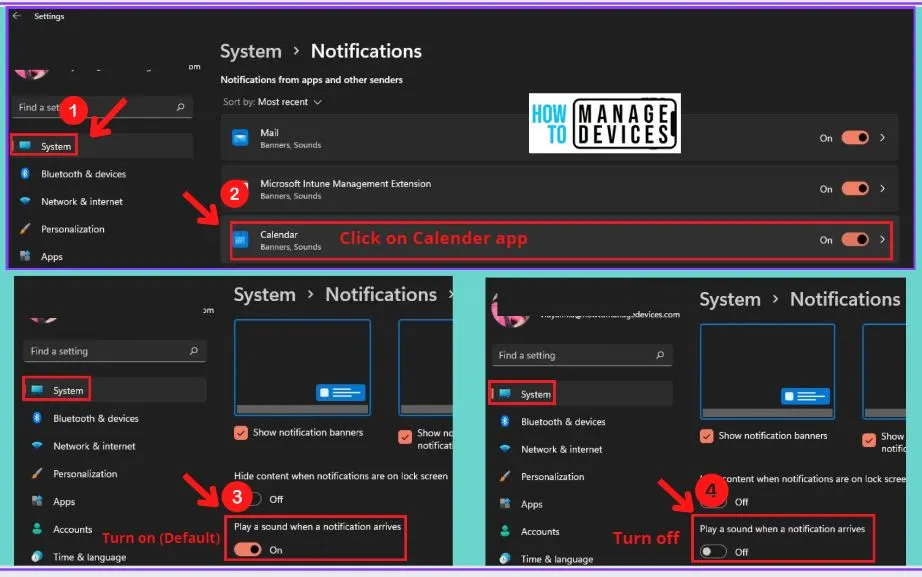
You can easily Turn On or Off Notification Sounds for specific sender settings in Windows 11. Follow the below steps and screenshot to “Turn On or Off Notification Sounds for Specific Senders in Settings.”
- Open Settings from the start menu (Win+I)
- Select the System tab on the left side and click Notification on the right side of the system tab
- Click on the apps and other senders you want on the right side (example: Calendar or some other apps)
- Go to “play a sound when a notification arrives” on the right side of the Calendar app
- Turn on (Default) “play a sound when a notification arrives” option by dragging the play a sound when a notification arrives pane circle to the right side
- Turn off the “play a sound when a notification arrives option” by dragging the play a sound when a notification arrives pane circle to the left side
6. Priority of Notifications in the Notification Center
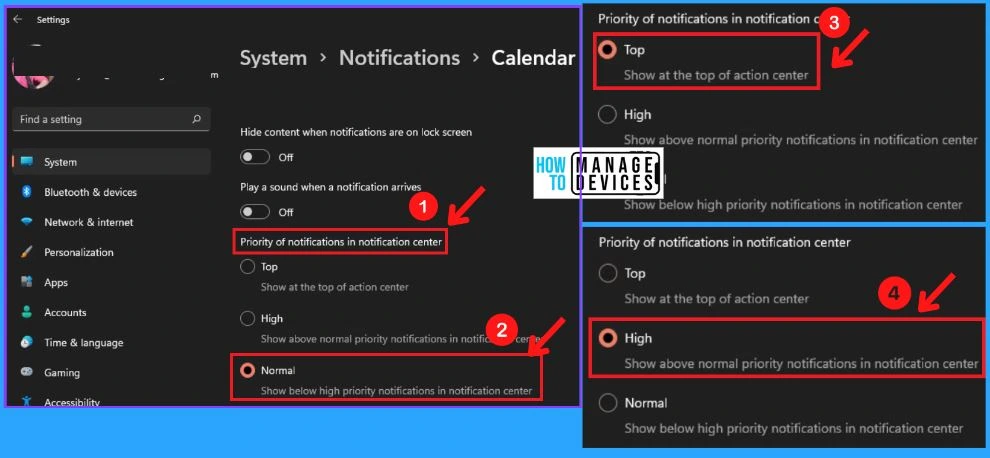
You can easily change the Priority of Notification in the notification center in Windows 11. You can also order the Priority notifications from apps to show them in the Notification Center.
- There are 3 types of Priority of Notifications. They are as follows.
- Top – Top level priority of notifications shows at the top of the Notification Center
- High – High-level Priority of notifications shows above normal priority notifications in the Notification Center
- Normal – Normal level priority of notifications shows below high priority notifications in the Notification Center
There are two different ways to change the Priority of notifications. They are as follows.
- Change Priority of Notification in Notification Center in Settings
- Change Priority of Notifications in Notification Center
1. Change Priority of Notification in Notification Center in Settings
You can easily change the Priority of Notifications in the notification center using settings in Windows 11. The below steps and screenshot shows how to change the Priority of Notification in the notification center.
- Select Settings from the start menu or use (Win+I) to open settings
- Select System on the left side of the settings page
- Select Notification on the right side of the System tab
- Under Notifications from apps and other senders, click on the app Appample: Calendar) you want to change the Priority of notifications
- Under Priority of notifications in the notification center, select Top, High or Normal (default) for the Priority you want for this App
2. Change Priority of Application Notifications in Notification Center
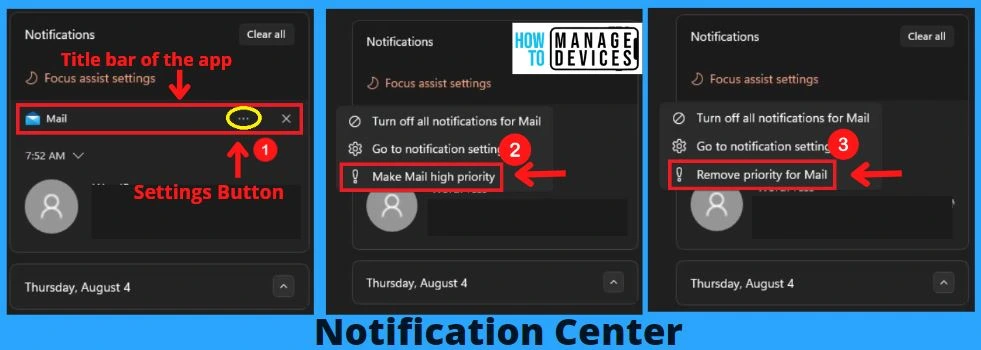
You can easily change the Priority of Application notifications in the notification center. The below steps and screenshot shows how to change the Priority of Notification in the notification center. Let’s take an example of an Outlook email application notification.
- Press the Windows key + A to open the Notification center or press the Action Center icon on the right end of the taskbar.
- Click on the Settings (3 dots) button on the title bar of the App (App l) you want to change the Priority for (see the below screenshot)
- Click the “make an app(Mail) high priority” option for high Priority
- Click the “Remove priority for the app(Mail)” option to remove the high Priority
C. Turn On or Off Specific Windows 11 Notifications via Notification Center
You can easily Turn on or off specific Windows 11 Notifications via the notification center. You can use this method if the App already has a notification, and you can only modify the default notification behavior.
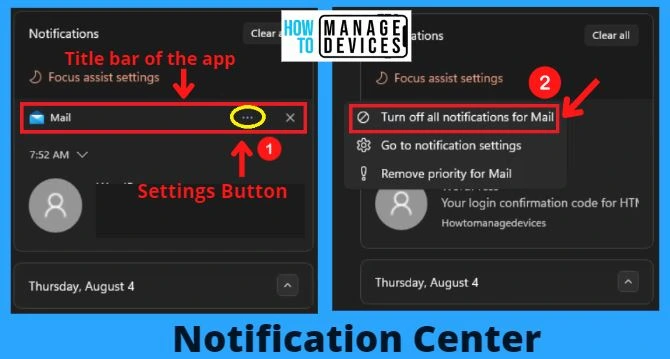
The below steps and screenshot show how to Turn on or off specific windows 11 notifications using the notification center.
- Press Windows key + A to open up the Notification Center on Windows 11
- Click on the Action button (three-dot icon) from the top of the App Appt you want to turn Off Notifications for a specific app (example: Mail)
- Click on Turn off all notifications for the specific app Appample: Mail) From the context menu
Author
About Author – Vidya is a computer enthusiast. She is here to share quick tips and tricks with Windows 11 or Windows 10 users. She is also keen to find solutions to day-to-day tech problems and write about them.

Is there a script or intune policy that can control this?