Hey there, Let’s discuss about enable or disable Prevent Typosquatting Prompt override in Microsoft edge browser using M365 Admin center. Microsoft 365 (M365) is a suite of productivity tools that help people and teams work together, chat, and collaborate easily.
Typosquatting, also known as URL hijacking, occurs when people buy intentionally misspelled or slightly different domain names that closely resemble a legitimate brand’s website. For example, if the actual website is “website.com,” a typosquatter might register “websit.com” or “websyte.com” to trick users.
If we would like wish we can use the PreventTyposquattingPromptOverride policy setting to understand whether users are permitted to override the Edge Website Typo Protection warnings regarding potential typosquatting websites.
Through this blog post, we will see how to enable or disable the policy, prevent typosquatting prompt override in Microsoft Edge Browser using M365 Admin Center. You will get step by step guidance from this blog post.
Table of Contents
What is Typosquatting?

Typosquatting is a form of cyberattack where attackers register domain names that are similar to popular or legitimate websites but contain common typographical errors. It involves tricking users into visiting malicious websites with URLs redirecting them to a malicious site.
Prevent Typosquatting Prompt Override in Microsoft Edge
To prevent typosquatting prompt override in Microsoft Edge using the Microsoft 365 Admin Center, we can deploy policies that restrict users from bypassing warnings about potentially malicious websites. This includes configuring settings in the Microsoft Endpoint Manager (Intune) or Group Policy, which can be managed through the Microsoft 365 Admin Center.
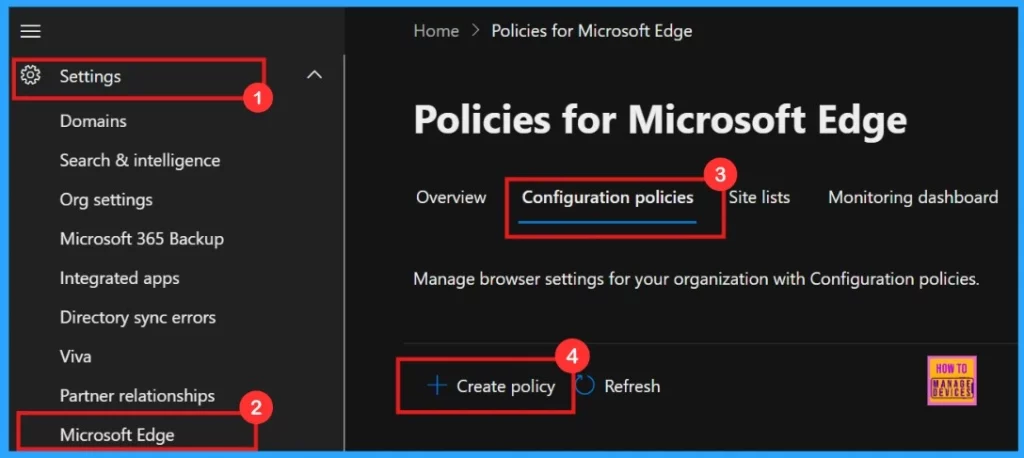
- Microsoft 365 admin center > Settings > Microsoft Edge > Configuration Policies > Create Policy
- Enable Disable Browser Guest Mode in Microsoft Edge Browser using M365 Admin Center
- Microsoft 365 E5 Security Add-on Now Available to Enhanced Cybersecurity for SMBs
- Enable or Disable Full Screen Mode Policy in Edge Browser using Microsoft 365 Admin Center Policy
Basics
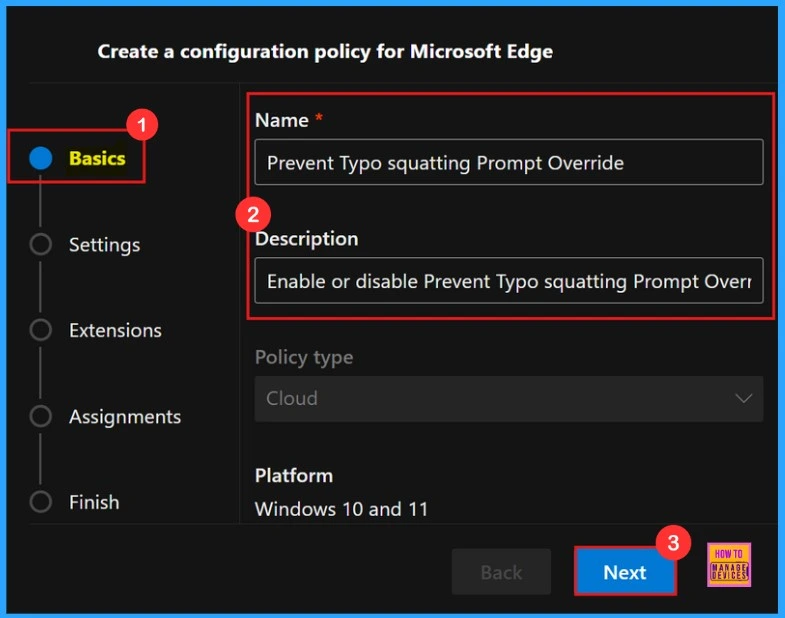
In the Basics section, we’ll need to provide a Name for our policy, which is a required field. We can also add an optional Description to help us easily identify and understand the policy’s purpose later. Additionally, this section displays the Policy Type (e.g., Cloud) and the Platform (e.g., Windows 10 and 11) for which the policy is being created.
Settings
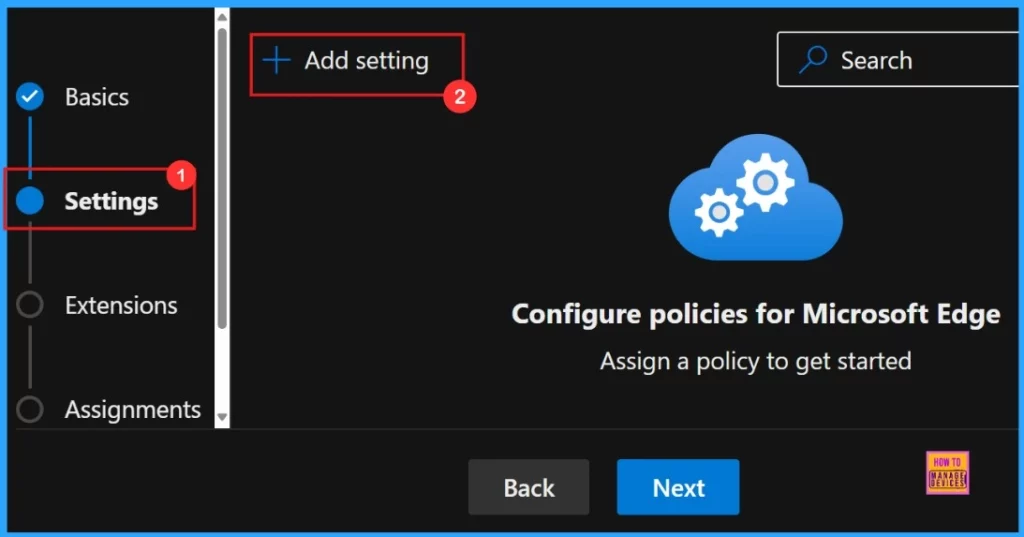
We can define and customize the specific settings for our policy. To add settings, simply click the +Add Settings button, as illustrated in the screenshot below. This allows us to choose from a range of options to tailor the policy to our organization’s needs.
Configure a Setting
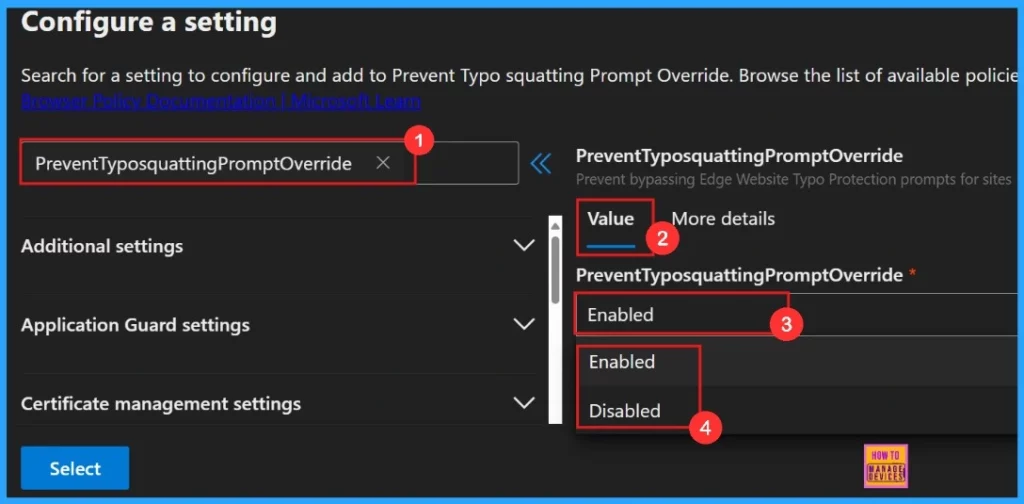
We can search our policy by typing the policy name. Then a value tab will open. On the Value tab, we have the option to enable or disable the selected policy. In this case, we can chose the Enabled option because the purpose of our policy is to activate a specific feature. If our goal is to deactivate the feature instead, we can select the Disabled option.
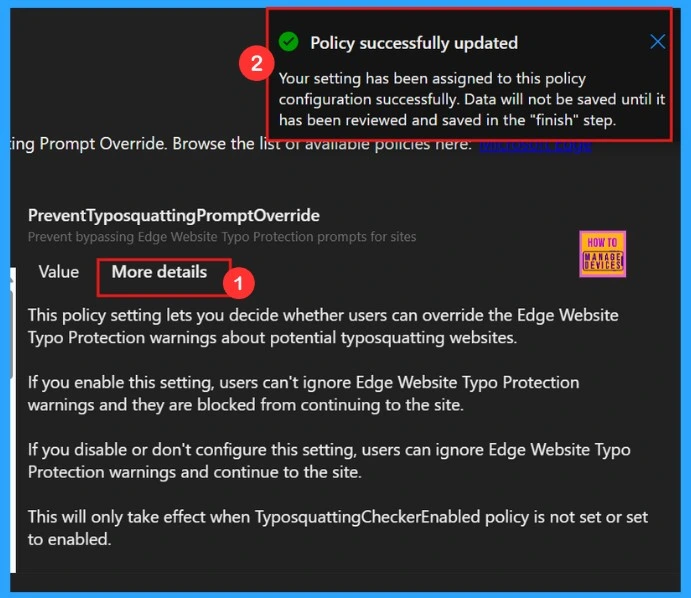
More Details
On the More Details tab, we can delve into the specifics of the selected policy settings, giving us a deeper understanding of how the policy works. Once we click the Select button, a notification will appear to confirm that the policy has been successfully updated. The screenshot below offers a clear visual representation of the information displayed on the More details tab.
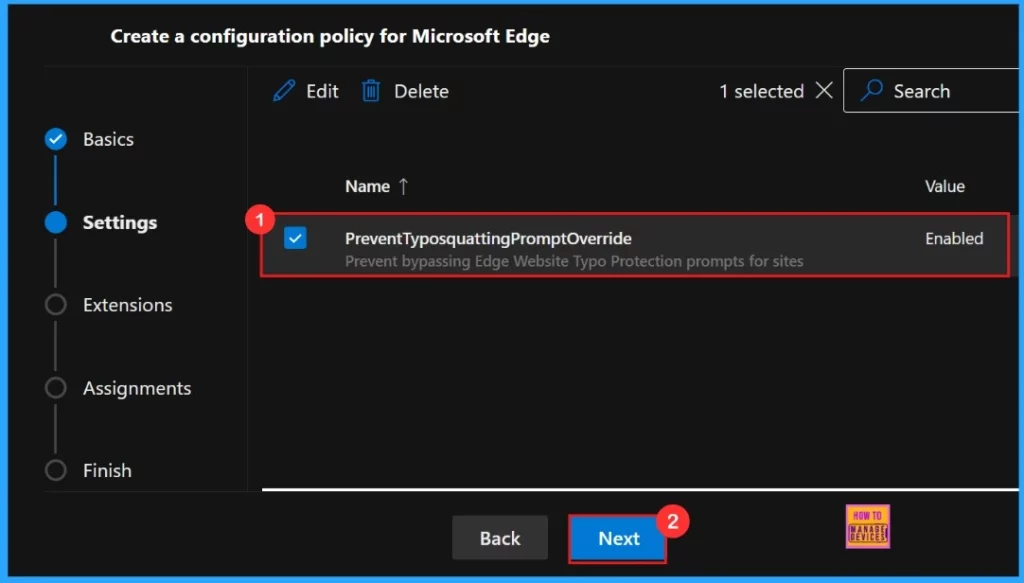
After selecting the policy, we need to close the configuration settings page. Our settings, including the policy chosen name and value, will appear on the Settings page. Here, we need to click on the checkbox near the Policy name and click on the Next button.
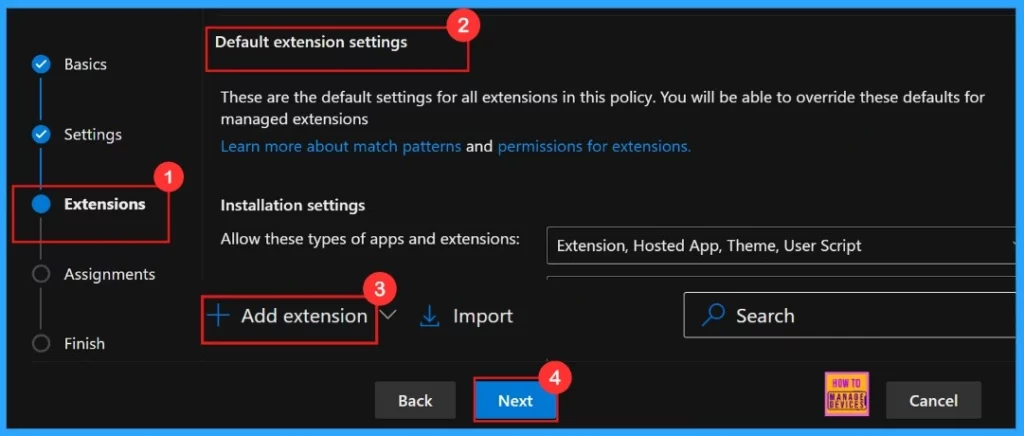
Extensions
In this section, we already have default extension settings. If we wish to include an extension, simply click the + Add extension button. However, we can skip the Extensions section altogether, as it is not a mandatory step for creating policies in the Microsoft 365 Admin Center.
- Click on the Next Button
Assignments
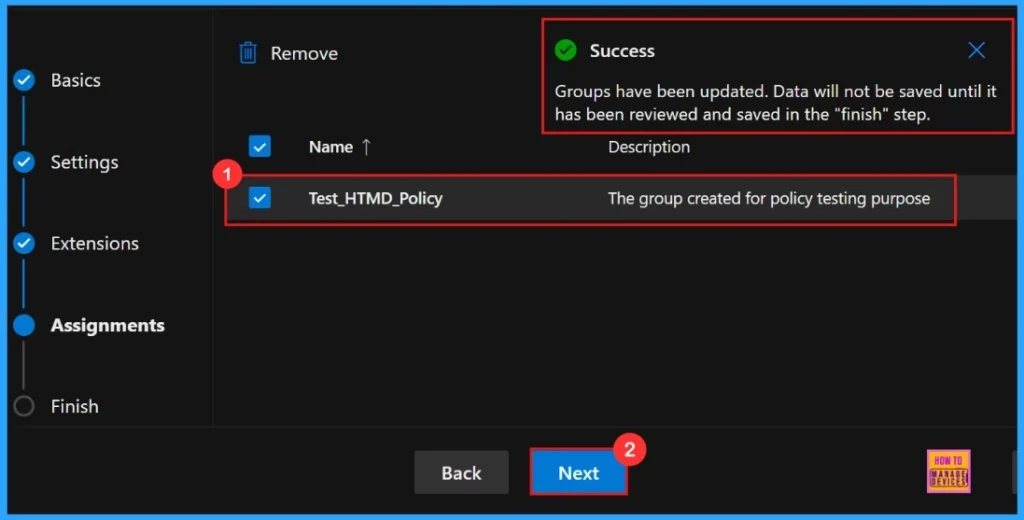
The Assignments tab allows us to specify the groups to which we want to apply the settings. To use this feature, click the +Select group option, choose a Microsoft Entra Group, and then click the Select button to confirm our choice.
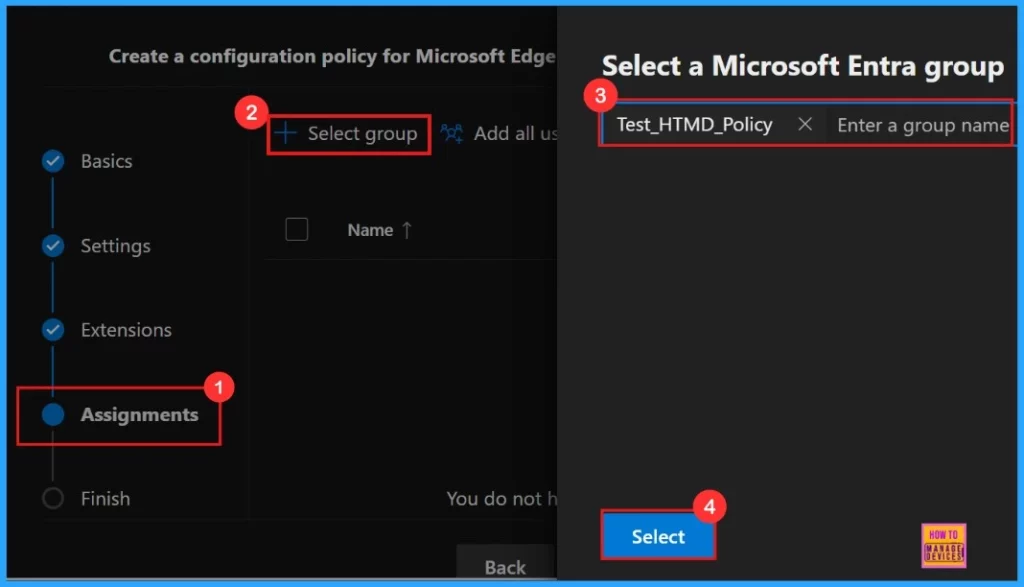
After clicking Select, a notification will appear on the page confirming that the group has been updated. However, the changes will not be saved permanently until you review and finalize them in the Finish step.e
Finish
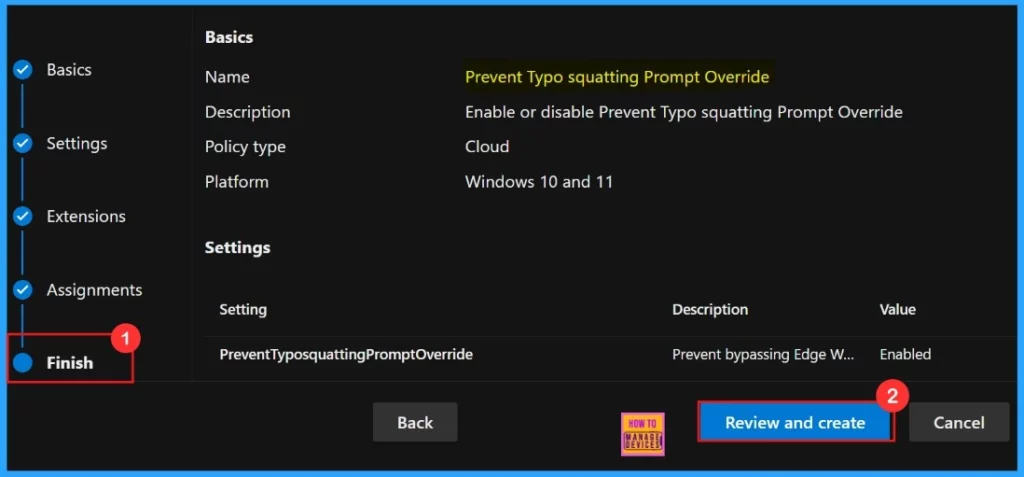
The Finish tab provides an opportunity to review all the details of your policy. If any adjustments are needed, we can click the Back button to make changes. When we are satisfied with the configuration, click Review and Create to finalize and save our policy.
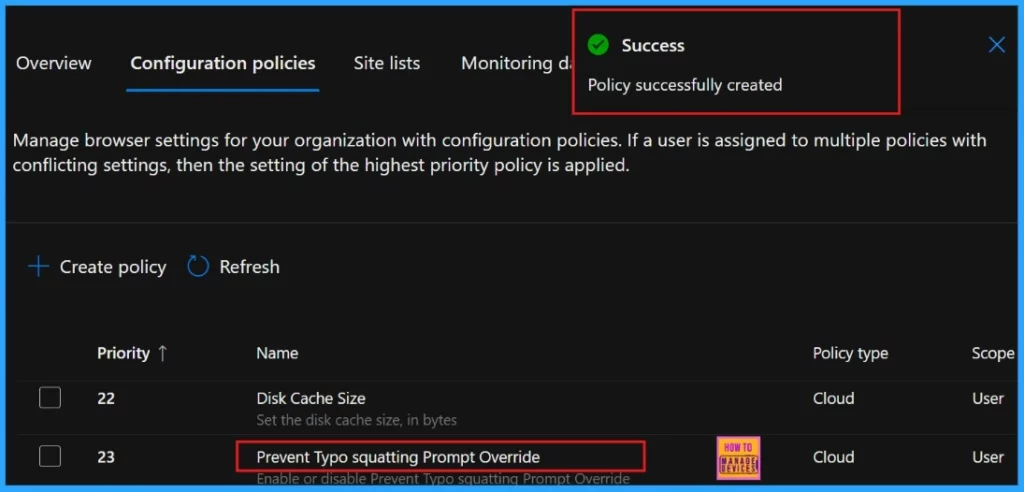
After clicking Review and Create, the portal will display a success message confirming that the policy has been successfully created. The newly created policy will then appear in the Configuration Policies section.
End User Experience
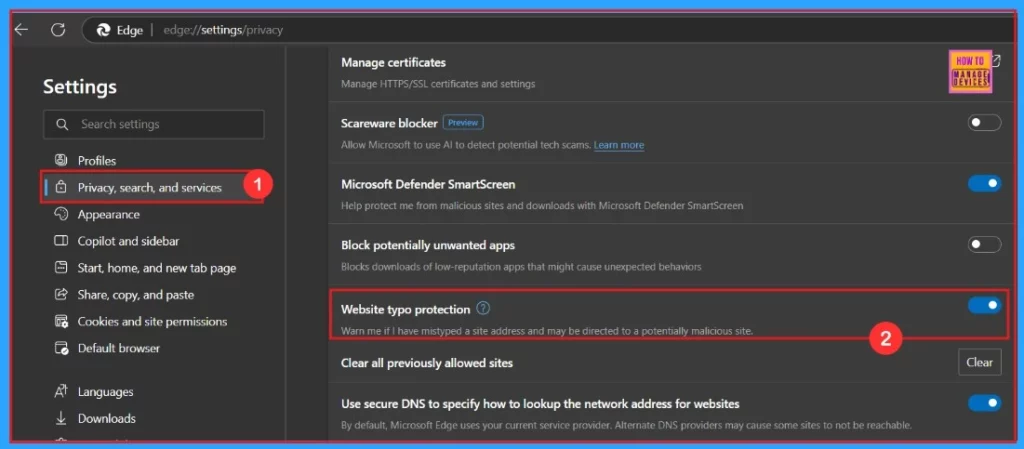
Select the Privacy, search, and Services option, and we will find the Website typo protection setting on the right side of the screen under the Security section. Enabling this feature ensures that the Edge browser is safeguarded by website typo protection. By default, this feature is already turned on.
Need Further Assistance or Have Technical Questions?
Join the LinkedIn Page and Telegram group to get the latest step-by-step guides and news updates. Join our Meetup Page to participate in User group meetings. Also, Join the WhatsApp Community to get the latest news on Microsoft Technologies. We are there on Reddit as well.
Author
Anoop C Nair has been Microsoft MVP for 10 consecutive years from 2015 onwards. He is a Workplace Solution Architect with more than 22+ years of experience in Workplace technologies. He is a Blogger, Speaker, and Local User Group Community leader. His primary focus is on Device Management technologies like SCCM and Intune. He writes about technologies like Intune, SCCM, Windows, Cloud PC, Windows, Entra, Microsoft Security, Career, etc.
