Today, we will discuss Enable Disable Print PDF as Image Default using Intune Security Policy. As you all know, Intune deploys policy very effectively. Utilizing the crucial Settings Catalog policy is an effective way to implement the policies.
We recently discussed various types of settings catalog policies on our site. Today, we will focus on how to turn the Print PDF into an Image option by default. PDFs play an essential role in documentation, as viewers generally prefer to read documents in PDF format.
Setting “Print as Image” as the default option in Microsoft Edge. However, in many cases, it did not appear properly due to missing fonts. At that time, printing PDF as an image was a good choice. With this printing option, the user can take an image of each documentation page, which can be very helpful for users.
This feature can be disabled or enabled by user choice, and it can be very effective for specific organizations through Microsoft Intune. So, in this post, let’s talk about how to deploy the enable or disable Print PDF as image as default policy through setting catalog.
Table of Contents
What is the Print PDF as Image as Default?
If you enable this policy, Microsoft Edge will default to setting the Print as Image option in the Print Preview when printing a PDF. If you disable or don’t configure this policy, Microsoft Edge will not default to setting the Print as image option in the Print Preview when printing a PDF.
Enable Disable Print PDF as Image Default using Intune Security Policy
We discussed various aspects of printing PDFs as images and their benefits. Now, let’s look into how to get started with this in Intune. First, you need to sign in to the Microsoft Intune admin center. Next, navigate to Devices > Configurations.
On the configuration page, you will see a “Create” option. Click on that, and then select “New Policy.” This will open the “Create a Profile” window. You should select the platform as Windows 10 and later and the profile type as Settings Catalog.

- Best Steps to Install Local Printer in Windows 11 | Driver Software
- Prevent Users From Installing Printer Drivers using Intune
- PDF24 Creator Deployment using Intune Enterprise App Catalog App
Basics
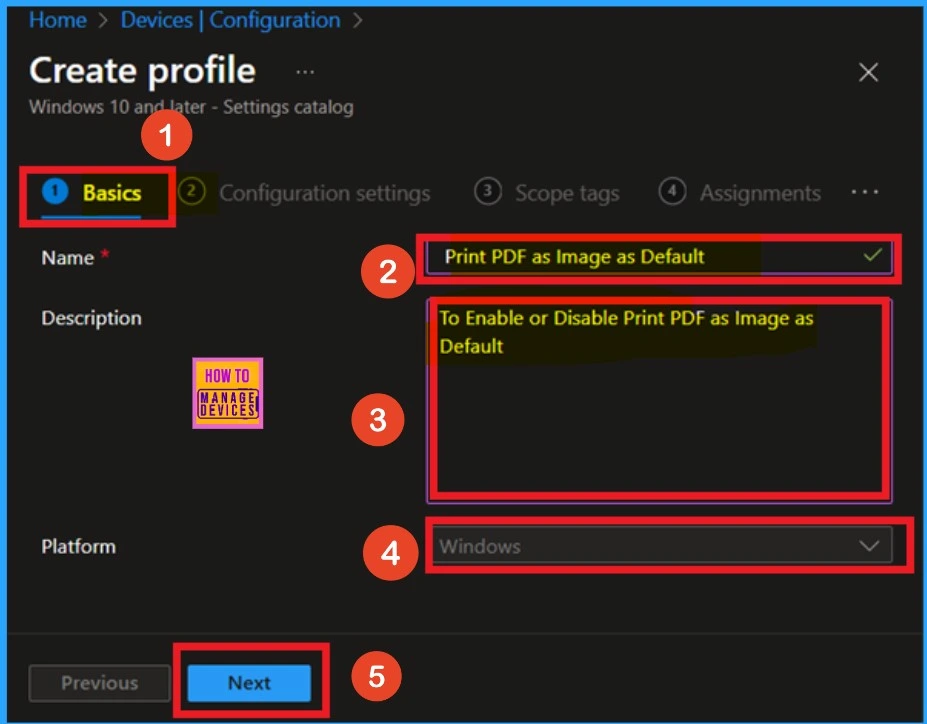
On the Basic page, you can enter the essential details of the policy. You will find fields for the name, description, and platform details here. I’ve given the name as Print PDF as Image as Default. You can also add a description to clarify the policy for future reference.
- Next, ensure that the platform is set to Windows, which is selected by default.
- You do not need to change here; click “Next” to proceed.
Configuration Settings
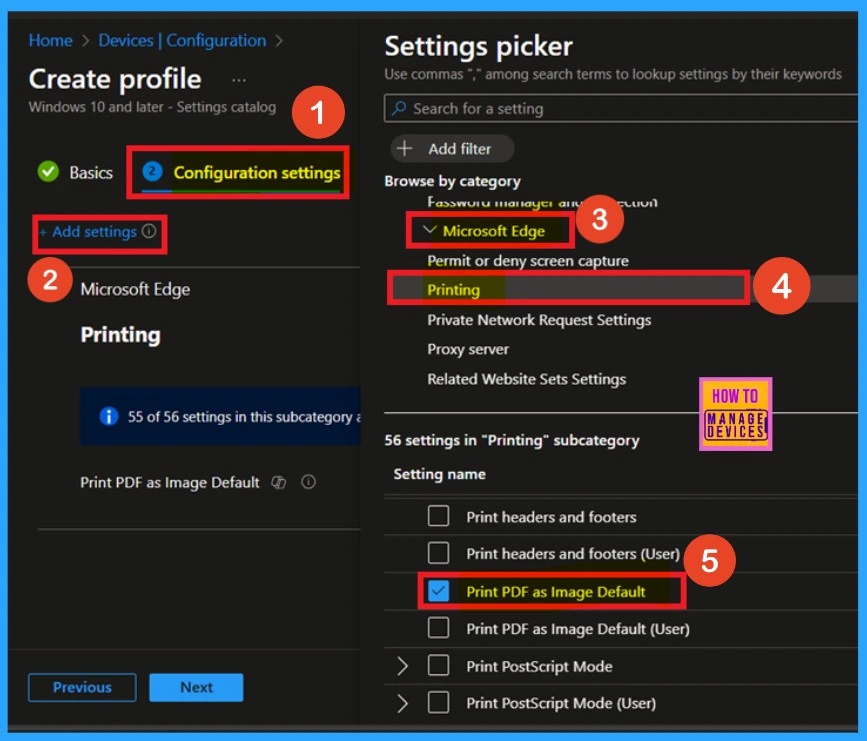
The next step is Configuring settings, which is very important. To do this, look for the “Add Setting” option in the hyperlink and click on it. This will open a window called Settings Picker with different categories. Search for Microsoft Edge and maximize the edge. Select the “Printing” category.
After clicking on “Printing,” you will see various settings available. Here, choose “Print PDF as Image as Default.” When you select this option, a blue check mark indicates it is selected. After making your selection, you can close the settings picker window.
Disable the Policy
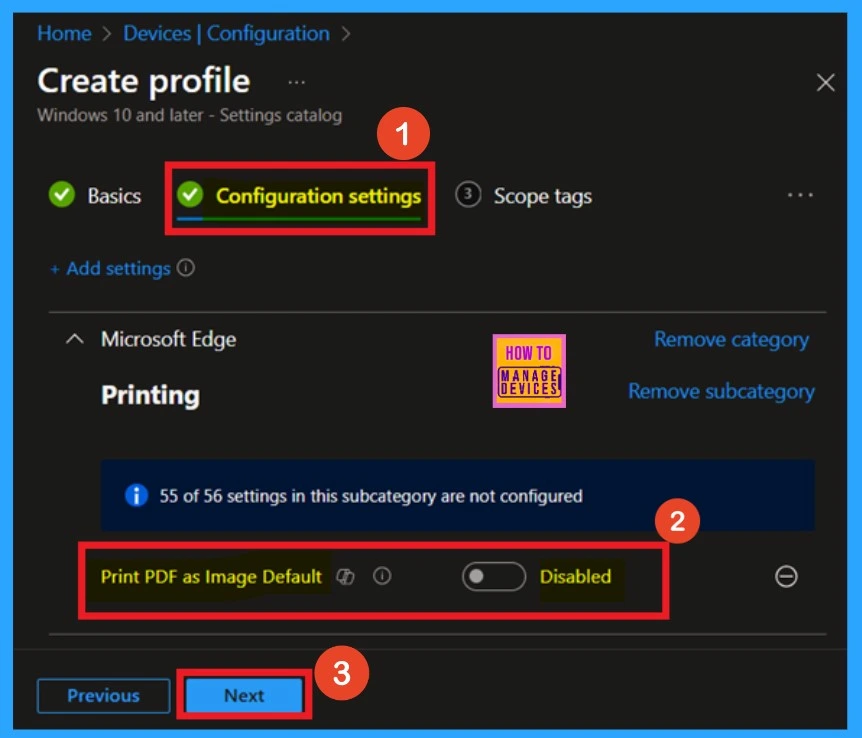
When you select the policy name and print PDF as an image as the default, you are in configuration settings. Here, you can see that policy name in a configuration settings page, and the policy is disabled. If you want to continue with the disabled policy deployment, you can click on Next. You don’t need to do anything.
- If you want to keep the policy Disabled, click on the Next, Skip the Enable policy Screenshot, and Continue with other Steps such as Scope tags, Assignments, and Review + create.
Enable the Policy
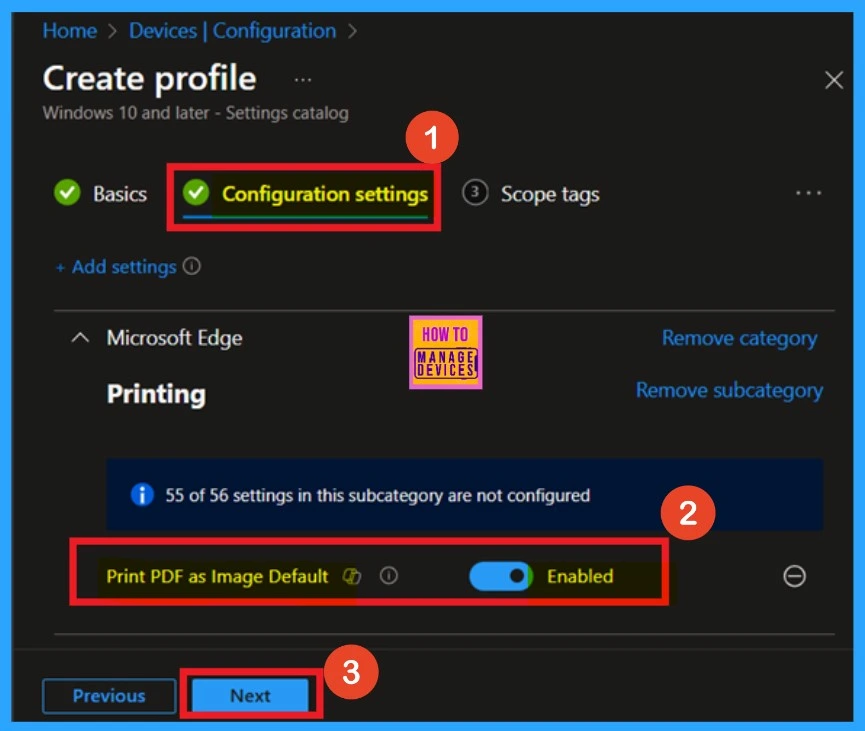
When this policy appears in the configuration settings, look for the toggle pane next to the policy name. To enable the policy, you can toggle it from left to right. The toggle will change to blue, indicating that it is Enabled. After that, you can easily proceed to the next step, and your policy will be successfully enabled.
- Click on the Next.
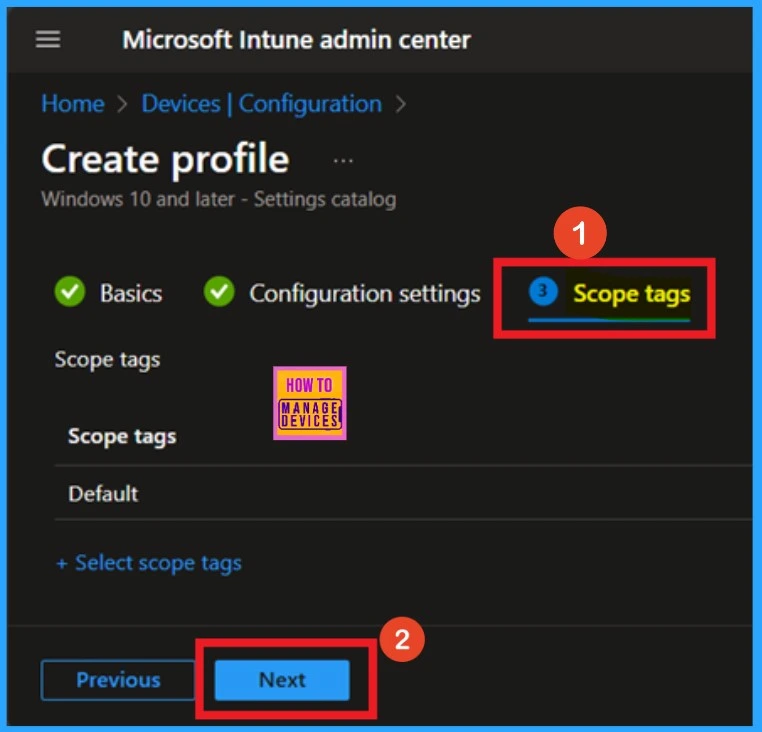
Scope tags
The scope tag section comes after the policy’s configuration settings. It’s important to note that the scope tag is always mandatory when deploying a policy. I decided to skip this policy to add scope tags. Then you can to click on the Next for further proceedings.
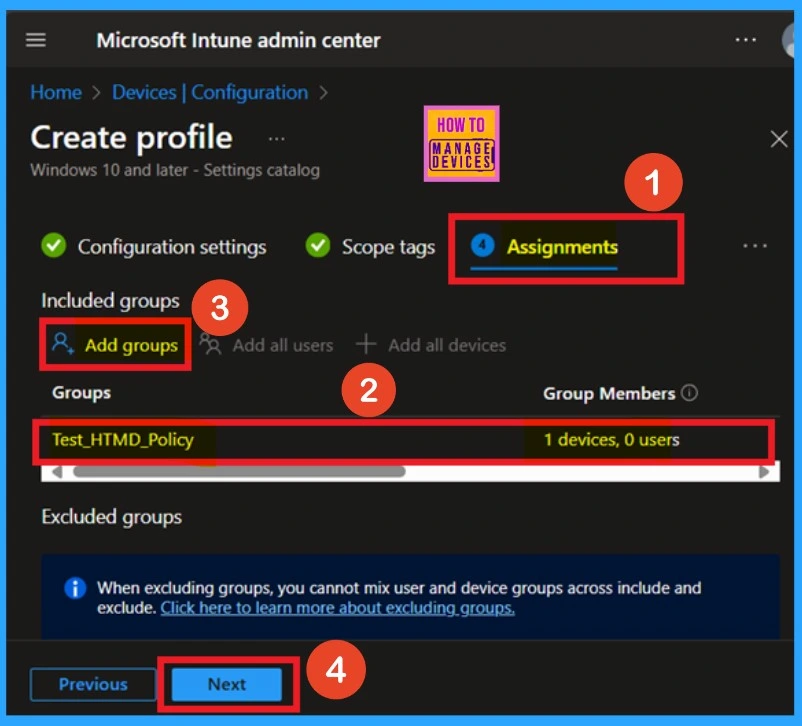
Assignments
The Assignment section is an important step when deploying a policy. We need to assign the policy to a specific group. In this section, you can add groups for policy assignments. Click on “Add Groups” under the “Include Groups” section. Then, select the group to which you want to assign the policy.
- Then click on the Next.
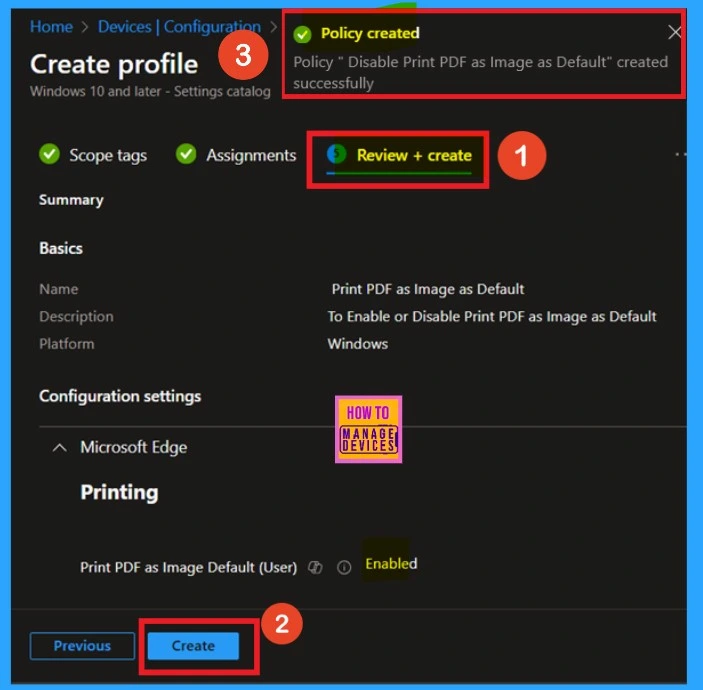
Review + create
The “Review + Create” option is the final step in the policy creation process. Here, you can review all the details provided for the policy. If everything is okay, you can click the “Create” button. Once you do this, you will receive a notification confirming that the policy has been created successfully.
Monitor Status
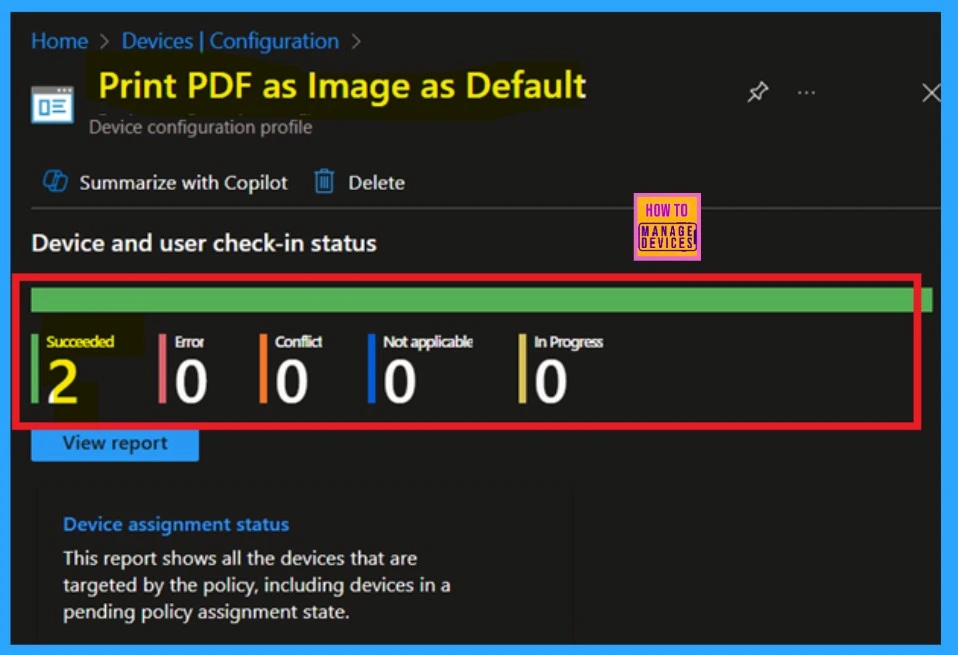
To check the monitoring status, go to Device > All Devices and look for the specific device you created (Print PDF as Image as Default). Typically, it takes about 8 hours for a policy to be deployed. To speed up this process, you can sync the policy through the company portal. After doing so, you can verify the monitoring status.
Client-Side Verification
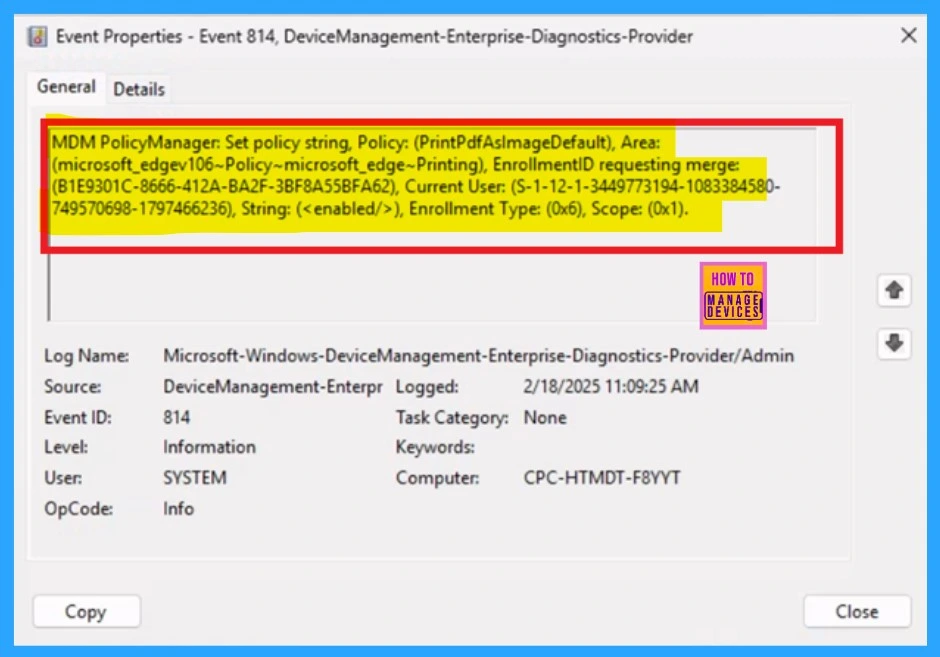
To check the Client-side verification of the Print PDF as Image as Default in Intune, open Event Viewer. To do that, go to Start and type “Event Viewer.” Then, navigate to Application and Services Logs > Microsoft > Windows > DeviceManagement–Enterprise–Diagnostics–Provider > Admin.
In the right pane, click on “Filter Current Log.” Enter “814” in the Event IDs field, then click OK. This action will filter the logs related to the status of the policy,
| Policy Details |
|---|
| MDM PolicyManager: Set policy string, Policy: (PrintPdfAslmageDefault), Area: (microsoft_edgev106~Policy~microsoft_edge~Printing), EnrollmentID requesting merge: (B1E9301C-8666-412A-BA2F-3BF8A55BFA62), Current User: (S-1-12-1-3449773194-1083384580- 749570698-1797466236), String: (), Enrollment Type: (0x6), Scope: (0x1). |
.Join the LinkedIn Page and Telegram group to get the latest step-by-step guides and news updates. Join our Meetup Page to participate in User group meetings. Also, Join the WhatsApp Community to get the latest news on Microsoft Technologies. We are there on Reddit as well.
Author
Anoop C Nair has been Microsoft MVP for 10 consecutive years from 2015 onwards. He is a Workplace Solution Architect with more than 22+ years of experience in Workplace technologies. He is a Blogger, Speaker, and Local User Group Community leader. His primary focus is on Device Management technologies like SCCM and Intune. He writes about technologies like Intune, SCCM, Windows, Cloud PC, Windows, Entra, Microsoft Security, Career, etc.


