Let’s discuss Resize an Image Using Paint and Photos Apps in Windows 11. As you know, Paint is a powerful feature that allows a wide range of image editing features. It is one of the best editing software at present.
Microsoft Paint has been a favourite app for over 30 years. Most users use the paint feature because it is easy and user-friendly. Paint also has different kinds of useful tools for every user. Paint provides simple drawing tools like pencil, brush, and eraser.
We all need the image resize option at some point, right? Resizing images is an integral part of digital photography and graphic design. It helps make images the right size for different uses, like websites and printing.
Sometimes, some applications also need some image size limits. In these cases, paint is one of our best features. So, let’s look into a detailed guide to resizing an image in Microsoft Paint in Windows 11.
Table of Contents
What is a Resize Image?
In Paint, the Resize option is one of the critical features. The resize option means changing image dimensions. With this, you can adjust the image size to fit specific needs. A resized image is always needed for website, printing and an image to share on a social media platform.
Resize an Image Using Paint and Photos Apps in Windows 11
Above, we discussed a brief note on Creating a perfectly sized photo using the resizing image feature in Paint on Windows 11. Sometimes, we have to be concerned that when we resize an image, it loses clarity in the image. Resizing with specific dimensions without affecting their clarity or sharpness is very important in paints, and It offers those.

- New MS Paint has AI Powered Fill and Erase Options
- Top 83 Windows 11 Desktop Admin Interview Questions
- Why Does Windows 11 24H2 Have Outdated Versions of Paint and Snipping Tool?
How it Works
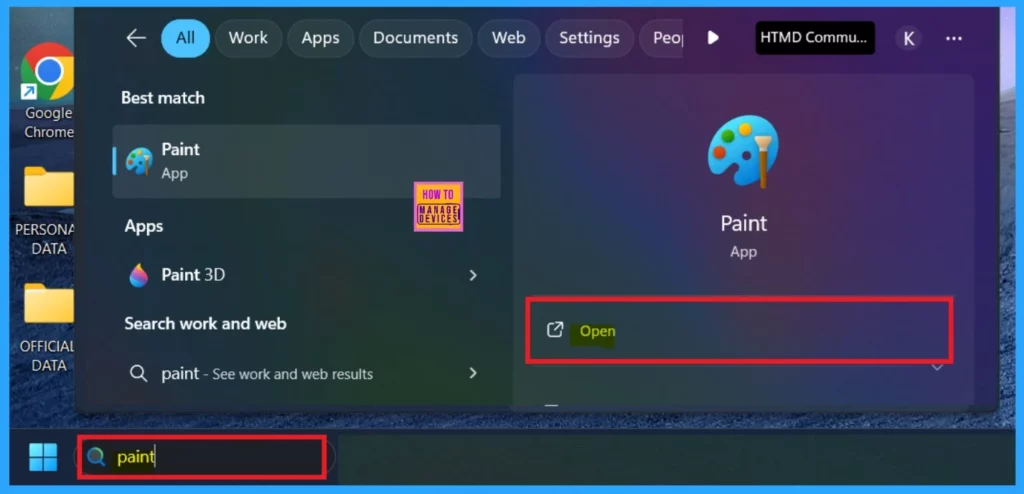
To open Microsoft Paint, start by clicking on the Start button. In the search bar, type “Paint” and select the Paint app from the search results to launch it. If you pined your paint on your taskbar it is very easy to open the Paint.
Once Paint is open, go to the top-left corner and click on File. From the drop-down menu, choose Open. This will prompt you to browse your computer for the image you wish to resize. Navigate to the folder where your image is located, select the image file, and click Open to load it into Paint.
- Here, I added a wallpaper for a trial.
- To resize an image in Microsoft Paint, first open the image in the app.
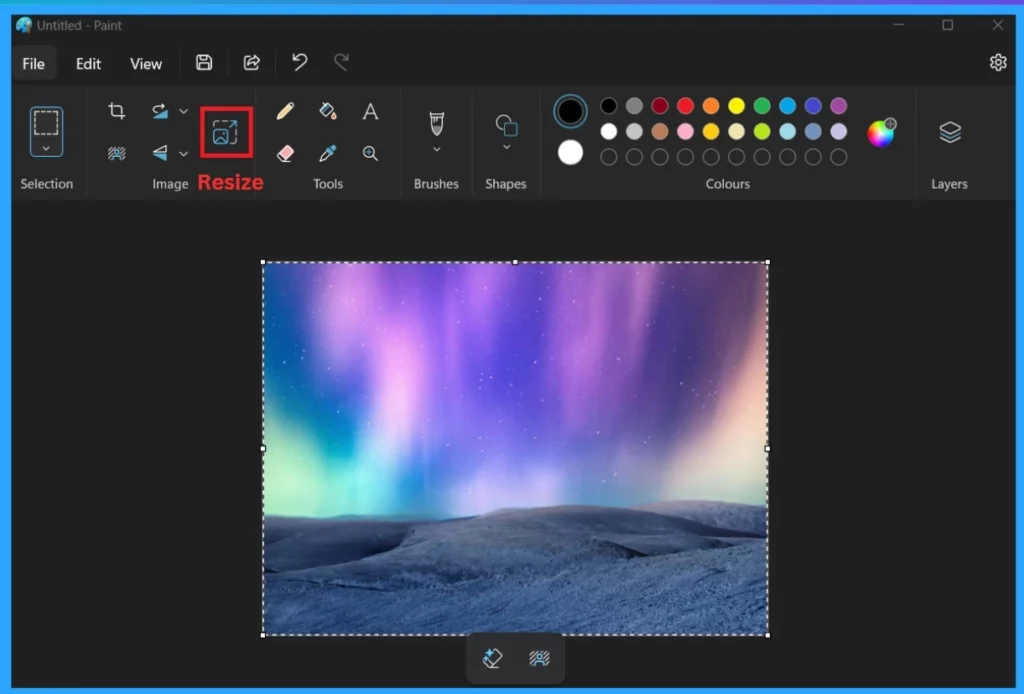
Then, go to the Home tab and look for the Resize button in the Image group (which is located in the toolbar). Click on the Resize button to open a dialog box with resizing options.Clicking on the Resize button opens a dialogue box with options for resizing your image. You can easily adjust the image size by percentage or set specific pixel dimensions.
- Choose whether you want to resize the image by Percentage or Pixels.
- This option allows you to specify how you would like the image dimensions to be adjusted.
- Here, you can see that 100 defaults to horizontal and vertical.
| Resize Options | Info |
|---|---|
| Percentage | The Percentage option allows you to resize an image based on a percentage of its original size. |
| Pixels | Pixels option allows you to resize an image based on a specific number of pixels for the width and height. |
| Horizontal | It refers to the width of the image. |
| Vertical | You can change the height of the image by adjusting the vertical setting. |
| Maintain aspect ratio | It means the width and height of the image will change together. |
| Skew | You can lean or stretch the image sideways or up and down by a certain amount. |
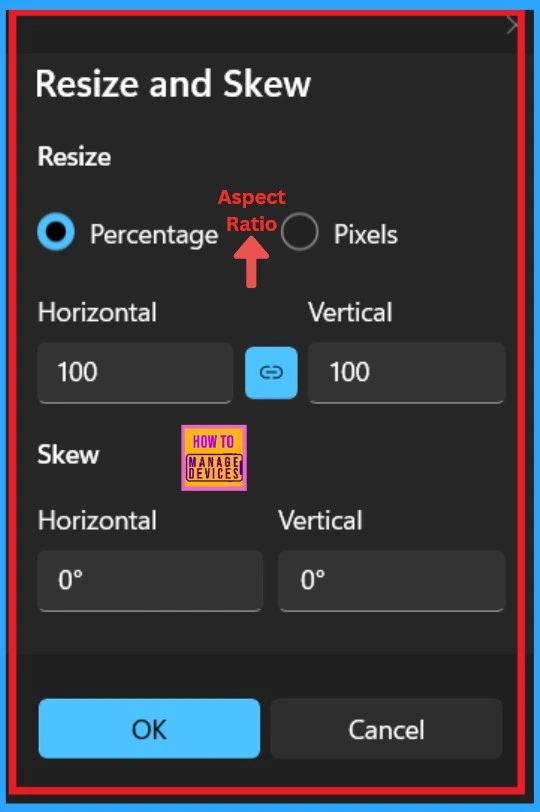
You can either scale the image based on a percentage of its original size or set a fixed number of pixels for the width and height. The Maintain aspect ratio option is a critical setting when resizing an image in Microsoft Paint. When this option is enabled, the width and height of the image will automatically adjust to keep the original.
- You can either enter a percentage or pixels to resize the width.
- When enabled – Maintaining the aspect ratio will allow you to control whether the resizing process will maintain the image’s original shape.
- Didasbled– It allow you to stretch the image in a non-proportional way
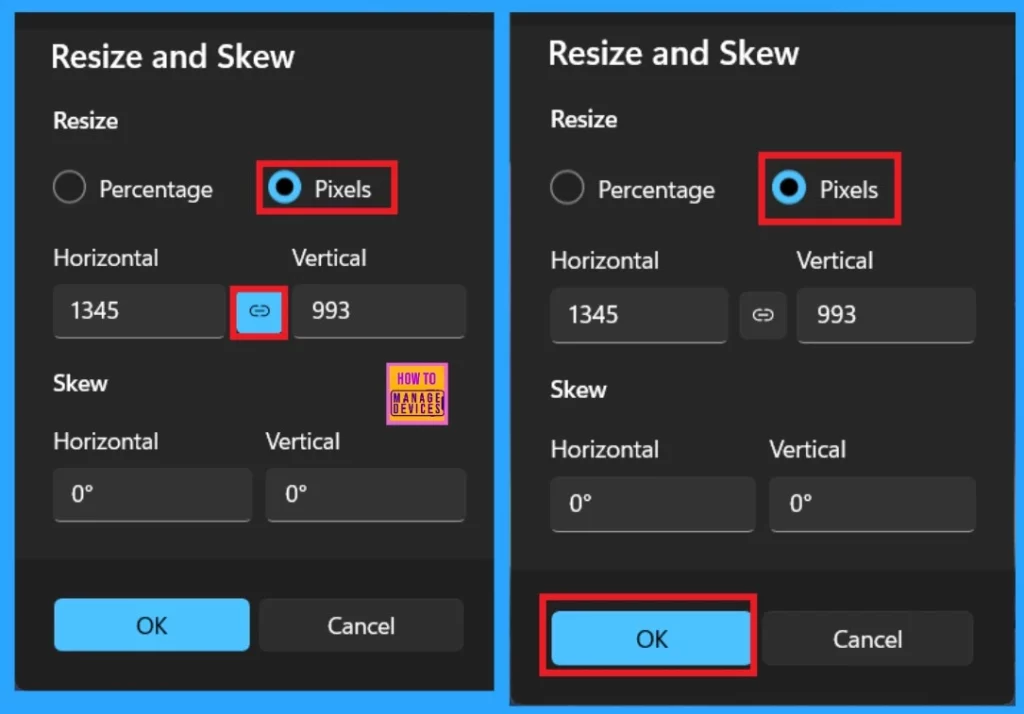
- For example added 1345 as horizontal and 993 as vertical.
- Then Click on the Ok
End Result
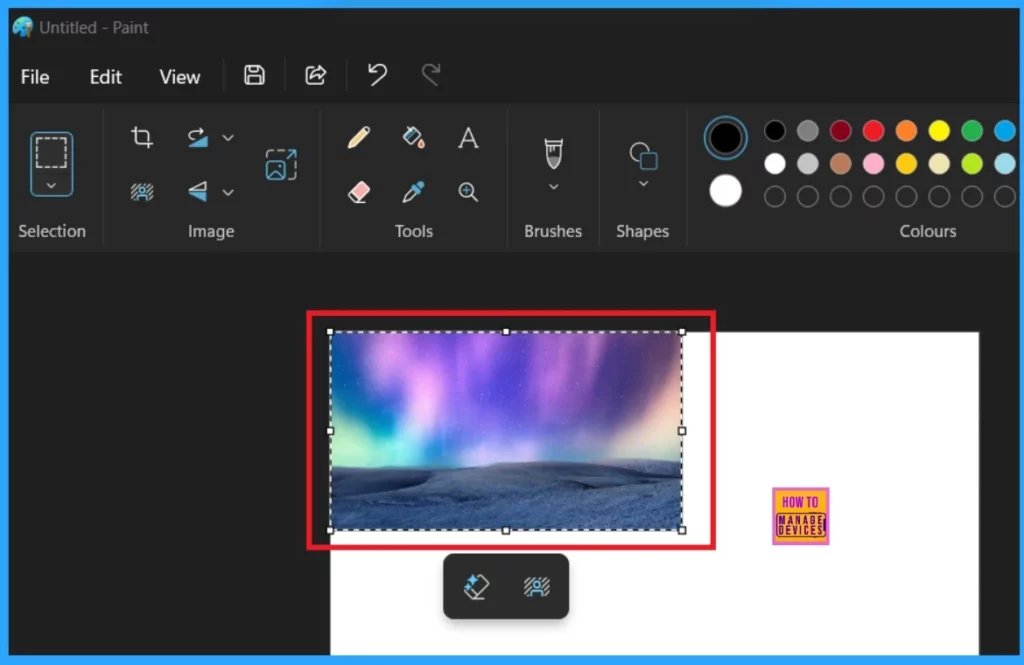
You can see the resulting image as the given ratio resizes it. You have to enter the specified ratio in the resize options. Here, I show an example. You can see the above image that is the end result.
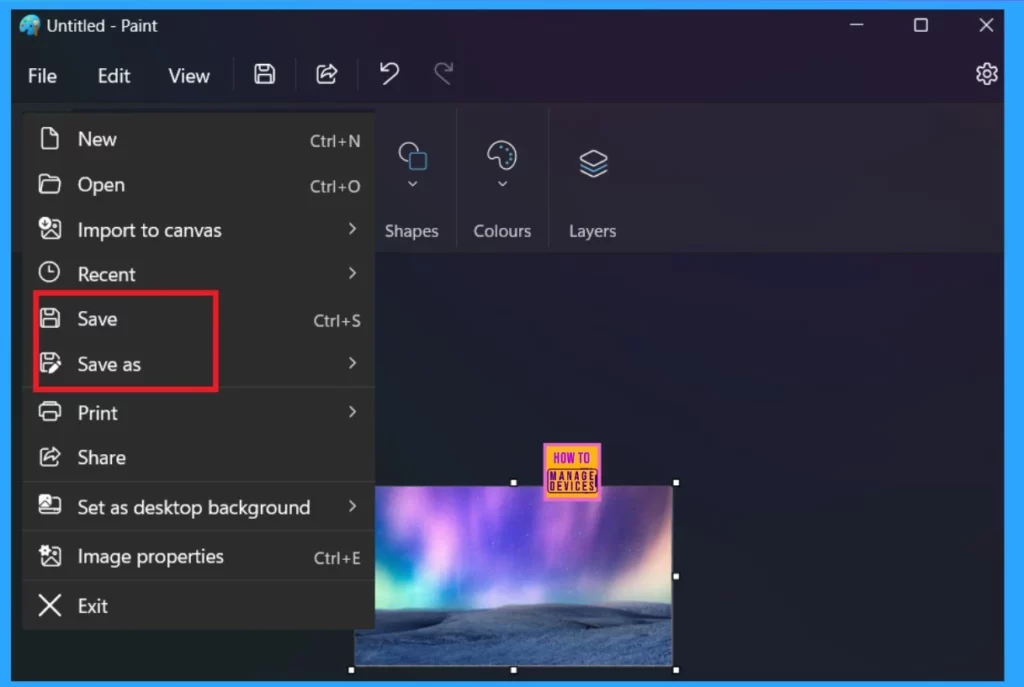
Once you’ve made the necessary edits or adjustments to an image in Microsoft Paint, saving your work is the final and crucial step. Paint provides simple options to save your image, either by saving over the existing file or as a new one.
On the top-left corner of the Paint window, you can see the word “File.” Clicking or tapping on this option, opens a drop-down menu that contains various file options. You’ll see multiple options once you have clicked on the File menu. Among these you can select the the Save or Save as options.
Resize with Image Properties
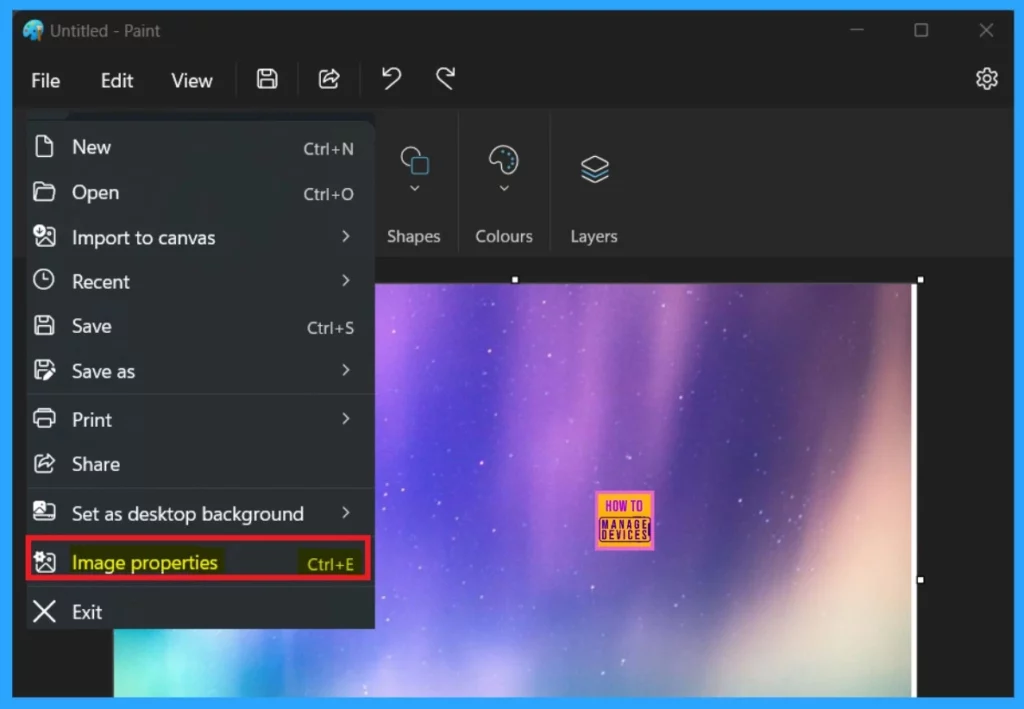
Another way to resize an image is to use the file Option. The file option offers many file management options. Click on the image properties option to access it. You can also use the Shortcut Key Cntrl+E. This will allow you to resize an image.
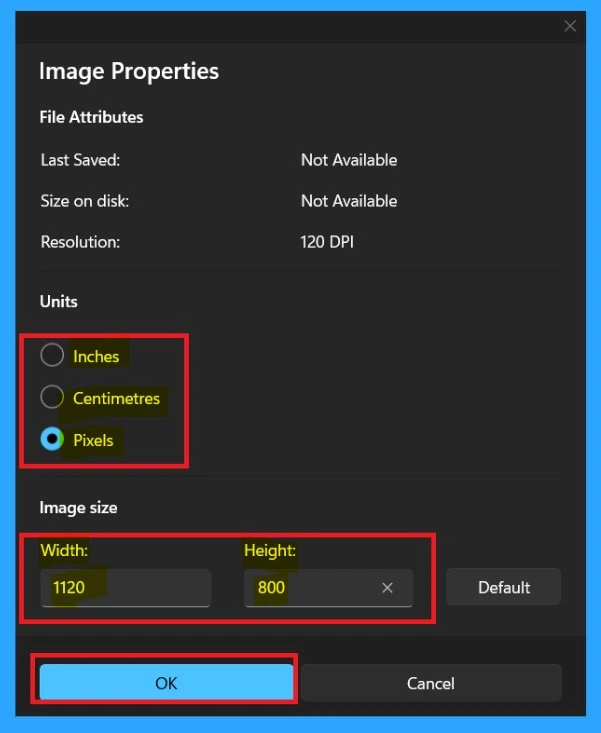
In the Image Properties window, you will see information about the image. Here, you can concentrate on the Image size options like width and height. Here, you can see that field displays the current width and height of the image in pixels.
- You can change it with your preferred size ratios.
- Enter a new width in pixels in the Width field and this changes how wide the image will be.
- Enter a new height in pixels in the Height field and this changes height of the Image.
Resize Image in Photos App
Resizing an image in the Photos app on a Windows computer is the best option. It allows you to adjust the image’s dimensions to fit your needs, such as reducing file size, changing image resolution, or preparing the image for any use.
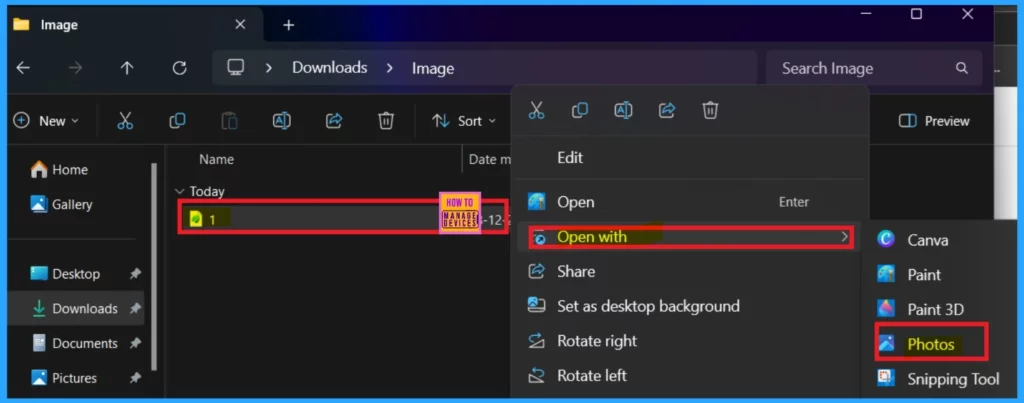
- First go to the image location that you want to Resize and Right click on It.
- Navigate through Open With> Photos.
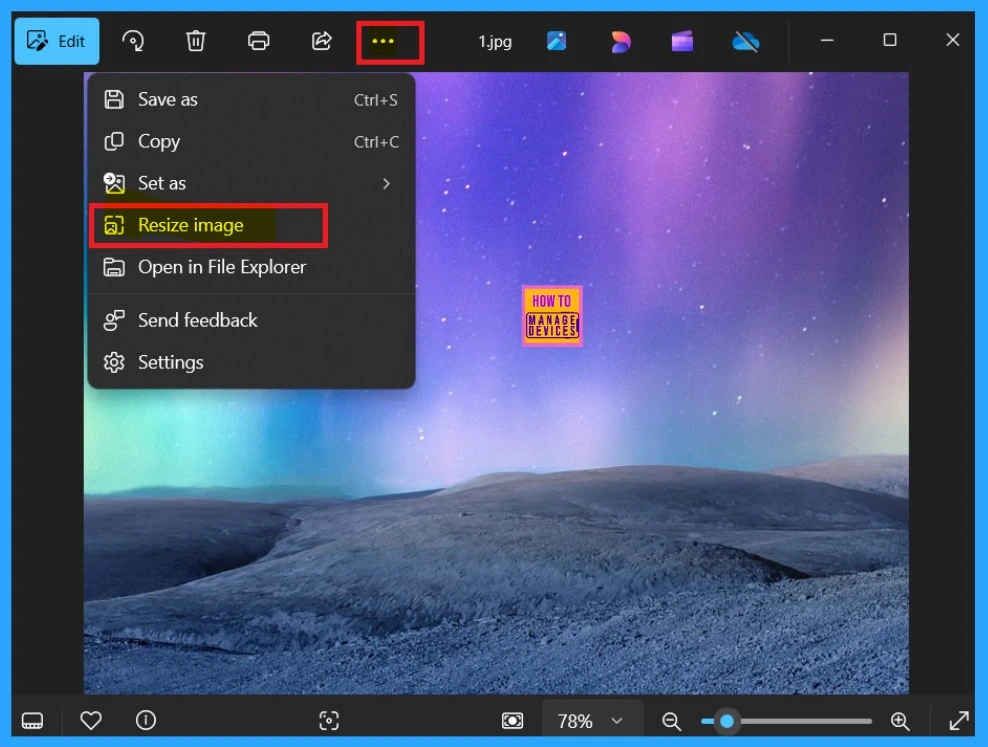
Once the image is in the Photos app, click the 3 dots in the top-right corner to open the menu. From the dropdown, select “Resize Image.” This will open the Resize Image dialog box, where you can adjust the size of the image.
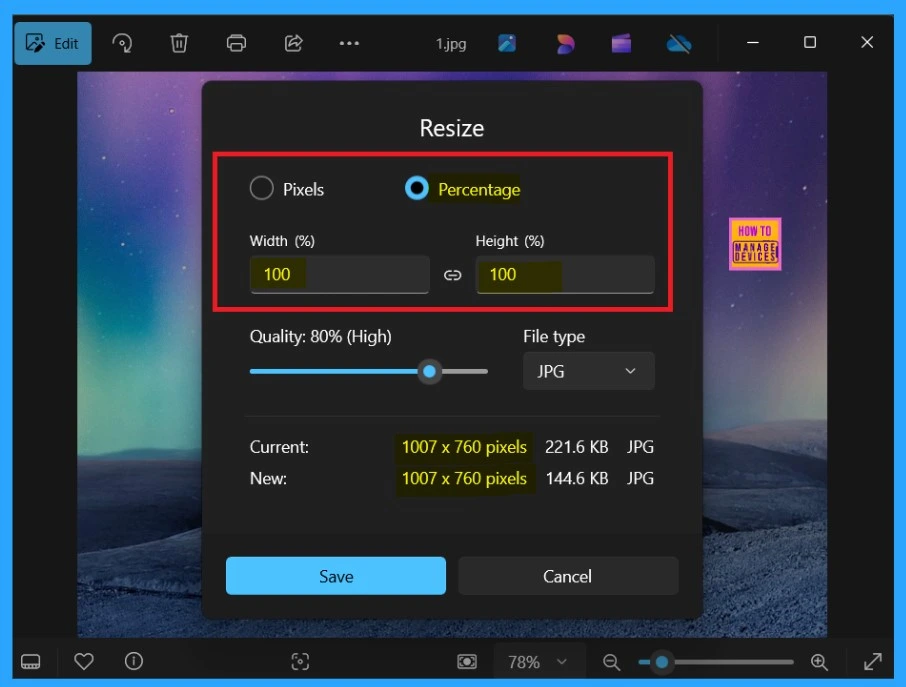
When the Resize image option is opened, the Width percentage is set to 100. You can also increase the quality of the image by Entering the percentage you want to resize the image by. If you resize the image by the same percentage for width and height, ensure the aspect ratio is maintained.
- You will also get the Info about the Current and New image Size diffrence.
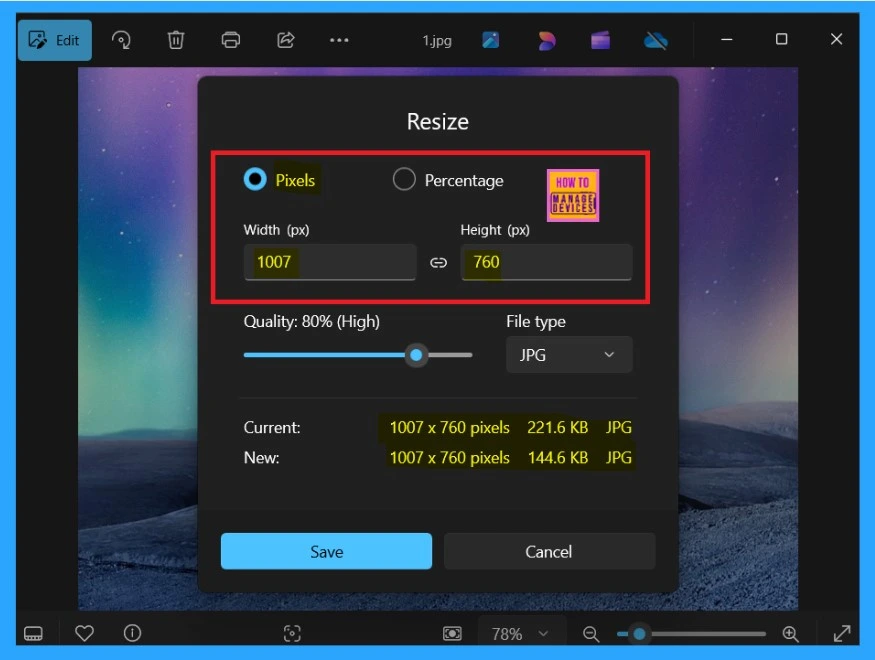
If you choose Pixels, enter the desired number for the width and height. To adjust both independently, uncheck the Maintain aspect ratio. To keep the image’s original proportions.
- To resize the image, uncheck the Maintain aspect ratio option to adjust the width and height separately.
Need Further Assistance or Have Technical Questions?
Join the LinkedIn Page and Telegram group to get the latest step-by-step guides and news updates. Join our Meetup Page to participate in User group meetings. Also, Join the WhatsApp Community to get the latest news on Microsoft Technologies. We are there on Reddit as well.
Author
Anoop C Nair has been Microsoft MVP from 2015 onwards for 10 consecutive years! He is a Workplace Solution Architect with more than 22+ years of experience in Workplace technologies. He is also a Blogger, Speaker, and Local User Group Community leader. His primary focus is on Device Management technologies like SCCM and Intune. He writes about technologies like Intune, SCCM, Windows, Cloud PC, Windows, Entra, Microsoft Security, Career, etc.
