Let’s see how to Customize Windows Out of Box Experience using SCCM. In this post, I will explain the scenarios where you can display language and region settings for user inputs in Windows Out of Box Experience (OOBE) after operating system deployment using the configuration manager.
The purpose of showing OOBE is to allow flexibility for end-users to specify settings for customizing the Windows 10 first-run experience. There are several pages in the OOBE flow, and each one requests a specific action or input from the user.
I have customized the complete OOBE flow to suppress OOBE flow except for the region and keyboard layout with the answer file. In the same way, you can customize it based on your requirements.
Let’s start with creating an answer file to customize an image.
Customize the Out of Box Experience(OOBE)
Windows System Image Manager (Windows SIM) is the tool included with the Windows ADK that you can use to create unattended Windows Setup answer files. Download and install the Windows ADK.
Windows SIM uses Windows image (.wim) files and catalog (.clg) files to display the available components and packages that can be added to an answer file (Unattend.xml).
Windows images and catalog files contain configurable settings that can be modified after a component or Package is added to an answer file.
Overview
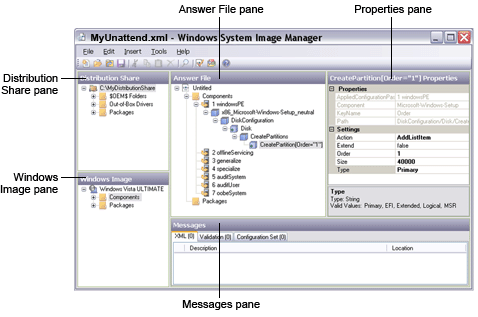
The Windows System Image Manager user interface contains a series of panes. The following screenshot illustrates the Windows SIM user interface. More Details Windows SIM Overview.
Limitations
The limitations of using Windows image files are as follows: Refer to Microsoft Article.
Create a Catalog File
Start Windows System Image Manager. You can open Windows SIM by searching your computer for “Windows System Image Manager.”
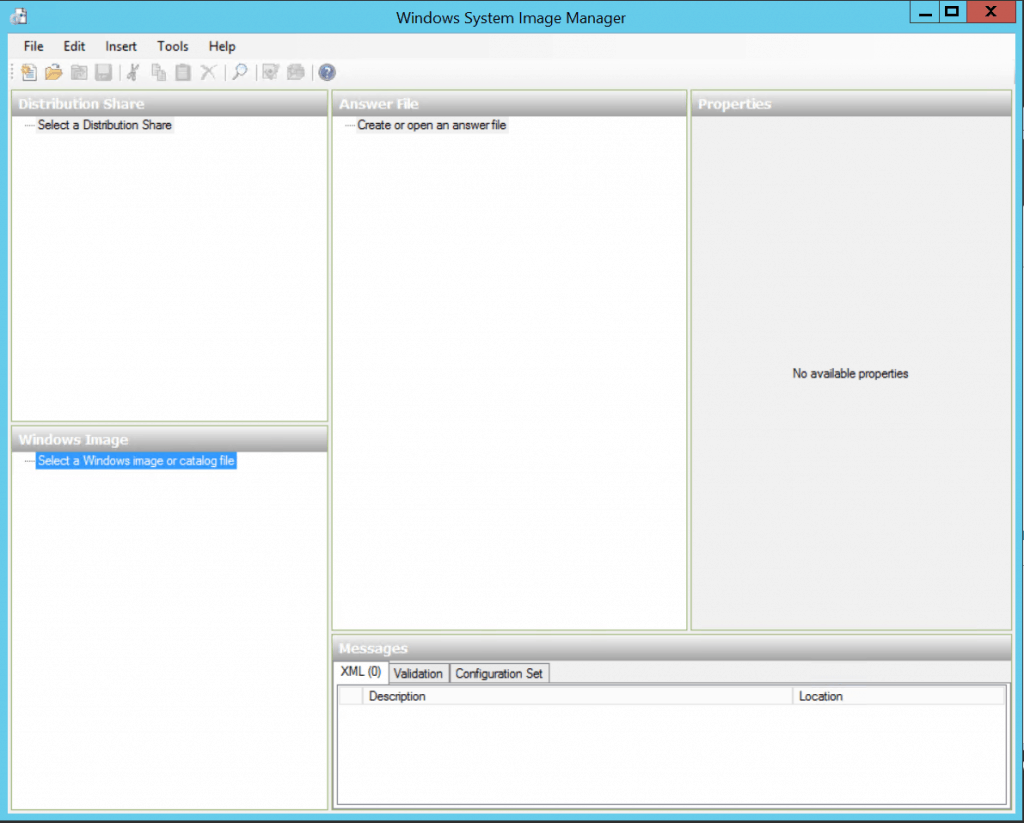
Click File> Select Windows Image.

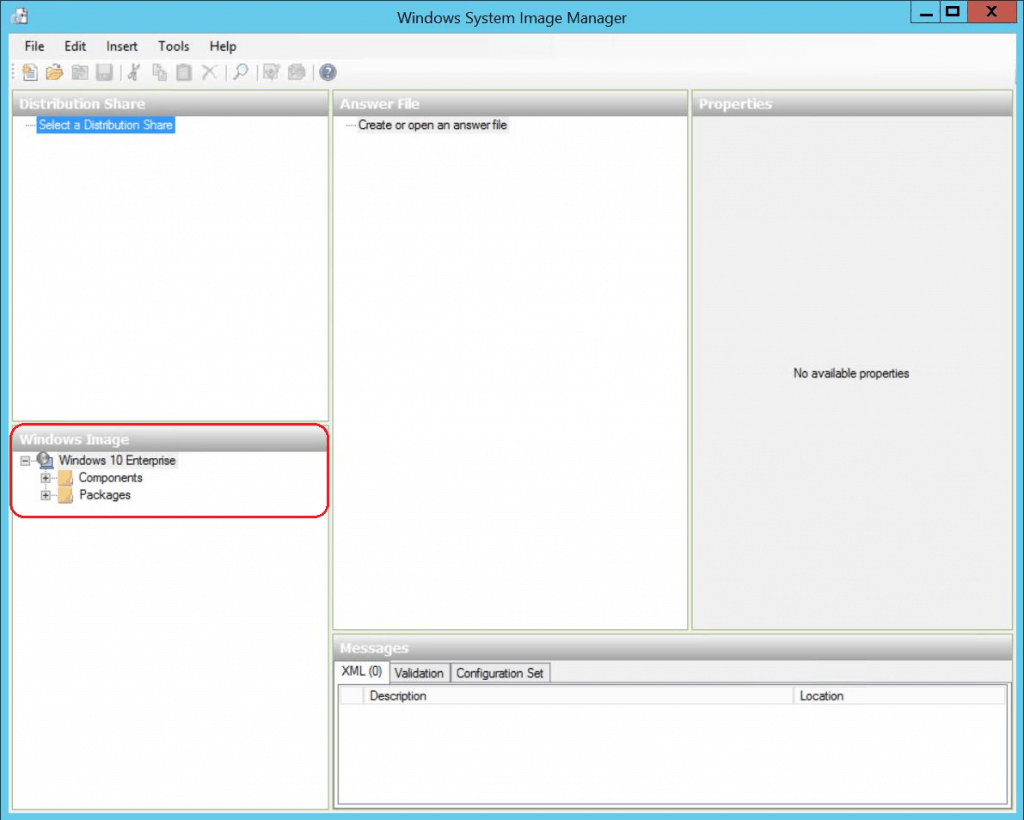
In Select a Windows Image, browse and select the image file (install. wim) and click OK. Click Yes to create the catalog file.
Note – Install.wim is located in the Sources folder of the downloaded Windows ISO.
Windows SIM creates the File based on the image file and saves it to the same folder as the image file. This process can take several minutes.

The catalog file appears in the Windows Image pane with lists of the configurable components and packages in that image.
Create a New Answer File
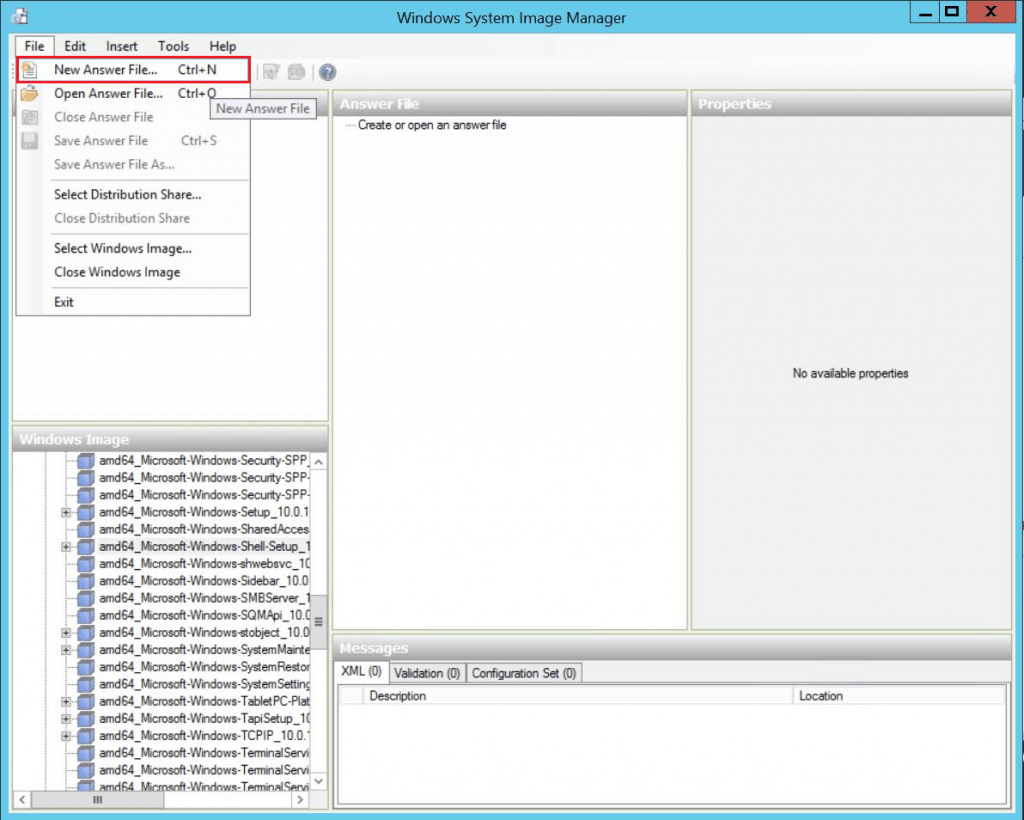
Click File> New Answer File. The new answer file appears in the Answer File pane.
Add new answer file settings. In the Windows Image pane, expand Components, right-click amd64_Microsoft-Windows-Shell-Setup_(OS Build version)_neutral, and then select Add Setting to Pass seven oobeSystem.
- oobeSystem: Most of these settings run after the user completes OOBE.
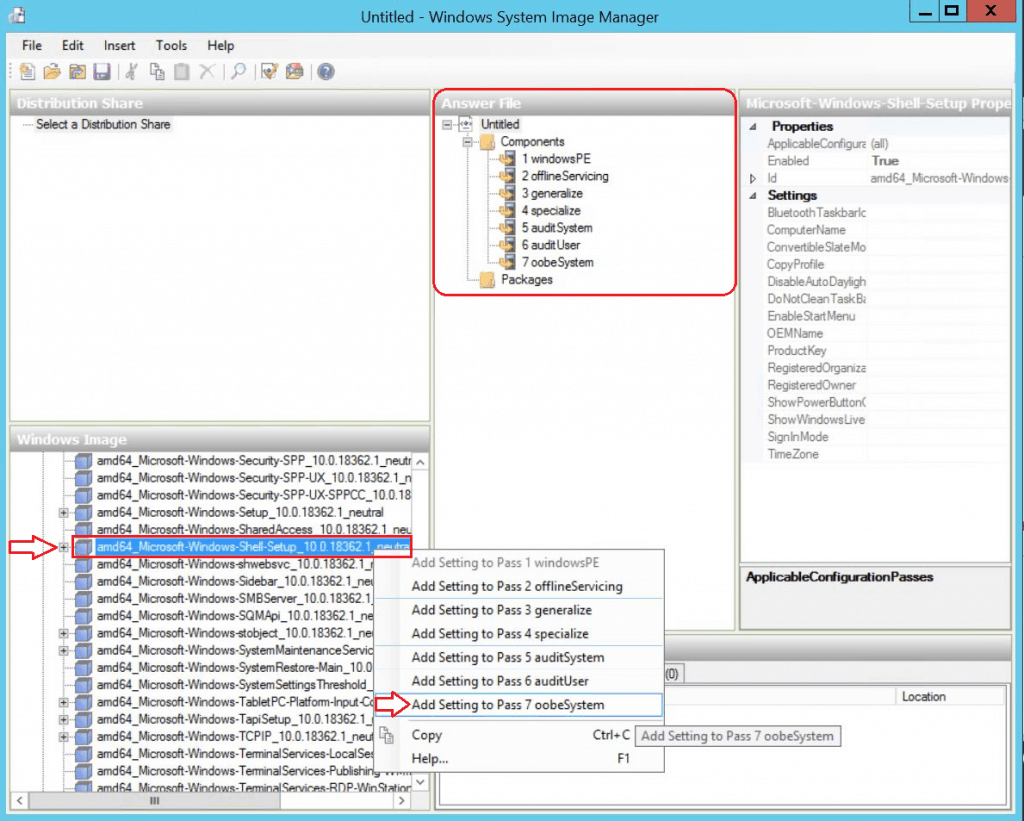
You can specify which configuration pass to add new settings to pre-configure the Out of Box Experience. I specified some of the behaviour of Windows Out of Box Experience (OOBE) screens to prevent pages from appearing in OOBE. Refer to the Microsoft article on Automatong OOBE.
| Setting | Description |
|---|---|
| HideEULAPage | Hides the Microsoft Software License Terms page. |
| HideLocalAccountScreen | Specifies whether the user will be required to sign in during OOBE. |
| HideOEMRegistrationScreen | Hides the OEM registration page. |
| HideOnlineAccountScreens | It hides the Join Wireless Network page. |
| HideWirelessSetupInOOBE | Specifies credentials for an account to log on to the computer automatically. |
| NetworkLocation | Specifies the network type. |
| OEMAppID | Enables the OEM to specify app information. |
| ProtectYourPC | Hides the Help protect your computer and improve Windows automatically page. That page specifies whether updates are automatically downloaded and installed. |
| UnattendEnableRetailDemo | Use to enable retail demo mode on the device. |
| VMModeOptimizations | Use to customize the user experience when in VM mode. |
| AutoLogon | Specifies credentials for an account that is used to automatically log on to the computer. |
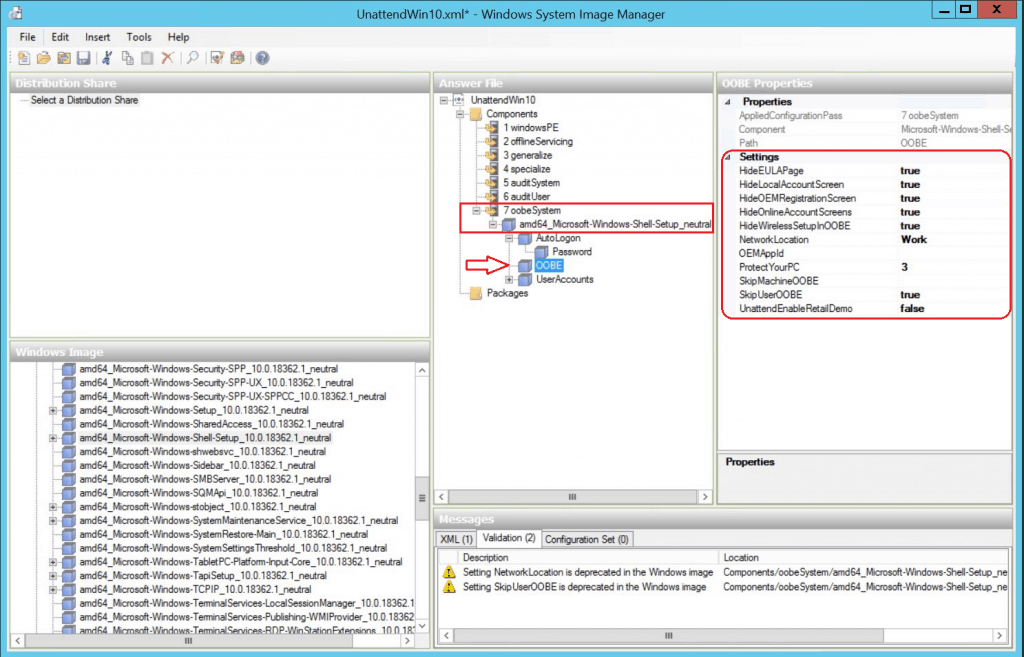
Save the answer file, for example, D:\AnswerFiles\UnattendWin10.xml

Note – If you open an existing answer file, you might be prompted to associate the answer file with the image. Click Yes.

Prepare Scripts
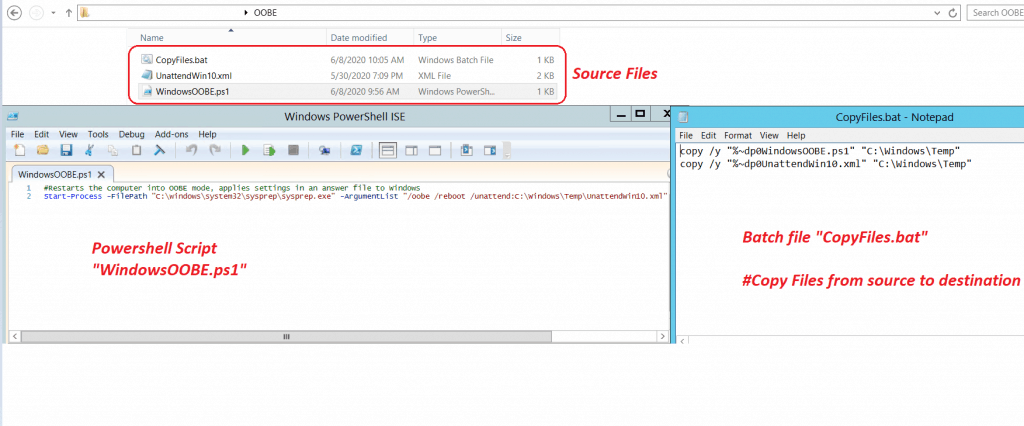
To configure OOBE, You can run the following PowerShell script to get started with configuration.
Start-Process -FilePath "C:\windows\system32\sysprep\sysprep.exe" -ArgumentList "/oobe /reboot /unattend:C:\Windows\Temp\UnattendWin10.xml"
Special thanks to Jörgen Nilsson for the post How to show OOBE for AzureAD Join after OSD with SCCM and Mani for sharing Tips.
Next, I will create a batch file and use the PowerShell script and unattended File to copy it to the location (C: WindowsTemp) for execution.
copy /y "%~dp0WindowsOOBE.ps1" "C:\Windows\Temp"
copy /y "%~dp0UnattendWin10.xml" "C:\Windows\Temp"
Create Package in SCCM
In the Configuration Manager console, Go to the Software Library workspace, expand Application Management, right-click Packages and select Create Package.

On the Package page, Specify the following information and click Next.
- Name: Specify the name of the Package.
- Description: Specify a description of this Package.
- Source folder: Choose Browse to select the UNC path and then specify the location of the Package’s source files.

On the Program Type, Choose the type of program. Do not create a program. Click Next.

Review the settings, and click Next.

Click Close to complete the Wizard.

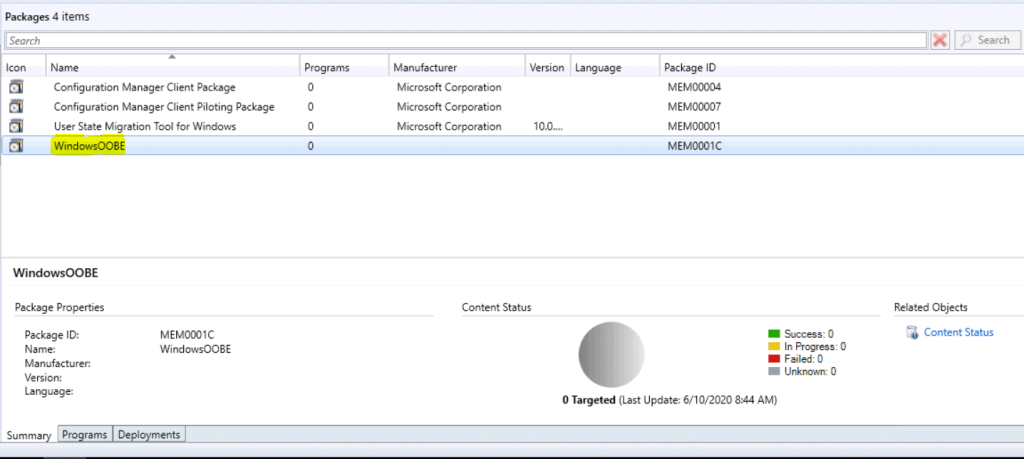
The Package is created successfully.
Distribute Package
You must distribute the Content to the distribution point. Right-click on the Package and click Distribute Content.
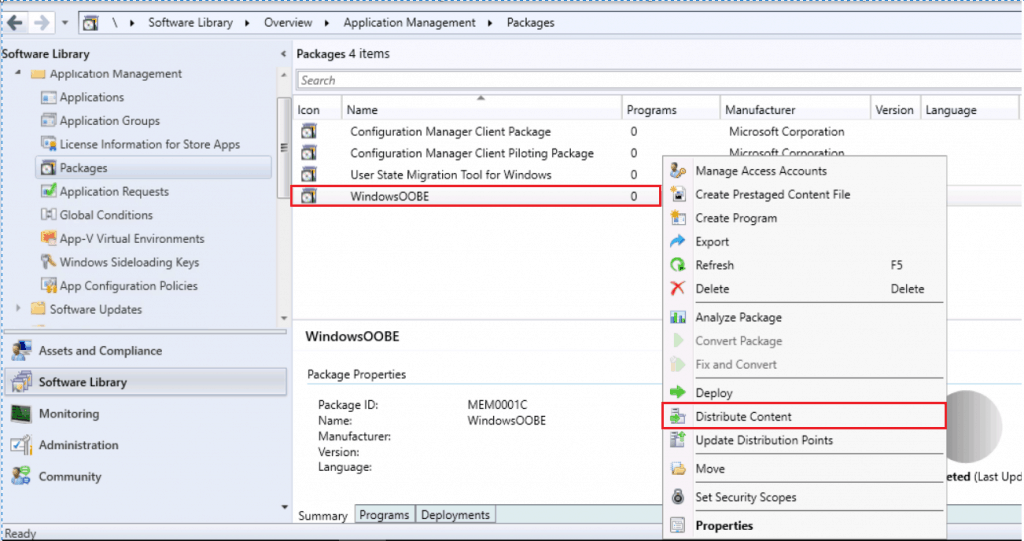
Review the selected Content for distribution. Click Next.

Add the distribution point or distribution point groups. Review the selected distribution points and groups and click Next.

Review the settings and click Next.

Click close to complete the Distribute Content wizard.

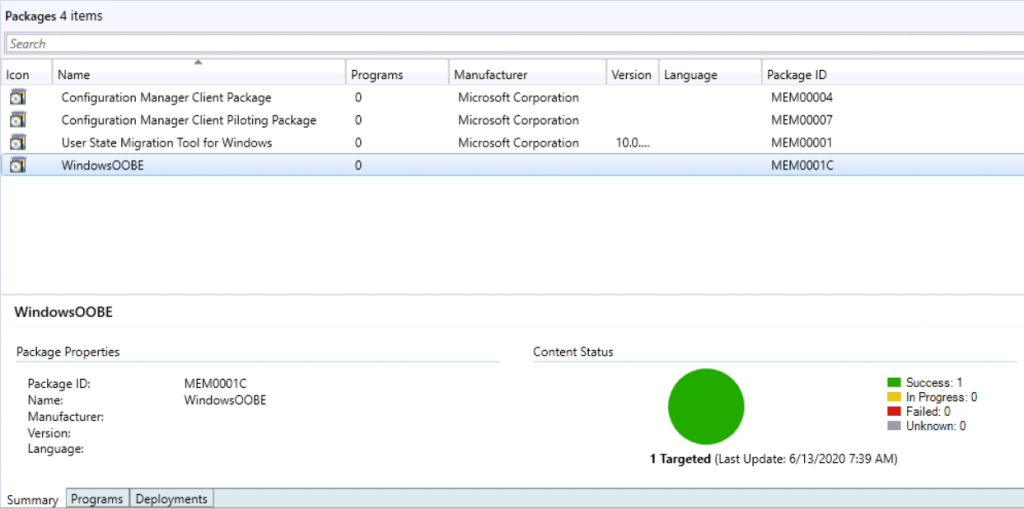
You can monitor the content status if it’s showing a yellow color, which means distribution is in progress. If the content distribution is successful, it will appear green, as shown.
Create or Edit an Existing Task Sequence
This guide will help you to create a Configuration Manager task sequence from scratch.
Customize Task Sequence
- In the Configuration Manager console, go to the Software Library workspace, expand Operating Systems, and select the Task Sequences node.
- Select the task sequence you want to edit in the Task Sequence list.
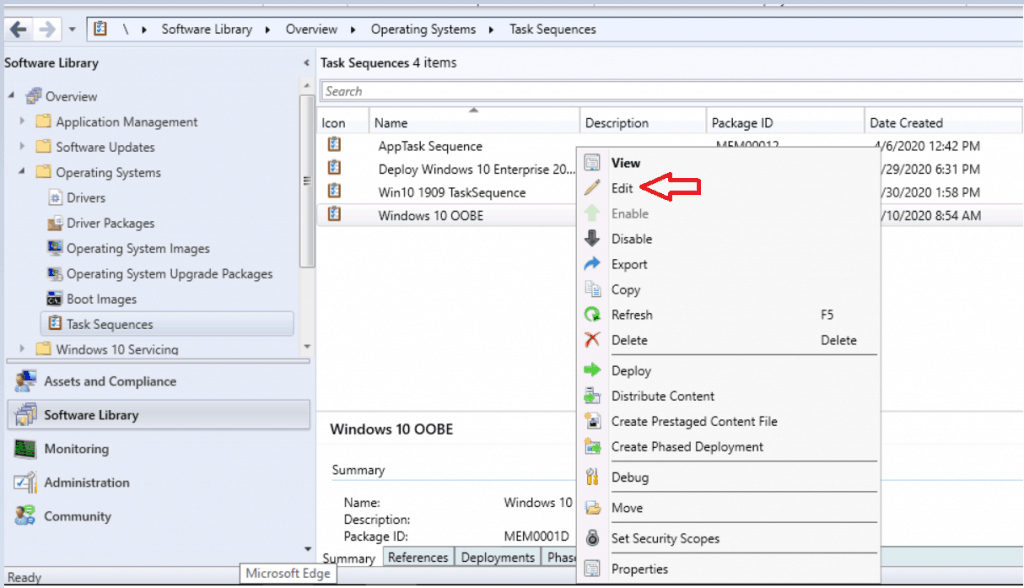
We are going to add the following steps to the task sequence.
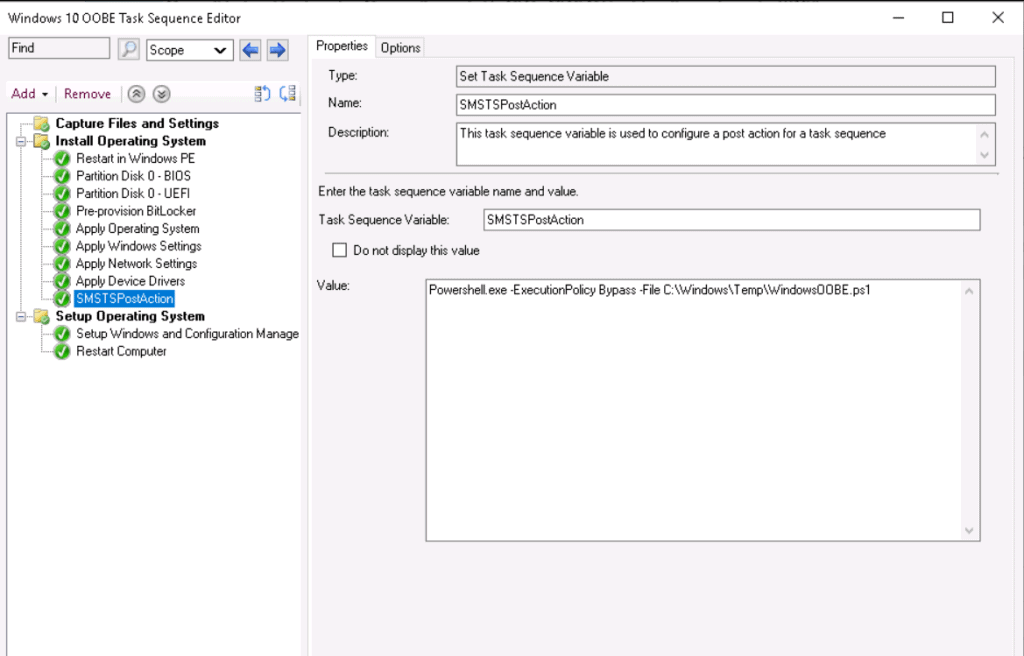
Set Task Sequence Variable
To add this step in the task sequence editor, select Add, select General and select Set Task Sequence Variable.
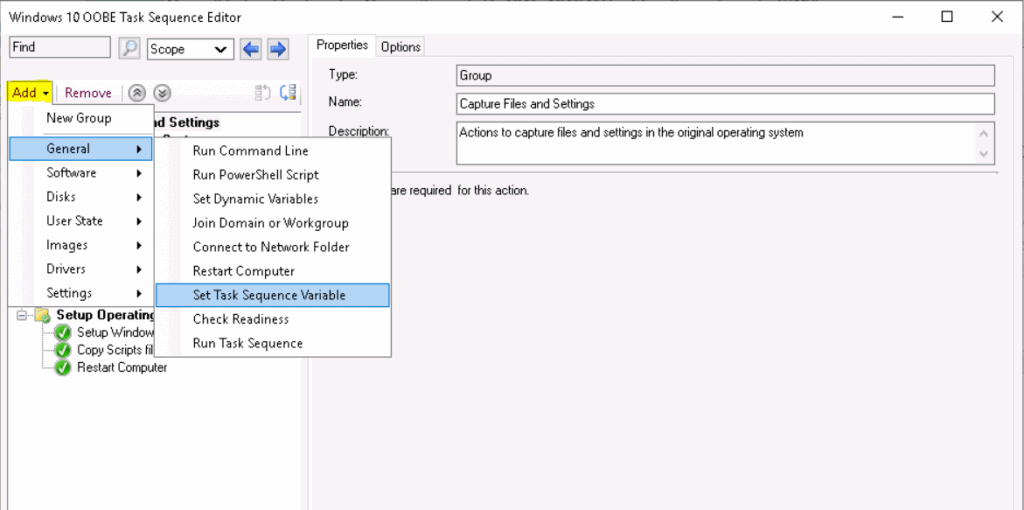
Configure the settings described in this section on the Properties tab for this step. Specify the name and value of a task sequence action variable.
SMSTSPostAction contains a command that runs after the task sequence is completed.
- In this step, I will run a PowerShell script that contains a command line to display the OOBE screen to the user.
Powershell.exe -ExecutionPolicy Bypass -File C:\Windows\Temp\WindowsOOBE.ps1

C:\Windows\Temp\WindowsOOBE.ps1 -<Path of Powershell Script>
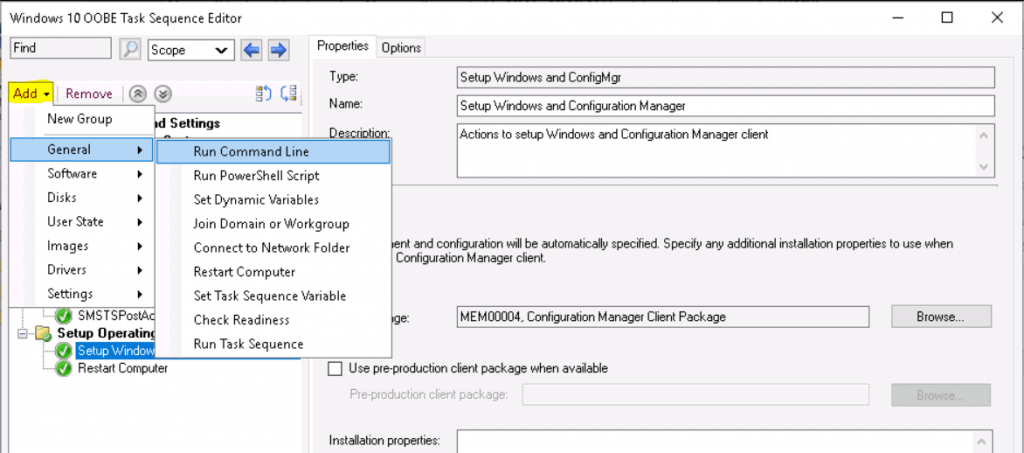
Add Run Command Line
To add this step in the task sequence editor, select Add, General, and Run Command-Line.
Configure the settings described in this section on the Properties tab for this step. Specifies the command line that the task sequence runs.
Package – Select this option to specify the Configuration Manager package that contains the necessary files.
Don’t be confused with task sequence action, Here in mine case the CopyWindows OOBE step holds a command line called “CopyFiles.bat”. That will copy all the required files in the target machine [C:\Windows\Temp] to perform the post-action task.
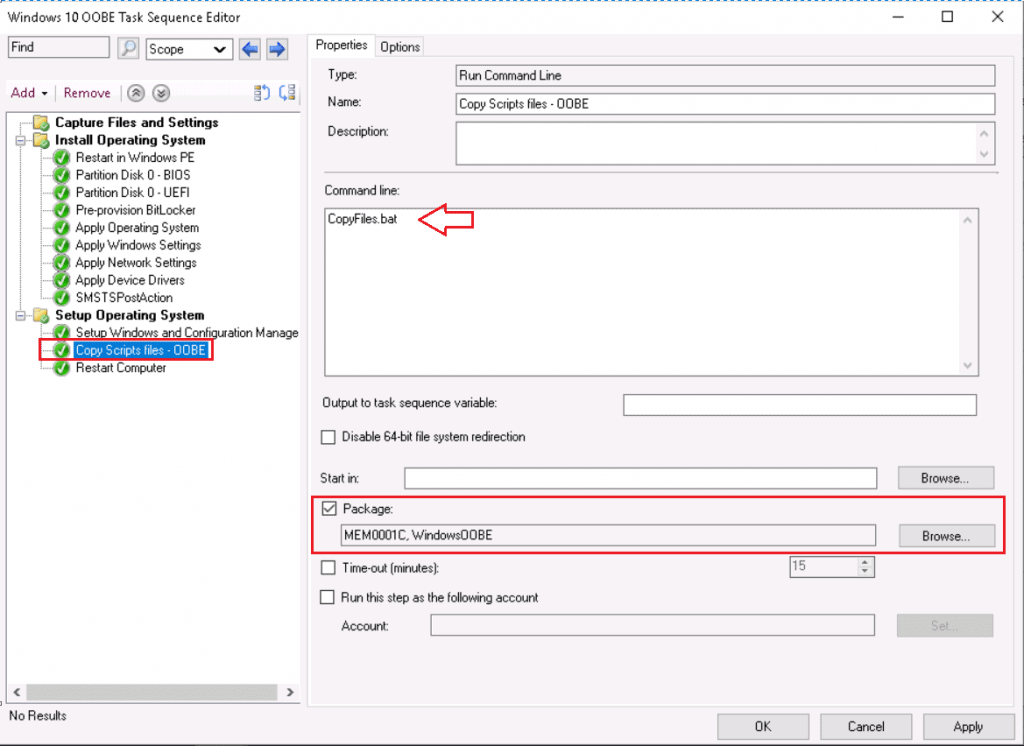
Review other settings added in Task Sequence, and make sure to apply all changes. Click Apply and OK, close the window.
Select the task sequence and target the Deployment to Collections.
User Experience
On Target Computers, depending on deployment settings, you will be presented with the Welcome to the Task Sequence Wizard.
Complete the Task Sequence Wizard by selecting the deployed task sequence. Click Next.

Once you complete the Wizard, the deployment of the new operating system begins.

Once the deployment is completed successfully, you will see the Windows Out of Box Experience (OOBE). OOBE consists of a series of screens and the flow requests input from the user.
The first screen will prompt you to set your region, which automatically sets your time and date. Select the region where your PCs are located. Then select Yes to continue.

Choose a keyboard layout. This step configures the onscreen keyboard to match your keyboard’s physical layout. It also configures language and keyboard characters. Select Yes to continue.

If you want to add another keyboard layout, select Add layout. Otherwise, select Skip.

It might take a few minutes to complete the setup.
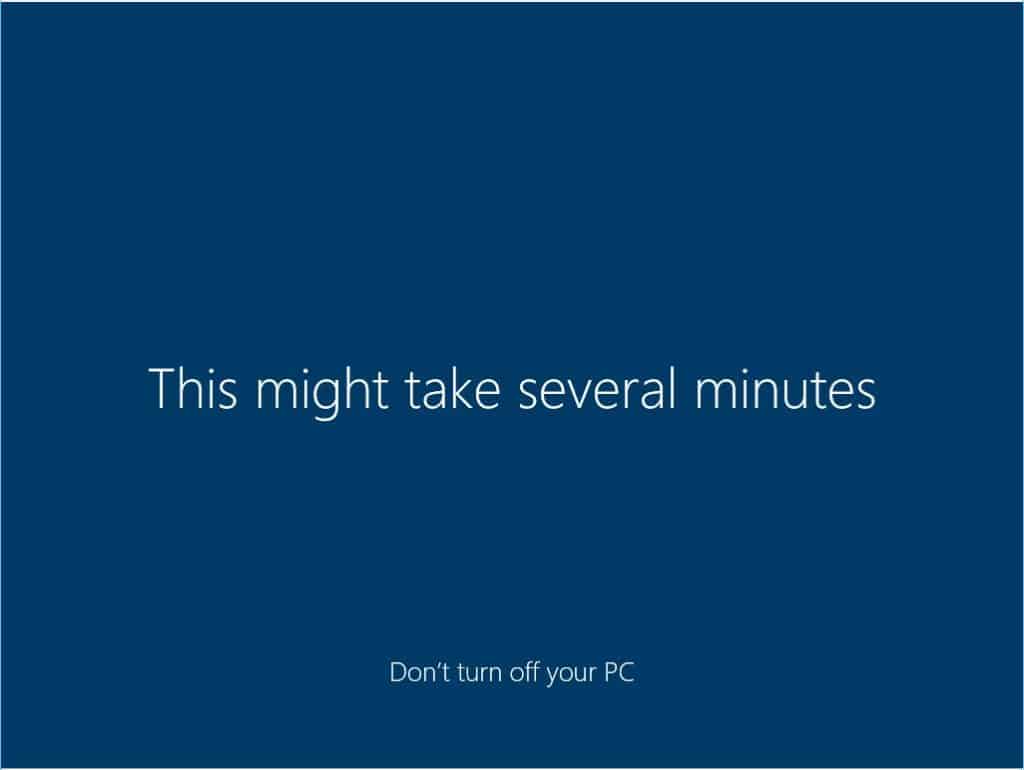
Once you finish the complete process. Devices are set up and ready to use.

Resources – Customize Windows Out of Box Experience
- Customize the Out of Box Experience (OOBE)
- Windows System Image Manager Technical Reference
- Deploy Windows 10 2004 Using SCCM | ConfigMgr | MEMCM
We are on WhatsApp. To get the latest step-by-step guides and news updates, Join our Channel. Click here –HTMD WhatsApp.
Jitesh Kumar has over five years of experience in the IT Industry. He writes and shares his experiences related to Microsoft device management technologies and IT Infrastructure management. His primary focus area is the Windows 10 Deployment solution with Configuration Manager, Microsoft Deployment Toolkit (MDT), and Microsoft Intune.

Hi Support.
wanted to say thank you for sharing this post. I’ve pretty much replicated this task but at the moment it’s stuck at Just a moment. been like this for 30 mins or so. Not sure what further to do to be fair.
Basically all i would like to achieve is format the disc and then install a windows image and stop at the OOBE screen so that i can join the device to Azure intune. I’m not sure what steps i need to carry out to get this to work Do you perhaps have a detailed step by step guide on how to achieve this. We are not install co-manage devices. Pure azure only. Is this something that you could help me with.