Let’s learn how to perform an SCCM upgrade with an offline service connection point. We have many posts about installing or updating the Configuration Manager infrastructure with an ONLINE service connection point.
Microsoft introduced an In-Console upgrade in the Current Branch versions of Configuration Manager. This type of upgrade is completed using the ONLINE “Service Connection” Role.
This post will learn how to upgrade your SCCM infrastructure when you have an OFFLINE service connection point.
With an Offline Service connection point, you can’t download the latest SCCM CB directly from the Microsoft cloud. Instead, you must go through an offline process, which I will explain in this post.
More details – Learn How to Install Reinstall SCCM Service Connection Point| ConfigMgr
Modes of operation for Service Connection Point Role
The service connection point supports two modes of operation
- In online mode, the service connection point automatically checks every 24 hours for updates and then downloads new updates that are available for your current infrastructure and product version to make them available in the SCCM console.
- In offline mode, the service connection point does not connect to the Microsoft cloud service, and you must manually Use the Service Connection Tool for SCCM to import available updates.
Why Offline Service Connection Point
There could be servers in the factory or ships where it’s not connected to internet access; to download the latest updates for CB, we should go for the offline mode option for upgrading the SCCM CB version.

Service Connection Tool
Each Hierarchy supports a single instance of this role. The site system role can only be installed at the top-tier site of your Hierarchy (On a Central Administration Site or a stand-alone Primary Site).
SCCM Service Connection Point Installation
The SCCM 1511 installation or upgrade wizard will ask to install the Service Connection Point. If you select to skip the role installation, you can manually add it to SCCM using the following steps.
- Go to Administration / Site Configuration / Servers and Site System Roles
- Right-click the Site System you wish to add the role
- Click Add Site System Role in the Ribbon

On General Tab, click Next to continue

On Proxy Tab, click Next.

On the Site System Role tab, select Service Connection Point and click Next

On the Service Connection Mode, select the desired option :
In Online mode, the Service Connection Point automatically downloads updates that are available for your current infrastructure and product version, making them available in the SCCM console
In Offline mode, the Service Connection Point does not connect to the Microsoft cloud service. You must manually use the service connection tool when your Service Connection Point is in Offline mode to import available updates.

On the Summary screen, wait for the setup to complete and close the wizard

How to Change Service Connection Point Mode from ONLINE to Offline
Let’s check the Prerequisites for Service Connection Point Offline Mode:
- You have a service connection point installed, and it is set to an Offline, on-demand connection.
- The tool must be run from a command prompt.
- Each computer where the tool runs (the service connection point computer, and the computer that is connected to the internet) must be an x64 bit system and have the following installed:
- Both the Visual C++ Redistributable x86 and x64 files. By default, SCCM installs the x64 version on the computer that hosts the service connection point.
- To download a copy of the Visual C++ files, visit Visual C++ Redistributable Packages for Visual Studio 2013 at the Microsoft Download Center.
- .NET Framework 4.5.2 or later.
- The account you use to run the tool must have:
- Local administrator permissions on the computer that hosts the service connection point (where the tool is run).
- Read permissions to the site database.
Open the SCCM console and go to the Administration Tab – expand “Site Configuration” – Select “Servers and Site System Roles” – on the right panel, Select Site Server and bottom Right-click on “Service Connection Point” and select Properties.

Change Service Connection Point role settings from Online to Offline and apply.

Download SCCM CB Updates with Offline Service Connection Point
It would be best to use a serviceconnectiontool.exe tool to download the Configuration Manager updates into the Console.
Where we can get serviceconnectiontool.exe
You can find the service connection tool (serviceconnectiontool.exe), in the SCCM installation media in %baselinemedia%\smssetup\tools\ServiceConnectionTool folder.
NOTE! – Always use the service connection tool that matches the version of SCCM that you use.
Overview
There are three primary steps to using the service connection tool
- Prepare: This step runs on the computer that hosts the service connection point.
- Connect: For this step, you run the tool on a remote computer that connects to the Internet.
- Import: This step runs on the computer that hosts the service connection point.
Prepare – Data Collection from SCCM Infra
In this procedure, the command-line examples use the following file names and folder locations (you do not need to use these paths and file names and instead can use alternatives that match your environment and preferences):
Run the following command to collect the telemetry data from your SCCM infra in OFFLINE service connection Point Scenario
On the computer that hosts the service connection point:
- Open a command prompt with administrative privileges, and then change directories to the location that contains serviceconnectiontool.exe.
serviceconnectiontool.exe -prepare -usagedatadest D:\USB\UsageData.cab
Starting CB 1706 version, the tool’s default download behavior has been modified, and the tool has options to control which files you want to download.
- downloadall This option downloads everything, including updates and hotfixes, regardless of the version of your site.
- downloadhotfix This option downloads all hotfixes regardless of the version of your site.
- downloadsiteversion This option downloads updates and hotfixes that have a version that is higher than the version of your site.
The example command line that uses -downloadsiteversion:
serviceconnectiontool.exe -connect -downloadsiteversion -usagedatasrc D:\USB -updatepackdest D:\USB\UpdatePacks
Verify Telemetry Data of SCCM CB
Try to use the following command to verify the telemetry data for the OFFLINE scenario.
serviceconnectiontool.exe -export -dest D:\USB\UsageData.csv
Connect serviceconnectiontool.exe Tool on Remote Computer
You need to copy the ServiceConnectionTool folder with all of its contents to the USB drive.
NOTE – With SCCM 1606, when connecting to Microsoft, you can upload multiple .cab files at one time (each from a different hierarchy), and specify a proxy server and a user for the proxy server.
Command-line options
To view help information for the service connection point tool, open the command prompt to the folder that contains the tool and run the command: serviceconnectiontool.exe.
Execution
- Create a folder Called USB in D Drive.
- On the computer that hosts the service connection point.
- Open a command prompt with administrative privileges.
- Run the following command to have the tool prepare a .cab file that contains useful information and copy it to a location you specify:
serviceconnectiontool.exe -prepare -usagedatadest D:\USB\UsageData.cab

If you upload .cab files from more than one Hierarchy simultaneously, each .cab file in the folder must have a unique name. You can manually rename files that you add to the folder.
If you want to view the usage information that is gathered to be uploaded to the Configuration Manager cloud service, run the following command to export the same data as a .csv file which you can then view using an application like Excel:
serviceconnectiontool.exe -export -dest D:\USB\UsageData.csv

- After the preparation step is complete, move the USB drive (or transfer the exported data by another method) to a computer with Internet access.
- Create a folder called “UpdatePacks” in the USB folder and also copy the Service Connection Tool folder from baseline media (%baselinemedia%\smssetup\tools\ServiceConnectionTool)
- On the computer with Internet access, open a command prompt with administrative privileges, and then change directories to the location that contains a copy of the tool serviceconnectiontool.exe and the additional files from that folder.
- Run the following command to begin the upload of usage information and the download of updates for SCCM:
serviceconnectiontool.exe -connect -usagedatasrc D:\USB -updatepackdest D:\USB\UpdatePacks

- After downloading updates for SCCM is complete, move the USB drive (or transfer the exported data by another method) to the computer that hosts the service connection point.
- On the computer that hosts the service connection point
- open a command prompt with administrative privileges
- change directories to the location that contains serviceconnectiontool.exe,
- and then run the following command:
serviceconnectiontool.exe -import -updatepacksrc D:\USB\UpdatePacks
- Once the import completes, you can close the command prompt. (Only updates for the applicable hierarchy are imported).
- Open the ConfigMgr console and navigate to Administration > Updates and Servicing. Updates that were imported and the Latest patch status are Ready to install.

Log Files
ServiceConnectionTool.log
Each time you run the service connection tool, a log file will generate in the same location as the tool called ServiceConnectionTool.log. This log file will provide simple details about the tool’s execution based on the commands used. An existing log file will be replaced each time you run the agency.
ConfigMgrSetup.log
When using the tool to connect and download updates, a log file called ConfigMgrSetup.log will be generated on the root of the system drive. This log file will provide more detailed information, such as what files are downloaded and extracted and whether the hash checks are successful.
In-Console Update
Let’s check the SCCM Upgrade with an Offline Service Connection Point | ConfigMgr.
Prerequisites Check
Right-click on the available update and click “Run prerequisite Check.”

Once it completes, you can see “Prerequisite check passed,” then again right-click and “Install Update Pack.”

Installation
Once you click Install hot-Fix, “Configuration Manager Update Wizard” will open
Select “I Accept these License Terms and Privacy Statement” and click next to continue
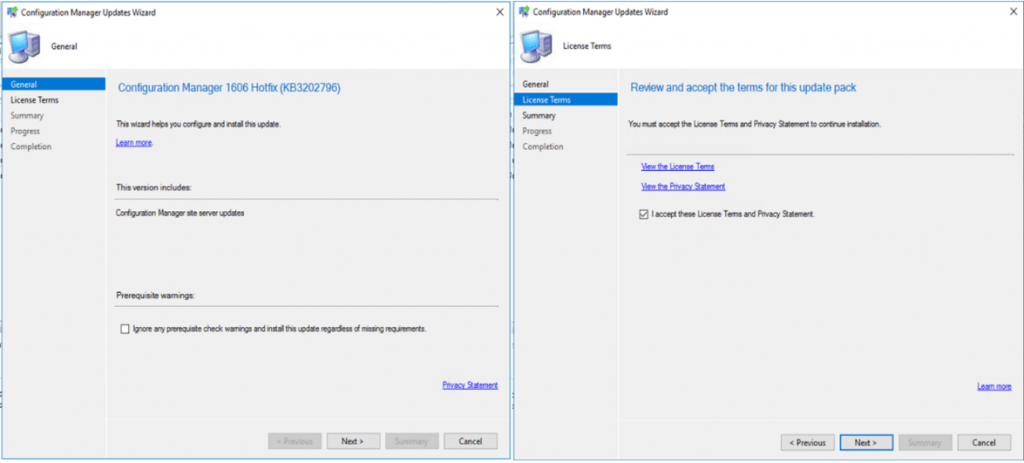
SCCM Upgrade with an Offline Service Connection Point | ConfigMgr.
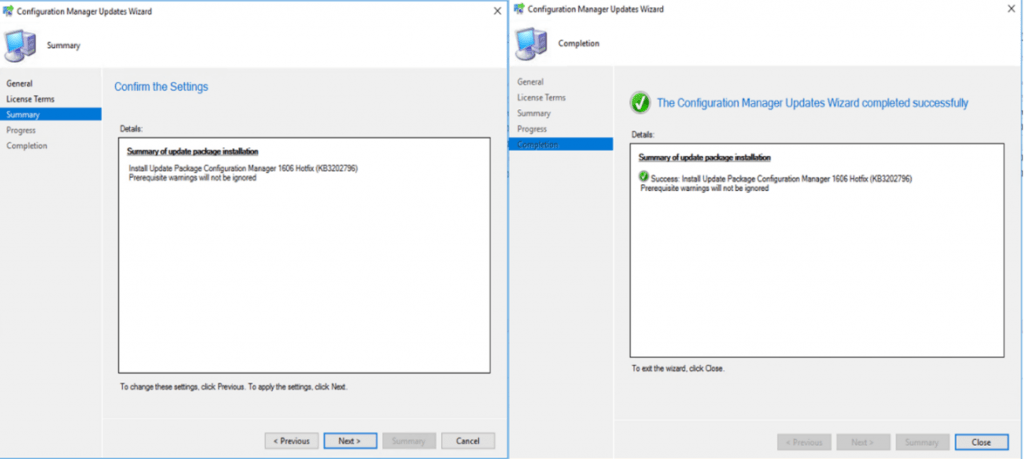
Once it has been done, close the Configuration Manager Update Wizard page.
Verify Console Version Upgrade Status
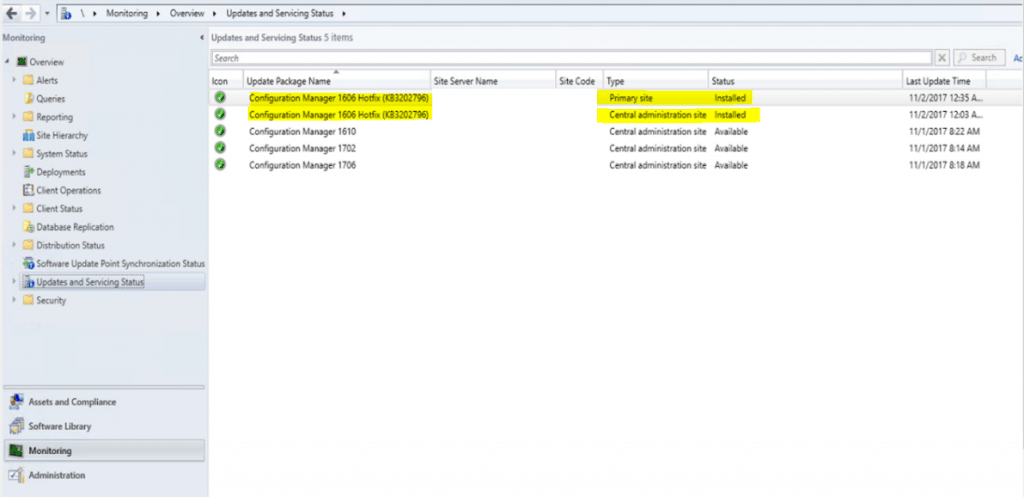
Check on Console; you can see the hot-fix state changed to Installing

Verify that “hman.log” and “dmpdownloader.log” files for updating process logs are available in C:\Program Files\Microsoft Configuration Manager\Logs.
You can verify the status in the Monitor tab in the SCCM console.
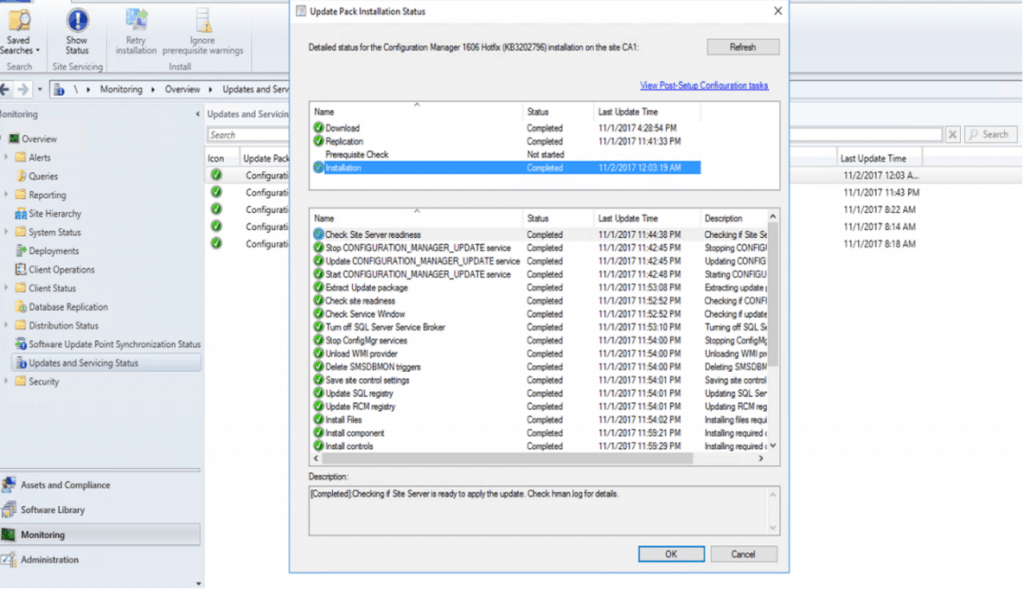
Once the hot-fix is completed installation, it sends the hot-fix to the Primary Console and updates all SCCM Servers in the Hierarchy.
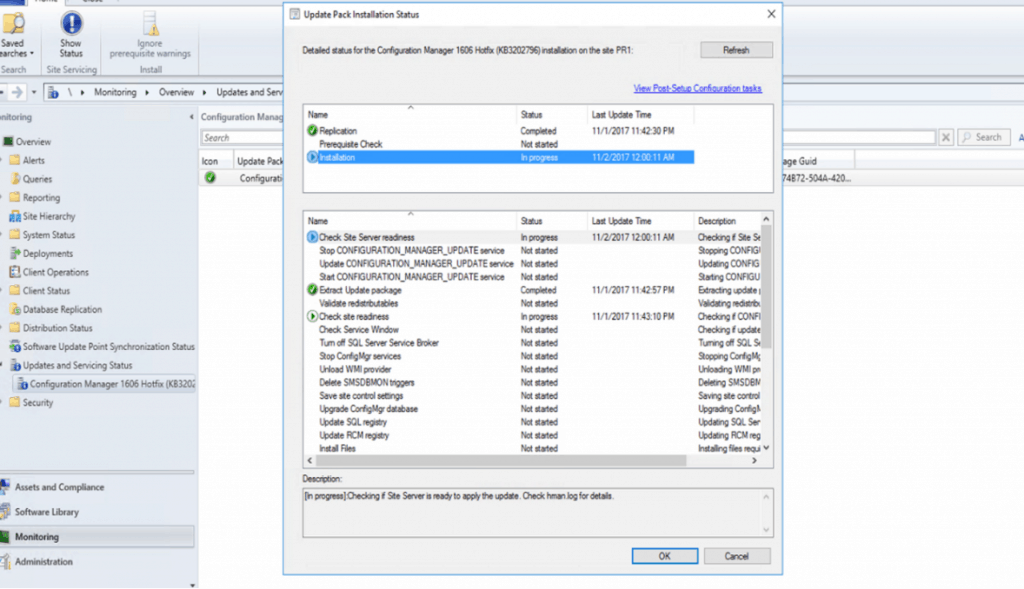
Now, you can see the upgrade is happening now. SCCM Upgrade with an Offline Service Connection Point.
Resources
- Use the Service Connection Tool for Configuration Manager – https://docs.microsoft.com/en-us/mem/configmgr/core/servers/manage/use-the-service-connection-tool
- SCCM 2002 Installation Step by Step Guide | MEMCM | ConfigMgr

Hi ,
We tried this but “import” step is not working. In serviceconnectiontool.log it shows imported successfully but when we check sccm console under update and servicing their are no new upgrades.
we are trying to upgrade 1810 to 2103 , is it possible ? we have selected downloadall option.
Hi Ritika,
This upgrade path not supported.
SCCM 2103 update is the first current branch update of year 2021. To perform SCCM 2103 upgrade, you must have installed SCCM 1910 or later.
First upgrade your SCCM to 1910 or later version and try again
Hello,
When i run this command on the system that have internet access: “serviceconnectiontool.exe -connect -downloadsiteversion -usagedatasrc D:\USB -updatepackdest D:\USB\UpdatePacks”
After the comand run it write that is uploading / downloading the file please wait..
But no files has been downloaded ?
Any help?
Do you see anything in the event logs or SCCM logs?
ServiceConnectionTool.log: Each time you run the service connection tool, it writes to this log file. The path of the log file is always the same location as the tool. This log file provides simple details about the tool usage based on the parameters you use. Each time you run the tool, the tool replaces any existing log file.
ConfigMgrSetup.log: During the Connect phase, the tool writes to this log file at the root of the system drive. This log file provides more detailed information. For example, what files the tool downloads, and if the hash checks are successful.
Hi Cosmin,
Actually the download wont start immediately we need wait some time to start download into the folder, and also as Anoop said did you checked ServiceConnectionTool.log
Hi,
This are the logs.
INFO:Logged-in account name:
INFO:Running as account name:
INFO:Telemetry Connect step is running
WARNING:UsageData.cab signature could not be verified.
ERROR:C:\Users\dell\AppData\Local\Temp\SCTtemp\Configmgr_UsageData\4099beff-1d84-4d1f-b8f3-8892f323a50f.TEL: UploadTelemetryData transmission fe2bfa88-39a2-4c7f-972b-8d44a4511278 failed with status code ERROR and error code UnknownError
ERROR:Telemetry Connect step: uploading usage data is a requirement to download update packages. File D:\New folder\USB\UsageData.cabdoes not contain telemetry data
INFO:Telemetry Connect step completed.
Hi Cosmin,
As per the error it says UsageData.cab is not valid, it might have got corrupted.
Please restart the process and create the new UsageData.cab and try again.
Note : don’t use same folder to create file.
Hi,
I have also try with a different location, check after the log from the UsageData.cab file to see if is corrupted or something. But the same error every time. I have also stop the antivirus.