Hello, guys. This week, let’s learn how to Create Sensitivity Labels in Microsoft 365 to Protect Corporate Data. It’s been a while since we discussed M365-related data protection. So, let’s dive deep into creating sensitivity labels to protect corporate data.
Sensitivity labels classify the organization’s data like emails, files, sites, etc. When we apply the labels, the data will be encrypted per the admins’ label settings configured. The Sensitivity labels are customizable as per the organizational requirements.
These labels can be applied automatically to the corporate data by defining how to identify the data, and we can also prompt users to apply the appropriate labels for the data they are handling. We can use the sensitivity labels as watermarks for the documents.
You may ask why we need to label the corporate data. In modern days, the people of an organization must coordinate with people inside and outside of an organization. So, an organization’s data will move outside and across various devices. This is the place where sensitivity labels play a sensitive role, which allows users to share data within or outside the organization in a secure way.
- Best Guide to Configure Email Settings for Android Devices in Intune
- Microsoft 365 Defender Attack Simulation to Educate Users about Phishing Emails – Part 1
Prerequisites
Sensitivity labels are part of Microsoft Purview Information protection. Sensitivity labels are part of various licensing. Based on the organizational requirements, one has to choose the correct licensing. We must choose the right licensing as the labelling can be applied on multiple sites and data. The best licensing that can be used for the right licensing is as follows.

- Microsoft 365 E5/A5/G5/E3/A3/G3/F1/F3/Business Premium/OneDrive for Business (Plan 2)
- Enterprise Mobility + Security E3/E5
- Office 365 E5/A5/E3/A3
- AIP Plan 1
- AIP Plan 2
Depending on your organization’s size and structure, the Compliance or Security teams will manage the Information protection. For this, the admin requires the access to any of the below roles.
- Global Administrator
- Information Protection
- Information Protection Admins
- Information Protection Analysts
- Information Protection Investigators
- Information Protection Readers
Create Sensitivity Labels in Microsoft 365
After enabling the sensitivity labels, users can view the labels’ ribbon to apply to the files. When users download the files with sensitivity labels applied, the sensitivity label and encryption settings from the label are enforced and remain with the file and provide guidance. Let’s see how to create the Sensitivity labels.
- Login to Microsoft Purview portal
- Click on Information Protection on the left side of the bar
- Click on Label
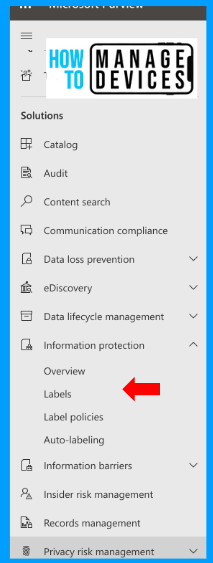
While creating labels, remember that having as few labels as possible keeps the environment simple and doesn’t overcomplicate things. Now you can view it, and I already have a few labels created. We can create a new label by clicking on Create Label.

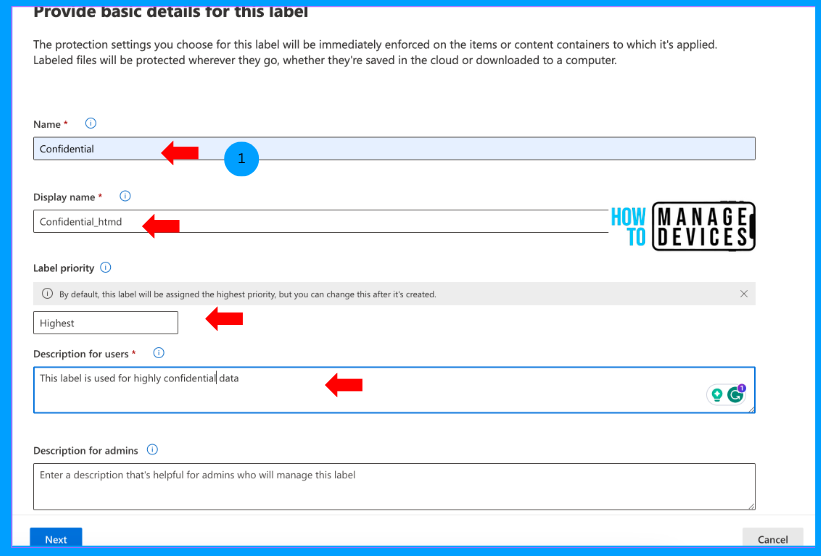
Now, let’s provide basic details for this label. Provide the Name for the label. This is the name that is visible for admins in the Compliance portal. Provide the Display Name; this name is visible to users while they are using the apps. Make sure that we provide the proper name that users can understand.
The label priority is selected as Highest by default, and we can change the priority once we create the labels. Now, provide label descriptions for users. This will be helpful when the label is applied to content and appears as a tooltip to users when they view the label in their apps. Also, describe admins. Also, choose the Label colour.
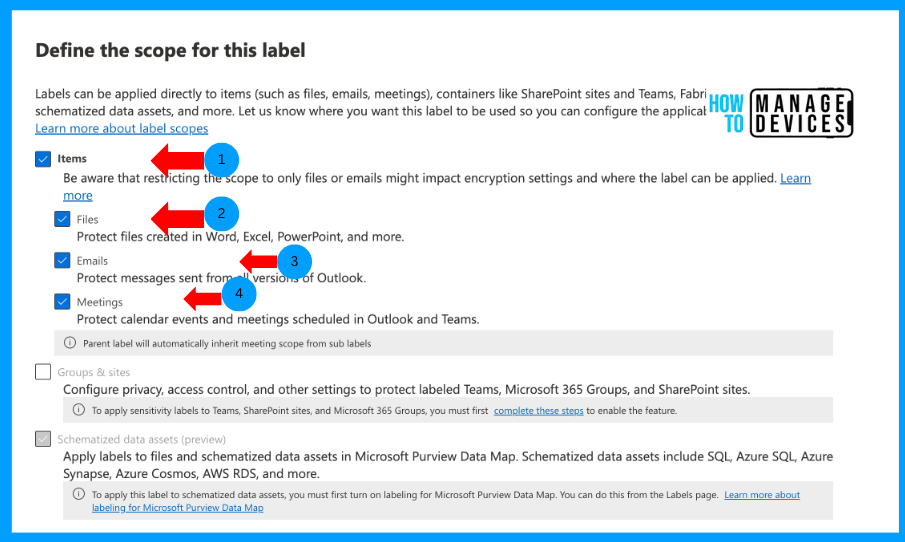
Now click on Next to Scope page. This is the section where we select the locations or files to which the labels will be applied. Select Items, and this will enable you to choose the labels to be applied for various types of files, Emails and team meetings. The Groups & Sites and Schematized Data options are greyed out for me as I need to enable a few settings. We can discuss them in another article.
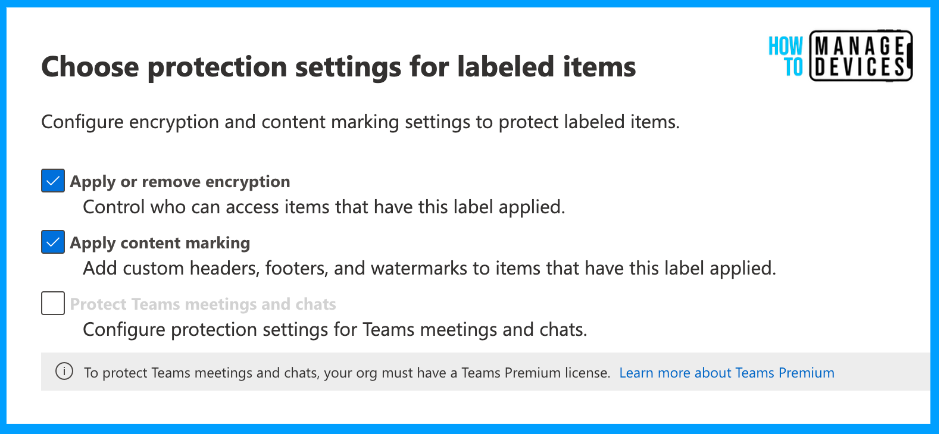
Click Next and move on to Protection settings for the labelled items page. On this page, let’s choose Encryption and watermarking for the documents. So, click on Apply or Remove Encryption. This will allow us to encrypt the data or not encrypt the data. If you want to watermark in the header and footer sections of Documents, select Apply Content Marking and click Next.
This is the item-level Encryption that can be applied using the labels. You can skip if you do not wish to encrypt or watermark the files. In that case, labels remain as labels without any encryption. I have selected both options as I want to show you guys how it works.
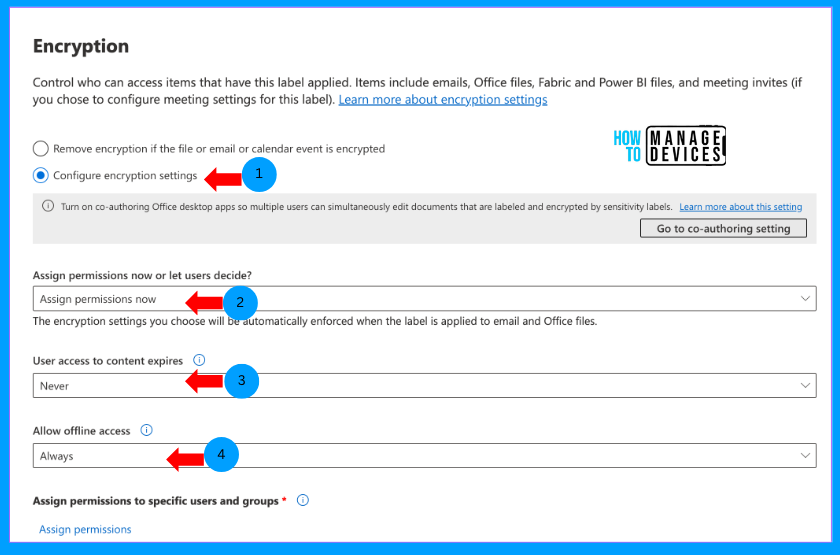
As we select to encrypt the data, we will get sub-sections for encryption and content marking. Let’s see what we can configure in these two sub-sections. Under Encryption, we have two options Remove Encryption if the file or, email or calendar events are encrypted and Configure Encryption settings. The first option removes the Encryption, and the second option enforces the Encryption of emails or files.
Select Configure Encryption settings, and we will have the option to Assign permissions now or let users decide. We can select Assign the Permission now or let users assign the permission when they apply the label. Let’s select Assign the permissions, and we can set the limit on how long users can access content with this label and specify a date or number of days at which access should expire.
We can also configure how long the user can access the content offline. Specify that labelled content is never available offline or that it’s available offline only for a number of days when that threshold is reached. Users must be unauthenticated, and their access is logged. When this happens, if their credentials aren’t cached, users are prompted to sign into Microsoft 365 before they can open the document.
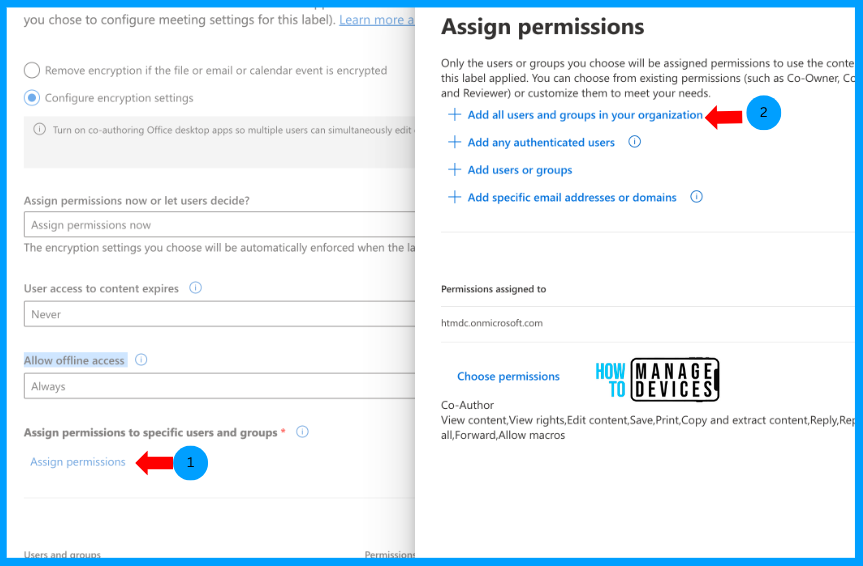
We can also define the users or groups who can interact with the labelled content. We can choose all the users in the organization or a few users as per your organizational requirements. I have selected all users for our discussion.
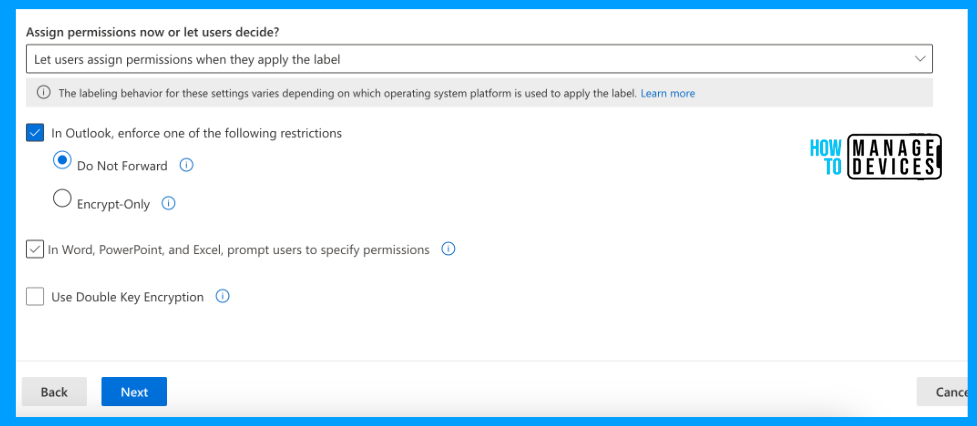
Now let’s see what options are available when we choose to let users assign permission when they apply the label. Users can decide whether to forward emails or not forward or only encrypt the emails. In Word, Excel and PowerPoint files, the user can define the permission while selecting the labels.
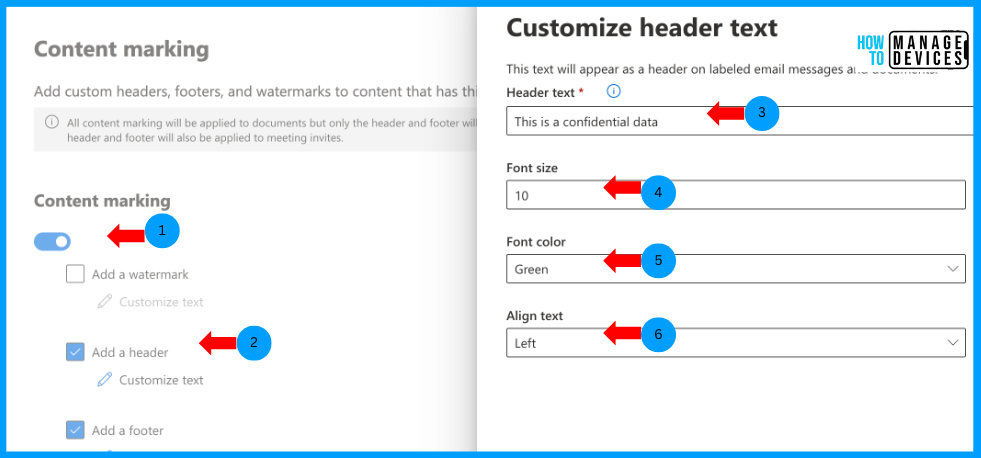
Click on Next to Content Marking screen. This is where we apply watermarking for Word, Excel, or PowerPoint files. Toggle the radio button to enable Content Marking. Here, we can choose the Header and Footer, font size and colour of the font. Configure as per your organizational branding.
Click Next to Auto-labeling for files and emails where we define certain conditions. If the condition matches, the labels will be auto-applied while creating, forwarding or replying to the emails. Click on the radio button to enable the Auto labelling. Now, we need to define the condition to auto-label the data.
Click on Add a condition, provide the name for the condition and select the data type. I have selected sensitive data like passport and credit card information. We can choose multiple sensitive data that are available by default from the Compliance portal, or we can use trainable classifiers.
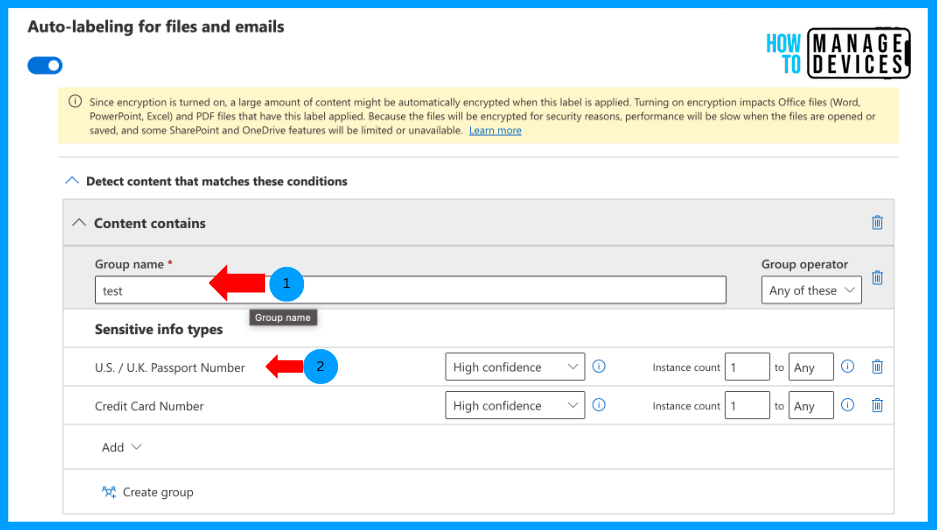
Now select whether we need to auto-apply the label or recommend users to auto-apply the label. I have selected the Auto-Apply label. Now, enter Display this message to users when the label is applied. We can leave it blank. When left blank, a default message will shown to the users.

Click on Next to Groups & Sites, as we did not apply Encryption for Groups and Sites, the options are disabled for us. Also, we didn’t select while creating the labels. Click on Next, Auto-labeling for schematized data assets. We didn’t select this option, so we will skip to the Finish screen. Here, we can view and edit the settings if you require any changes. Now click on Create label to create the label.
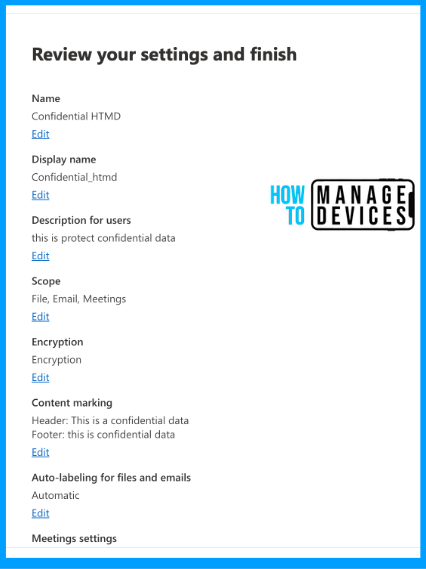
This will take a while to create the label. Once created, as a final step, we will be shown three options.
- Automatically apply labels to sensitive content
- Publish labels to users’ apps
- Don’t create a policy yet
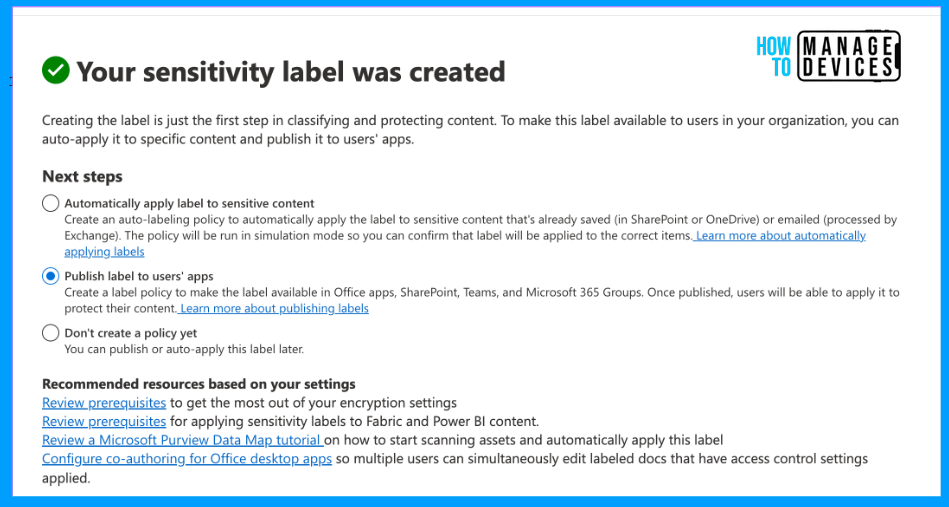
For now, I’m selecting Don’t Create a Policy Yet. This will create the label and not create any policies to publish the label to the users. We will discuss publishing and assigning the labels to users in part 2 of this post. We can have multiple labels published at a single time and various other features in the following article.
Conclusion
So, Microsoft made great progress in the area of security and made a lot of refinement to achieve modern day challenges. Sensitivity labels are one of them, which are useful to protect data inside and outside of the organization irrespective of device platform. I hope you enjoyed this article, we will meet again in part 2 of this article soon. Till then, Happy Learning.
We are on WhatsApp now. To get the latest step-by-step guides, news, and updates, Join our Channel. Click here.
Author
About Author – Narendra Kumar Malepati (Naren) has 11+ years of experience in IT, working on different MDM tools. Over the last seven years, Naren has been working on various features of Intune, including migration from different MDMs to Intune. Naren mainly focuses on Android, iOS, and MacOS.
