Hey, let’s discuss how to Control Sharing Options using Intune for Microsoft Edge Browser on Windows Devices. The importance of this policy is that it controls the Windows 10 Share experience in Microsoft Edge. It helps in managing how users share content with other apps on the system. This ensures a balance between productivity and security.
This policy is mainly used in Windows 10 environments, especially inside Microsoft Edge. It is applied through device management tools like Intune or Group Policy. Organizations use it to manage user sharing permissions on work devices.
Organizations may want to enable this policy so that users can easily share documents, links, or files. This supports teamwork and improves productivity when employees collaborate. It also saves time by allowing quick sharing directly from the browser.
On the other hand, organizations may want to disable this policy to stop sensitive data from being shared outside secure apps. This helps protect company information and ensures compliance with data security rules. For example, in a financial company, disabling sharing prevents employees from accidentally sending confidential client data through personal apps.
Table of Contents
What are the Advantages of enabling Share Experience Policy using Intune?
Enabling this policy allows users to use the Windows 10 Share experience in Microsoft Edge. It helps employees share content, links, and files quickly with other apps, saving time. This improves teamwork, makes collaboration easier, and increases overall productivity.
1. Helps users share content easily between apps.
2. Provides faster collaboration and communication.
3. Improves productivity by reducing extra steps.
4. Supports teamwork in organizations.
5. Makes the user experience more convenient.
Enable Share Experience Policy in Microsoft Edge on Windows 10 to Control Sharing Options using Intune
Before enabling this policy, users cannot access the Windows 10 Share experience in Microsoft Edge. The Share button is hidden, and they are unable to send content directly to other apps. This limits collaboration and may slow down sharing tasks.
After enabling this policy, users can easily access the Share option from the Settings and More Menu in Microsoft Edge. They can quickly share links, files, or content with other apps on the system. This improves convenience, teamwork, and overall productivity.
- How to Configure App Data Sharing using SharedLocal Folder in Windows 10 with Intune Policy
- Allow Disallow to Save Messages from a Shared Mailbox to Sent Items with Intune
- How to Configure Do not Add Shares of Recently Opened Documents to Network Locations Policy using Intune
Create a Profile
To deploy this policy through Microsoft Intune, first sign into the Microsoft Intune admin center. Next, navigate to Devices > Configurations. On the right side, you will see the option for create; select that and then click on New Policy.
| Platform | Profile Type |
|---|---|
| Windows 10 and later | Settings Catalog |
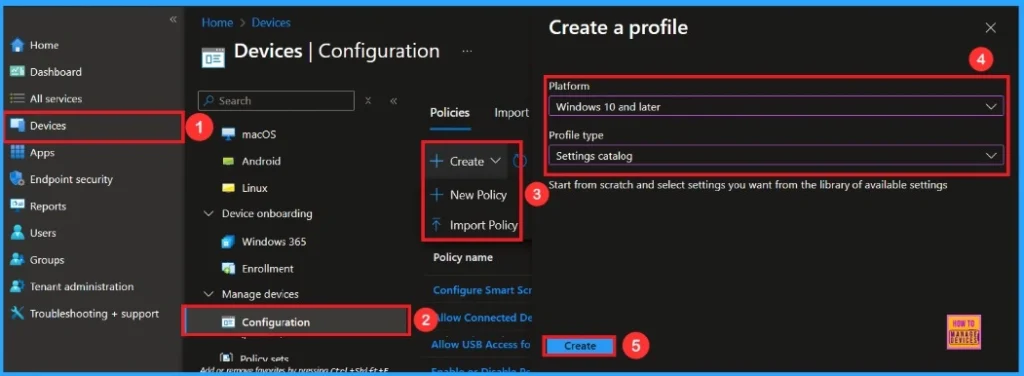
First Step
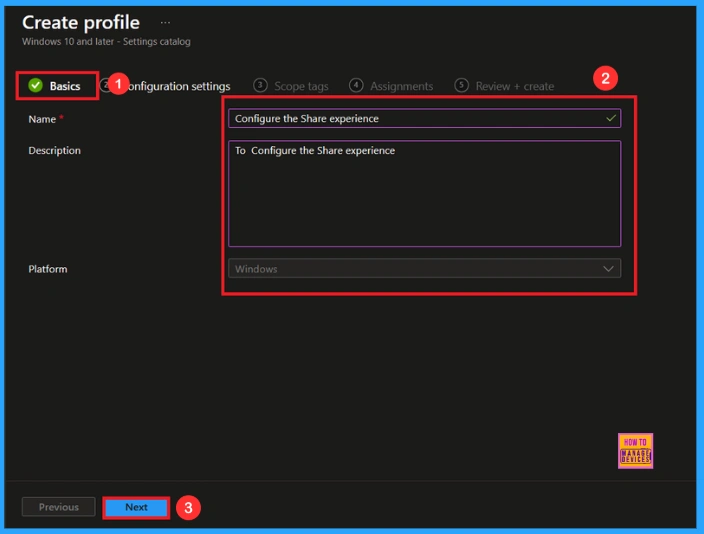
In the basic details section, you must enter essential information about a policy, including its name, description, and platform details. I will give the name Configure the Share Experience. You can add the description if you want to, as it helps you identify the policy later.
Configuration Settings – Settings Picker
In the configuration settings, first locate the option to add settings through a hyperlink and click on it. This action will open a settings picker. Next, search the category as Microsoft Edge and select Configure the Share Experience.
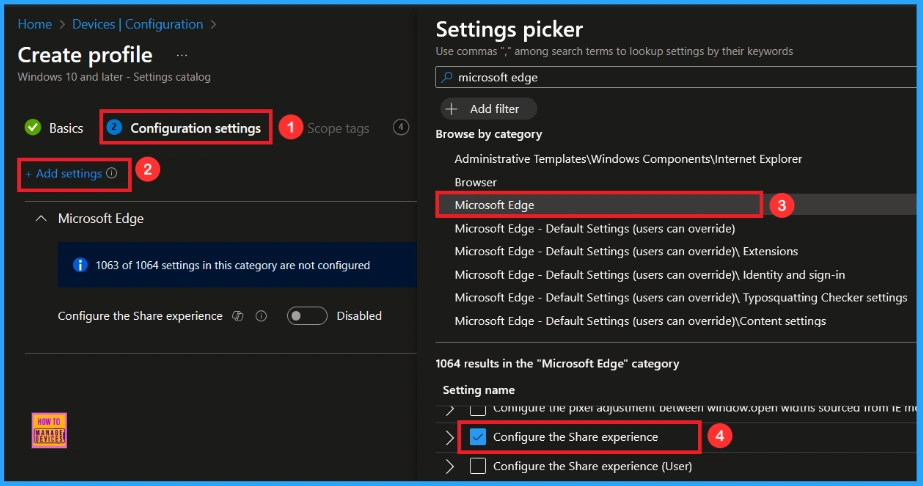
After that, you can close the settings picker window. Once you close the settings window, you will be directed to the configuration settings page. This setting is turned off by default. If you want to keep this setting disabled, click the next option.
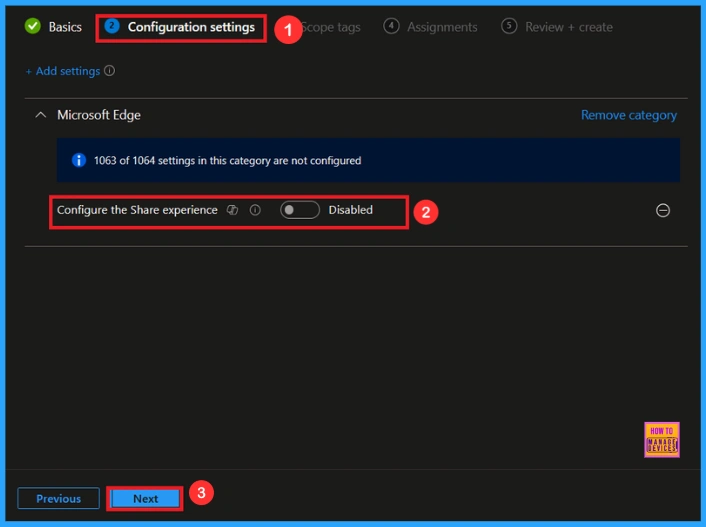
Enable Share Experience Policy
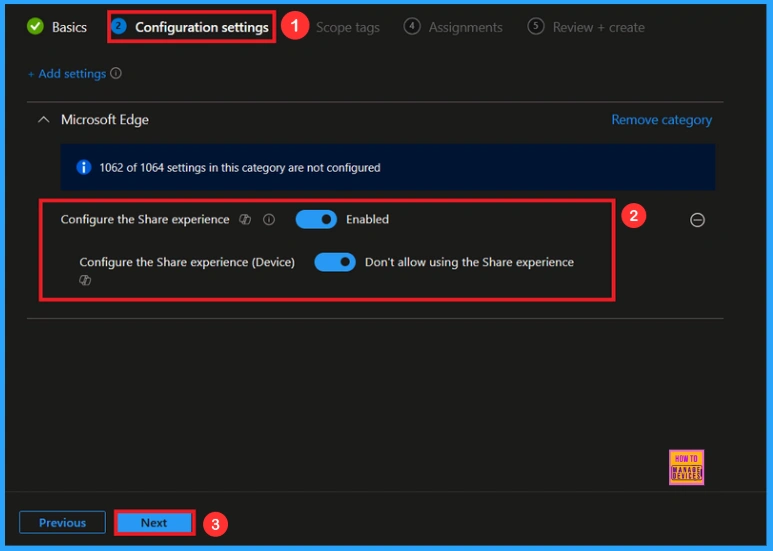
To enable this policy, you need to enable this Policy. You will find a toggle switch there. Moving the toggle from left to right changes to a blue color and is labeled “Enabled.” This indicates that the option is now activated. Then click Next to continue.
Scope Tags
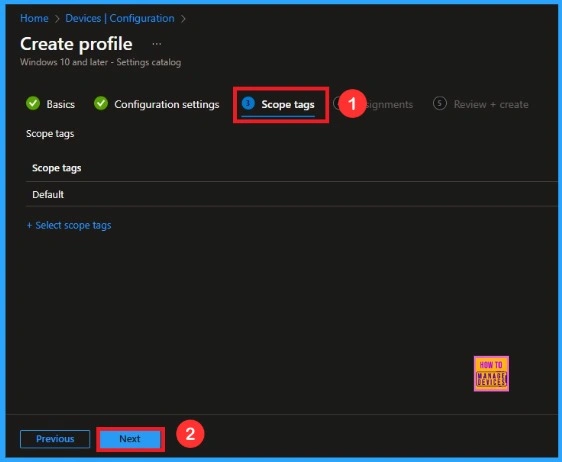
After the configuration tab, you will find the scope tags section. In this section, you can add a scope tag for the policy, but it is not mandatory; therefore, I will skip this part and click Next.
Assignments
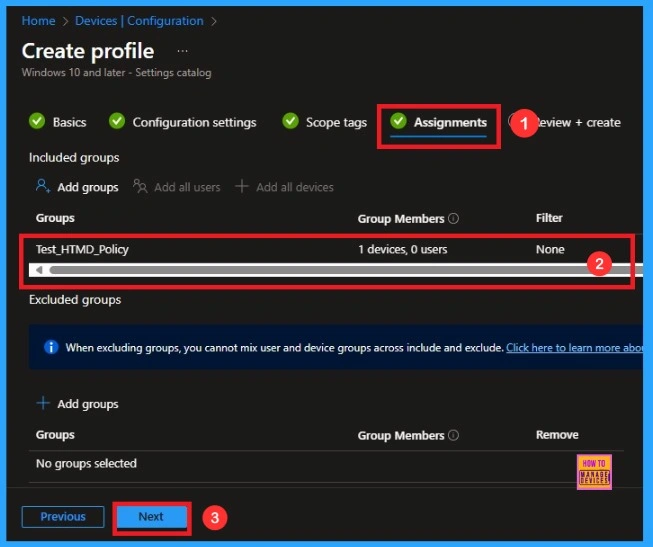
The next step is the Assignment tab, which is essential for policy deployment. In this section, you can specify the group to which you want to apply the policy. I clicked on “Add Groups” under the Include Group option. When I clicked “Add Groups,” a list of suggested groups appeared. I selected the group(Test_HTMD_Policy) and now it is visible on the assignment page. After this, click “Next” to proceed.
Review+ Create
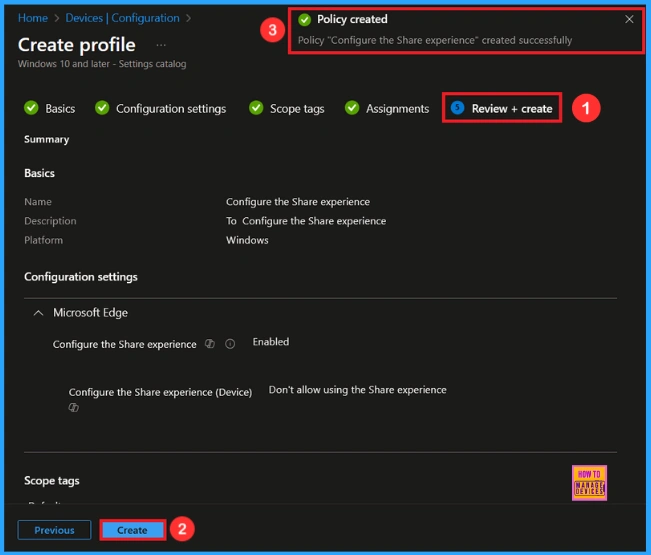
After completing the assignments, you will reach the review and create option, which is the final stage of policy creation. You can view all the details about the policy, including the basics, specifics, and configuration details. Now,click on the “Create” option then, you will see a notification “Configure the Share Experience created successfully”.
Device and User Check-in Status
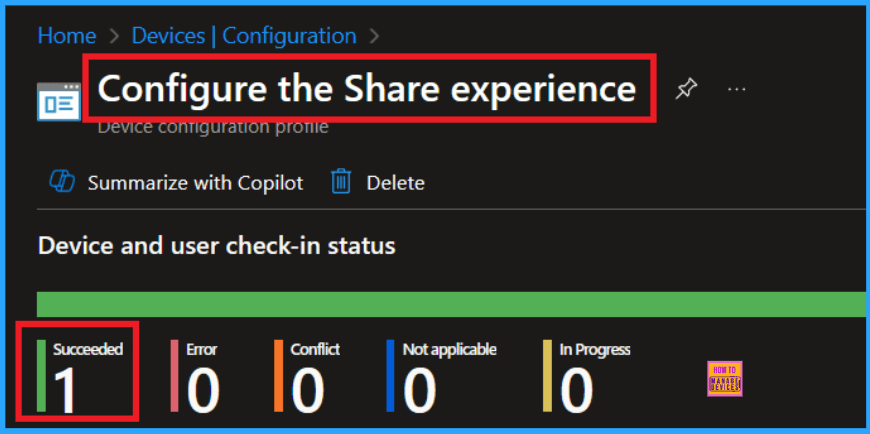
To view a policy’s status, go to Devices > Configuration in the Intune portal, select the policy (Configure the Share Experience), and check that the status shows Succeeded (1). Use manual sync in the Company Portal to speed up the process.
Client Side Verification
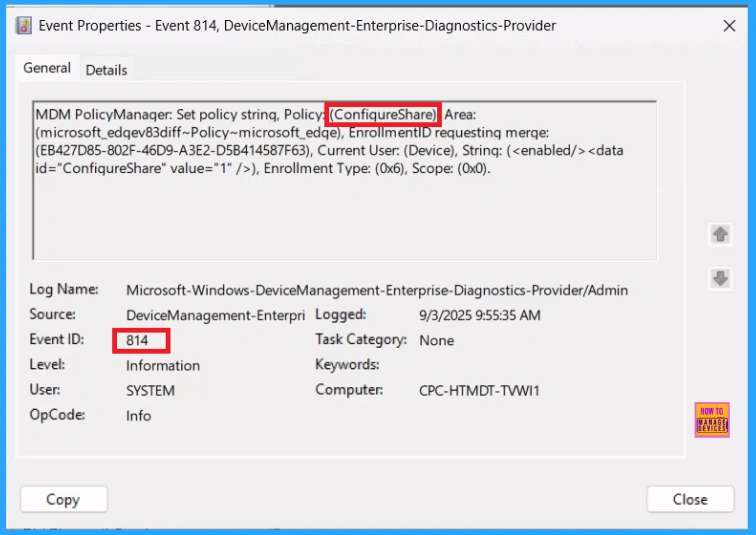
To monitor the status of Intune, you can use Event Viewer. Go to the Start and type Event Viewer. Then, navigate to Application and Services Logs > Microsoft > Windows > DeviceManagement–Enterprise–Diagnostics–Provider > Admin. Then you will get a list of Information. In the right pane, click on Filter Current Log then, focus on the Event IDs field and enter 814.
MDM PolicyManager: Set policy string, Policy: (ConfiqureShare) Area:
(microsoft_edqev83diff~Policy~microsoft_edqe), EnrollmentID requestinq merqe:
(EB427D85-802F-46D9-A3E2-D5B414587F63), Current User: (Device), Strinq: (), Enrollment Type: (0x6), Scope: (0x0).
How to Remove assigned Group from Share Experience Policy
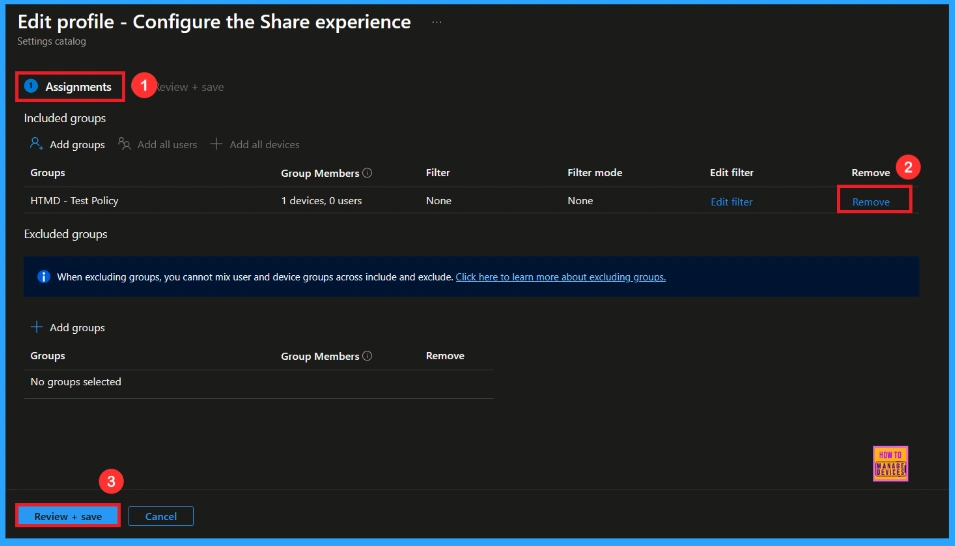
After creating the policy, if you want to remove the specific group that you previously selected, you can easily do that. First, go to Devices > Configuration policies. In the Configuration policy section, search and select the policy. In the Assignment section, you will find an Edit option and click on it. Then, click the Remove option.
For detailed information, you can refer to our previous post – Learn How to Delete or Remove App Assignment from Intune using by Step-by-Step Guide.
How to Delete Share Experience Policy from Intune Portal
If you want to delete this policy for any reason, you can easily do so. First, search for the policy name in the configuration section. When you find the policy name, you will see a 3-dot menu next to it. Click on the 3 dots, then click the Delete button.
For detailed information, you can refer to our previous post – How to Delete Allow Clipboard History Policy in Intune Step by Step Guide.

Need Further Assistance or Have Technical Questions?
Join the LinkedIn Page and Telegram group to get the latest step-by-step guides and news updates. Join our Meetup Page to participate in User group meetings. Also, Join the WhatsApp Community to get the latest news on Microsoft Technologies. We are there on Reddit as well.
Author
Anoop C Nair has been Microsoft MVP from 2015 onwards for 10 consecutive years! He is a Workplace Solution Architect with more than 22+ years of experience in Workplace technologies. He is also a Blogger, Speaker, and Local User Group Community leader. His primary focus is on Device Management technologies like SCCM and Intune. He writes about technologies like Intune, SCCM, Windows, Cloud PC, Windows, Entra, Microsoft Security, Career, etc.

