Today,we are discussing Do not Add Shares of Recently Opened Documents to Network Locations. As you all know, we recently published many types of setting catalog policies. The setting catalog is one of the best features in Intune.
With this feature admins can easily deploy the policy to the organizations.You know it’s a very important policy and this feature stops shared folders or files from being added automatically to a computer’s network locations. While systems like Windows usually do this to make access easier, it can lead to privacy risks.
When you open a document in a remote shared folder, the system can decide whether to automatically add that folder to Network Locations. This setting helps manage how shared folders are shown and accessed on the network. When you enable this setting, shared folders won’t be automatically added to Network Locations when you open a document.
Users will only see these folders if they manually add them, making it easier to keep Network Locations well-organized. This setting helps manage shared folders on a network. Turning it on lets users protect privacy, improve security, and keep things organized.
Table of Contents
What Does Enabling the Remote Shared Folders Policy Do?
It prevents shared folders from being automatically added to Network Locations when a document is opened.
Do Not Add Shares of Recently Opened Documents to Network Locations– Windows CSP Details
Above we discussed an overall view on Do not Add Shares of Recently Opened Documents to Network Locations. You knowing this feature helps protect shared files and folders. When shares are added automatically, it can create chances that hackers might use to access sensitive information.
CSP( Configuration Service Providers) deatils are very important for a policy creation. CSPs are similar to Group Policy extensions, providing administrators with a powerful way to manage specific settings efficiently.
| Property name | Property value |
|---|---|
| Format | chr (string) |
| Access Type | Add, Delete, Get, Replace |
./User/Vendor/MSFT/Policy/Config/ADMX_Desktop/NoRecentDocsNetHood
- Do not Delete Temp Folders upon Exit Security Policy using Intune
- Windows 11 New File Explorer Experience New Features Design Details
- Enable or Disable Hotspot Authentication in Networks using Intune Policy
Create a Profile
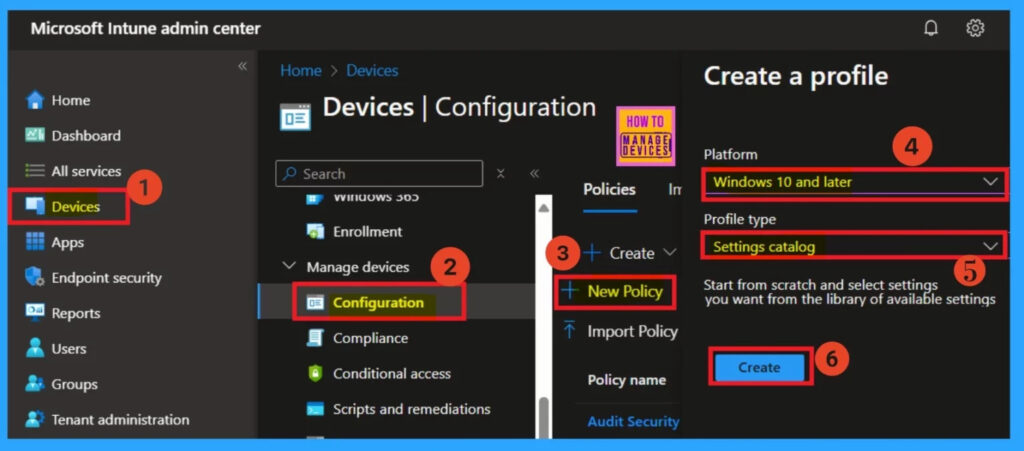
To start the policy creation process, the first step is to create a profile. Sign in to the Microsoft Intune Admin Center. Navigate to “Devices,” then go to the “Configurations” menu. Click on “New Policy.” In the “New Policy” section, select the platform as Windows 10 and later and choose the profile type as Settings Catalog.
Basics
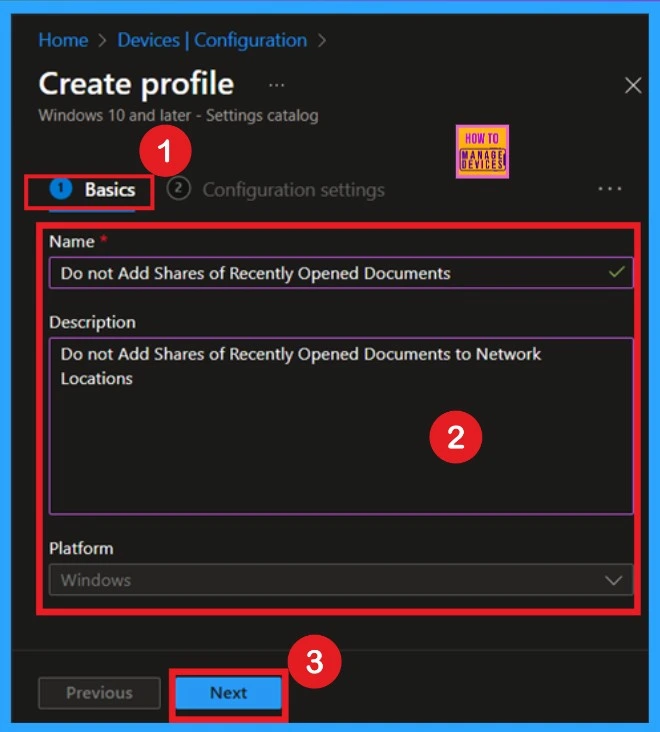
Basic is the first step you need to address. Start by entering the fundamental details of a policy, such as its name, description, and platform details. The name is mandatory and must be entered. Additionally, the description allows you to provide details about the policy for better clarity in the future.
- Click on the Next.
Configuration Setting- Settings Picker
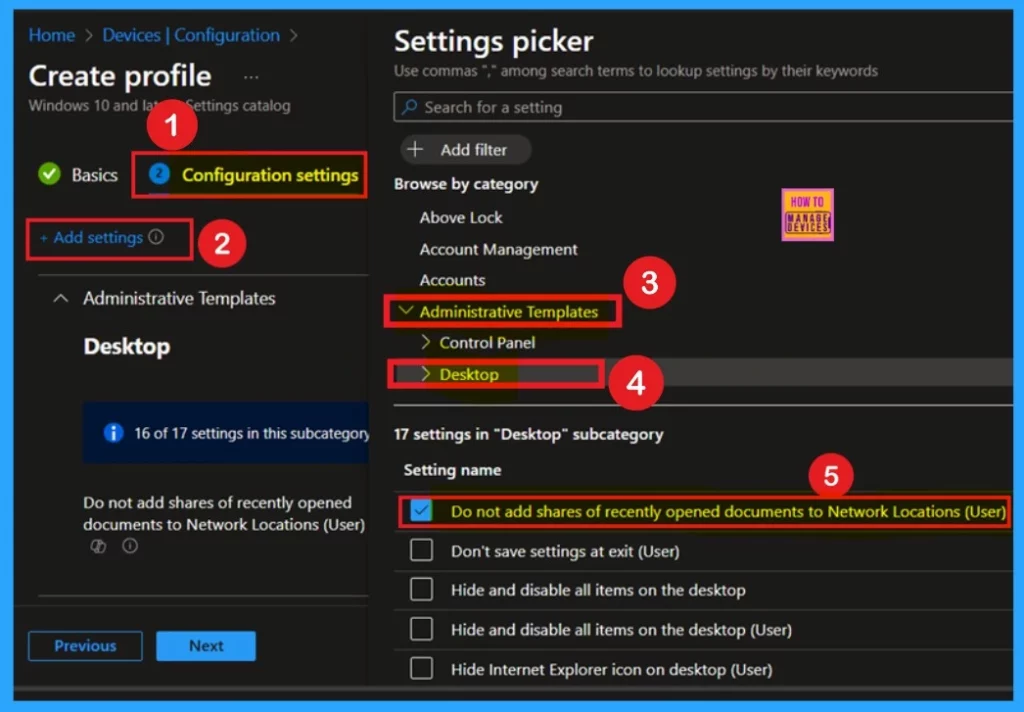
The important part of policy creation is the settings, specifically the configuration settings. After completing the basics, the configuration settings page comes next. On this page, you will see a +Add Settings‘ option in blue. Click on it. When you click on this option, a Settings Picker window will appear.
In the Settings Picker window, enlarge the administrative templates. Then, select the Desktop option. Under the ‘Desktop’ option, you will find various settings.
- For example, you may find a setting named Do not add shares of recently opened documents to network locations.
- Once you select this option, close the Settings Picker window
Disabled
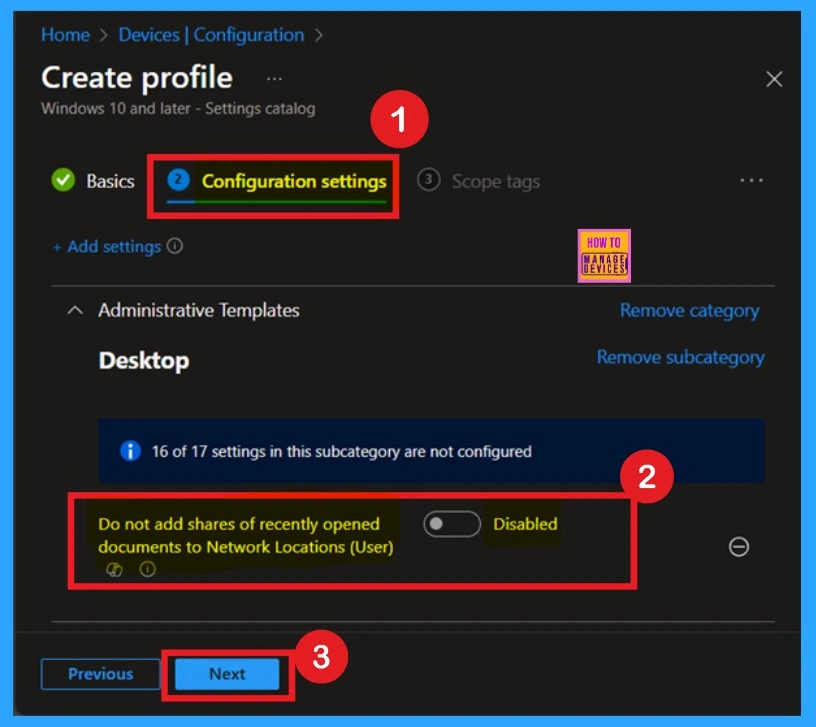
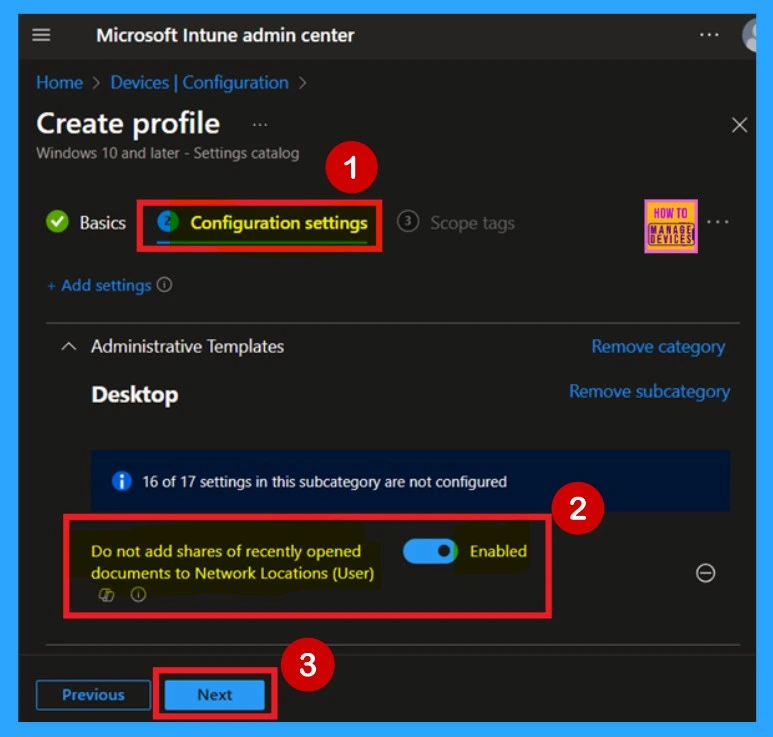
After closing the Settings Picker window, you will return to the configuration settings page. Here, you will find the option Do not add shares of recently opened documents to network locations. By default, this option is disabled. You can proceed with this policy setting as is. Then, click Next to continue.
Enabled
If you want to enable the policy you can easily do that. You can see the option for ”Do not Add Shares of Recently Opened Documents to Network Locations”. Here you have to Toggle the pane to the left to the right. Now you can see that it is enabled and it’s on a blue color now. Then click on the Next to continue.
Scope tags
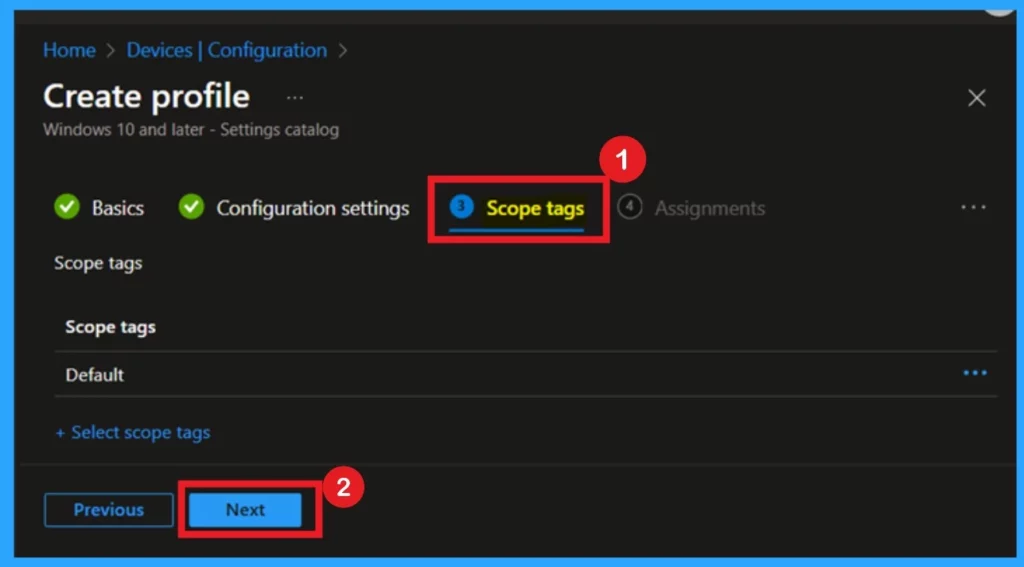
After the Configuration tab, you’ll reach the Scope tags section. Here, you have the option to assign a scope tag to the policy. This helps with organizing and filtering policies across your organization. However, this step is completely optional. If you don’t need to use scope tags, you can just skip it.
- Once you’re done, click Next to move forward.
Assignments
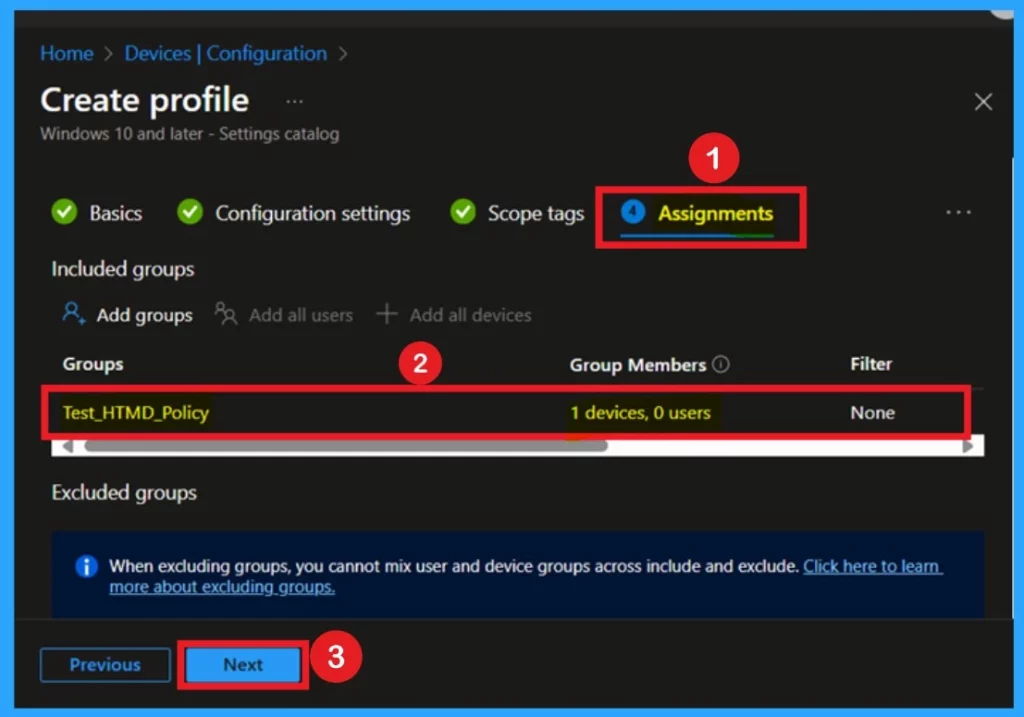
The next step is the Assignment tab, which is essential for applying the policy. Here, you choose the group you want the policy to target. To begin, click Add Groups under the Include Group section. A list of available groups will appear select the group you want to assign the policy to.
- Once selected, the group will be added to the assignment list.
- After confirming your choices, click Next to continue.
Review + Create
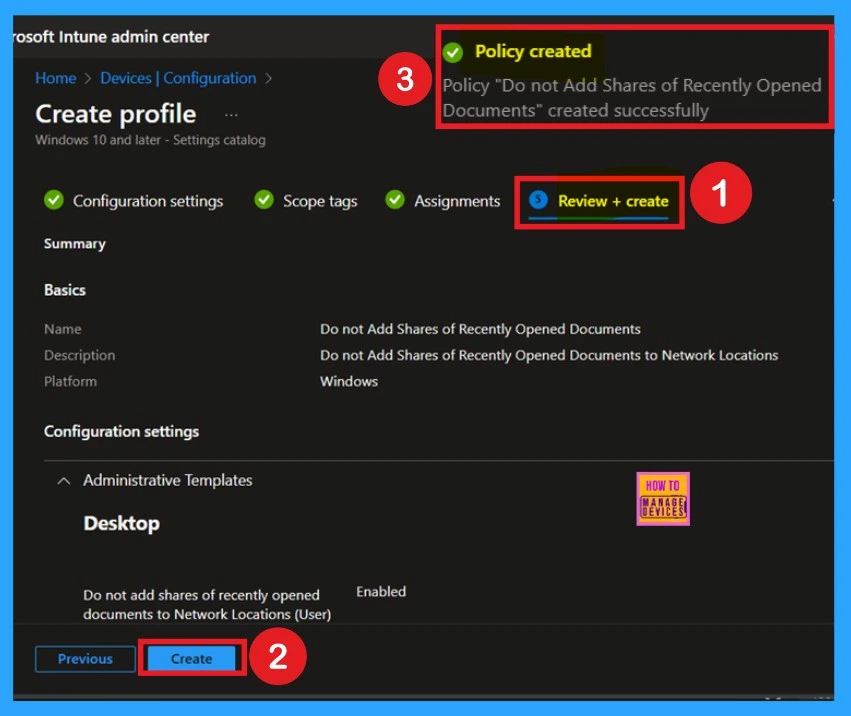
After completing the assignments, you’ll arrive at the Review + Create stage the final step in setting up the policy. This is where you can go over all the details, including the basic info and configuration settings. If everything looks good, simply click Create to finish and apply the policy. Now you will notified that the policy is successfully created.
Monitoring Status
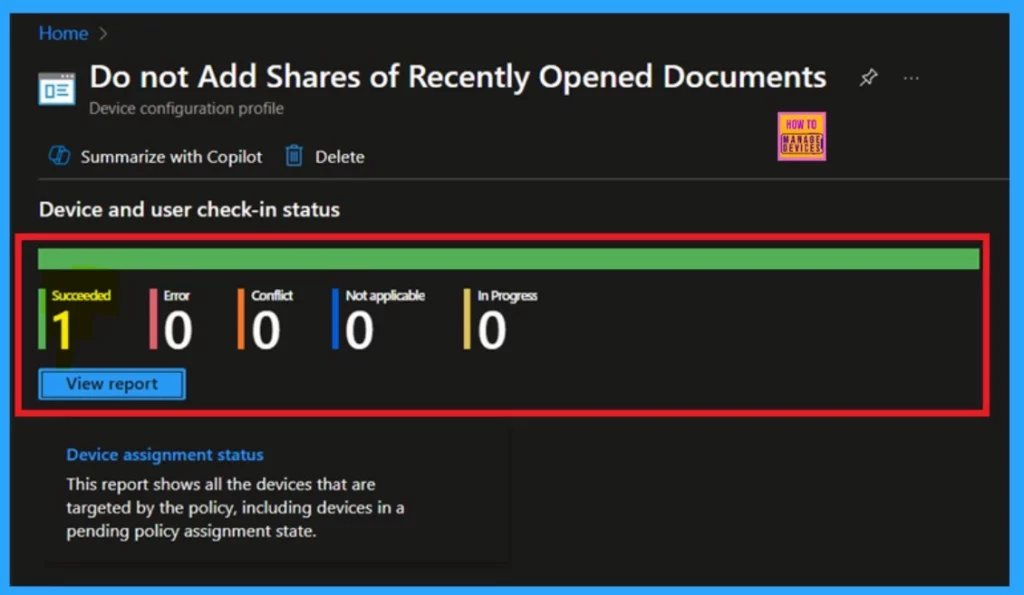
When you create a new policy for a device, it typically takes up to 8 hours for the policy to apply automatically. However, you can speed up this process by manually syncing the policy. After syncing, you can verify if the policy was applied successfully by checking in Intune:
- Go to Devices > Configuration profiles, then select the policy to view its status.
Client-Side Verification
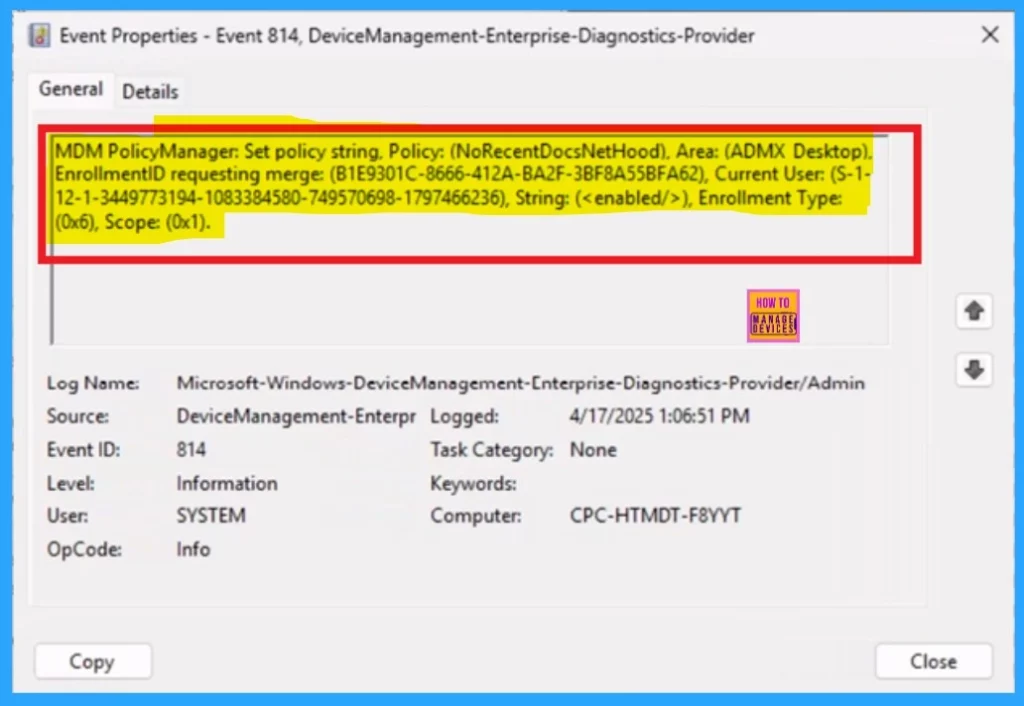
To monitor the status of Intune, you can use the Event Viewer application. Begin by opening the Start menu and typing “Event Viewer” to locate and launch the program. Once open, navigate through the following path Services Logs > Microsoft > Windows > DeviceManagement-Enterprise-Diagnostics-Provider > Admin.
In the Admin section, look to the right pane and select “Filter Current Log.” A dialog box will appear and enter 814 in the Event IDs field to apply the filter. Finally, click “OK” to view the filtered results, which will display the relevant Intune status events.
Need Further Assistance or Have Technical Questions?
Join the LinkedIn Page and Telegram group to get the latest step-by-step guides and news updates. Join our Meetup Page to participate in User group meetings. Also, Join the WhatsApp Community to get the latest news on Microsoft Technologies. We are there on Reddit as well.
Author
Anoop C Nair has been a Microsoft MVP for 10 consecutive years from 2015 onwards. He is a Workplace Solution Architect with more than 22+ years of experience in Workplace technologies. He is a Blogger, Speaker, and Local User Group Community leader. His primary focus is on Device Management technologies like SCCM and Intune. He writes about technologies like Intune, SCCM, Windows, Cloud PC, Windows, Entra, Microsoft Security, Career, etc.
