Hi, let’s discuss Start or Stop Automatic Maintenance in Windows. Automatic Maintenance is a feature in Windows that allows the user to run scheduled tasks to keep the PC running securely and smoothly. This type of Maintenance is essential to secure software hardware and security configurations up to date.
Automatic Maintenance aims to integrate all the background maintenance tasks in Windows. Also, it aims to help third-party developers add their maintenance functionality to Windows without negatively impacting performance and power efficiency.
Automatic Maintenance keeps your operating system in good condition by performing routine tasks without user interference. This only aims to improve the performance and secure and maintain the efficiency of your system.
Manually starting or stopping the automatic Maintenance is a straightforward process in Windows 11. It is one of the best features of Windows 11; it joins all the background tasks and implements them once at a scheduled time.
What is Automatic Maintenance in Windows?

Automatic Maintenance is a built-in Windows feature that helps you perform various system maintenance tasks, such as software updates, security scans, and system diagnostics, to keep your computer running smoothly.
Start and Stop Automatic Maintenance in Windows
Knowing how to Start and Stop Automatic Maintenance in Windows is essential. Suppose you want to maintain your system immediately when the workload increases in your operating system. In Automatic Maintenance, When you are not using your operating system, Windows automatically runs Scheduled Maintenance daily.
- You can start and stop the Automatic Maintenance in 2 ways
| Options | Use |
|---|---|
| Option 1 | By using Control Panel |
| Option 2 | By using Powe shell/ Command Prompt |
Start and Stop Automatic Maintenance By Using Control Panel
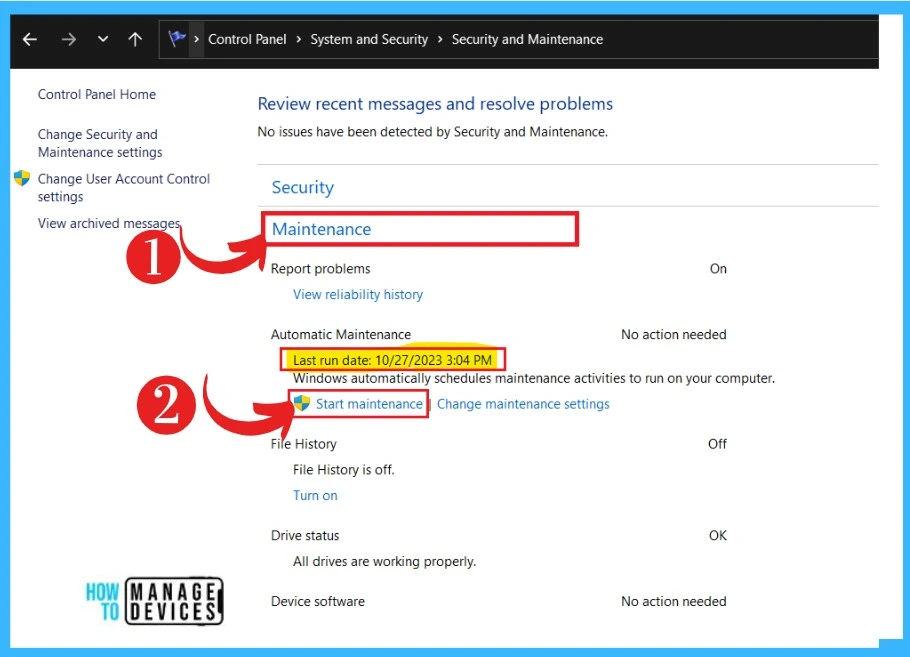
You can start and stop Automatic Maintenance by using a control panel. First, you have to open the system Control panel and then select the Security and Maintenance option. You can see the last run date and time in the Maintenance option. The screenshot below will help you.
- To start Automatic Maintenance
- Expand the Maintenance option in the Security and Maintenance
- Click on the Start Maintenance option

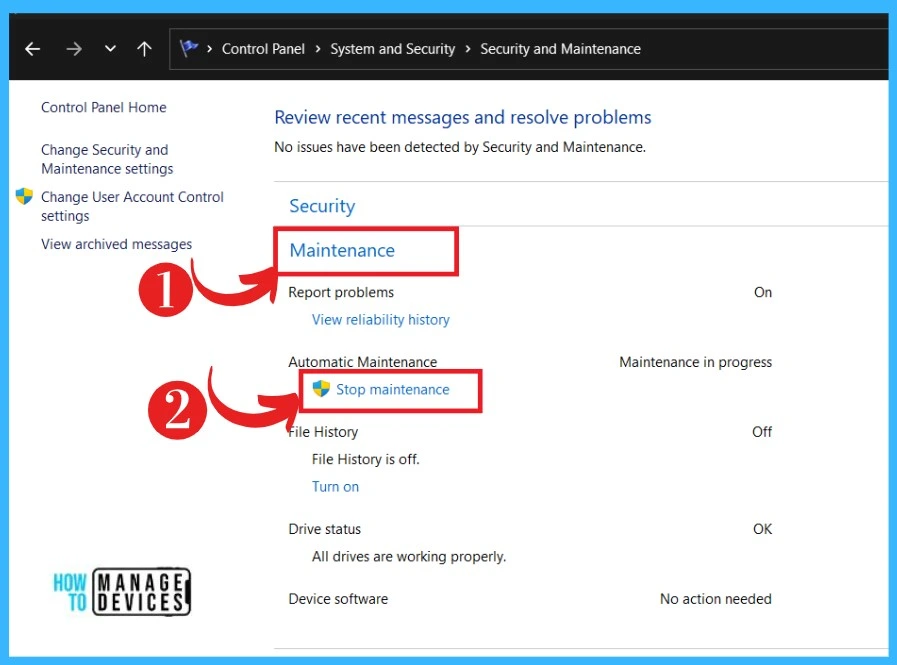
To Stop Automatic Maintenance In the Control Panel
Stop Automatic Maintenance in the Control panel is a straightforward process. When you start a maintenance process, you can stop it immediately if you want it. Expand the Maintenence section And click on the Stop Maintenance option.

To Start or Stop Automatic Maintenance in PowerShell
Another way of starting and stopping Automatic Maintenance is by using the Windows Powershell. Powershell is a task-based command-line shell. PowerShell is a powerful tool that helps you solve administration tasks. For Starting Automatic Maintenance:
- Open the Windows Powershell or Command Prompt.
- Enter the Command ” MSchedExe.exe Start” to Start the Automatic Maintenance

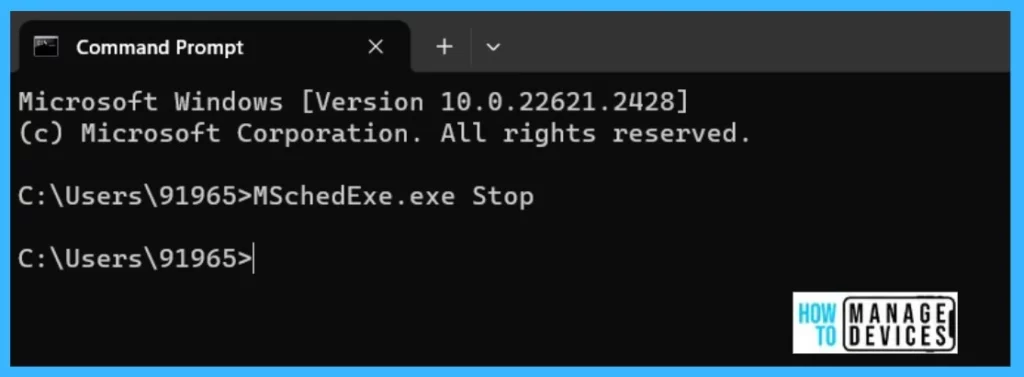
Stop Automatic Maintenance in PowerShell/ Command Prompt
It is easy to Stop Automatic Maintenance using Powershell or Command Prompt. As we see above, see how to enter a command like Enter the command in the Command prompt MSchedExe.exe Stop. The screenshot below Guide you.

We are on WhatsApp. To get the latest step-by-step guides and news updates, Join our Channel. Click here – HTMD WhatsApp.
Author
Krishna. R is a computer enthusiast. She loves writing on Windows 11 and related technologies. She likes to share her knowledge, quick tips, and tricks with Windows 11 or Windows 10 with the community.

