Hey there, let’s discuss on the topic enable or disable Storage Locations in File Explorer using Intune Policy. The configuration feature known as ‘Set Allowed Storage Locations’ serves to restrict the locations where an application, service, or system can store data.
This helps to ensure compliance with data governance policies, regulatory requirements, or to enhance performance optimizations. By specifying allowed storage locations, administrators can limit data to particular geographic areas.
Cloud service providers, or on-site servers, thereby reducing risks related to data leaks, delays, or unauthorized access. In general, this function is essential for data management, security, and the efficiency of operations in Modern IT systems.
In enterprise applications, it prevents developers or users from accidentally saving files to unsecure or unauthorized storage services. Here we are going to deploy Set Allowed Storage Locations in File Explorer using Intune Policy.
Table of Contents
Where is SetAllowedStorageLocations Commonly Used?

SetAllowedStorageLocations commonly used in Cloud platforms, Enterprise applications, Database systems, Hybrid or multi-cloud setups.
Enable or Disable Storage Locations in File Explorer using Intune Policy – CSP Details
The Configuration Service Providers, or CSPs for short, are basically components of Windows that allow IT admins and mobile device management systems to remotely set up rules, settings, and limitations on Windows devices. The CSP details are crucial for effective policy development, and we can find the detailed information in the table and screenshot provided below.
Framework Properties
| Property name | Property value |
|---|---|
| Format | int |
| Access Type | Add, Delete, Get, Replace |
| Default Value | 0 |
Allowed Values
A value that can represent one or more storage locations in File Explorer. If not specified, the default is access to all storage locations. The below table shows more details.
| Value | Description |
|---|---|
| 0 (Default) | Access to all storage locations. |
| 1 | Removable Drives. |
| 2 | Sync roots. |
| 3 | Removable Drives, Sync roots. |
| 4 | Local Drives. |
| 5 | Removable Drives, Local Drives. |
| 6 | Sync Roots, Local Drives. |
| 7 | Removable Drives, Sync Roots, Local Drives. |
./User/Vendor/MSFT/Policy/Config/FileExplorer/SetAllowedStorageLocations ./Device/Vendor/MSFT/Policy/Config/FileExplorer/SetAllowedStorageLocations

- Best Method to Prevent Users from Modifying Settings Policy Using Intune
- Best Guide to Configure Delivery Optimization Cache Host Policy using Intune
- Disallow Cache Server Downloads On VPN in Windows Settings Catalog
Create a Profile
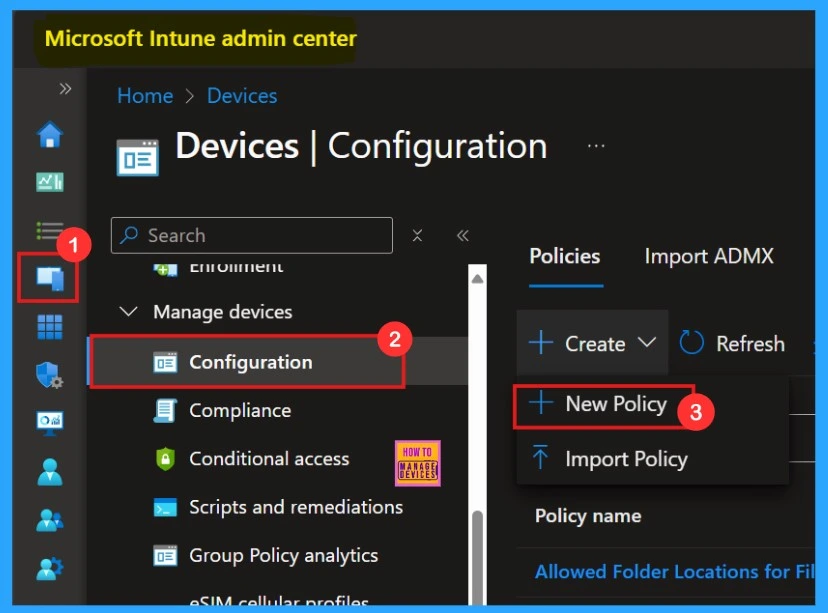
To deploy a policy we need to Create a profile. First, login in Microsoft Intune Admin Center. Click on Devices > Configurations. On the right side, click the + Create option and select the New policy.
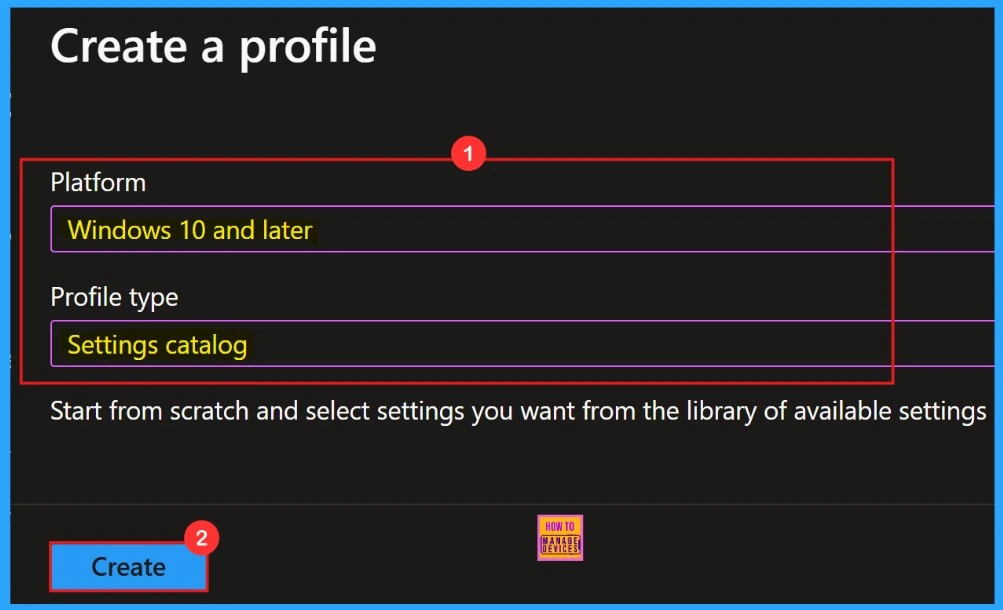
Another window will open showing the details to choose Platform and profile type. Here we select Windows 10 and later as the platform, and set the profile type to Setting catalog. Then, click Create to proceed.
Basics
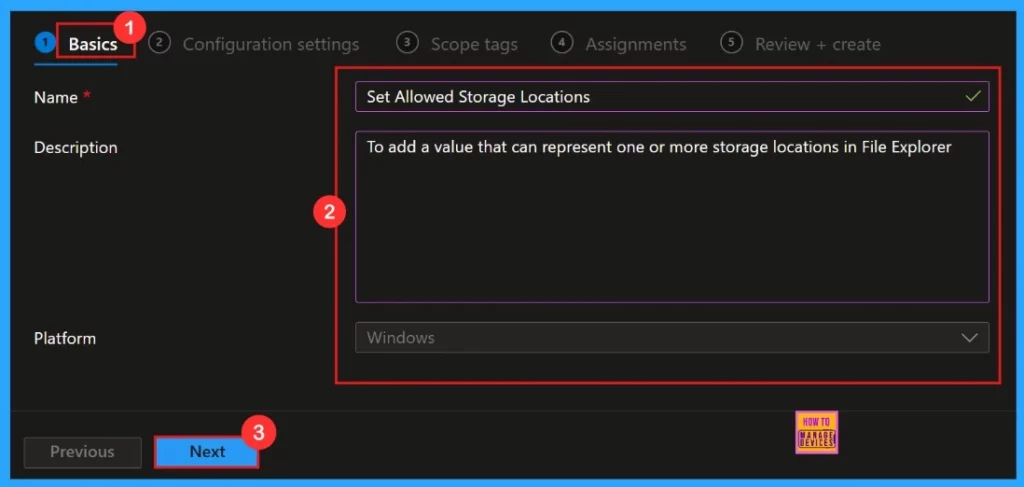
In the Basics tab, we need to add the name of our policy in the Name section. If we want to add any description about the policy we can add that in the given space. Here we can see the policy name and it’s description in the below screenshot.
| Name | Description |
|---|---|
| Set Allowed Storage Locations | To add a value that can represent one or more storage locations in file explorer |
Configuration Settings
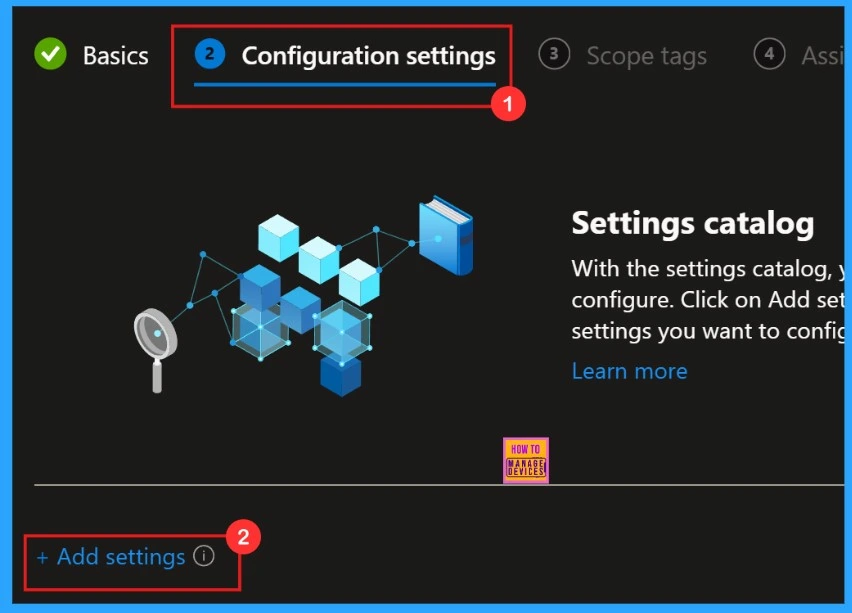
Configuration Settings is an important section, to add settings to the policy. Configuratopn settings defines the rules, parameters, and controls determining how systems, applications, or networks operate in policy management. We can add settings for the policies in the configuration settings.
Settings Picker
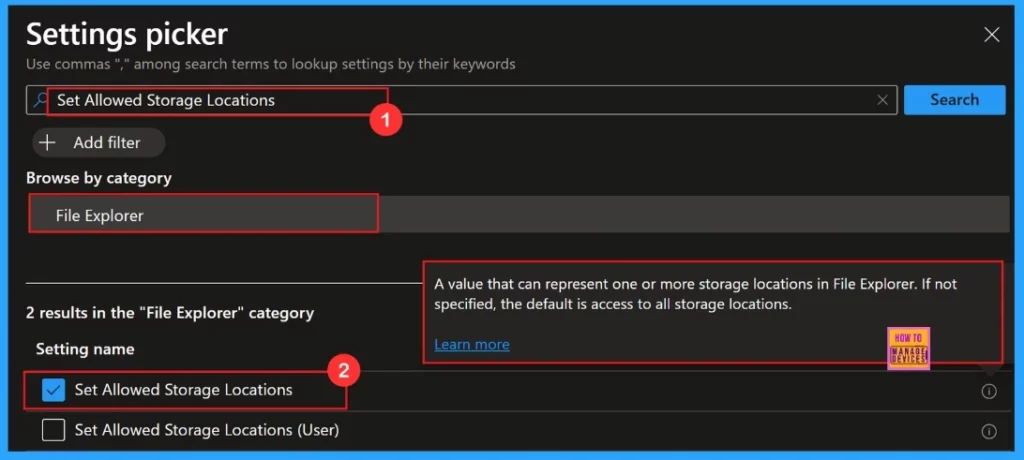
Settings Picker” allows us to choose preferred policy settings from the list. This simplifies policy deployment and reduces errors. Our policy “ Set Allowed Storage Locations ” comes under “File explorer” Catagory.
- Setting Picker > File Explorer >Set Allowed Storage Locations
Configuration Settings
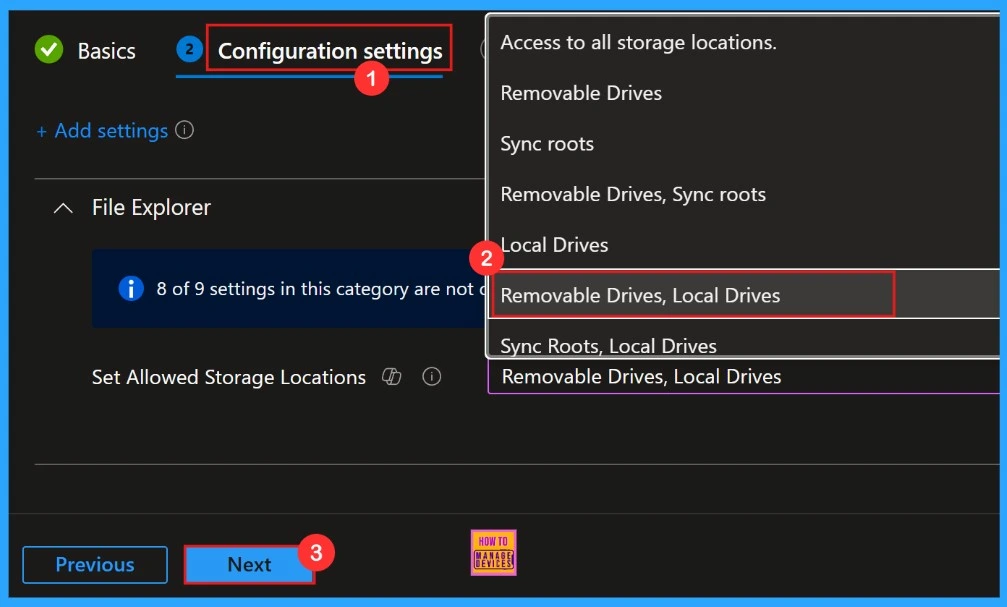
In this part, we need to add a configuration settings as a value. A value that can represent one or more storage locations in File Explorer. If not specified, the default is access to all storage locations. Here we select the value as Removable drives and Local drives.
Scope Tags
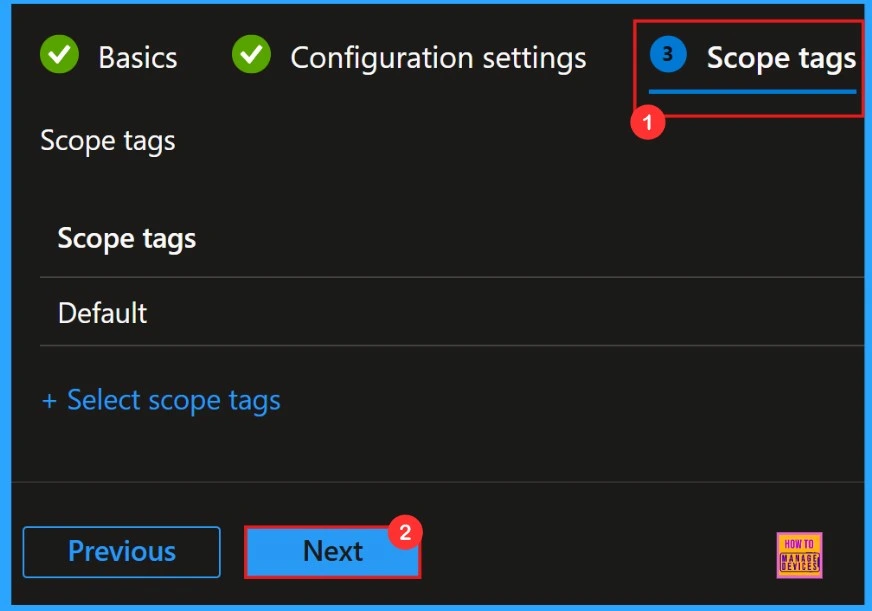
The next section is the Scope tag which is not a mandatory step. It helps to assign this policy to a defined group of users or devices. Actually, Scope tags are a filtering mechanism that restricts access to policies, configurations, and devices in IT management systems. To skip this section is preferable.
Assignments
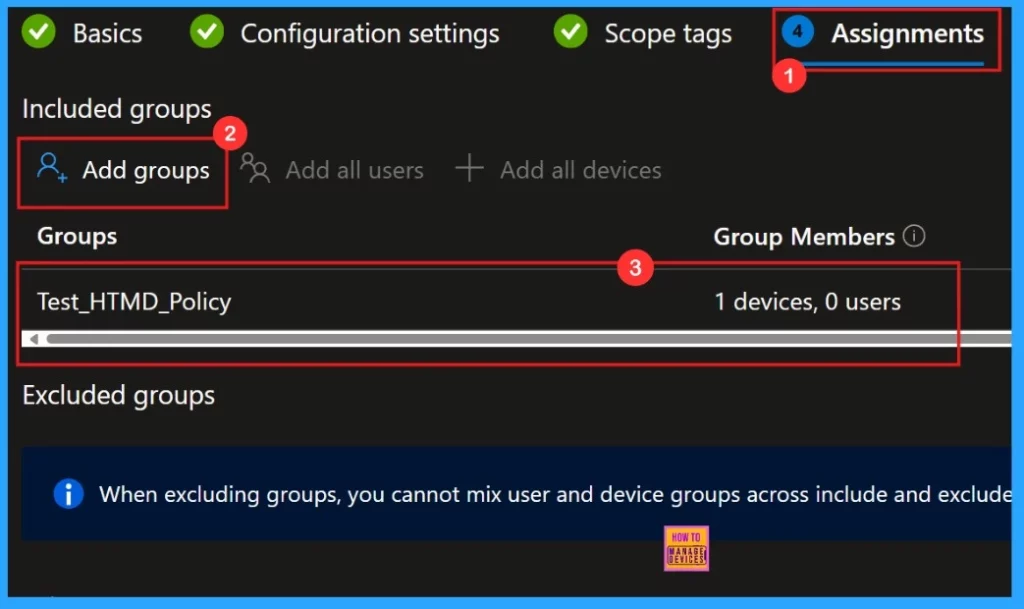
We need to add groups in this section. The assignments in Microsoft Intune determine which users or devices a policy applies to. The selected group will show on the assignment page. Then, click Next to continue.
Review + Create
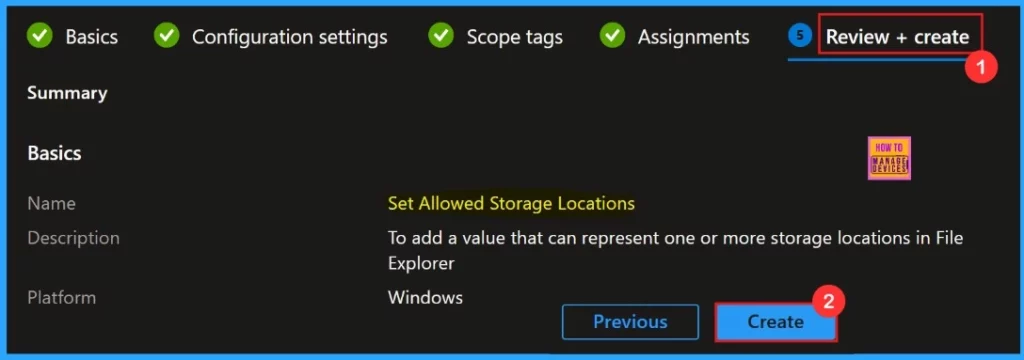
This part is gives us a summary of what the details are we have given for the policy creation. Because, Review + Create is the final step of a policy deployment. We can go through it and confirm all the information given was correct. when all seems good, just click “Create“.
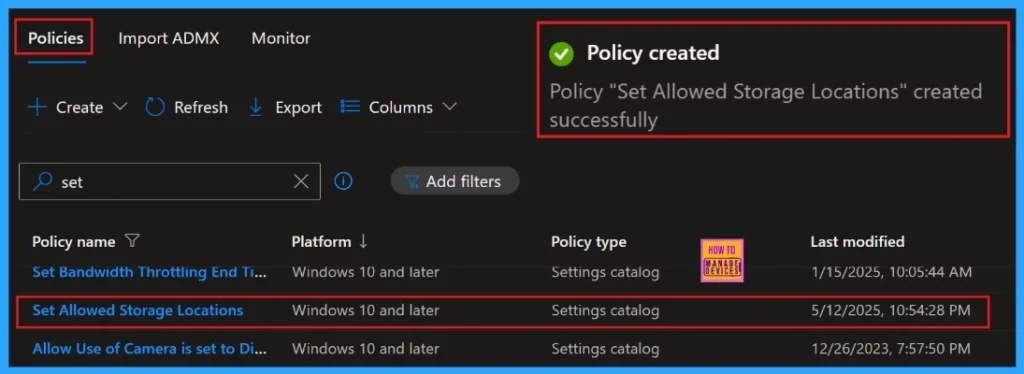
A pop-up notification will appear on the screen after clicking the Create button. The message notify that the policy Set allowed Storage Locations created successfully.
Monitoring Status
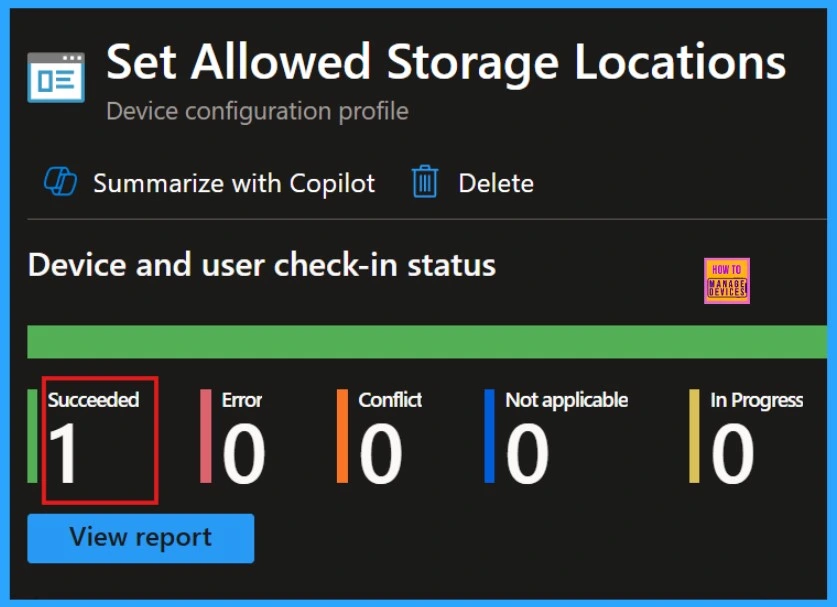
To check the monitoring status, sign in to the Microsoft Intune Admin Center. Then, go to Devices > Configuration Policies. In the Configuration policies section, search for the policy we created, that is “Set allowed Storage Locations”. We can find the result as 1 Succeeded.
Client-Side Verification
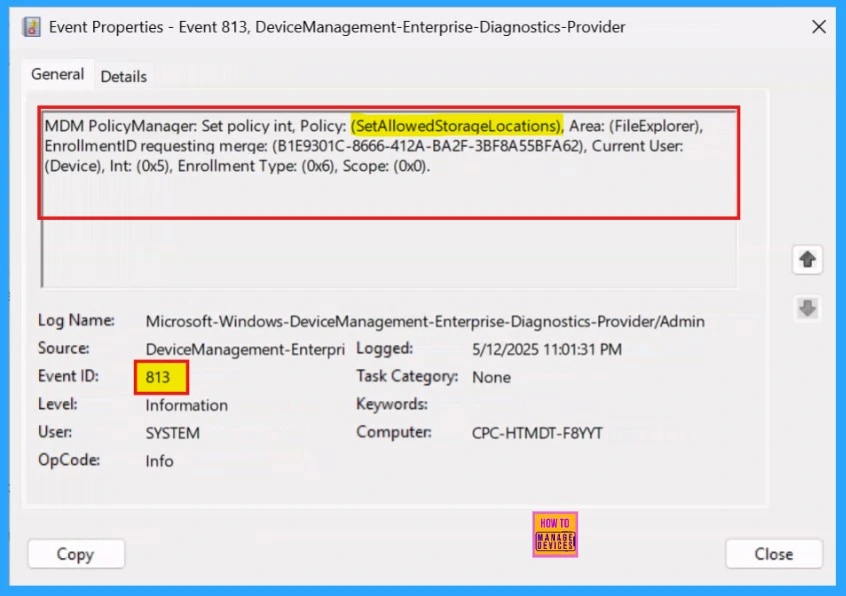
By accessing Event Viewer we can easily complete the Client Side Verification. Need to open the Event Viewer on the assigned device.
MDM PolicyManaqer: Set policy int, Policy: (SetAllowedStoraqeLocations), Area: (FileExplorer), EnrollmentlD requestin merqe: (B1E9301C-8666-412A-BA2F-3BF8A55BFA62), Current User: (Device), Int: (0x5), Enrollment Type: (0x6), Scope: (0x0).
- Go to Applications and Services Logs > Microsoft > Windows > Devicemanagement-Enterprise-Diagnostics-Provider > Admin to open it then, we can see the success event ID in 813.
How to Remove Assigned Group from Set Allowed Storage Locations Policy
Removing an assigned group from a policy is sometimes necessary for security, compliance, or operational efficiency. The below screenshot shows how we can remove an assigned group from the policy. After the removal we need to click Review + Save, so that the changes we made is saved.
For more details – Learn How to Delete or Remove App Assignment from Intune using Step by Step Guide

How to Delete Set Allowed Storage Locations Policy from Intune
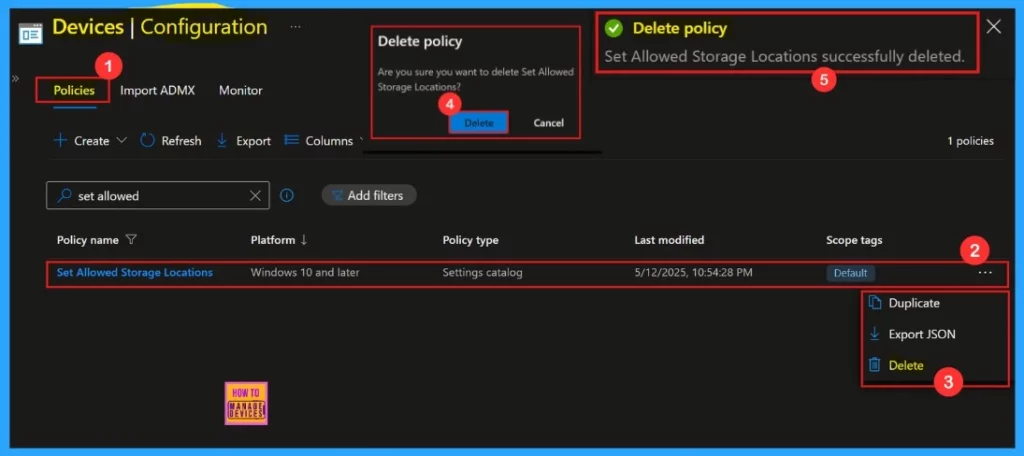
Now, we are going to see the steps for deleting a policy. Deleting a policy in Microsoft Intune is sometimes necessary for security, compliance, or operational efficiency. We need to search for our policy under “Policies” then find the three dot option, there we can find the delete.
After clicking the delete icon, a confirmation message will pop-up for deletion of the policy. The below screenshot shows details view of how we can delete the policy.
For more details- How to Delete Allow Clipboard History Policy in Intune Step by Step Guide
Need Further Assistance or Have Technical Questions?
Join the LinkedIn Page and Telegram group to get the latest step-by-step guides and news updates. Join our Meetup Page to participate in User group meetings. Also, Join the WhatsApp Community to get the latest news on Microsoft Technologies. We are there on Reddit as well.
Author
Anoop C Nair has been a Microsoft MVP for 10 consecutive years from 2015 onwards. He is a Workplace Solution Architect with more than 22+ years of experience in Workplace technologies. He is a Blogger, Speaker, and Local User Group Community leader. His primary focus is on Device Management technologies like SCCM and Intune. He writes about technologies like Intune, SCCM, Windows, Cloud PC, Windows, Entra, Microsoft Security, Career, etc.


After applying the configuration (option 6, ‘Sync Roots, Local Drives’, in my case), Explorer.exe starts to crash. The desktop freezes and the taskbar disappears. The desktop starts again, but explorer.exe crashes again. This cycle continues until the laptop is restarted. After logging in, the same crashes start again. I tried it on two laptops, but the problem persisted. After removing the configuration, everything went back to normal. Any ideas?