Today, I will explore Sysprep Capture Windows 10 Image using DISM. This post will teach you how to run Sysprep to capture Windows 10 or Windows 11 Images using the DISM (Deployment Image Servicing and Management) Tool. Several steps are required during the image capture process.
DISM is a command-line tool that can service a Windows image or prepare a Windows Preinstallation Environment (Windows PE) image. DISM is in the c:\windows\system32 folder of all Windows 10 or Windows 11 installations, but you can run DISM in the command prompt from any location.
DISM is a valuable tool when traditional Windows Image deployments using Microsoft Deployment Tools like SCCM (Configuration Manager) or MDT (Microsoft Deployment Toolkit) are not feasible. While Windows Image deployments are commonly preferred in organizations, specific policies implemented within the environment can restrict the execution of capture Task Sequences, limiting the deployment options.
In such scenarios, DISM provides an alternative solution for managing Windows Images. It allows administrators to perform various operations, including image servicing, mounting, adding or removing drivers, enabling or disabling features, and applying updates.
DISM offers a command-line interface that provides granular control over Windows Image management, even when capture Task Sequences are inaccessible. By leveraging DISM, organizations can overcome the limitations imposed by policies and still make necessary changes to Windows Images.
- How to Solve Sysprep Error 0x80073cf2
- Free Generic Windows 10 Product Keys from Microsoft
- Deploy Windows Captured Image Using SCCM And MDT
- Windows 10 With Cortana For India More New Features
What are the Benefits of using Sysprep?
Using Sysprep (System Preparation) in Windows offers several benefits when preparing a system for deployment or imaging. Here are some key advantages:
Remove system-specific data from Windows: Sysprep can remove all system-specific information from an installed Windows image, including the computer security identifier (SID). The Windows installation can then be captured and installed throughout an organization.
Configures Windows to boot to Audit mode: Audit mode enables you to install third-party applications and device drivers and test the computer’s functionality.
Configures Windows to boot to Windows Welcome: Configures a Windows installation to boot to Windows Welcome the next time the computer starts. You configure a system to boot to Windows Welcome immediately before delivering the computer to a customer.
Resets Windows Product Activation: Sysprep can reset Windows Product Activation up to three times.
What is SysPrep?
Sysprep (System Preparation) prepares a Windows installation (Windows client and Windows Server) for imaging, allowing you to capture a customized structure. Sysprep removes PC-specific information from a Windows installation, “generalizing” the structure to be installed on different PCs.
With Sysprep, you can configure the PC to boot to audit mode, where you can make additional changes or updates to your Image. Or, you can configure Windows to boot to the Out-of-Box Experience (OOBE).
Limitations –SysPrep
While Sysprep is a useful tool for preparing Windows systems for deployment, it does have some limitations that are important to be aware of:
- You must use only the Sysprep version installed with the Windows image you intend to configure.
- Only an administrator can run Sysprep.
- Only one instance of Sysprep can run at a time.
- Sysprep must not be used on upgrade installation types. Run Sysprep only on clean installations.
- The Sysprep tool runs only if the computer is a workgroup member, not a domain. If the computer is joined to a domain, Sysprep removes the computer from the domain.
- You can run
Sysprepcommand up to 1001 times on a single Windows image. After running Sysprep 1001 times, you must recreate your Windows image.
Prerequisites –SysPrep
Software Requirements
- Hyper-V
- Windows Operating System ISO
- Windows ADK to create a WinPE ISO (Download)
Overview – Windows Capture Process
The following steps help you perform the Windows capture once you have the prepared machines with all prerequisites and customizations.
- Run Sysprep Utility.
- Boot a virtual machine in WinPE.
- Run DISM Command to capture the image and store the image either to network share/USB storage.
- Once the process is completed, you will get a Windows Image (.wim) file.

Create WinPE ISO
The next step is to create a WinPE ISO to use with Virtual Machine. To create a WinPE (Windows Preinstallation Environment) ISO, follow these steps:
- Open the Start menu and search for “Deployment and Imaging Tools Environment”.
- Right-click on the result and select “Run as administrator”.

Create a working directory for WinPE, Choose a location on your computer where you want to create the WinPE files. In the command prompt, enter the following command to create the WinPE files: copype amd64 C:\path.
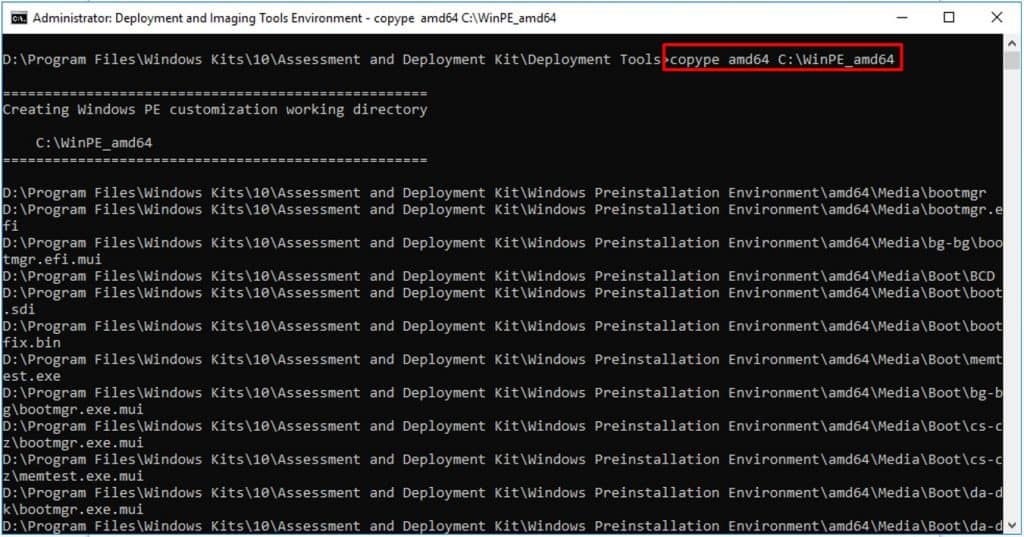
Here I run the below command for copies of amd64 boot files.
copype amd64 C:\WinPE_amd64
Started creating Windows PE working directory in the specified location.
Once the Windows PE working directory is successfully created, use MakeWinPEMedia with the /ISO option to create an ISO file that contains the WinPE files.
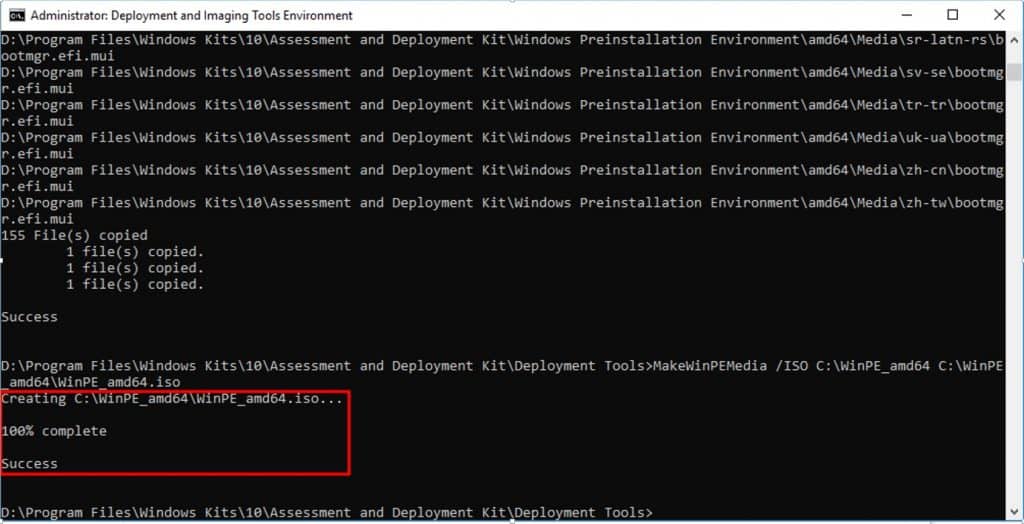
MakeWinPEMedia /ISO C:\WinPE_amd64 C:\WinPE_amd64\WinPE_amd64.iso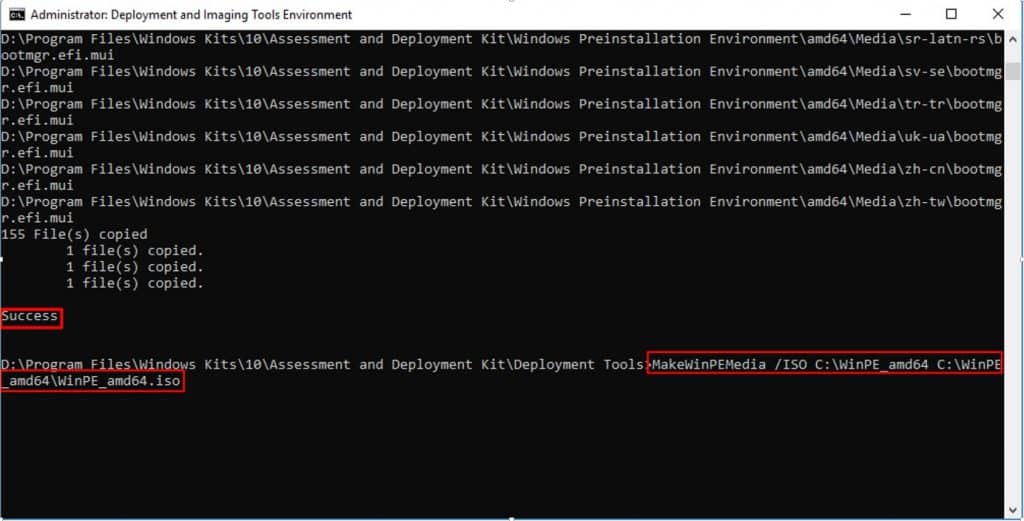
The WinPE ISO has been successfully generated.
Why do We Need a Virtual Machine to Prepare for Capturing?
Using a virtual machine for preparing Windows image captures offers a range of benefits, including isolation, testing capabilities, repeatability, minimal impact on production environments, portability, and improved time and resource efficiency.
It provides a safe and controlled environment for customization and configuration, ensuring a smooth and reliable process for capturing Windows images. Virtual machines provide a snapshot feature that allows you to save the state of the virtual machine at a specific point in time.
Tips! Building an image from a VM allows you to use Checkpoint/state restores. With checkpoint, you can revert your operating system state to any saved state later, which is useful to run right before you begin the capture process. That is a value-added feature for experimenting with software or tweaks that may cause operating system problems.
Capturing an image from hardware will result in driver injection failure on several new models. When building a universal vision for deployment, you do not want any hardware-specific configurations in your Image.
Additional Tips & Tricks
While preparing the System to capture, you have to consider these steps.
- Perform a clean installation of the Windows Operating System.
- During installation, create a local Administrator account.
- After installation is complete, log in to the System with a created local Administrator account.
Before connecting with the network, ensure that the Windows store apps do not get automatically updated.
Apply Local GPO Computer Configuration/Administrative Templates/Windows Components/Store Enable -Turn off Automatic Download and Install of updates policy
Perform ‘Prepare for image capture’ prerequisite tasks
- Check for Windows updates to install the latest patches to the System.
- Don’t include drivers in the captured Image.
- Don’t install any Microsoft Store apps using the Microsoft Store.
- Verify that necessary applications, updates, and language packs are installed on Windows, configure the Time Zone, and validate other system personalization.
- Before you start capturing, clean up your System.
- Remove Quick Access history from File Explorer.
- Run Disk Clean-up, and empty the Recycle Bin. Some other common directories that can be cleaned up include %LocalAppData%\temp, C:\Windows\Temp.
- Delete all profiles before running SYSPREP. The only profiles that should be in WIM are Administrator and Default.
- Remove unwanted Built-in apps from Windows Store.
Why Should We Generalize the Image?
We need to generalize the Image to remove unique specific information, replace the Computer SID related to an image and make it ready for deployment on different platforms.
Generalize Image and Run Sysprep
Insert Disk to mount the WinPE ISO (created and explained in the above section) file by providing the path to the ISO file. Booting the prepared Image in WinPE will be needed to start the capturing.

Once the ISO file is mounted, it will appear as shown below

- Use SYSPREP to prepare the System for capture
- Sysprep can be executed in two modes through the GUI or Command prompt.
GUI Mode
Start the Sysprep.exe utility. Run as administrator located in folder C:\Windows\System32\sysprep directory.

- Tick the Generalize checkbox and select Shutdown options.
- Shutdown – Once Sysprep is complete, the machine will automatically shut down.

Click on OK to start the process.

Sysprep started running. Please wait for a few moments! Once Sysprep completes, the Machine will shut down after processing the changes.

Command Prompt
- Start to command prompt Run as administrator.
- Go to the Sysprep folder to locate the Sysprep utility and type the following command for execution.
Sysprep.exe /generalize /oobe /shutdown
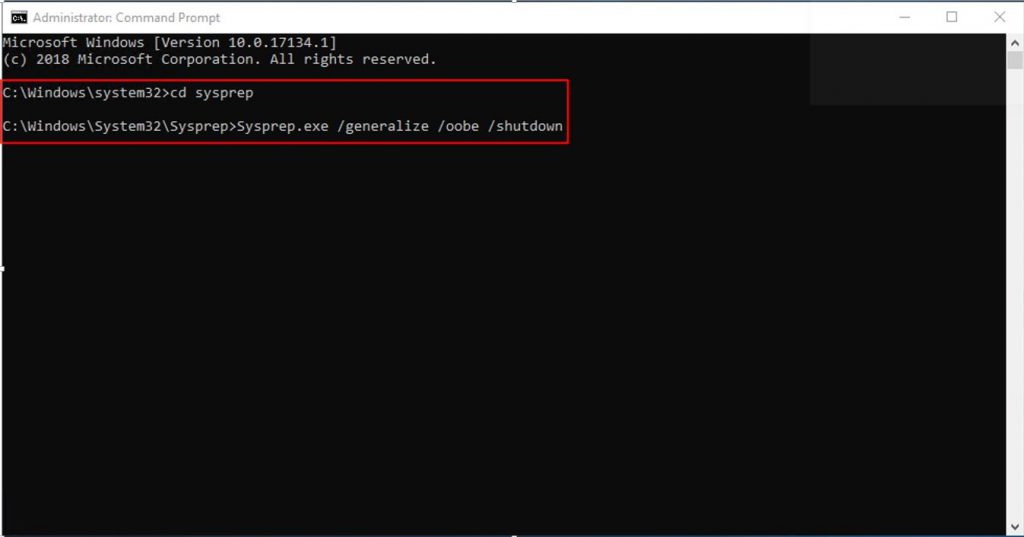
Sysprep started running. Please wait for a few moments! Once Sysprep completes, the Machine will shut down after processing the changes.

The System generalizes the images and shuts down. Start the Virtual Machine. Your virtual Machine should appear like this.

Capture Windows Image after Generalize
Boot the virtual machine with Windows PE media.
You may be prompted to “Press any key to boot from CD or DVD…..“. Go ahead and press the key.
Important: You may need to click inside the window to ensure your keystrokes are sent to the Virtual Machine.
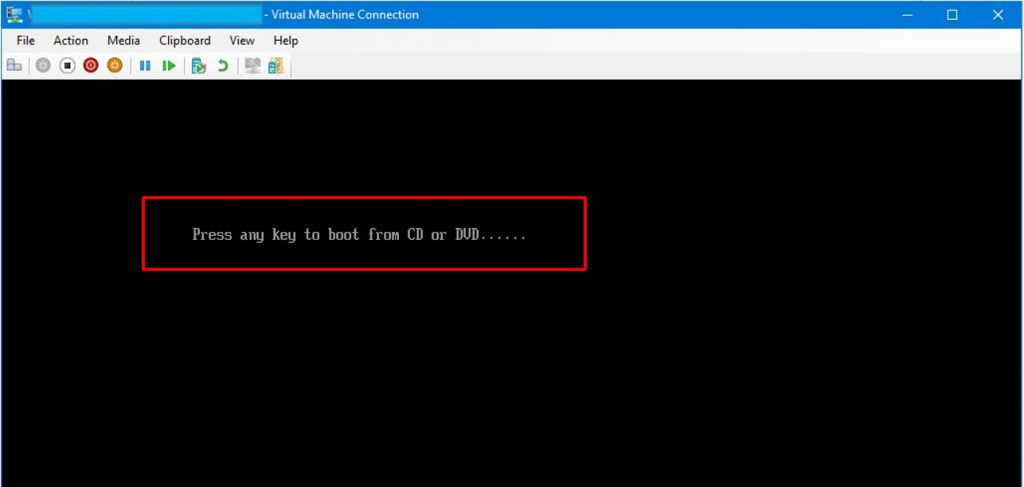
The Machine should boot to the Command prompt for PE, identified as X:\

Important! The System must be connected with a stable network to save the image file to the network share.
- Identify the network IP address where you will keep the captured Image.
- Use the net use command to map a network-shared folder to save the image.
- If prompted, provide the user credentials for the connection.

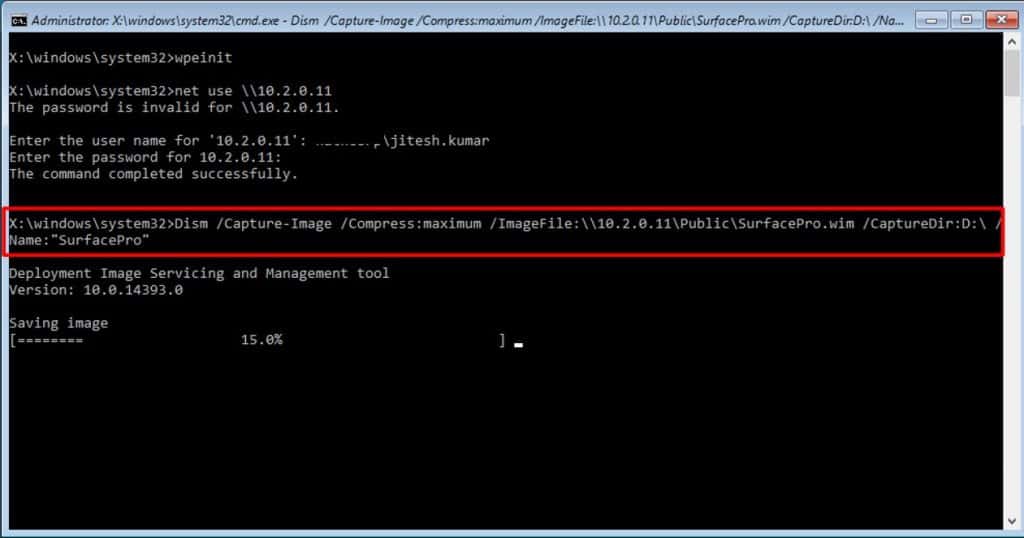
Run the following Dism command to capture the Windows partition. For Example :
Dism /Capture-Image /Compress:maximum /ImageFile:\\<NetworkSharePath>\SurfacePro.wim /CaptureDir:D:\ /Name:"SurfacePro"
/ImageFile: Specifies the file’s path where the Image will save.
/Compress: Specifies the type of compression used for the initial capture operation. The maximum option provides the best reduction.
/CaptureDir: Specifies the directory to which the Image was applied.
Note: Assigning drive letters to partitions is handled by WinPE when it first boots up, normally assigns the System Reserved partition a drive letter C: and the OS partition a drive letter D:
Here the image capture is running.
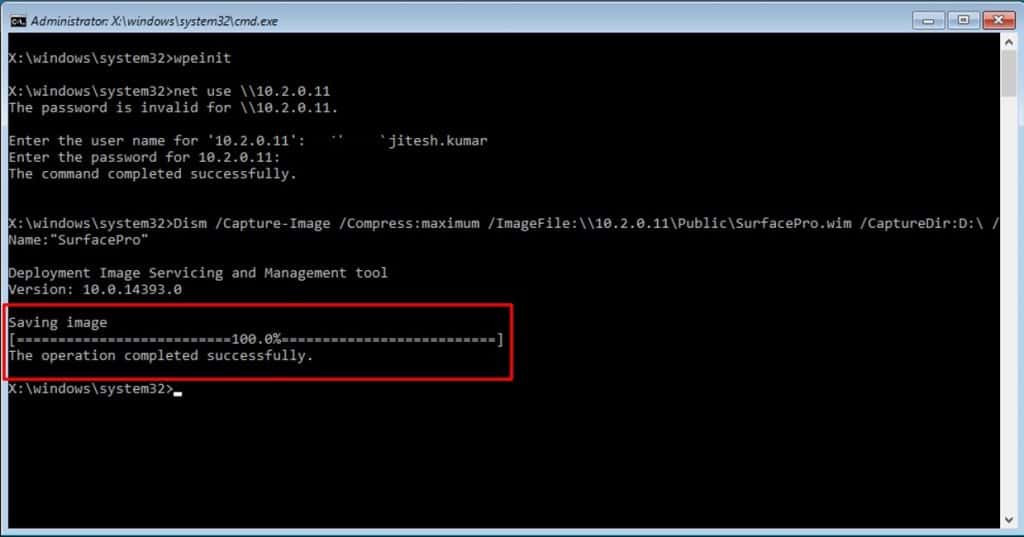
The Image file is successfully captured in a shared folder, Copy the Image and use it for deployment.
Deploy Capture Windows Image
We can either use WinPE, Configuration Manager, or Microsoft Deployment Tools to deploy the captured image.
The post will help you manage the deployment of Windows Captured Image & Deploy Windows Image using MDT + SCCM – Deploy Windows Captured Image Using SCCM and MDT.
Troubleshooting
When you update an app from the Microsoft Store, the Windows image will cause Sysprep to fail. That app will become tied to the logged-in user account.
You may encounter an issue when you remove or update a provisioned Microsoft Store app by using the Microsoft Store and then running Sysprep on the computer.

Review the log file at %Windir%\System32\Sysprep\Panther\setupact.log. The following error appears in the log files.
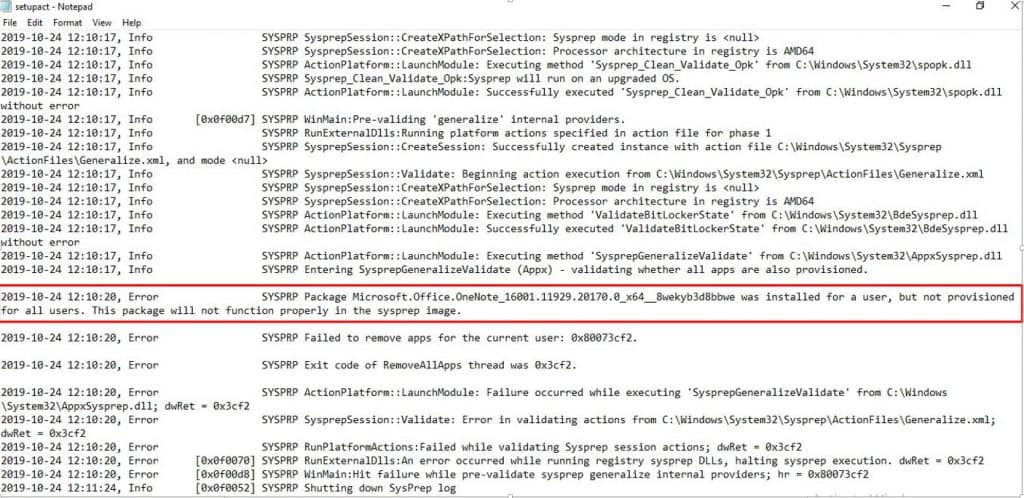
This Microsoft article discusses an issue when removing or updating a provisioned Microsoft store app.
To resolve this issue, remove the appx package for the user. You will get package information from the log file.
- Start Powershell run as administrator.
- Type the following command to remove the package.
- Run
Remove-AppxPackage -Package <packagefullname>from PowerShell.
Resources – Sysprep Capture Windows 10 Image
- Sysprep (System Preparation) Overview
- Windows 10 Update Enhancements Number of Devices Updates Every Hour
We are on WhatsApp. To get the latest step-by-step guides and news updates, Join our Channel. Click here –HTMD WhatsApp.
Author
Jitesh Kumar has over five years of experience in the IT Industry. He writes and shares his experiences related to Microsoft device management technologies and IT Infrastructure management. His primary focus area is the Windows 10 Deployment solution with Configuration Manager, Microsoft Deployment Toolkit (MDT), and Microsoft Intune.

Good work !
Hi,
very interesting.
How do I create a bootable image from USB after running Sysprep?
Hello! Thank you for visiting this link and your valuable comment. You can use MDT or SCCM to import the captured Image (.Wim) and create a bootable USB to deploy OS.
Reference link –
ConfigMgr Standalone Media Creation Guide > https://www.anoopcnair.com/sccm-configmgr-create-standalone-media/
Deploy Windows 10 Image Using Microsoft Deployment Toolkit (MDT) – https://www.anoopcnair.com/deploy-windows-image-using-mdt-sccm/
You looking to deploy only Wim? Feel free to ask any queries in HTMDForum – http://forum.howtomanagedevices.com/
Thanks, Jitesh for your links
Hi Jitesh,
How do I make sure that the Sysprep does not wipe the installed programs
Thanks for your help. Your tutorial was most helpful
Hello, Thank you for your valuable feedback! Sysprep doesn’t wiping the installed programs! But we need to make sure the installed program doesn’t have any dependencies related to license, Activation ID or machine based settings. In that case it might cause an issue! Further installing antivirus product and perform capture isn’t a best practice.
Feel free to ask any queries in HTMDForum – http://forum.howtomanagedevices.com/
Hi Jitesh,
When would you make a full video from scratch about sysprep and capture image to be used as ISO ?
Thanks for your time.
Hello, Thank you for interest and your time to reading the article! We already have one recording session available from HTMD Weekend Learning – you can explore the video guide for more details – https://howtomanagedevices.com/sccm/2304/mdt-deployment-for-windows-10/
We will keep you all posted. Stay connected with us for further update!!
Great , very interessant
Excellent article! I’ve learnt so much in just few minutes from you!
Thank you!
What do I do if my image for the D drive is only 2 kb? I have sysprepped the server OS and followed everything to a T, but for some reason the OS Partition is only 2 kb, but the System Reserved Partition is 311 mb, which sounds right.
Please help.
Hello Sean, At the WinPE Stage Could you please try to launch the Notepad and check the driver where the Image is getting installed. As it could be varied at the WinPE. Generally, the OS driver is indicating with a driver letter D.
It looks like I wasn’t seeing the right drives because the server I am imaging has a Software Raid controller, specifically the Perc S140. I was able to download this driver, and inject it into my WinPE environment using Drvload. Now I can see the array and image it.
My D drive image was so small because it was a partition I had created to store images on my WinPE USB.
Thanks again for the response, and this awesome write up.
Sean
Hello
Where can I get the article to deploy the captured image using WinPE?\
Thanks
Once you have the captured WIM, You only need to boot the device into WinPE as explained and Enter the command to apply the WIM to the device.
Reference link – https://docs.microsoft.com/en-us/windows-hardware/manufacture/desktop/capture-and-apply-an-image?view=windows-11
February 21, 2022
Hello,
I don’t quite understand your steps for “sysprep”, WinPE and DISM.
Assume the computer is “clean”. His hard drive has just been purchased.
So, what are the steps without using a server or virtual machine?
There is an external hard drive attached to the blank computer.
We have:
Windows 10 Pro iso (from the official Microsoft site) on USB key.
You can use Legal or UEFI mode
Steps
1-We start the PC and we go to the BIOS to ask to boot on the USB key.
2-We turn off the PC.
3-We insert the key in the computer and we start again.
4-We see Windows 10 appear and its installation.
Since the goal is to have a Windows image using sysprep:
Do I have to enter an activation key?
Is it mandatory to have a Microsoft account?
Is the Administrator account required or is the creation of an Administrator account, example: Paul, correct?
Do we update Windows 10 before using sysprep?
Next?
C:\Windows\System32\Sysprep\sysprep.exe?
In Audit mode or OOBE?
We want to add Microsoft Office and other software and have them in the picture. When should it be done?
Thank you
Hi Paul, I am assuming all the steps are added in the post sequently! If you’re trying to capture an image from physical hardware, recommended using Virtual machines to prepare a generic image.
Do I have to enter an activation key? – You can add an activation key while deploying an image.
Is it mandatory to have a Microsoft account? No
Is the Administrator account required or is the creation of an Administrator account, example: Paul, correct? If you’ll use (for example Paul) the account will be appearing for all users who’ll be going to use the same image if you not deleting the account, It’s best to use the Inbuilt administrator account to perform! Note: Using multiple accounts in the device may prevent performing Sysprep.
Do we update Windows 10 before using sysprep? It’s best to update the image.
You still have any questions, you can add to HTMDForum.com | We’ll happy to help you.
Hi Jitesh Kumar,
Just a quick question, my Capturing only took 1 second, and it’s only 300M, is that right?
Thanks,
Hello, I don’t think! The size of the image would be that around. Could you please validate whether you’re capturing the correct disk! If you’re at WinPE, you can Open Notepad in command prompt windows and browse to the local disk drive.
Hi,
Thank you for taking the time out to show us DISM.
I am having an issue and when I try to sysprep the image it works, but sysprep moves very quickly.
I am not sure why and I only get about 250mb file and that’s it. I know it’s bigger than that.
I am trying to remember why sysprep moves rather quickly when it’s capturing the image.
Any help I would definitely appreciate it.
When I create a task sequence to install this image, I get error code 0x80070490 during task sequence step ‘Apply Operating System’
I understand the whole reason for a generalized basic image to be used system wide under the umbrella of your system as it were but if it is so generalized that there is not one identifying piece of data within the image why can’t the image just be bought and sold as a general image not customized going through this whole system prep process seems like a waste of time if there’s a generalized image somewhere I’ll take it then I can change it to my own but to have to go through this process seems a little unwieldy and maybe I’m missing the whole point of that but it seems like a large process to get a generalized can of soup that anybody can make and I guess my question at the end of the day is why go through this process to make a generalized image when that doesn’t matter it’s gonna be your own thing in and anyway just do windows the way windows is
Does a computer have to be activated in order to sysprep it?
The capture command that JK uses is not correct for most machines.
Dism /Capture-Image /Compress:maximum /ImageFile:\\\SurfacePro.wim /CaptureDir:D:\ /Name:”SurfacePro”
In my case the CaptureDIR command had to be C which is where the image is located. So I had to use this. Dism /Capture-Image /Compress:maximum /ImageFile:\\\SurfacePro.wim /CaptureDir:C:\ /Name:”SurfacePro”
Hi,
Just want to say this guide is GREAT. I am new to imaging and SCCM but this has saved my life! Thank you!