Hi, Let’s learn how to Prevent Users from Adjusting Desktop Toolbars using Intune Policy. As you all know that toolbars are important part of devies. You know Toolbas are the graphical interface called GUI it act as a important role to the operating system.
As you know that setting catlog is one of the best feature in Intune with that admins can deploy diffrent types of policies over the Organizations. In this post, we are deploying how to Prohibit Adjusting Desktop Toolbars for User.
Toolbars make software easier to use and more productive by grouping commonly used tools in one place. This helps users work faster and handle tasks more easily. Some times users can change toolbars like resizing or rearranging them can cause problems like disrupted workflows, and security risks.
Setting policies to stop these changes helps organizations keep a uniform and secure setup, improving efficiency. Organizations can set a policy to stop users from changing the size of desktop toolbars or rearranging items on docked toolbars. This helps create a same look for all users, making IT management easier and reducing difficulties.
Table of Contents
What Does this Setting Do Regarding Desktop Toolbars?
It prevents users from changing the length or repositioning items on docked desktop toolbars, but still allows them to add or remove toolbars.
Adjusting Desktop Toolbars for User– Windows CSP Details
Above we discussed a lot of things about the Desktop toolbars and why it’s important to manage toolbars on Desktop. Now the point is how this policy to be configured into the Intune. Now, let’s explore Configuration Service Providers (CSPs) in more detail.
CSPs are similar to Group Policy extensions ,providing administrators with a powerful way to manage specific settings efficiently
| Property Name | Property Value |
|---|---|
| Format | chr (string) |
| Access Type | Add, Delete, Get, Replace |
./User/Vendor/MSFT/Policy/Config/ADMX_Desktop/sz_DB_Moving

- Troubleshooting Steps to Restore Missing Microsoft Edge Browser Toolbar
- Add or Remove the Copilot Toolbar Icon in Microsoft Edge
- Drag Teams Presenter Toolbar during Screen Sharing Frustrating Experience is Going to End Soon
Create a Profile
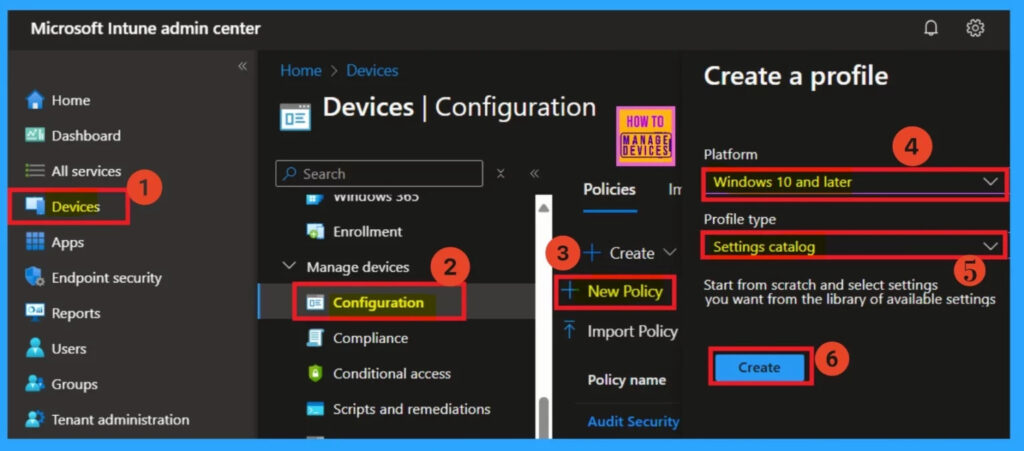
First you have to sign into the Microsoft Intune admin center and navigate through Devices> Configuration>New Policy. The platform is set to the Windows 10 and later and the Profile type as setting catalog. then click on the Next.
Basics
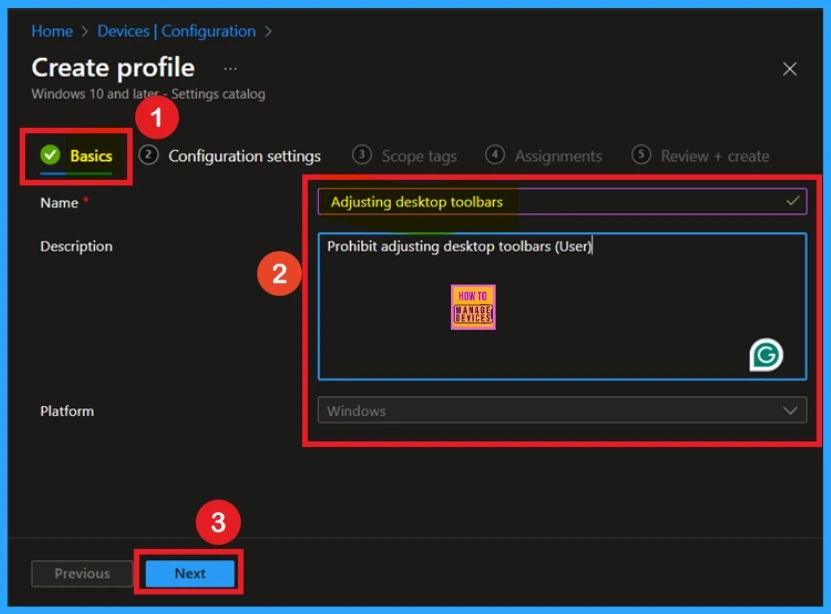
The next step is understanding the basics. You need to enter the basic details of the policy, including the name, description, and platform information. The “Name” field is mandatory, and you must provide a policy name. In this case, I entered the policy name as “Adjusting Desktop Toolbars.”
For the description, ensure you add a meaningful explanation to easily identify the policy later. The platform is preselected as Windows by default. Once these details are entered, click Next.
Configuration Setting- Settings Picker
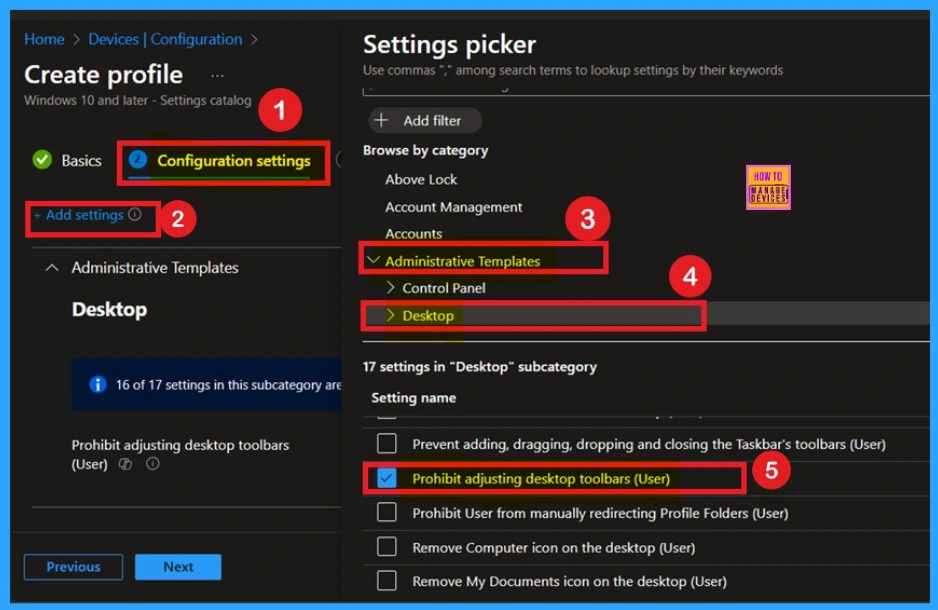
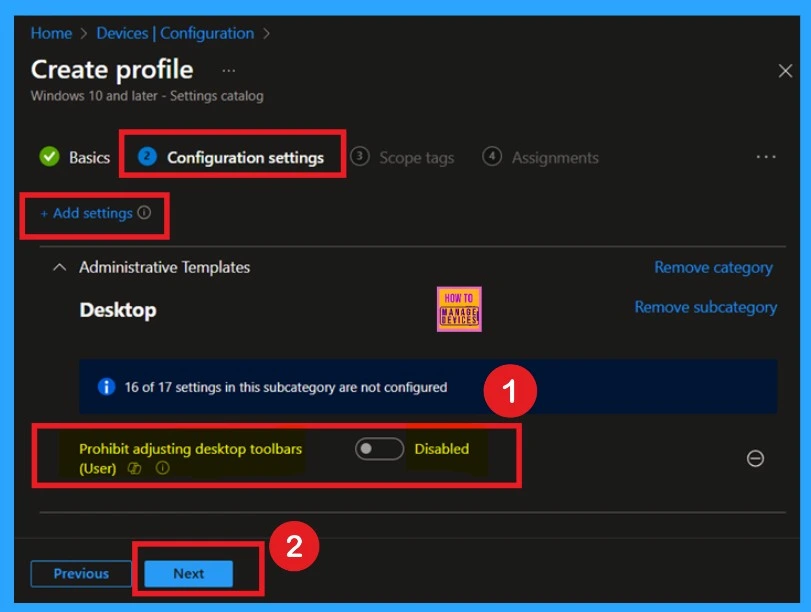
The next step involves accessing the configuration settings. In the configuration settings, you will see a blue-colored + Add Settings option. Click on it to open the Settings Picker window. In the Settings Picker window, expand the “Administrative Templates.” Within the administrative templates, select the “Desktop” option.
Under the desktop option, you will find a list of settings. From this list, choose the “Prohibit Adjusting Desktop Toolbars for Users” option. Finally, close the configuration page.
Disable Adjusting Desktop Toolbars for User
When you close the “Prohibit Adjusting Desktop Toolbars for Users” option, you will see the settings appear in your configuration policies window. Here, you’ll notice that the policy is disabled by default. If you want to configure this policy in its current state, meaning with the disabled format, you can click “Next” to continue.
Enable Adjusting Desktop Toolbars for User
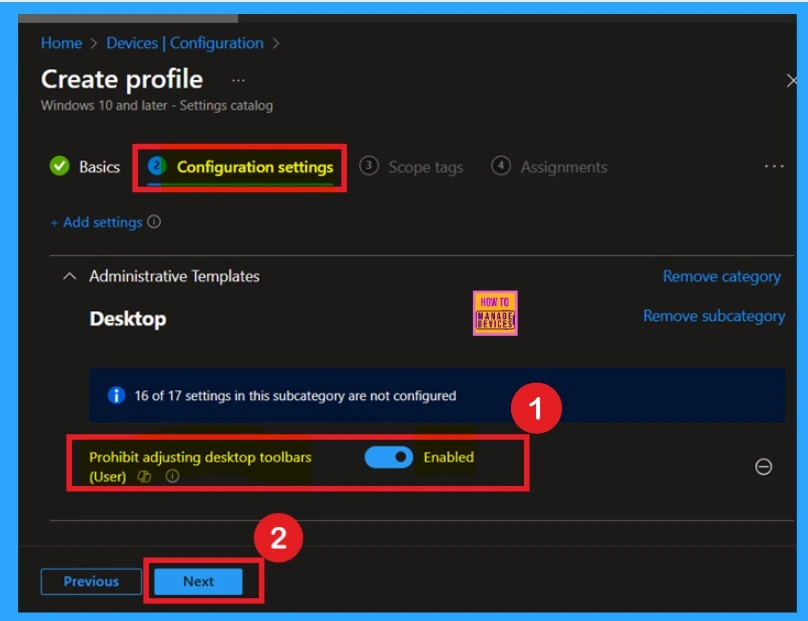
If you want to enable this policy, you can find the settings name in the configuration settings window. Here, you need to toggle the pane from left to right, which will turn it blue. This indicates that the policy is now enabled. After that, you can click “Next” to proceed.
Scope tags
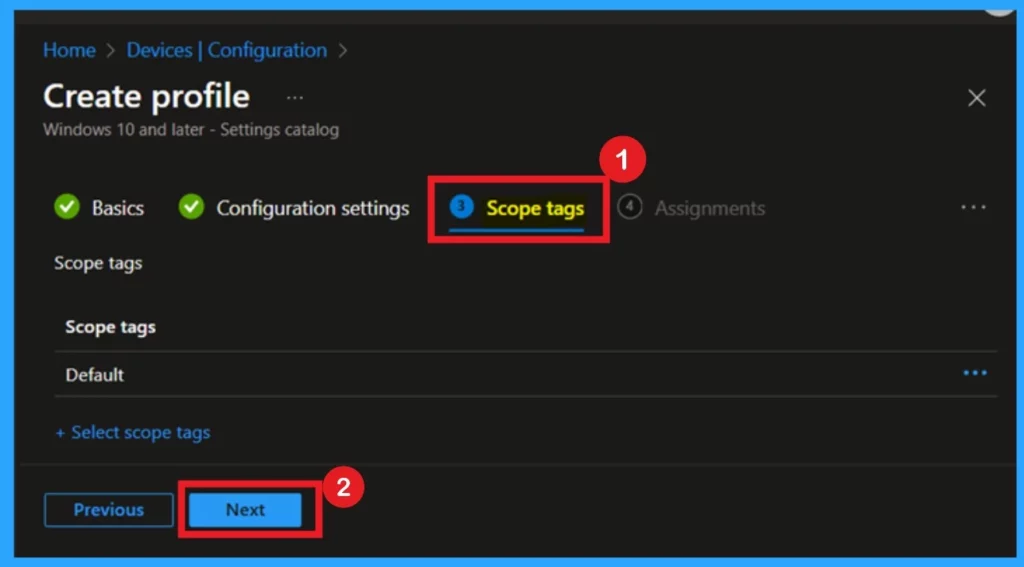
After the Configuration tab, you’ll reach the Scope tags section. This step gives you the option to assign a scope tag to the policy, which can help with organizing and filtering policies within your organization. Adding a scope tag is optional. If you don’t need it, you can simply skip this step.
- Once you’ve made your choice, click Next to continue to the next stage of the setup
Assignments
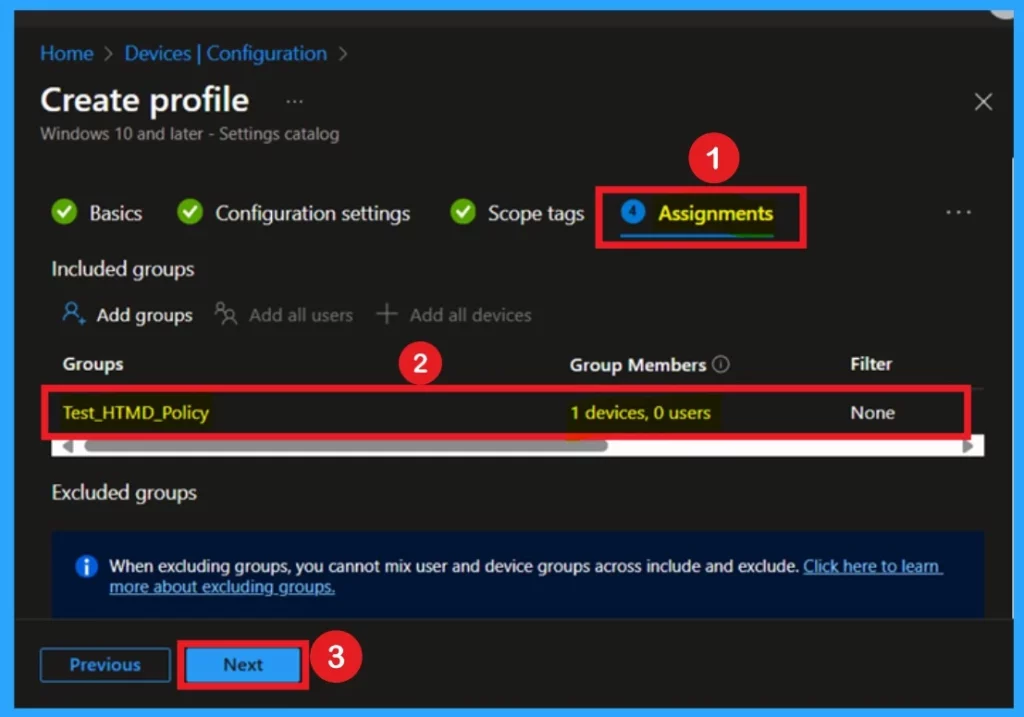
The next step is the Assignments tab, which is crucial for deploying the policy. Here, you’ll choose the group(s) that the policy should apply to. To get started, click Add Groups under the Include section.
A list of available groups will appear you can simply select the group(s) you want to target, and they’ll be added to your assignment list. Once you’ve made your selections, click Next to further proceeding.
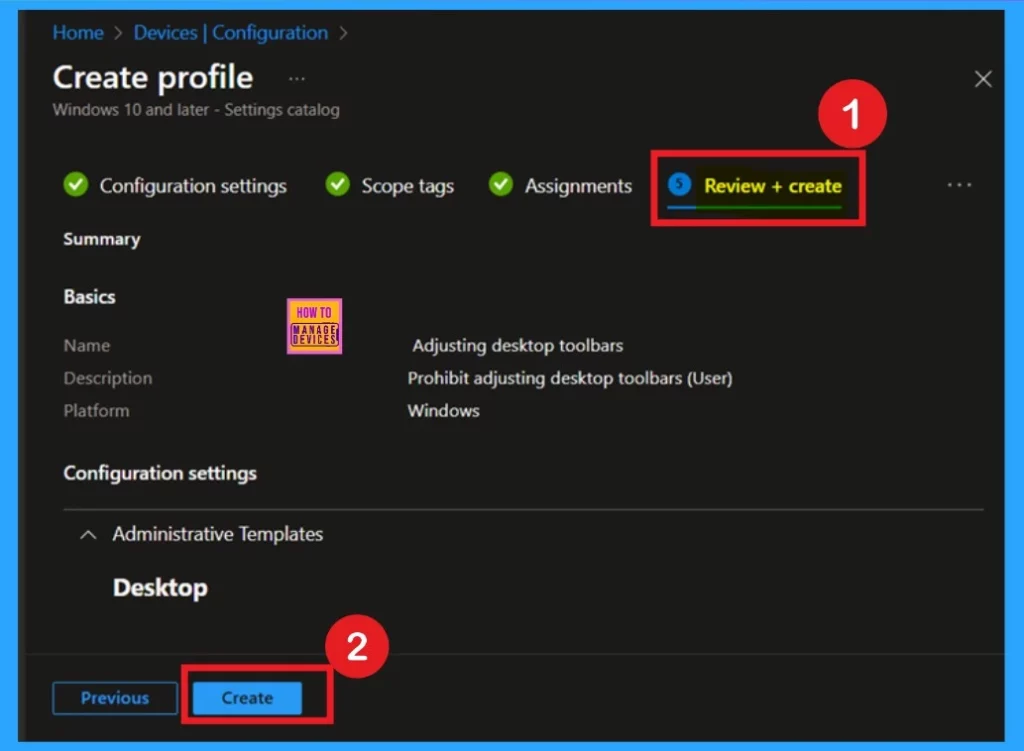
Review + Create
After completing the Assignments step, you’ll reach the Review + Create, the final step in the policy creation process. This section provides a summary of all your configured settings, including basic details, configurations, and assignments. Take a moment to carefully review everything.
If all the information looks correct, go ahead and click Create. Once done, you’ll receive a confirmation notification indicating that the policy has been successfully created.
Monitoring Status
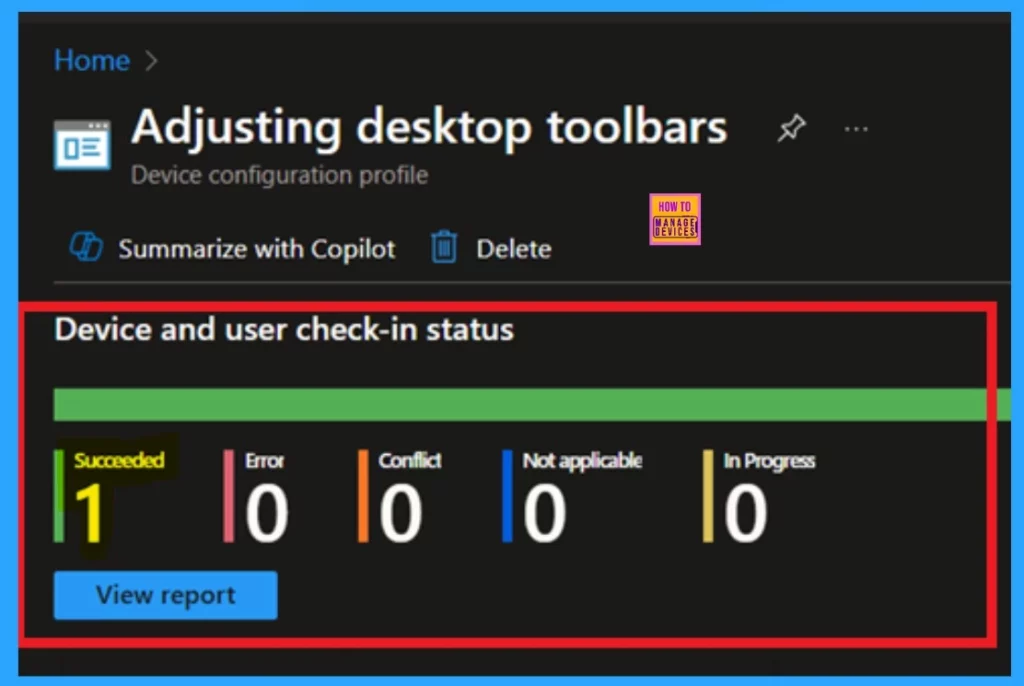
When a new policy is created for a device, it can take up to 8 hours to apply automatically. However, you can accelerate the process by manually syncing the device. Once the sync is complete, you can verify that the policy has been applied by checking its status in Microsoft Intune.
- To confirm, navigate to Devices > Configuration profiles, then select the specific policy to view its deployment status.
Client Side Verification through Event Viewer
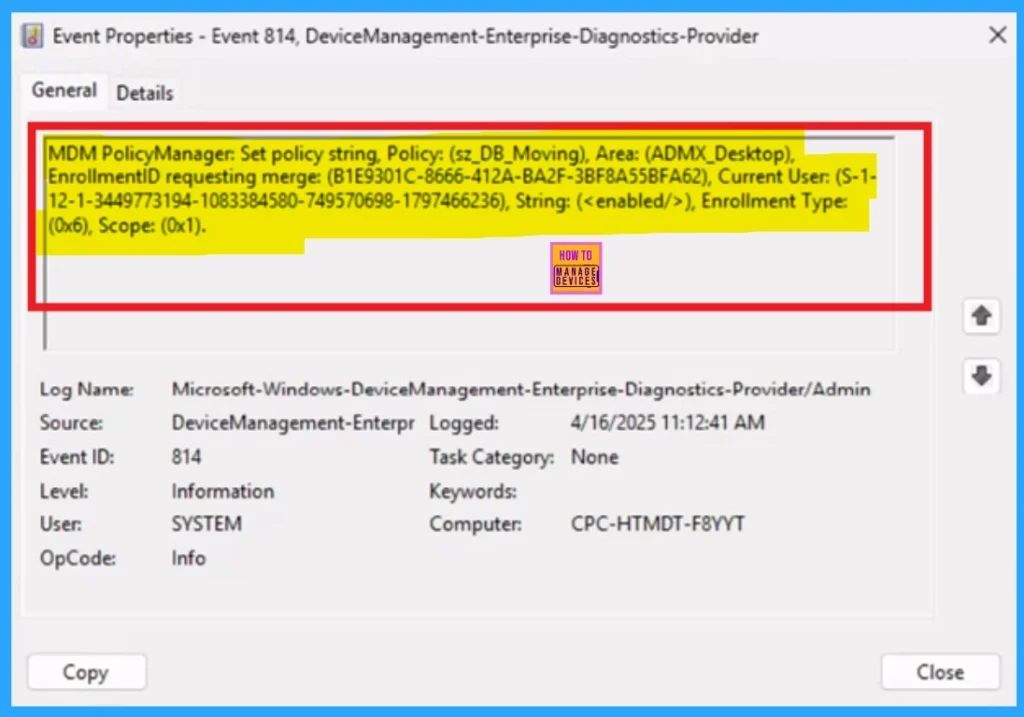
To, monitor the status of Intune, you can use the Event Viewer. First, go to Start and type Event Viewer. Then, navigate to Application and Services Logs > Microsoft > Windows > DeviceManagement–Enterprise–Diagnostics–Provider > Admin.
- In the right pane, click Filter Current Log, enter 814 in the Event IDs field, and click OK to filter the logs.
| Policy Details |
|---|
| MDM PolicyManager: Set policy string, Policy: (sz_DB_Moving), Area: (ADMX_Desktop), EnrollmentiD requesting merge: (B1E9301C-8666-412A-BA2F-3BF8A55BFA62), Current User: (S-1- 12-1-3449773194-1083384580-749570698-1797466236), String: (), Enrollment Type: (0x6), Scope: (0x1). |
Need Further Assistance or Have Technical Questions?
Join the LinkedIn Page and Telegram group to get the latest step-by-step guides and news updates. Join our Meetup Page to participate in User group meetings. Also, Join the WhatsApp Community to get the latest news on Microsoft Technologies. We are there on Reddit as well.
Author
Anoop C Nair has been Microsoft MVP for 10 consecutive years from 2015 onwards. He is a Workplace Solution Architect with more than 22+ years of experience in Workplace technologies. He is a Blogger, Speaker, and Local User Group Community leader. His primary focus is on Device Management technologies like SCCM and Intune. He writes about technologies like Intune, SCCM, Windows, Cloud PC, Windows, Entra, Microsoft Security, Career, etc.
