Running Out of updates? It’s Time to Upgrade your Operating System to Windows 10 1909 Upgrade. Let’s learn how to create and upgrade Windows 10 Task Sequence.
Various Windows 10 deployment scenarios are available to install the latest version of Windows 10 1909. To successfully deploy the latest operating system and choose among those options, It’s important to understand the capabilities and limitations.
In this post, I will explain how to use Modern deployment methods (In-Place Upgrade), which are supported by existing deployment tools such as Microsoft Deployment Toolkit (MDT) and Microsoft Endpoint Configuration Manager (MECM).
The in-place upgrade provides a simple, automated process that leverages the Windows setup process to automatically upgrade from an earlier version of Windows. This process automatically migrates existing data, settings, drivers, and applications.
Microsoft has built-in extremely robust fallback options. If something goes wrong, the In-place Upgrade can easily revert the Windows Update to the previous version by returning to an earlier build. The Process can be automated and handled remotely with deployment tools.
Prerequisites – Windows 10 1909 Upgrade
Create a Windows 10 operating system upgrade package from the latest Windows 10. Check the Windows 10 – Release Information
Make sure that your device has enough space. Upgrading to a 32-bit OS requires at least 16 GB of free disk space, or 20 GB for a 64-bit OS.
Supported Deployment Tools –
You must use Configuration Manager 1906 or 1910 for Windows 10 1909 upgrade.
It is always recommended to use the latest version to experience the best features.
Learn about the supported Windows 10 versions for Configuration Manager. Check Microsoft Blog.
Windows 10 Upgrade Process – Overview
The upgrade process consists of four phases: Downlevel, SafeOS, First boot, and Second boot. The computer reboots once between each step.
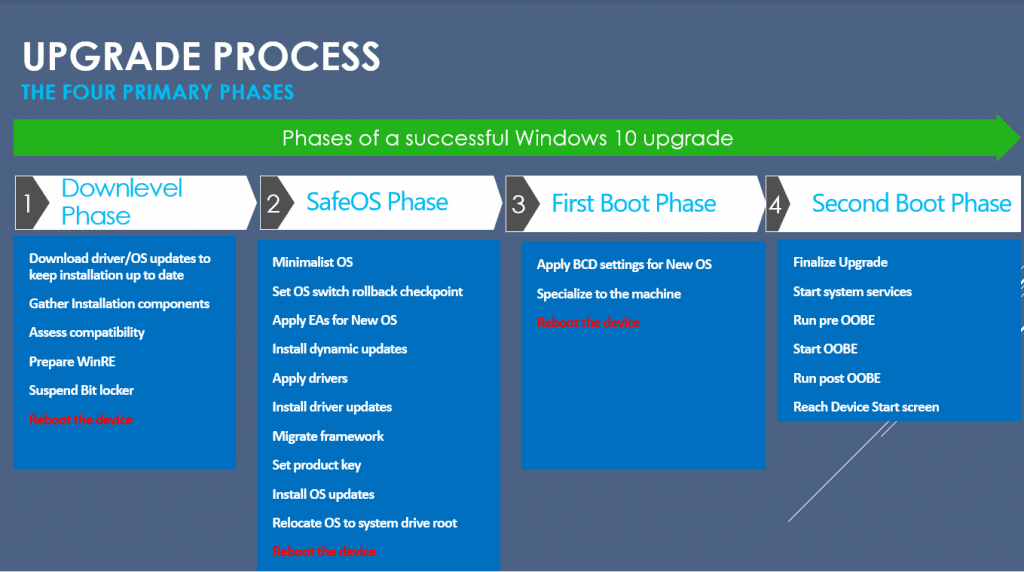
What are the upgrade paths available?
You can upgrade to Windows 10 from Windows 7 or a later operating system. You can also migrate from one edition of Windows 10 to a different edition of the same release.
Summary of available upgrade path in Microsoft Blog.
Note: In-place upgrades from Windows 7, Windows 8.1, or Windows 10 semi-annual channels to Windows 10 LTSC are not supported.
Why Consider an In-Place Upgrade?
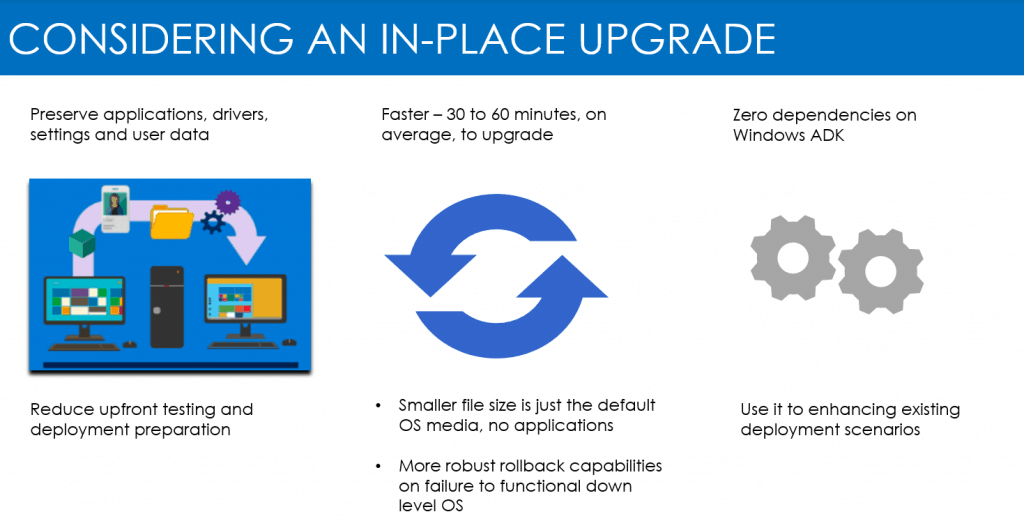
Limitations
The following tasks aren’t compatible with the in-place upgrade
- Changing disk partitions.
- We are changing the system architecture (x86 to x64 bits).
- I am modifying the base OS language.
- When we have dual or multi-boot systems.
- We are changing the computer’s domain membership or updating the local Administrator group.
- Outdated device drivers.
- WinPE Offline operation and third-party disk encryption.
You can’t use a captured or custom image for an upgrade.
Add an Operating System Upgrade Package
You must import the complete Windows 10 installation media to create upgrade packages. These packages will be used to upgrade an existing Windows 7 or later to Windows 10 1909, one release of Windows 10 to a later release of Windows 10.
Open Configuration Manager Console, Go to Software Library > Operating Systems > Operating System Upgrade Packages.
Right-click Operating System Upgrade Packages and select Add Operating System Upgrade Packages. (you can create a custom folder for selection)

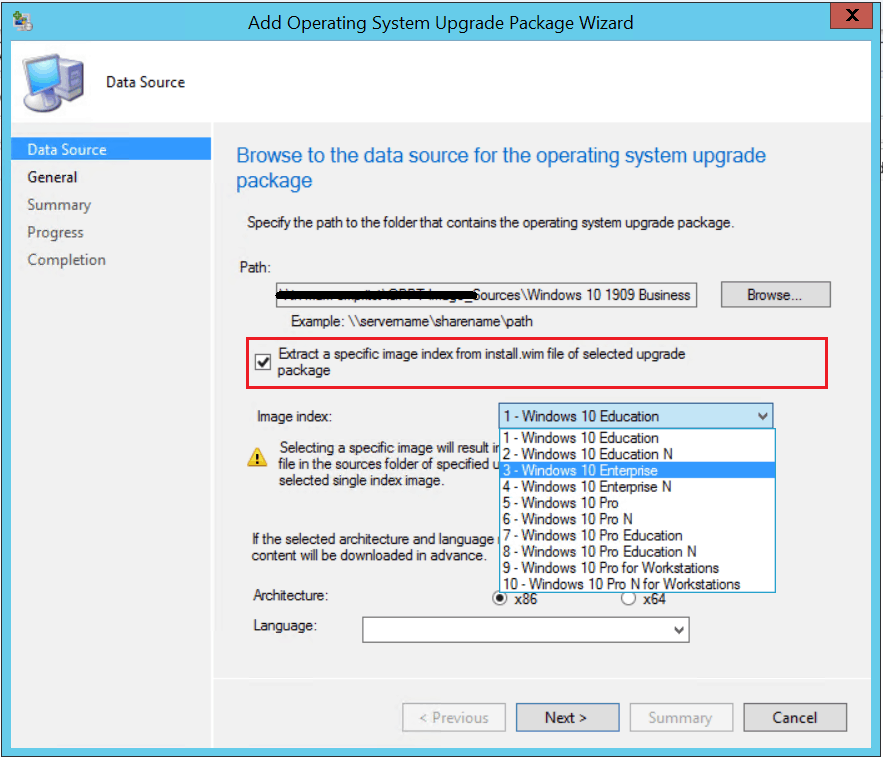
In Data Source, click Browse and specify the network-shared path to the root folder where you extracted the source of an ISO file.

You can now specify to automatically import a single index rather than all image indexes in the file. Using this option results in a smaller image file.
Select the option to Extract a specific image index from the specified WIM file. Then, select the Image index from the drop-down list.
In the General tab, provide Name, Version, and Comment. Click Next.

Review the provided information, and click Next to complete the wizard.

Wait for a moment while exporting is in progress.

After successfully completion, click close to exit the wizard.

Distribute Operating System Upgrade Packages
After importing the upgrade package, you must distribuContentcontent to the distribution point. Right-click Windows 10 Enterprise and click DistContentContent.
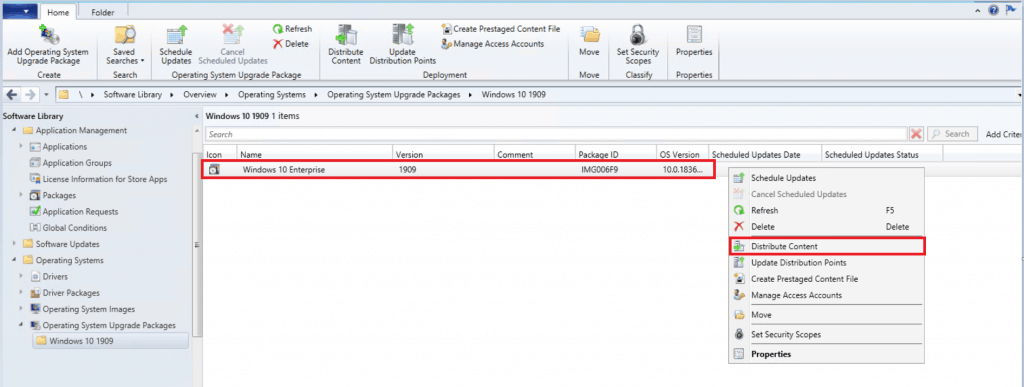
Review the seContentcontent for distribution. Click Next.

Add the distribution point or distribution point groups. Click Next.

Review the selected distribution points and groups and click Next.

Review the settings and click Next.
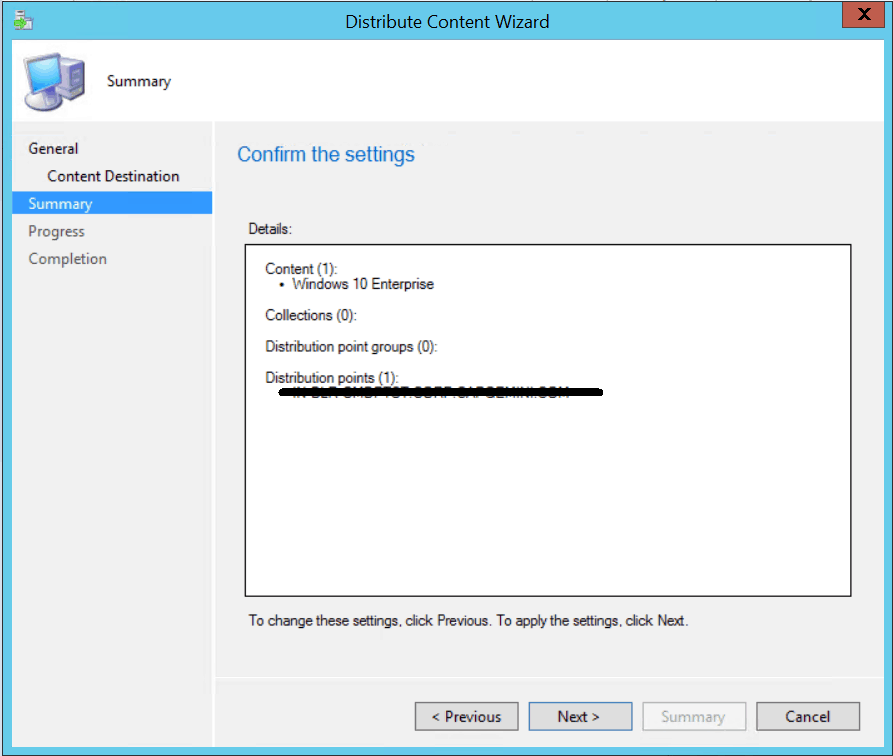
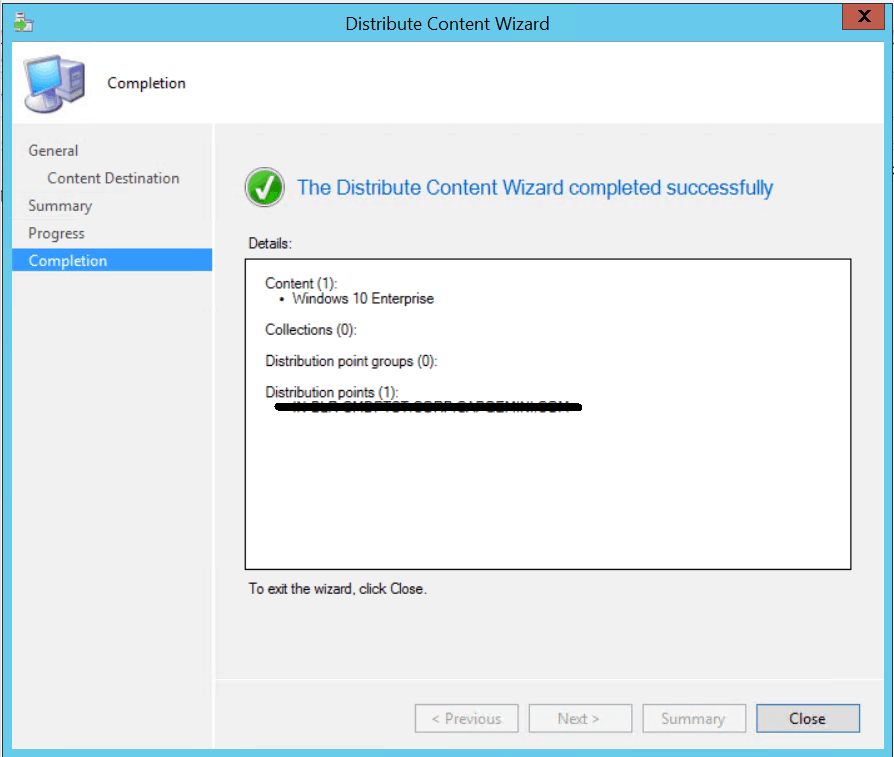
Click close to complete the Distribute Content wizard.
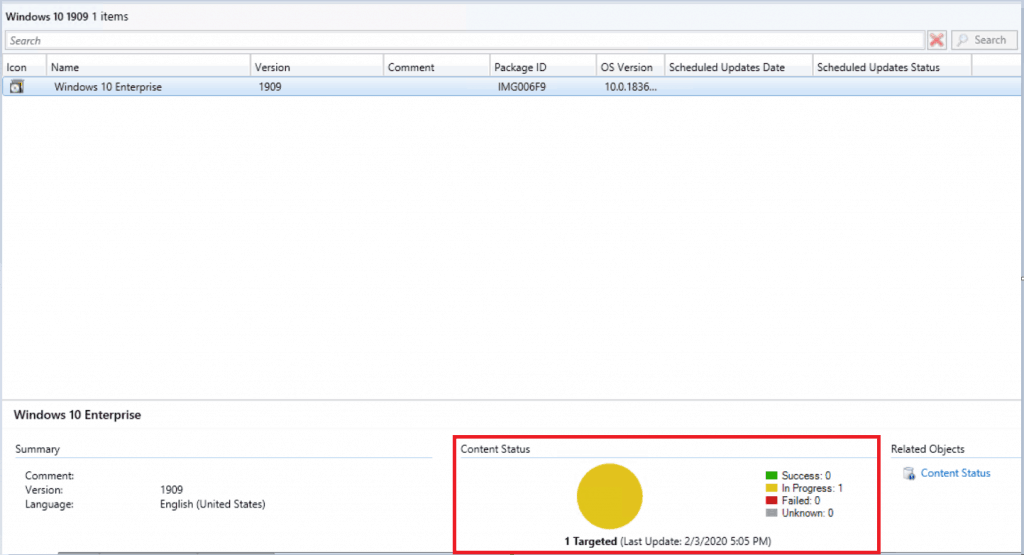
You can monitor the content status. If it’s showing the yellow color, distribution is in progress.
In the Configuration Manager console, go to the Monitoring workspace, expand Distribution Status, and select the Content Status node. This node displays the packages.
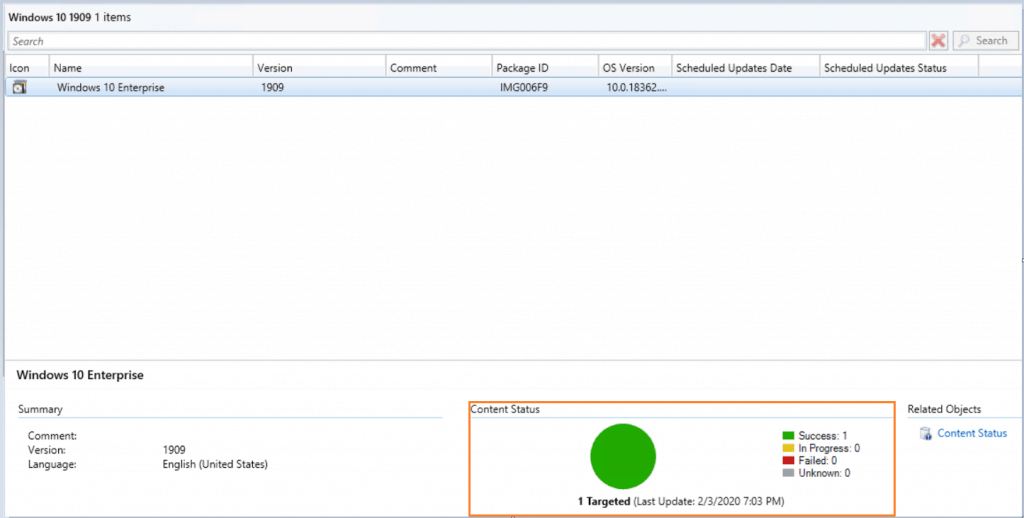
If the content distribution is successful, it will appear in Green color.
Create an In-place upgrade task sequence to upgrade an OS
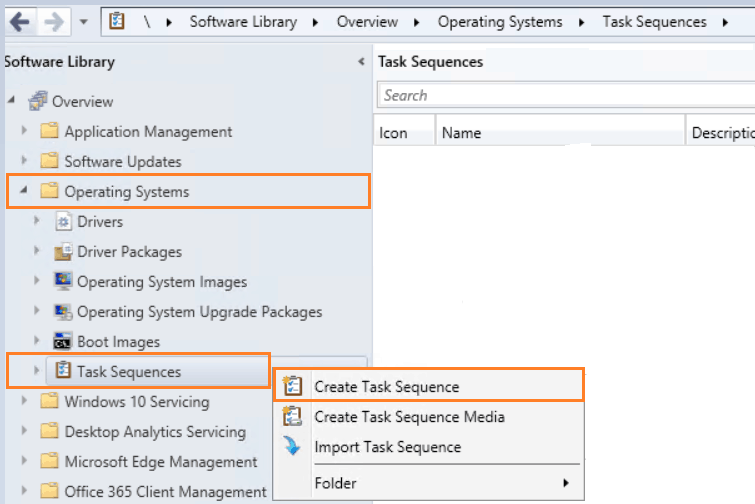
Go to the Software Library workspace in the Configuration Manager console, expand Operating Systems, and select Task Sequences.
On the Home tab of the ribbon, in the Create group, select Create Task Sequence.
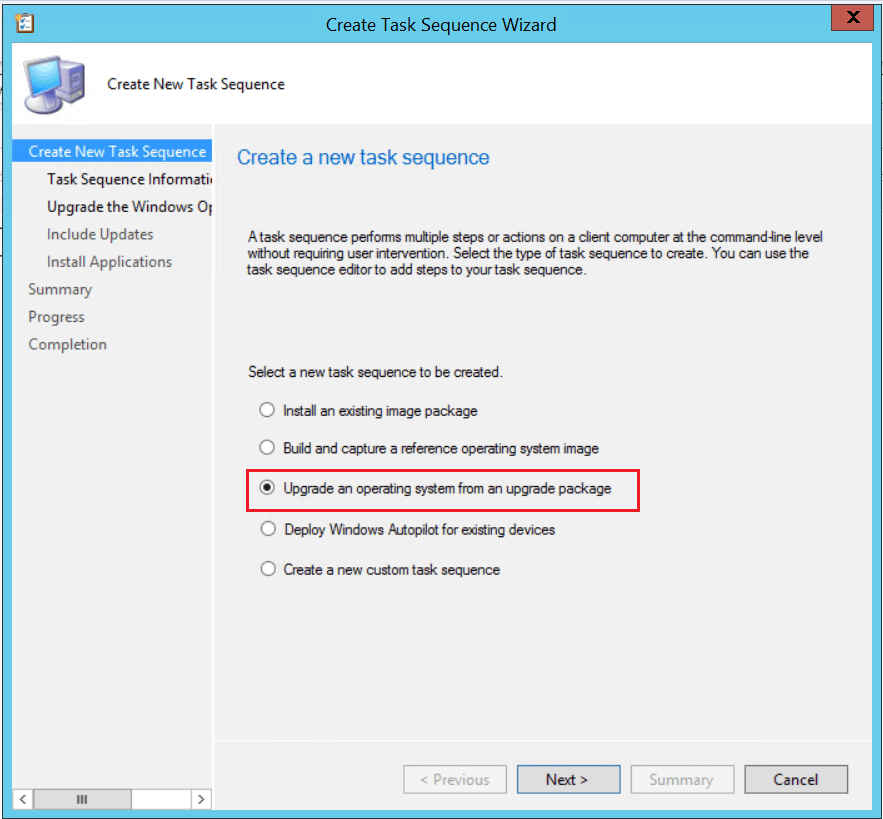
On the Create a New Task Sequence page of the Create Task Sequence Wizard, select Upgrade an operating system from an upgrade package and then choose Next.
On the Task Sequence Information page, specify the following settings:
Task sequence name: Specify a name that identifies the task sequence.
Description: Optionally specify a description.

On the Upgrade the Windows Operating System page, specify the following settings:
Upgrade package: Specify the upgrade package that contains the OS upgrade source files. Click on the Browse option to select the source file.
Verify that you’ve selected the correct upgrade package by looking at the information in the Properties pane.
Edition index: If the package contains multiple OS edition indexes, select the desired index. By default, the wizard selects the first index.
Product key: Specify the Windows product key for the OS to install.

Select an Operating System Upgrade Package from the content folders. Click OK.

Review the selected Upgrade package, Edition index, and Product key. Click Next.

Specify whether to install required, all, or no software updates on the Include Updates page.
Then select Next. If you specify to install software updates, Configuration Manager installs only those updates targeted to the collections the destination computer is a member.

Specify the applications to install on the destination computer on the Install Applications page, and then select Next.
If you select more than one application, specify whether the task sequence should continue if the installation of a specific application fails.

Review the task sequence details, and click Next.

After completing successfully, click close.

The Upgrade Task Sequence is created successfully.

Customize Upgrade Task Sequence
Under Software Library > Operating Systems > Task Sequences. Right-click on task sequences and select Edit.
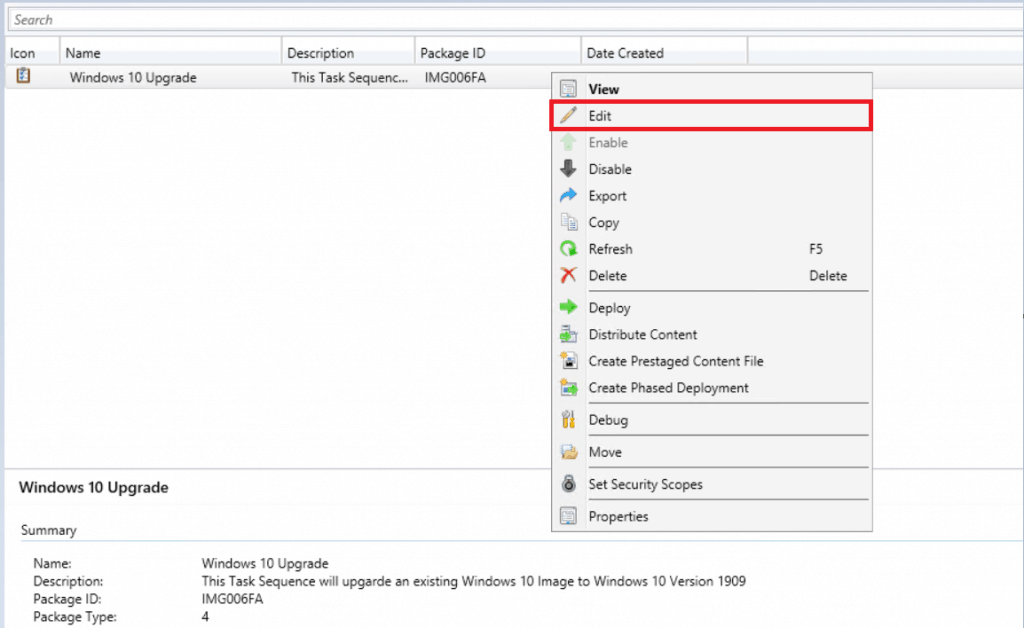
A task sequence will give you more granular control to:
- Perform pre-deployment checks.
- Pre-Upgrade –
- Manage drive encryption state
- Uninstall has known problematic drivers and apps.
- Post-upgrade –
- Install additional drivers and apps.
- Manage drive encryption state.
- Configuration.
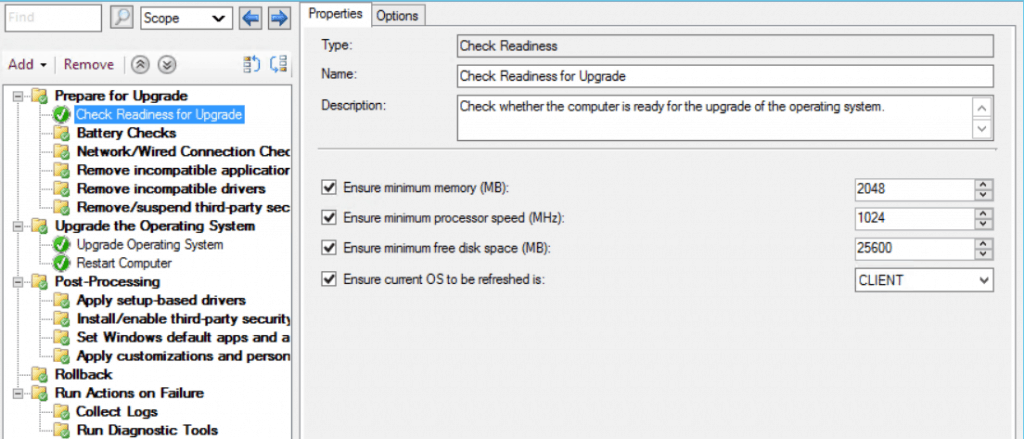
She recommended task sequence steps to prepare for the upgrade.
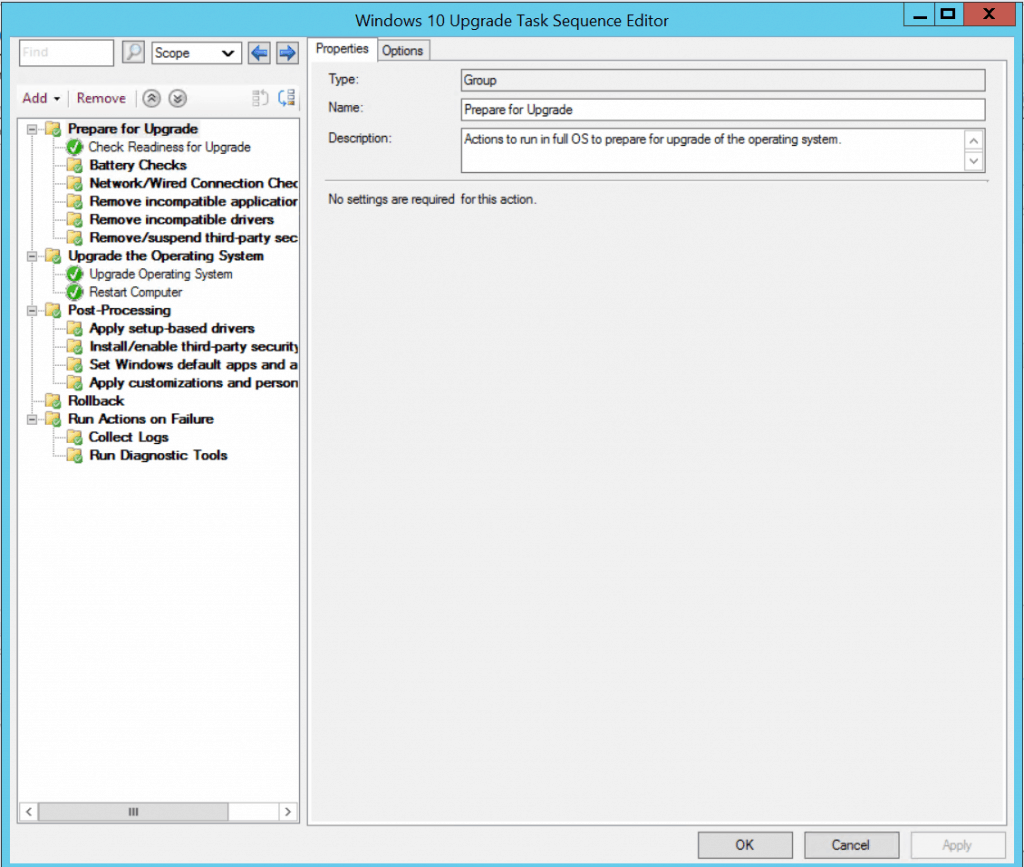
This Check Readiness step will check whether the computer is ready for a Windows 10 upgrade. You could modify these options in case you want.
Review other settings added in Task Sequence. If you have made any changes here, click Apply and OK.
Create a device collection
Read this post to know more about Collections by Anoop.
Deploy Windows 10 Upgrade Task Sequence
Review drivers and applications that are installed on computers. Before deploying the upgrade task sequence, make sure the drivers are compatible with Windows 10.
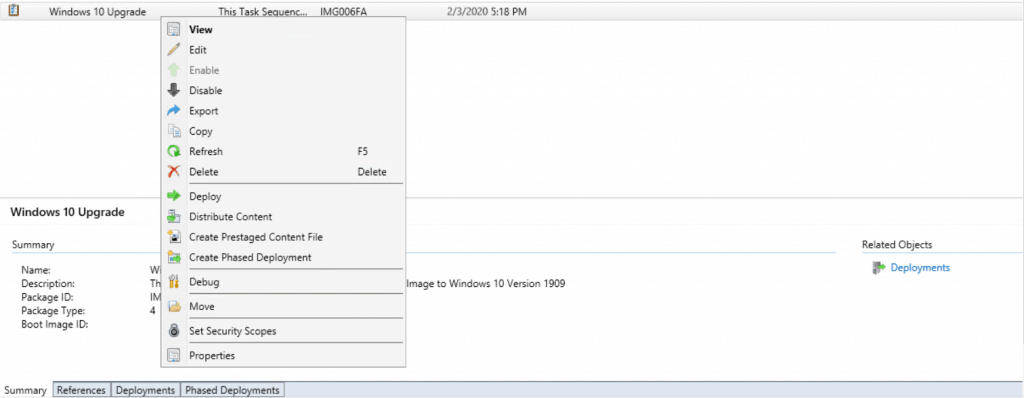
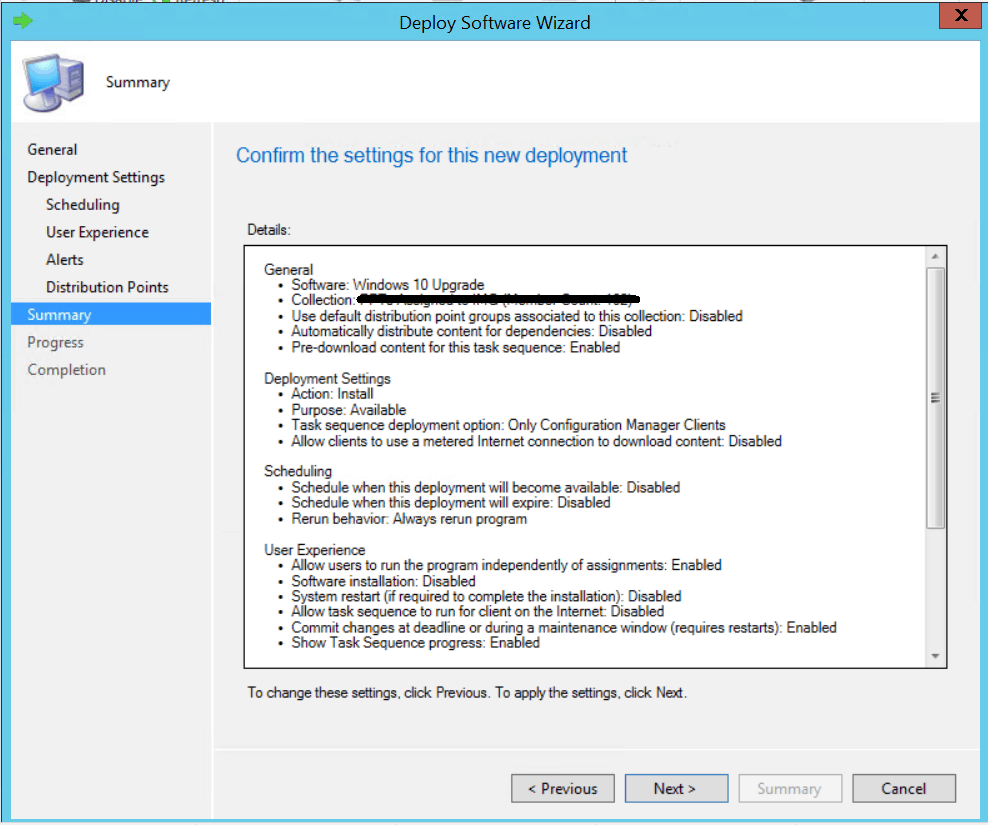
On the General, click Browse to select the collection where you wish to perform the deployment.

On the Deployment Settings, select the Purpose of the deployment.
Available – The task sequence will appear in the software center. The Process will start only when the user initiates.
Required – It will force the deployment at the deadline.

On the Scheduling tab, you can specify the schedule for this deployment.

On the User Experience tab, leave the default selected options.

Click Next.

You can specify how clients interact with the DPs to reContentcontent from reference packages on the Distribution Points page. Click Next.

Review the selected options and click Next.
Results – Windows 10 In-Place Upgrade
Launch the Software Center from the Start Menu on the target device and select Operating Systems. The Windows 10 upgrade task sequence will be available for installation.

Select the task sequence and click Install. Once you choose Install, no more user input will be required.
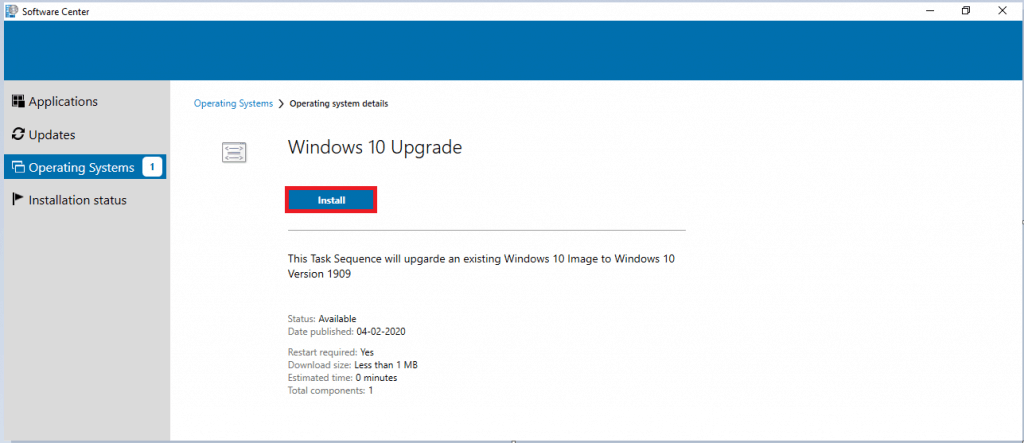
Depending on the environment, this step will take around 60-90 minutes when the upgrade process starts.
When the task sequence begins, it automatically initiates the in-place upgrade process by invoking the Windows setup program (Setup.exe) with the necessary command-line parameters to perform an automated upgrade.
After completing the task sequence, the computer will be fully upgraded to Windows 10 1909.
Resources
We are on WhatsApp. To get the latest step-by-step guides and news updates, Join our Channel. Click here –HTMD WhatsApp.
Author
Jitesh Kumar has over five years of experience in the IT Industry. He writes and shares his experiences related to Microsoft device management technologies and IT Infrastructure management. His primary focus area is the Windows 10 Deployment solution with Configuration Manager, Microsoft Deployment Toolkit (MDT), and Microsoft Intune.

Great article…
Although I wonder, whats the benefit to doing it this way with a task sequence rather than using the Windows 10 Servicing/All Windows 10 Updates node and selecting the feature update to 1909?
There’s limitation with servicing options while from TaskSequence we can full control the Image and do various changes on requirements. As whenever Image changes we having expectation & challenges to meet the changes according to environments. In that case TS is better option.
Can we push this task to the collection and user execute it when they’re not in the office ? (Content pre-downloaded at cccmcache) so they upgrade after hours
With this option users have to wait for download all the contents references in the TaskSequence Once TS available in Software Center.After that User can execute the installations.
also, More details on caching options of task sequence is explained by Vimal but it can become bit tricky https://www.anoopcnair.com/sccm-task-sequence-pre-cache-content/
use Onevinn’s “Upgrade Tools”
https://gallery.technet.microsoft.com/Windows-10-Upgrade-Tools-431094ca
I have upgraded on 2 systems to test, and both systems upgraded successfully. The issue is that the start menu and taskbar got reset to default and all custom settings for the user were gone. Also, Office 2019 Enterprise gives an error when launched that it needs to “repair”. How do we retain the user settings such as taskbar and start menu? and why is Office needing a repair after the upgrade?
Is there anyone available to give me an update? How long does it take to get a response?
For immediate response try HTMDForum.com
Hi i need install some SW after upgrade.
I put it do post-processing but computer after restart stop processing TS.
I need to use command because drivers problem.
SETUP.EXE /ImageIndex 1 /auto upgrade /quiet /DynamicUpdate Disable /MigrateDrivers None /copylogs C:\temp\W10Upgrade /InstallDrivers c:\temp\drivers /diagnosticprompt enable /priority Normal
You can ask your queries in HTMDFORUM.COM for quick response.
I am not receiving a change in the deployment process. It successfully installs but the SCCM/ECM console still says “in process” not successful, even though the update has completed.
Hello Joe! Sorry for delay response – If you still have issue please use http://htmdforum.com/
I do still have the issue but we are going to deploy this update with Windows Update for Business. We are in the process of making the switch now.
Can I upgrade customized image using this?
Hello Vishal, You can’t use a captured or custom image for upgrade.
Here’s limitations –
https://www.anoopcnair.com/windows-10-1909-upgrade-sccm-task-sequence/#Limitations
If you have any further questions please use http://htmdforum.com/
Hello,
Is there a way to have a report based on the Check Readiness?
Cause of course all client which doesn’t pass the “Check Readiness” are under failed, and you have to inspect every one to see what exactly failed.