Let’s discuss Configure a Windows 10 PC as a Kiosk for Running Cloud PC Windows 365 using Windows App. Microsoft now allows users to Configure a Windows 10 PC as a Kiosk for Running Windows App on Windows, macOS, iOS, iPadOS, web, and in public preview for Android.
As you know, Windows 10’s service will end next year, and we have to migrate to a new Windows 11 PC with all the great security features turned on by default to keep your organization protected and productive. But sometimes, we cannot upgrade it with Intune and Autopatch.
Instead of upgrading Windows 10 to Windows 11, we can use Windows 11 on a Cloud PC. A Cloud PC lets your workers securely access applications and documents from anywhere worldwide, but they must connect from a client device. It is very time-consuming, and we can configure the Windows 10 device as a kiosk.
So, it is easy and quick for the user to sign in to their Windows 365 Cloud PC directly from that kiosk device. In this blog post, I will help you configure a Windows 10 PC as a Kiosk for running Windows Apps. Check out Shannon Fritz’s complete guide on this topic below.
Table of Contents
What is Cloud PC Kiosk Configuration?

Cloud PC Kiosk Configuration involves setting up a Windows device to function as a kiosk primarily used to connect to a Cloud PC. This setup is particularly useful for organizations that want to provide a streamlined and secure way for users to access their Cloud PCs without the distractions or complexities of a full desktop environment.
Configure a Windows 10 PC as a Kiosk for Running Cloud PC Windows 365 using Windows App
Cloud PC Kisok Configuration can be done only with some access. Configuring a Windows 10 PC as a Kiosk for Running Windows Apps is similar to Windows 365 Boot.
Last year, Microsoft brought Windows 365 Boot to reduce the complexity of configuring the client device, the physical endpoint in Windows 365 Cloud PCs.
- Yubico Smart Card Redirection for Windows 365 Cloud PCs Login using Windows App on iOS
- Allow Disallow Windows Apps to Communicate with Unpaired Devices Policy in Windows 11
- How to Control Running Background Windows Apps Using Intune
Cloud PC Kiosk Configuration
As mentioned above, you need access to configure the Cloud PC kiosk. I will explain the process using Microsoft Intune to install and configure these, giving you a working kiosk as a starting point. You can then modify the configuration to meet your needs. The table below shows the needed access to configure a Cloud PC kiosk with Windows 10 Pro or Enterprise.
| Need Access to Configure Cloud PC Kiosk |
|---|
| Windows App – installed from the Microsoft Store or via MSIX |
| Microsoft Edge WebView2 – installed via PowerShell or Win32 package |
| AssignedAccess – a CSP to configure the kiosk |
Here, you can use Microsoft Intune to install and configure these, giving you a working kiosk as a starting point. You can then modify the configuration to meet your needs.
I will show you a new Microsoft Entra security group called Cloud PC kiosks throughout this example. Members of the group should be the Windows 10 devices that are to be configured as kiosks.
Create New Group
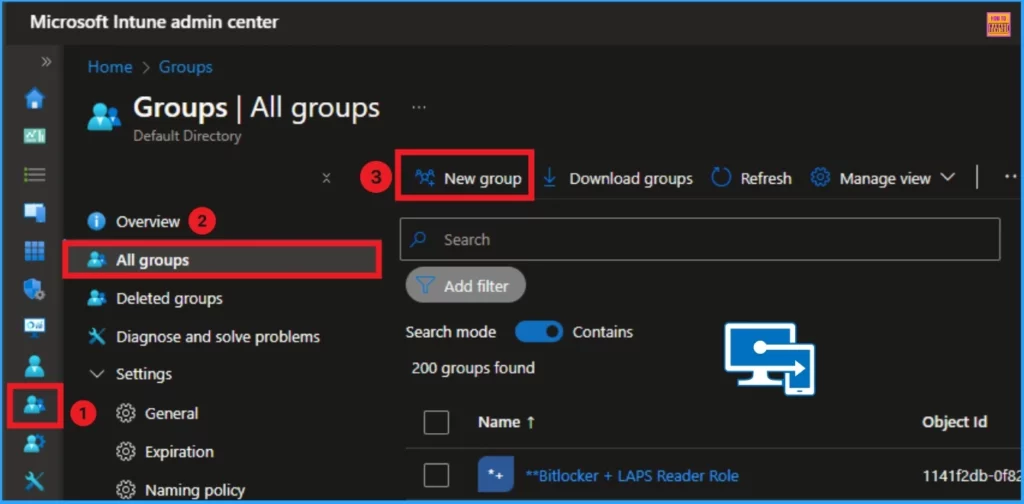
You can easily create new groups in Microsoft Intune by Going to Groups in the Microsoft Intune Admin Center, selecting All Groups, and clicking on the New Group from the Intune Admin Center.

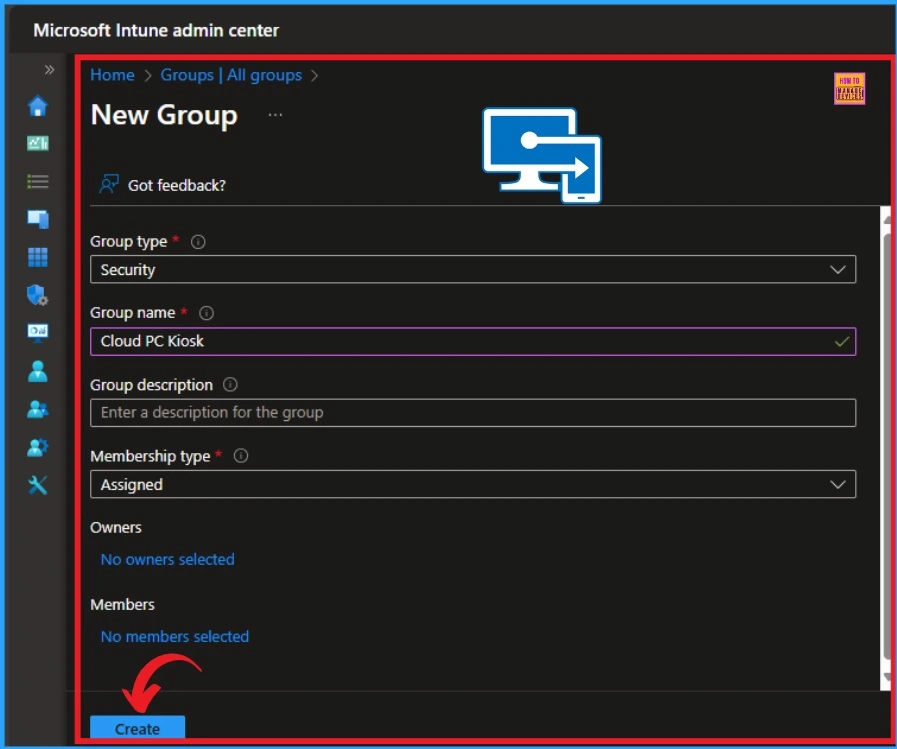
In the New Group window, you can select the Group Type, Group Name, Group Description, Membership type, etc. Here, You can give the Group name Cloud PC Kiosk.

Install Windows App
After that, you must Install Windows App on the device in a system context that allows any user to run the application. Using Microsoft Store is the easiest way to add this app. You could also download the MSIX package from the What’s New on the Windows App page. To use the line-of-business application, you’ll need the VCLibs.140.00 it depends on.
Install WebView2
Windows App requires WebView2, which is not preinstalled on Windows 10. Since the kiosk configuration prevents the dynamic installation of WebView2, you can use a PowerShell script to download and install WebView2, also in the system context, using the Evergreen Standalone Installer.
Create a Custom Kiosk Policy
Users can create the kiosk configuration using a custom profile. This gives you the most flexibility in how your kiosk works and is defined entirely in XML. In Microsoft Intune, you can create a Custom Kiosk Policy from Templates.
- HEVC Video Coding and Symmetric NAT with RDP Shortpath Support with Windows 365 Cloud PC 2409
- Most Asked 54 Windows 365 Cloud PC Interview Questions and Answers
- Best way to Choose the Right GPU-Enabled Cloud PC Standard Super or Max | Windows 365
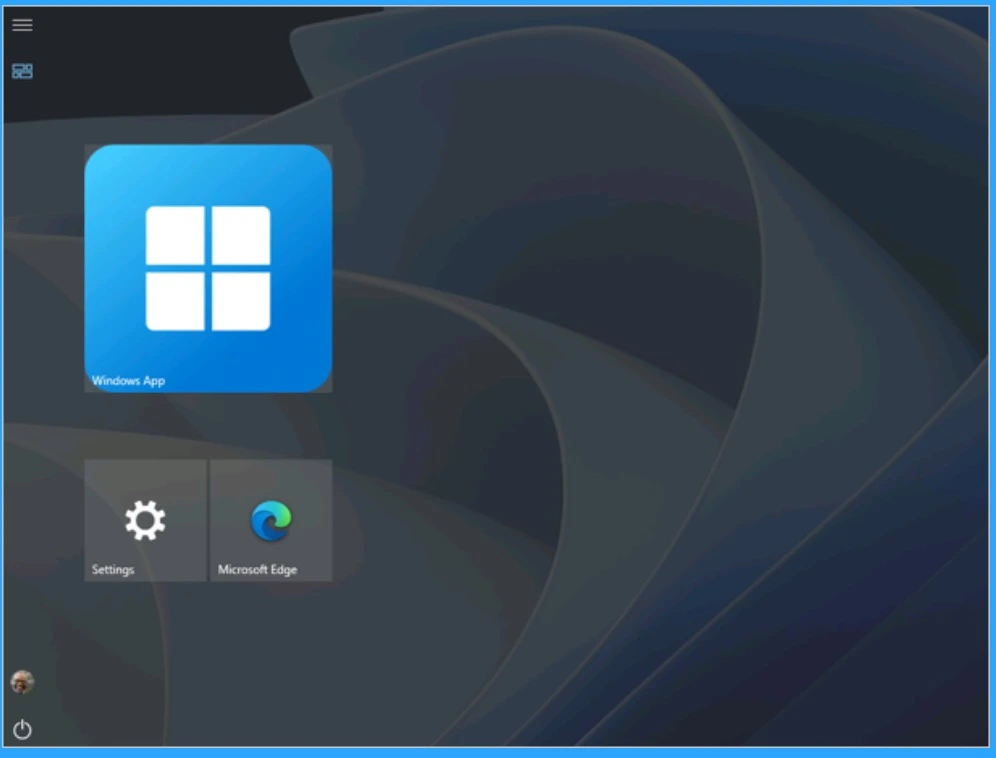
The screenshot below shows the new look of the Kiosk. With the PageVisibilityList policy, you can also control which parts of the Settings users can access.

Need Further Assistance or Have Technical Questions?
Join the LinkedIn Page and Telegram group to get the latest step-by-step guides and news updates. Join our Meetup Page to participate in User group meetings. Also, Join the WhatsApp Community to get the latest news on Microsoft Technologies. We are there on Reddit as well.
Resource
Check out the full guide from Shannon Fritz Connect to Cloud PCs from Windows 10 kiosks using Windows App
Author
Anoop C Nair has been Microsoft MVP from 2015 onwards for ten consecutive years! He is a Workplace Solution Architect with more than 22+ years of experience in Workplace technologies. He is also a Blogger, Speaker, and Local User Group Community leader. His primary focus is on Device Management technologies like SCCM and Intune. He writes about technologies like Intune, SCCM, Windows, Cloud PC, Windows, Entra, Microsoft Security, Career, etc.
