Let’s learn how to disallow or allow Windows apps communicate with unpaired devices in Windows 11. In Windows 1, apps can automatically share and synchronize information with wireless devices that do not explicitly pair with your device by default.
They communicate with unpaired devices and let apps on your device share information with things like store–tracking beacons, which send you ads as you walk nearby. Several settings are available to minimize connections from Windows to Microsoft services or configure privacy settings.
For example, you can configure diagnostic data to the lowest level for your edition of Windows and evaluate other connections Windows makes to Microsoft services you want to turn off using the instructions in this article. While it is possible to minimize network connections to Microsoft, these communications are enabled by default for many reasons, such as updating malware definitions and maintaining current certificate revocation lists.
Since some settings can reduce your device’s functionality and security configuration, before deploying Windows Restricted Traffic Limited Functionality Baseline, choose the correct settings configuration for your environment and ensure that Windows and Microsoft Defender Antivirus are fully up-to-date.

Table of Contents
Are there any Intune Policy Settings to Disallow or Allow Windows Apps to Communicate with Unpaired Devices in Windows 11?

The answer is no. We cannot find any Intune Policy to Disallow or Allow Windows Apps to Communicate with Unpaired Devices in Windows 11. We can only find a policy in Intune, Let Apps Access Trusted Devices Force Deny These App with a caution “Configure one or more settings for a valid policy “. If you have anything, let us know in the Comments.
Allow or Disallow Windows Apps to Communicate with Unpaired Devices Policy
You can Disallow or Allow Windows Apps Communicate with Unpaired Devices in Windows 11. The methods for changing the settings are listed below.
- Using Windows Settings App
- Using Local Group Policy Editor
- Using Registry File
- Enable Disable Settings Homepage in Windows 11
- How to Open Links in App Instead of Web Browser in Windows 11
- Add Remove Apps to Graphics Settings List | Graphics Performance Preferences for Apps in Windows 11
Using Windows Settings App
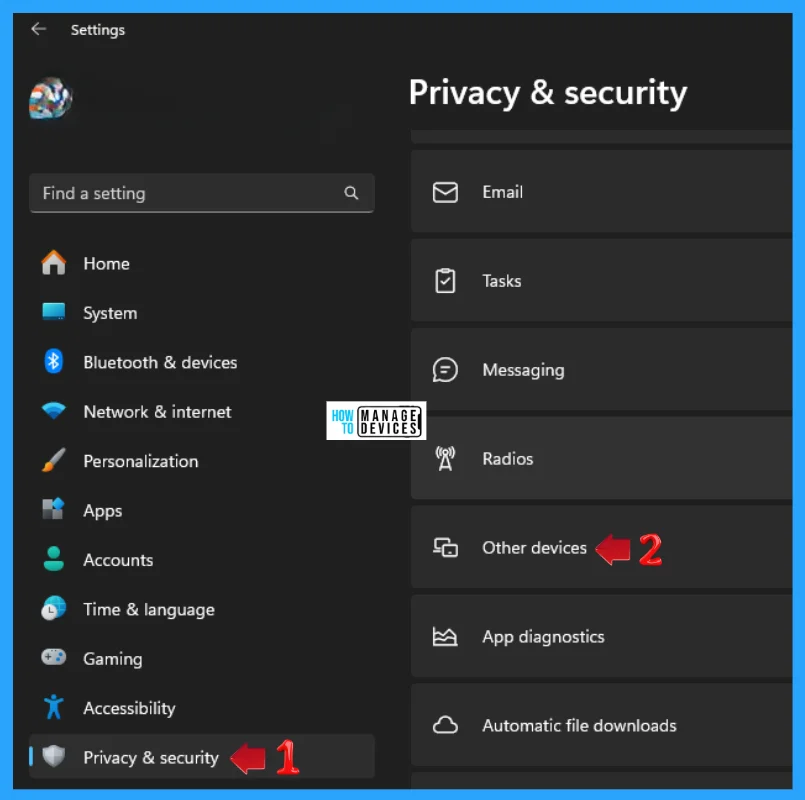
To disallow or allow Windows apps communicate with unpaired devices, you can use the Windows settings to make any modifications. To do so, click the Windows button, select Settings, or press Win Key + I to open settings directly.
Then, under settings, click the Privacy & Security option on the left panel. Scroll down to find the Other Devices option in the right panel, then click on it to open.
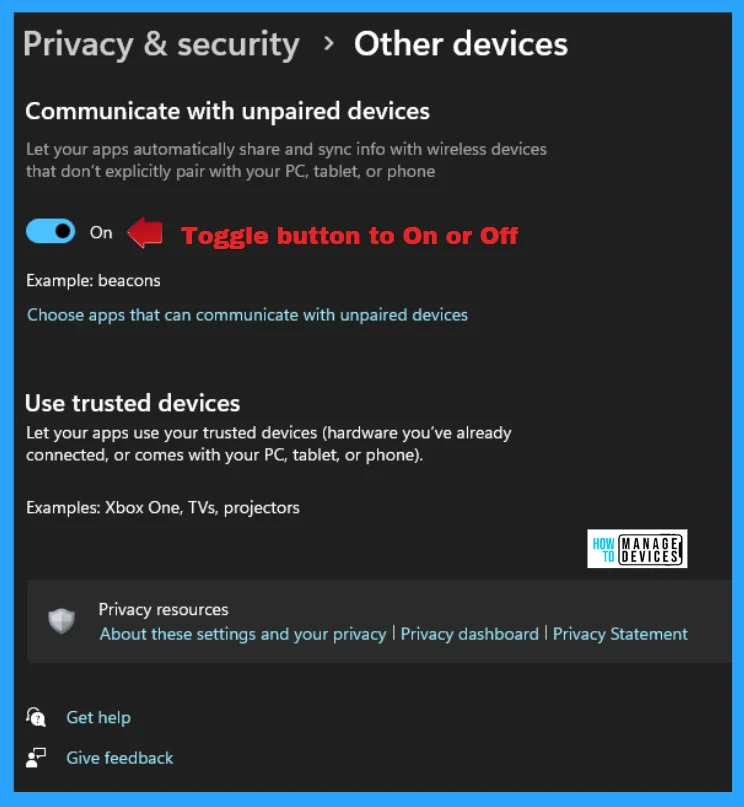
This setting lets your apps automatically share and sync info with wireless devices that do not explicitly pair with your CP, tablet, or phone. Toggle the button to turn this setting on or off (it is on by default). Your apps use your trusted devices (hardware you have already connected or that comes with your PC, tablet, or phone).
Using Local Group Policy Editor
In Windows 11, you can set the Local Group Policy Editor to disallow or allow Windows apps communicate with unpaired devices. To do so, open the Local Group Policy and follow the process.
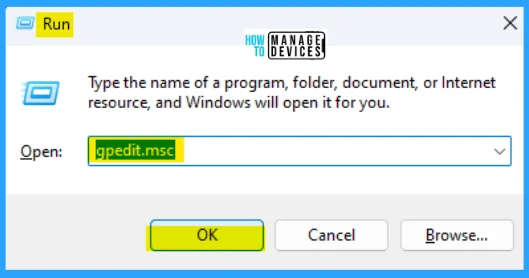
- Open the Run command and press Win Key + R.
- Type gpedit.msc
- Click OK or press Enter.
When the Group Policy Editor opens, navigate to the following path to access the required policy settings. To make changes, select App Privacy.
Computer Configuration > Administrative Templates > Windows Components> App Privacy
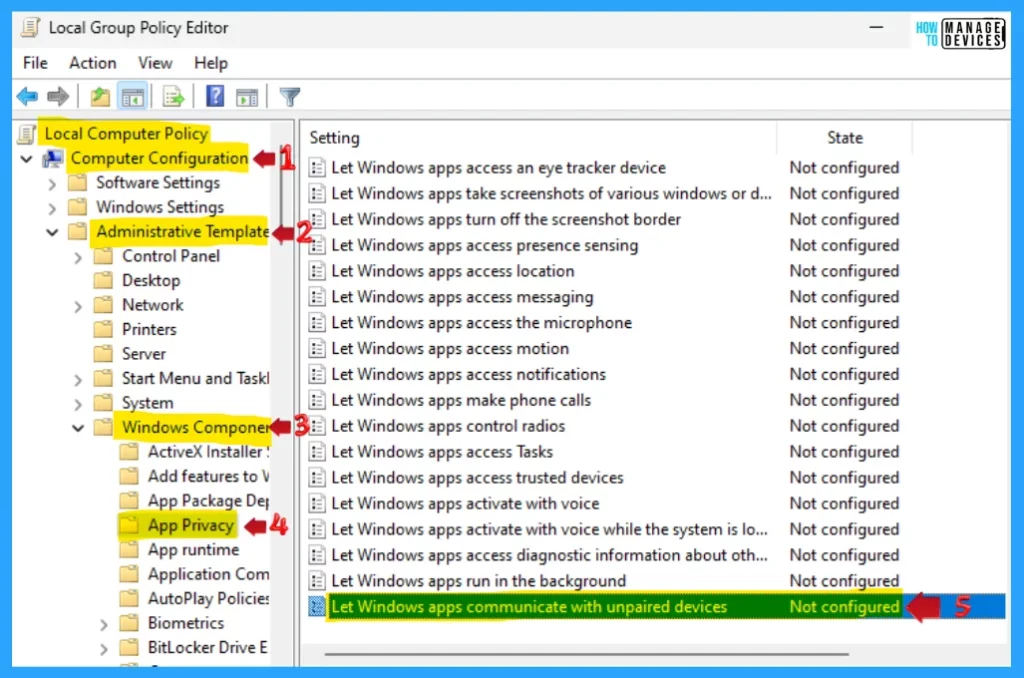
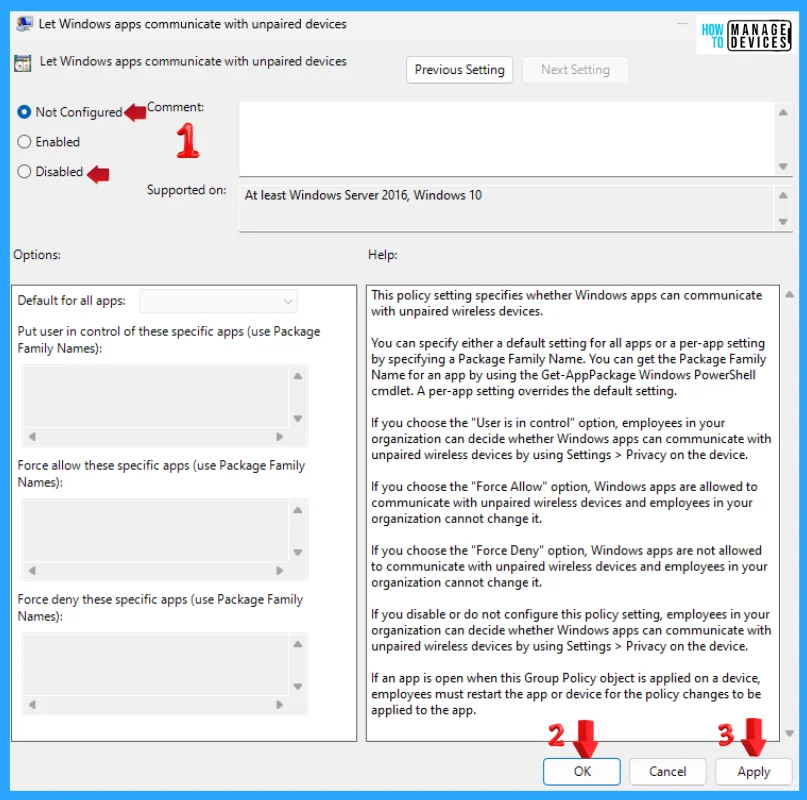
Double-click on Let Windows apps communicate with unpaired devices to open the settings. Here, you can see that it needs at least Windows Server 2016 and Windows 10. You can choose the following option: press Apply, then press the OK button to apply the changes.
This policy setting specifies whether Windows apps can communicate with unpaired wireless devices. You can specify either a default setting for all apps or a per-app setting by specifying a Package Family Name. You can get the Package Family Name for an app by using the Get-AppPackage Windows PowerShell cmdlet. A per-app setting overrides the default setting.
Suppose you disable or do not configure this policy setting. In that case, employees in your organisation can decide whether Windows apps can communicate with unpaired wireless devices by using Settings > Privacy on the device.
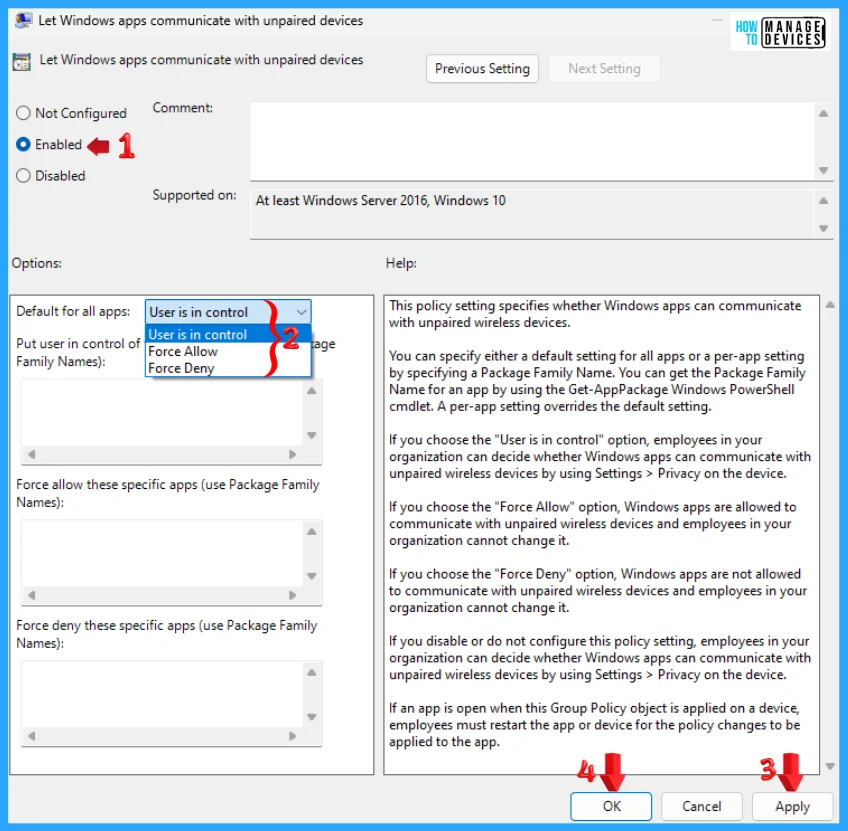
If you choose Enabled, then the following conditions appear, each of which is the user’s choice to select the connection type.
If an app is open when this Group Policy object is applied on a device, employees must restart the app or device for the policy changes to be applied to the app.
- Enable
- User is in Control: If you choose the ‘User is in Control’ option, employees in your organisation can decide whether Windows apps can communicate with unpaired wireless devices by using Settings > Privacy on the device.
- Force Allow: If you choose the ‘Force Allow’ option, Windows apps are allowed to communicate with unpaired wireless devices, and employees in your organisation cannot change it.
- Force Deny: If you choose the ‘Force Deny’ option, Windows apps are not allowed to communicate with unpaired wireless devices, and employees in your organisation cannot change it.
NOTE: You should restart your device after making any changes for its applicability.
Using Registry File
Using the registry editor, there are ways to disallow or allow Windows apps communicate with unpaired devices in Windows. This procedure is done using the Registry File. Let’s discuss the step-by-step guidelines for it. You can do the above using the three methods listed below.
- Current User
- All Users
- Default User Choice
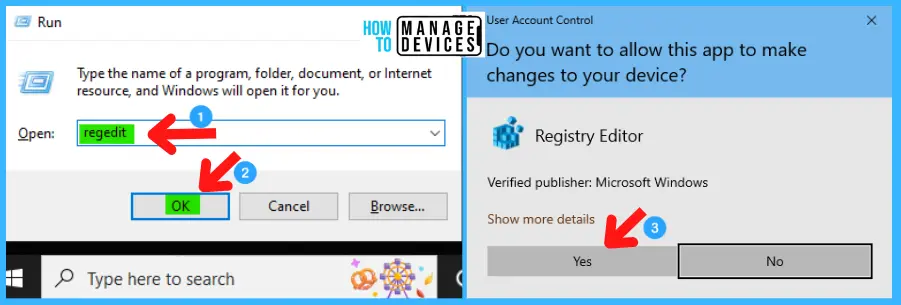
Now, open Run Window, and press Windows Key + R from the keyboard simultaneously. This is the keyboard shortcut to open the run window. Now, type regedit and click on OK to continue. Then, it asks the Admin’s permission to change the Device. Click Yes.
- Window Key + R (To open run command)
- Type ‘regedit‘ and press OK
- Administrator Permission press Yes
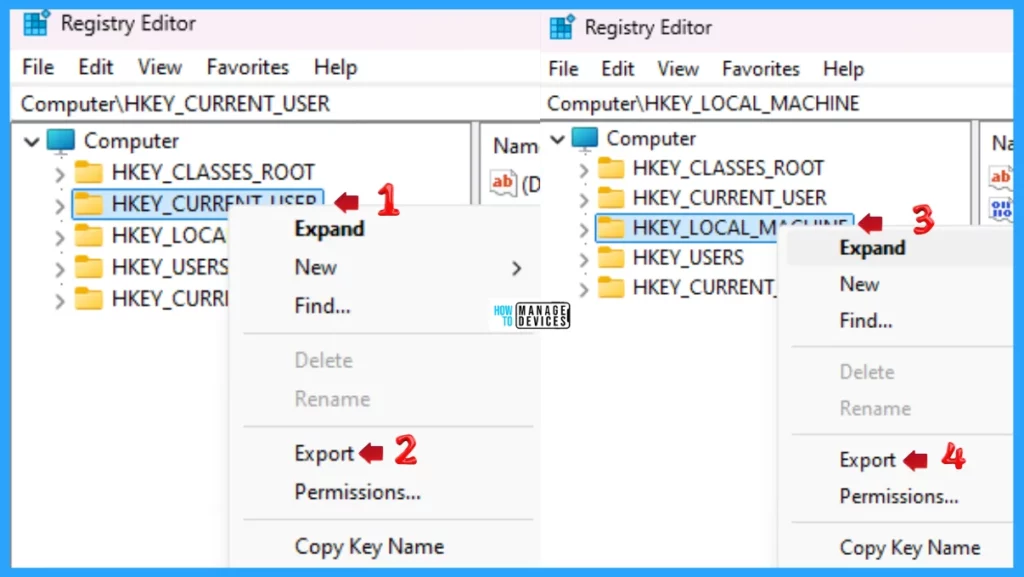
NOTE! Take Backup—If any mistake occurs in the Registry Editor, it may affect the system. It is advisable to take a backup of the Registry before proceeding. To back up, go to File in the top left corner of the Registry Editor. Click on it, then select Export and save the backup.
- Go to File.
- Right-click on HKEY_CURRENT_USER and HKEY_LOCAL_MACHINE.
- Click on Export.
- Please save it.
Current User
Use the .reg file to allow Windows apps to communicate with unpaired devices in Windows for the Current User. To create a .reg file, open NotePad, type the following code, and name it AllowAppsCommunicateWithUnparedDevicesCurrentUser. Then, save it on the desktop using the .reg extension.
Windows Registry Editor Version 5.00

[HKEY_CURRENT_USER\Software\Microsoft\Windows\CurrentVersion\Privacy]
"TailoredExperiencesWithDiagnosticDataEnabled"=dword:00000001
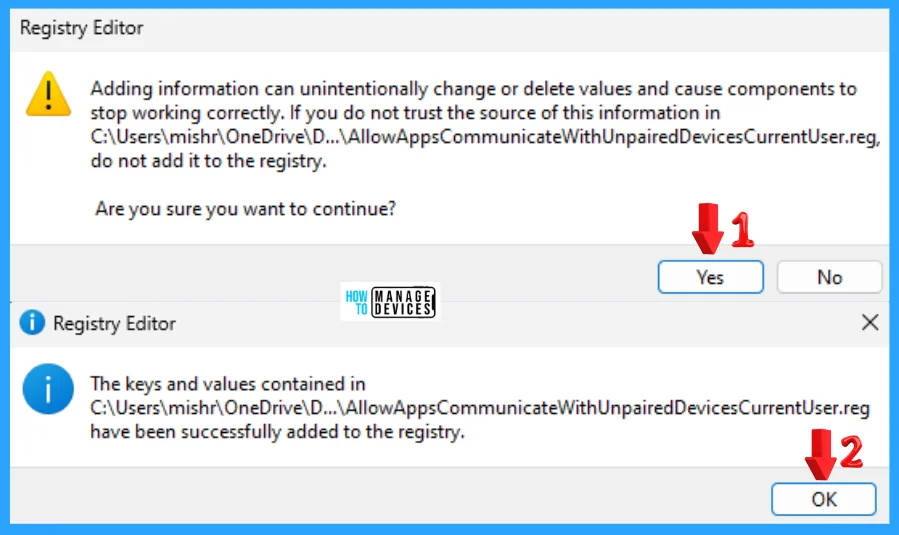
When the file is saved at your selected location, double-click on it. The User Account Control Window will open; click Yes to continue. Then, the Registry Editor Waring window will open.
Adding information can unintentionally change or delete values and cause components to stop working correctly. If you do not trust the source of this information in the path you created, do not add it to the registry; otherwise, click Yes to continue.
The following window shows that the key and value you added have been successfully added to the registry editor. Now click on OK and restart your PC to add the applicable test.
Use the .reg file to disallow Windows apps to communicate with unpaired devices in Windows for the Current User. To create a .reg file, open NotePad, type the following code, and name it DisallowAppsCommunicateWithUnparedDevicesCurrentUser. Then, save it on the desktop using the .reg extension.
Windows Registry Editor Version 5.00

[HKEY_CURRENT_USER\Software\Microsoft\Windows\CurrentVersion\Privacy]
"TailoredExperiencesWithDiagnosticDataEnabled"=dword:00000000
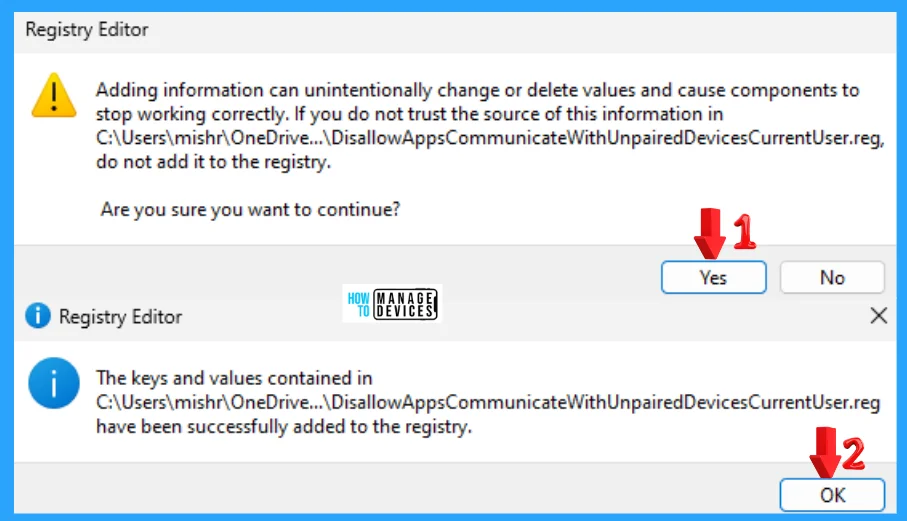
When the file is saved at your selected location, double-click on it. The User Account Control Window will open; click Yes to continue. Then, the Registry Editor Waring window will open.
Adding information can unintentionally change or delete values and cause components to stop working correctly. If you do not trust the source of this information in the path you created, do not add it to the registry; otherwise, click Yes to continue.
The following window shows that the key and value you added have been successfully added to the registry editor. Now click on OK and restart your PC to add the applicable test.
All Users
Use the .reg file to force allow Windows apps to communicate with unpaired devices in Windows for All Users. To create a .reg file, open NotePad, type the following code, and name it AllowAppsCommunicateWithUnparedDevicesAllUsers. Then, save it on the desktop using the .reg extension.
Windows Registry Editor Version 5.00

[HKEY_LOCAL_MACHINE\SOFTWARE\Policies\Microsoft\Windows\AppPrivacy]
"LetAppsSyncWithDevices"=dword:00000001
"LetAppsSyncWithDevices_UserInControlOfTheseApps"=hex(7):00,00
"LetAppsSyncWithDevices_ForceAllowTheseApps"=hex(7):00,00
"LetAppsSyncWithDevices_ForceDenyTheseApps"=hex(7):00,00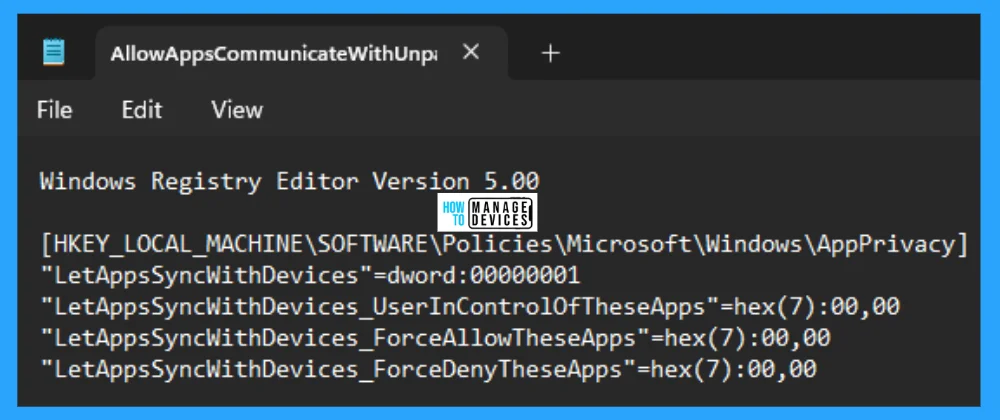
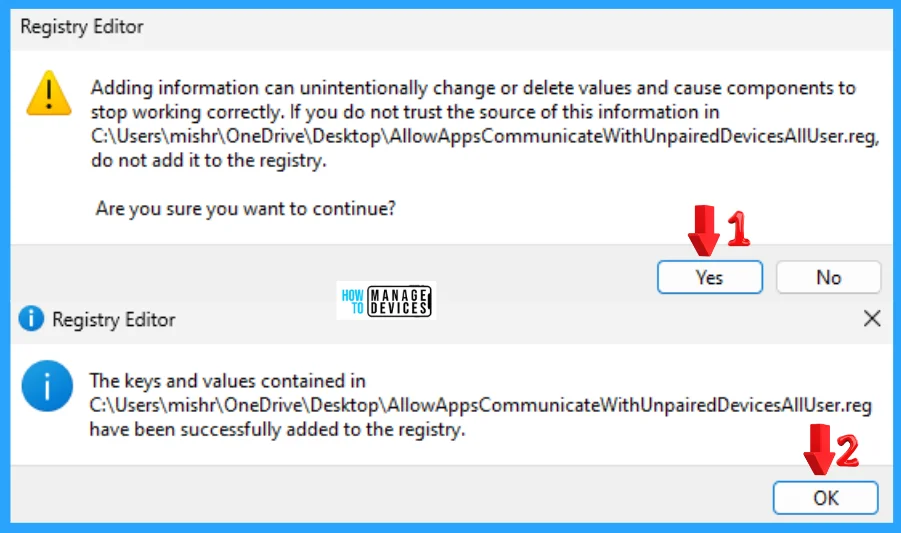
When the file is saved at your selected location, double-click on it. The User Account Control Window will open; click Yes to continue. Then, the Registry Editor Waring window will open.
Adding information can unintentionally change or delete values and cause components to stop working correctly. If you do not trust the source of this information in the path you created, do not add it to the registry; otherwise, click Yes to continue.
The following window shows that the key and value you added have been successfully added to the registry editor. Now click on OK and restart your PC to add the applicable test.
Use the .reg file to disallow Windows apps to communicate with unpaired devices in Windows for All Users. To create a .reg file, open NotePad, type the following code, and name it DisallowAppsCommunicateWithUnparedDevicesAllUsers. Then, save it on the desktop using the .reg extension.
Windows Registry Editor Version 5.00

[HKEY_LOCAL_MACHINE\SOFTWARE\Policies\Microsoft\Windows\AppPrivacy]
"LetAppsSyncWithDevices"=dword:00000002
"LetAppsSyncWithDevices_UserInControlOfTheseApps"=hex(7):00,00
"LetAppsSyncWithDevices_ForceAllowTheseApps"=hex(7):00,00
"LetAppsSyncWithDevices_ForceDenyTheseApps"=hex(7):00,00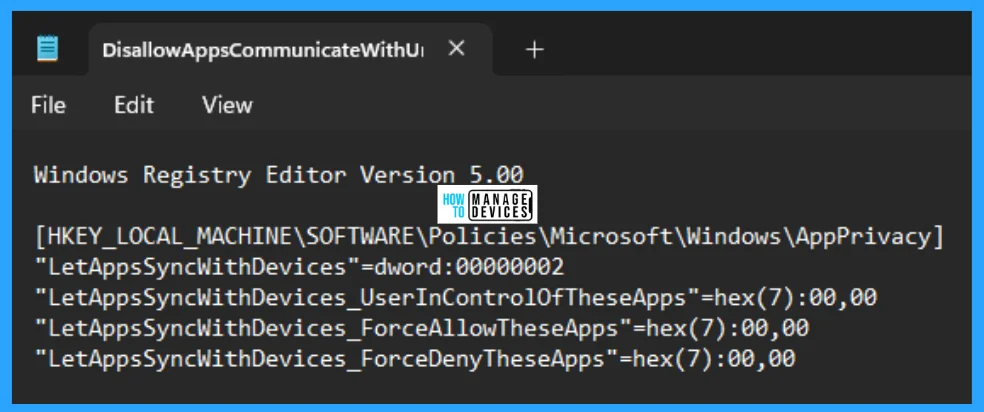
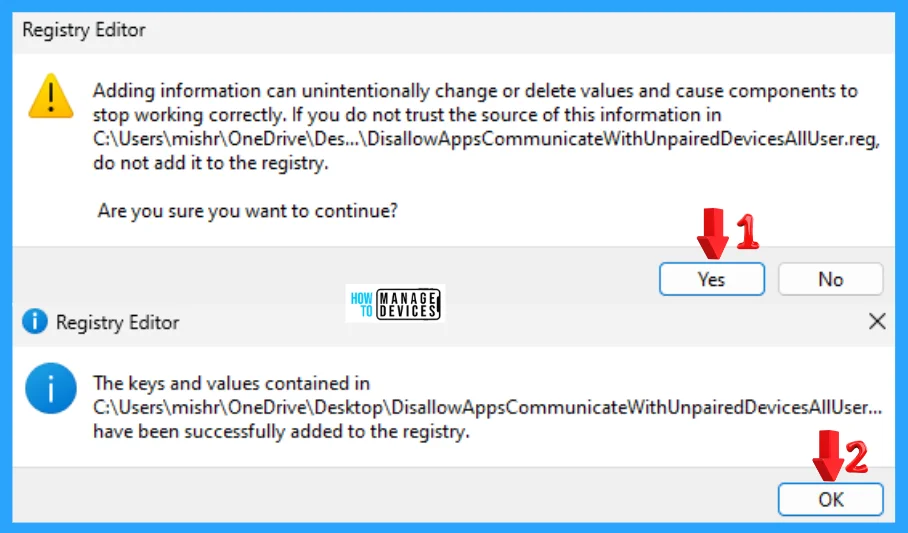
When the file is saved at your selected location, double-click on it. The User Account Control Window will open; click Yes to continue. Then, the Registry Editor Waring window will open.
Adding information can unintentionally change or delete values and cause components to stop working correctly. If you do not trust the source of this information in the path you created, do not add it to the registry; otherwise, click Yes to continue.
The following window shows that the key and value you added have been successfully added to the registry editor. Now click on OK and restart your PC to add the applicable test.
Default User Choice
Use the .reg file to make the default user choice of Windows apps to communicate with unpaired devices in Windows. To create a .reg file, open NotePad, type the following code, and name it DefaultUserChoiceAppsCommunicateWithUnparedDevices. Then, save it on the desktop using the .reg extension.
Windows Registry Editor Version 5.00

[HKEY_LOCAL_MACHINE\SOFTWARE\Policies\Microsoft\Windows\AppPrivacy]
"LetAppsSyncWithDevices"=-
"LetAppsSyncWithDevices_UserInControlOfTheseApps"=-
"LetAppsSyncWithDevices_ForceAllowTheseApps"=-
"LetAppsSyncWithDevices_ForceDenyTheseApps"=-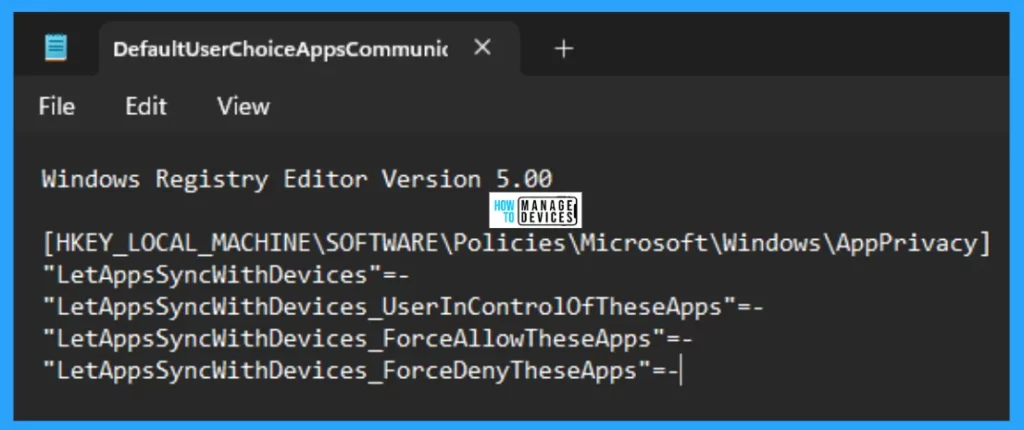
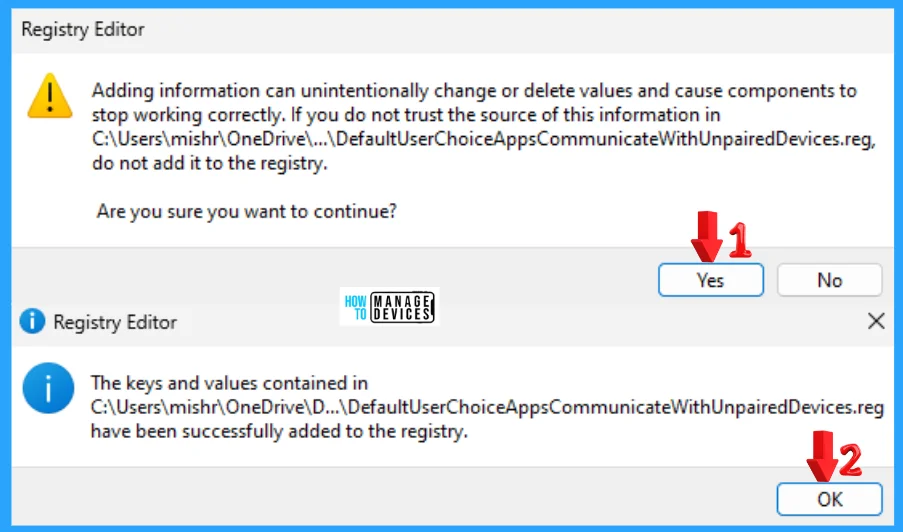
When the file is saved at your selected location, double-click on it. The User Account Control Window will open; click Yes to continue. Then, the Registry Editor Waring window will open.
Adding information can unintentionally change or delete values and cause components to stop working correctly. If you do not trust the source of this information in the path you created, do not add it to the registry; otherwise, click Yes to continue.
The following window shows that the key and value you added have been successfully added to the registry editor. Now click on OK and restart your PC to add the applicable test.
I hope the information on how to Add or Remove All Program Lists from the Start Menu in Windows 11 is helpful. Please follow us on the HTMD Community and visit our website, HTMD Forum, if you like our content. Suggest improvements, if any, and we would love to know which topic you want us to explore next.
Sources
We are on WhatsApp. To get the latest step-by-step guides and news updates, Join our Channel. Click here – HTMD WhatsApp.
Author
Alok graduated with a Master of Computer Applications (MCA) degree. He loves writing on Windows 11 and related technologies. He likes to share his knowledge, quick tips, and tricks with Windows 11 or Windows 10 with the community.
