
Key Takeaways
- Prevents access through the Run dialog and Map Network Drive window.
- Supports restricting individual drives or multiple drive combinations.
- Does not block applications from accessing drives.
- Does not prevent Disk Management from viewing or modifying drive properties.
- Can be combined with the Hide These Specified Drives in My Computer policy for improved protection.
Let’s discussRestrict Windows Drive Access to Protect Sensitive Data using Microsoft Intune. Controlling access to local drives is an important part of securing Windows devices in an organization. The Prevent Access to Drives from My Computer policy in Microsoft Intune helps administrators restrict users from opening selected drives through File Explorer (My Computer). This can reduce the risk of unauthorized access to sensitive files stored on specific drives while maintaining a consistent user experience.
Table of Contents
Table of Contents
Restrict Windows Drive Access to Protect Sensitive Data using Microsoft Intune
When this policy is enabled, users can still see the restricted drive icons in File Explorer, but they cannot open them or browse their contents. If a user attempts to access a restricted drive, Windows displays a message indicating that access has been blocked by a system policy. The restriction also applies when users try to access the drive through the Run dialog or the Map Network Drive window.
- Intune Policy Tattooed Or Not Tattooed Windows CSP Policy
- Intune User Policy Troubleshooting Tips For Prevent Changing Theme
- Intune Logs Event IDs IME Logs Details For Windows Client Side Troubleshooting
Intune Policy to Prevent Users to Save Files on Local Drives
Let’s see how to configure Intune Policy to Prevent Users to Save Files on Local Drives. Let’s start creating the Intune policy straightaway. You can perform registry changes to achieve the same results, but I won’t recommend doing the registry hack when a better option is available for you. This policy configuration walkthrough is done from Intune admin center.
- Login to Microsoft Intune admin center.
- Navigate to Devices -> Windows -> Configuration profiles.
- Click on +Create Profile.
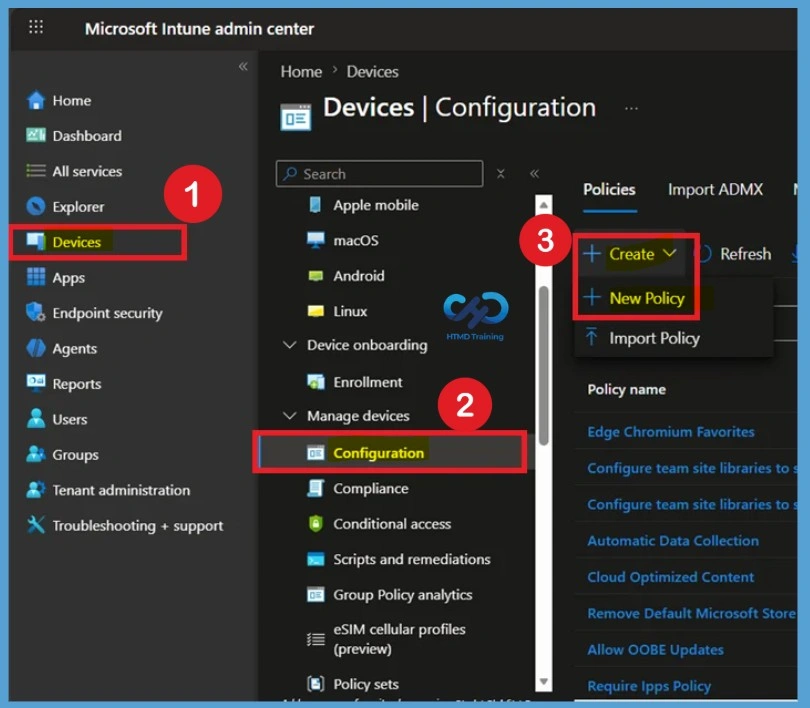
The Intune policy creation process is called profile creation. You can change policies from Create Profile blade. Don’t worry about the preview tag there near to settings catalog. Microsoft fully supports this type of policy.

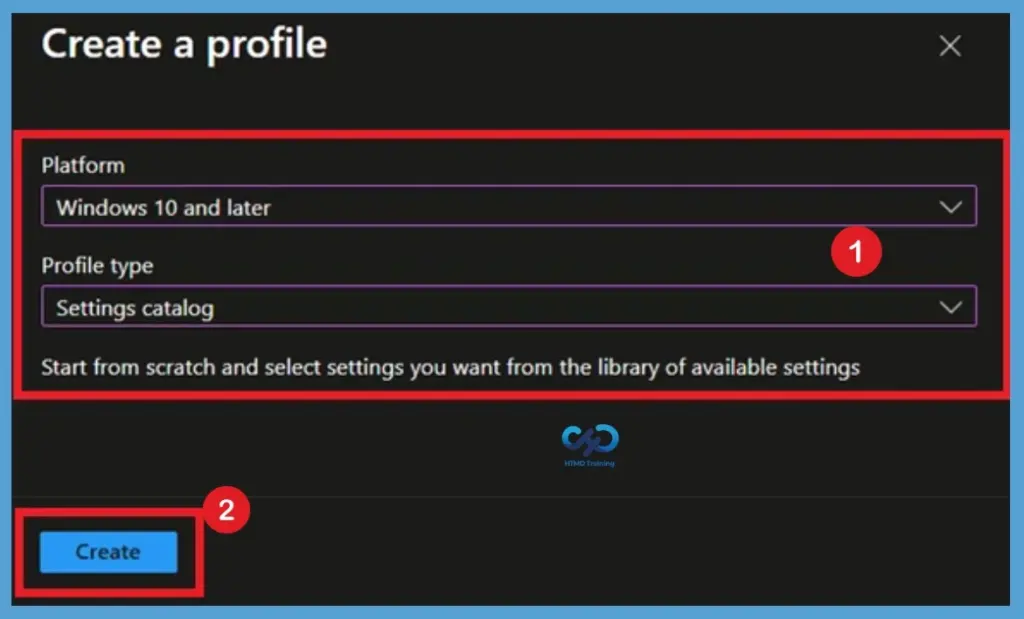
- Select Platform: Select Windows 10 and later.
- Profile: Select Settings catalog.
- Click on the Create button
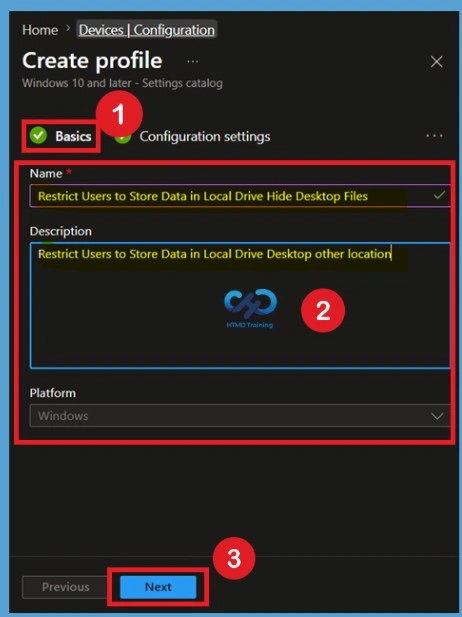
Basic Tab
Once you click on Create button from the above page, you will need to enter the Name and Description of the setting catalog policy. Enter the name of the policy Name such as Restrict Users to Store Data in Local Drive Hide Desktop Files. And click on the next button to continue. I recommend using detailed descriptions so that colleagues can easily understand the details.
Configuration Settings
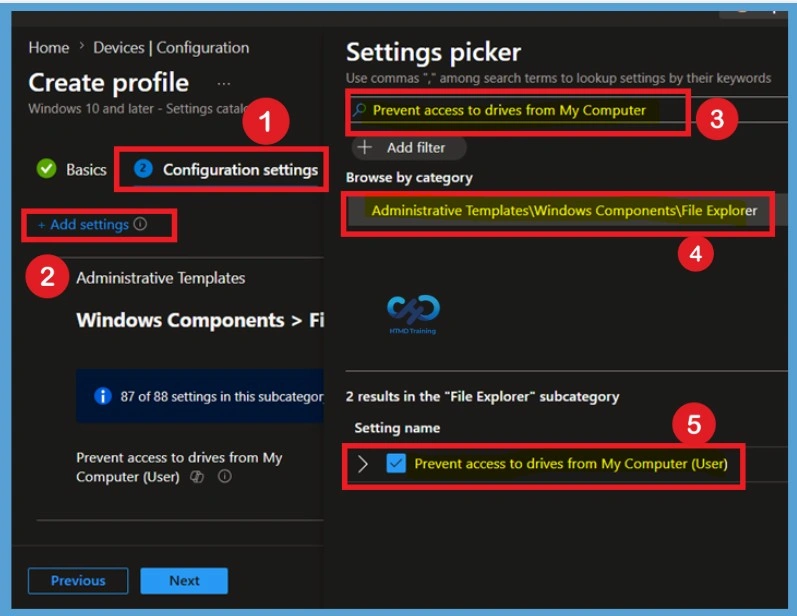
You can click on the +Add Settings link to bring up the new blade of the policy configuration wizard. This link will help with a new blade called the Settings Picker with a search box. With the settings catalog, you can choose which settings you want to configure. Click on Add settings to browse or search the catalog for the settings you want to configure.
- Here I searched the Policy name and get from the Administrative Templates\Windows Components\File Explorer category
- Then select the Policy Name Prevent access to drives from My Computer (User)
NOTE! – Settings picker – Use commas “,” among search terms to lookup settings by their keywords – In this scenario, I used Prevent access to Drives from my Computer as a keyword.
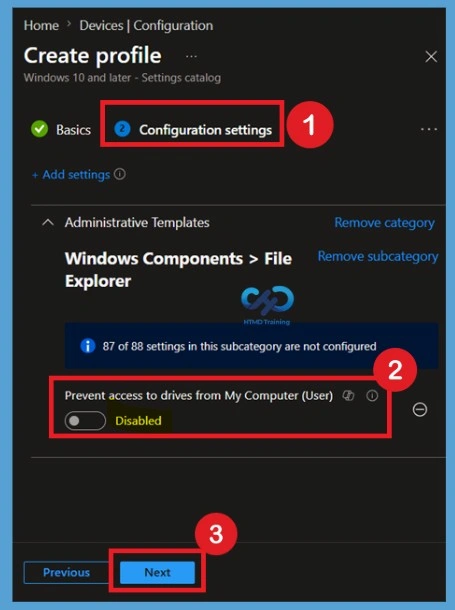
Disabled State of the Policy
By default, the Prevent Access to Drives from My Computer policy is Disabled. In this state, users can freely open and browse all available drives through File Explorer, provided they have the necessary permissions. If you want to continue, click Next.
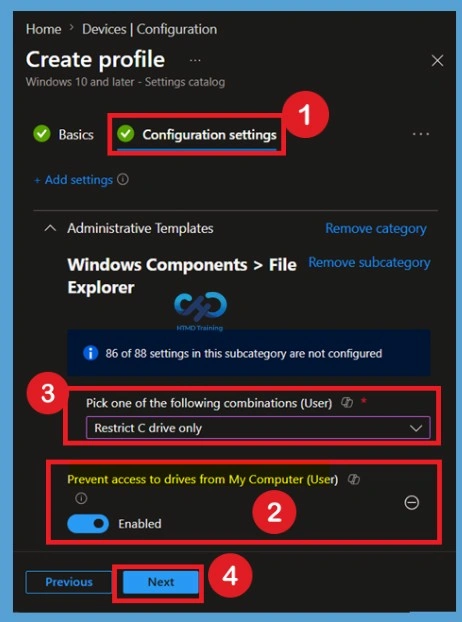
Enable the Policy
You can close the Settings Picker blade to get the following screen on the Intune MEM Admin center portal. Make sure that you have enabled the policy settings called – prevent access to drives from my computer. You also need to pick one of the following combinations to make this policy work.
| Settings Info |
|---|
| Restrict A and B Drives only |
| Restrict C drive only |
| Restrict D drive only |
| Restrict A, B, and C drives Only |
| Restrict A, B, C, and D drives Only |
| Restrict all Drives |
| Do not Restrict Drives |
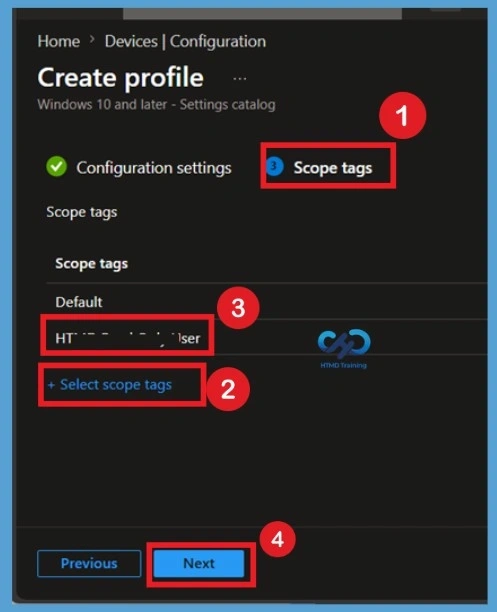
Scope Tags
Use Scope Tags to control which administrative groups can view and manage the Prevent Access to Drives from My Computer policy. Scope tags are especially useful in organizations with multiple IT teams or delegated administration. If scope tags are not required in your environment, you can leave this section unchanged and continue with the policy creation.
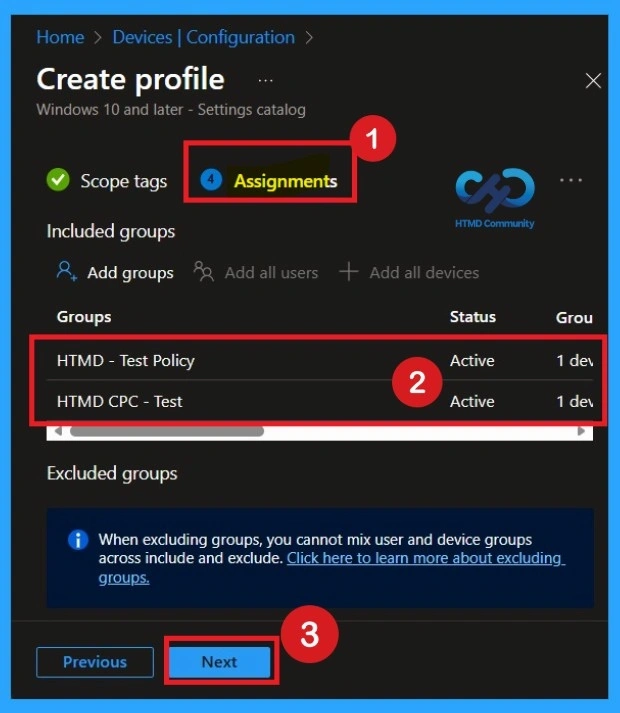
Assignment Settings
Assign the Prevent Access to Drives from My Computer policy to the appropriate Microsoft Entra user or device groups. Carefully review the targeted groups to ensure the drive restrictions are applied only to the intended users or devices.
In the Assignments section, click Add groups under Included groups and select the required user or device groups. Assigning the policy ensures it is applied only to the intended users or devices, such as test groups or production environments. Then click on the Next.
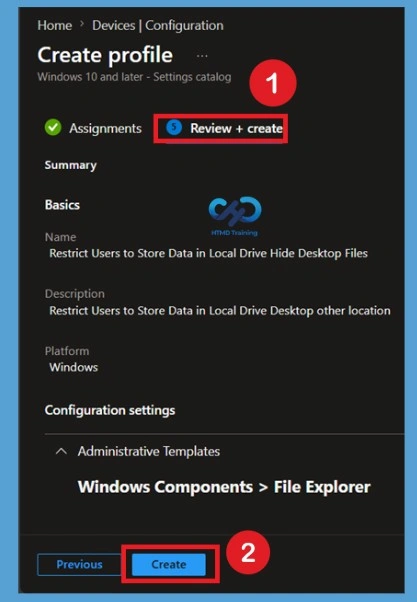
Review + Create Policy
On the Review + Create page, verify all configured settings for the Prevent Access to Drives from My Computer policy. Confirm that the selected drives, assignments, and other configuration options are correct before creating the profile.
- Select Create to deploy the policy to the assigned groups.
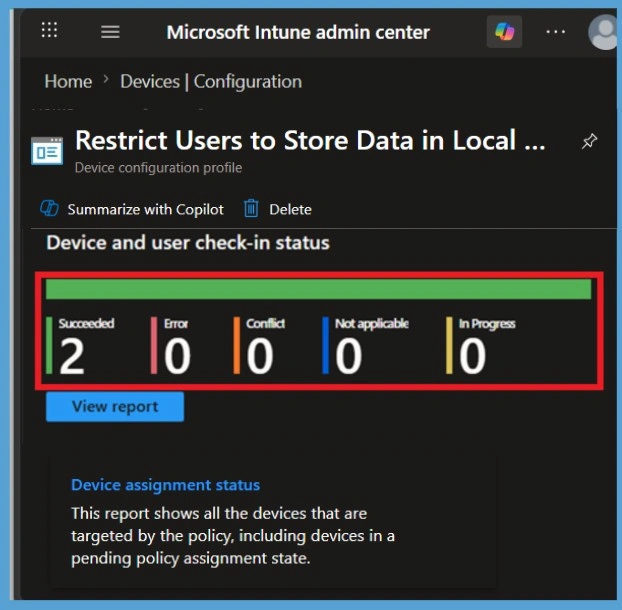
Monitoring Status
After deployment, monitor the Prevent Access to Drives from My Computer policy from the Intune admin center. The monitoring page displays deployment results, including successful, pending, and failed device check-ins. Reviewing the policy status helps administrators quickly identify devices that require troubleshooting or additional investigation.
- Navigate to Devices > Configuration > Policies and open the policy.
- Review the Overview, Device status, User status, to confirm successful deployment.
- If any devices show a failed or pending state, review the error details and ensure the device is online and has synchronized with Intune.
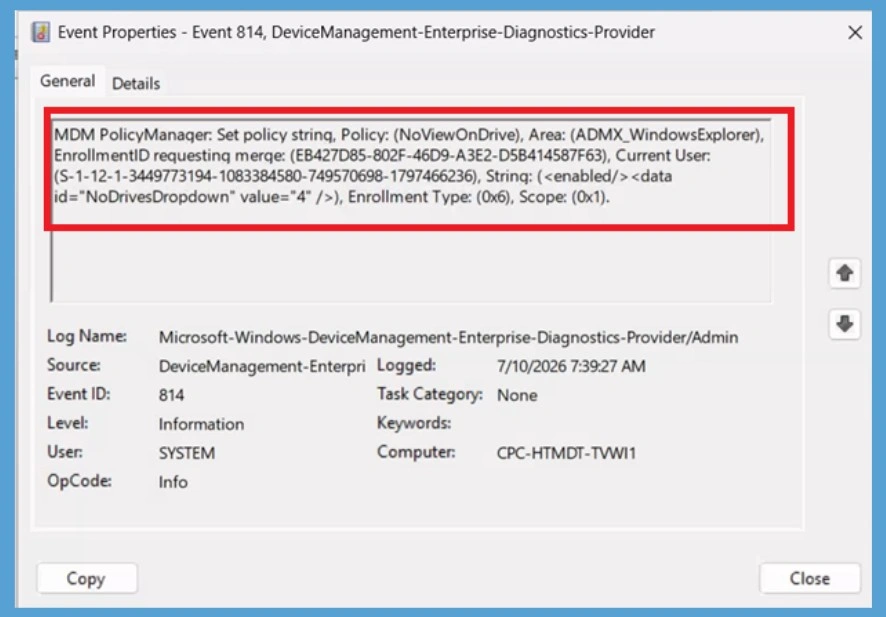
Client Side Verification
To verify policy application, open Event Viewer and navigate to Applications and Services Logs > Microsoft > Windows > DeviceManagement-Enterprise-Diagnostics-Provider > Admin. Select Filter Current Log from the Actions pane and search for Event ID 814, which indicates that the Intune policy has been processed successfully.
Delete Policy Permanently
When the policy is no longer needed, you can permanently delete the Prevent Access to Drives from My Computer policy from Microsoft Intune. Before deleting it, ensure that it is no longer assigned to any users or devices to prevent configuration changes. After deletion, Intune stops managing this configuration.
- Navigate to Devices > Configuration > Policies, select the policy, click the three-dot menu, and choose Delete. Confirm the deletion when prompted.
For detailed information, you can refer to our previous post – How to Delete Allow Clipboard History Policy in Intune Step by Step Guide.
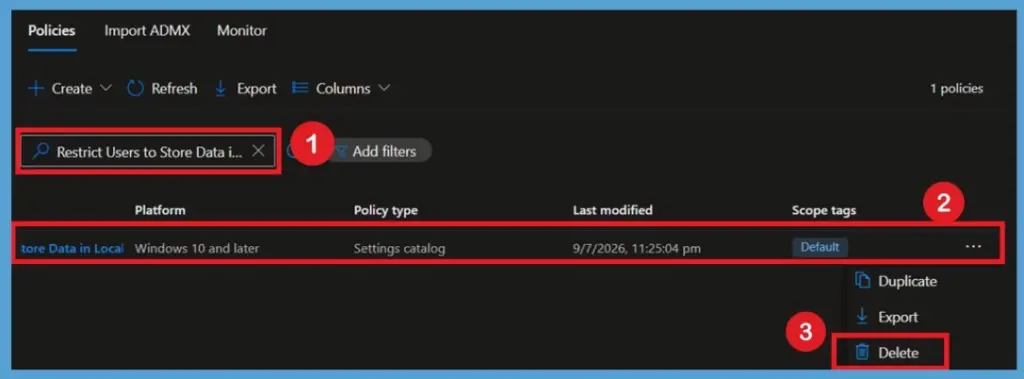
Remove Policy from Assigned Groups
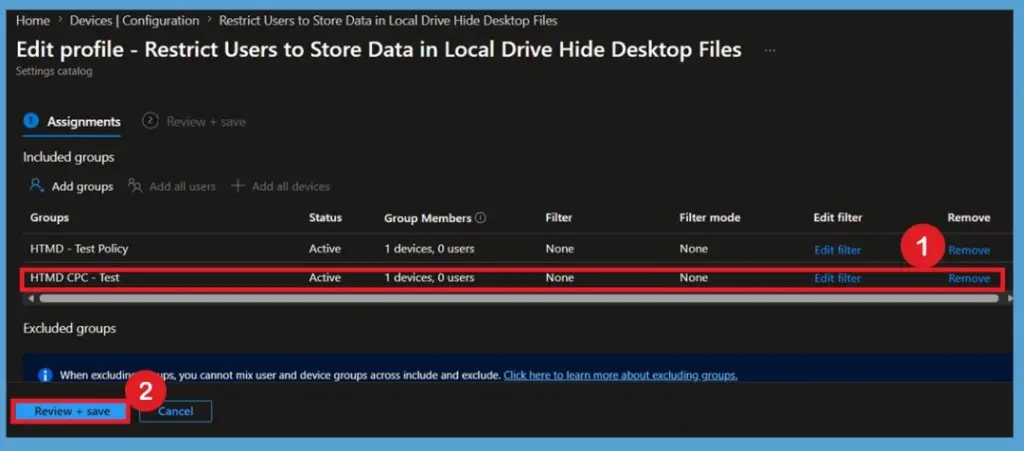
If the drive restriction is no longer required, edit the Prevent Access to Drives from My Computer policy and remove the assigned Microsoft groups. Save the updated configuration so the policy is no longer targeted to those users or devices. After the next device synchronization, the drive access restrictions will be removed from the affected devices.
For detailed information, you can refer to our previous post – How to Delete Allow Clipboard History Policy in Intune Step by Step Guide.
Need Further Assistance or Have Technical Questions?
Join the LinkedIn Page and Telegram group to get the latest step-by-step guides and news updates. Join our Meetup Page to participate in User group meetings. Also, join the WhatsApp Community and the Whatsapp channel to get the latest news on Microsoft Technologies. We are there on Reddit as well.
Author
Anoop C Nair has been Microsoft MVP from 2015 onwards for 10 consecutive years! He is a Workplace Solution Architect with more than 22+ years of experience in Workplace technologies. He is also a Blogger, Speaker, and Local User Group Community leader. His primary focus is on Device Management technologies like SCCM and Intune. He writes about technologies like Intune, SCCM, Windows, Cloud PC, Windows, Entra, Microsoft Security, Career, etc
Anoop C Nair is Workplace Technology solution architect with 25+ years of experience in global enterprise organizations such as JP Morgan, Capgemini, etc. He is Microsoft Certified Trainer. Microsoft MVP from 2015 onwards for consecutive 11 years! He also conducts Intune and modern workplace tech training for enterprise organizations. He is Blogger, Speaker, and Founder of HTMD Community and HTMD Conference. His focus is on Device Management technologies such as Intune, Windows, Cloud PC. He writes about technologies like Intune, SCCM, Windows, Cloud PC, Windows, Entra, Microsoft Security.
Hi Anoop,
This article is very helpful. Does this restrictions also apply on Windows 10 Pro edition?
Hi, No this is not available for Windows 10 and Windows 11 Home, Pro, and Business editions. Only available for Enterprise and Education as per MS docs.
What if we wish to allow users to utilize OneDrive KFR so that their files will sync, but otherwise disallow c:\ access? Basically the SharedPC profile is too broad. It can obviously be done as you can access c:\users\$user\downloads even with the restriction on, sadly there’s no documentation I’ve been able to find on doing this.
Can we install application after this ristriction?
Hi beesee,
Yep exactly what I’m trying to achieve, basically Shared PC Mode with Local Storage Disabled BUT still allow OneDrive Sync.
Plus the Shared PC Mode allows the Desktop to be disabled without hiding it, so we can still put things in Public Desktop and all icons can be seen, but stops you adding more icons.
Cannot seem to get best of both worlds 🙁
Hello ,
We need to block all system drive and allow USB ( Pendrive ) on same system from Intune. is it possible ?
Thanks,
Rushi
This is a great article but even if I block C drive access.
Along with it my One drive access is also blocked and I do not want that.
Could you please suggest something ? I intend to block C drive but allow users to save their data on their one drive.
Hi Clinton,
Did you find a way to allow users to save their data on drive and to block C drive acces?