Let’s learn how to modify the Windows Recovery Environment (WinRE) behaviour in Windows 11. The Windows Recovery Environment (WinRE) is crucial to your Windows system and can repair common causes of unbootable operating systems.
It is based on the Windows Preinstallation Environment (WinPE) and can be customized with additional drivers, languages, Windows PE Optional Components, and other troubleshooting and diagnostic tools. By default, WinRE is preloaded in Windows 10 and 11 for desktop editions like Home, Pro, Enterprise, and Education, Windows Server 2016, and later installations.
WinRE is a very effective tool. It can restore Windows 10, Windows 11 Operating Systems to a previous date, perform disk checks, repair boot manager and system file checks, and also go back to a previous version of Windows. Many users want ways to disable WinRE because it allows unauthorized users to use the tool to factory restore their devices and remove all the user data.
By disabling the Windows Recovery Environment, your Advanced Options menu will no longer contain an option to Reset this PC. Using these tools, you can troubleshoot and recover your system from various system problems and errors.

What is the Windows Recovery Environment?
Windows recovery environment is nothing but a recovery environment designed to help you troubleshoot and repair common startup issues. By default, the Windows recovery environment is Enabled in all desktop editions of Windows 11. With the help of the recovery environment, users can rebuild and repair the bootloader, add new Windows installations to the boot menu, restore the Windows operating system to an earlier date with the help of a previously created restore point, restore Windows images, and much more. In short, the Windows Recovery Environment is helpful in troubleshooting startup issues.
Process to Enable Disable Windows Recovery Environment (WinRE)
As we all know Windows has the unique feature of providing various methods for modifying settings; Windows helps to protect the user by providing many processes. Here, in the Windows Recovery Environment, the User can make any changes in its behaviour. The methods are listed below.
- Enable Disable Windows Recovery Environment (WinRE) Using Windows Terminal (Admin)
- Enable Disable Windows Recovery Environment (WinRE) Using Registry Editor
What is new with WinRE for Windows 11
- You can now run most tools within WinRE without selecting an administrator account and entering the password. When booted into the Recovery environment, encrypted files won’t be accessible unless the user has the key to decrypt the volume.
- We’ve updated the behaviour of Advanced startup (Settings > Update & Security > Recovery > Advanced startup “Restart now”) so Ease of Access features will work in the recovery environment. For example, previously, if the narrator feature were enabled before launching Advanced Startup, it would not be enabled on restart (and could not be enabled). Advanced Startup boots directly into the Windows Recovery Environment, where a user can turn on Ease of Access features using a keyboard shortcut.
Enable Disable Windows Recovery Environment WinRE using Windows Terminal (Admin)
You can make changes using the Windows Terminal in Administrator access. To do so, right-click on the window icon or press Win key + X, then press Yes on User Account Control to permit to make changes to this device.
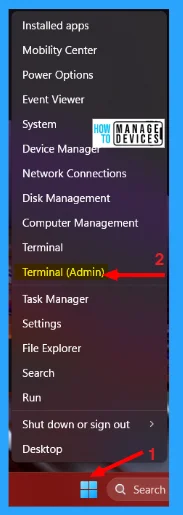
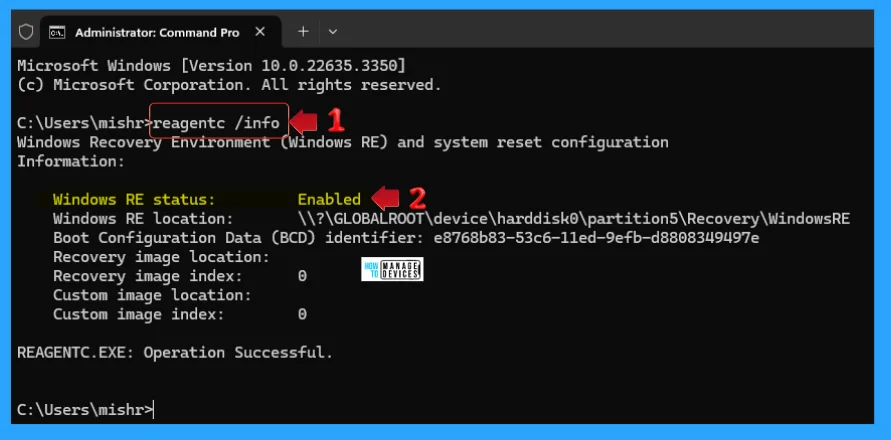
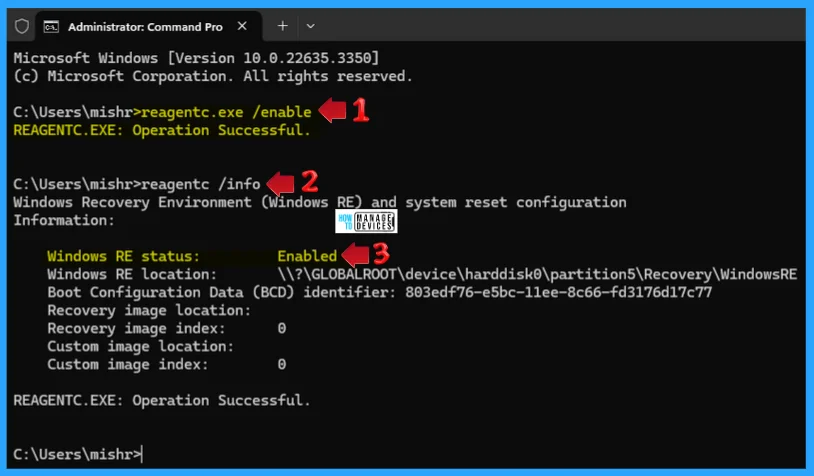
When the Window Terminal (Admin) opens, then select Elevated Command Prompt or PowerShell (Admin) both have the same command to receive the information. Now, type the following command to know the Windows Recovery Environment (Windows RE) and System Reset Configuration Information then press Enter.
Type the command reagentc /info and then press Enter
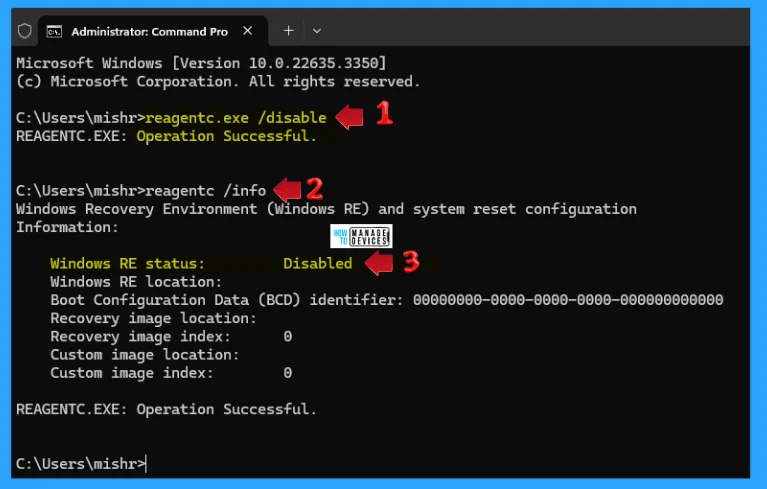
If your Windows Recovery Environment (WinRE) is enabled, then type the following command and press Enter to disable the setting. Then, you can type the info command listed to know the status (i.e. disabled), as shown in the image below.
- Type reagentc.exe /disable, then press Enter; Operation Successful
- Type reagentc /info, then press Enter to confirm the status.
If your Windows Recovery Environment (WinRE) is disabled, then type the following command and press Enter to enable the setting. Then, you can type the info command listed to know the status (i.e. disabled), as shown in the image below.
- Type reagentc.exe /enable, then press Enter; Operation Successful
- Type reagentc /info, then press Enter to confirm the status.
Enable Disable Windows Recovery Environment (WinRE) using Registry Editor
Another way is to Set Active Hours on Windows 11 from the registry. This procedure is done using the Registry Editor. Let’s check how to Set Active Hours on Windows 11 using the Registry Editor. You can now follow the process listed below to enter the registry editor to modify changes.
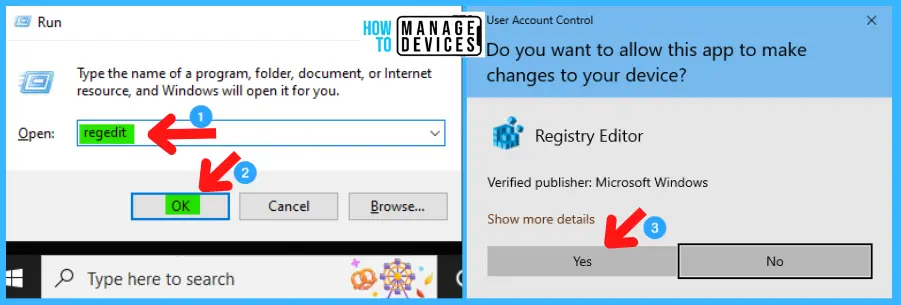
- Window Key + R (To open run command)
- Type ‘regedit‘ and press OK
- Administrator permission press Yes
NOTE! Take Backup—If any mistake occurs in the Registry Editor, it may affect the system. It is advisable to take a backup of the Registry before proceeding. In the Registry Editor, go to File in the left top corner for backup. Click on it, then select Export and save the backup.
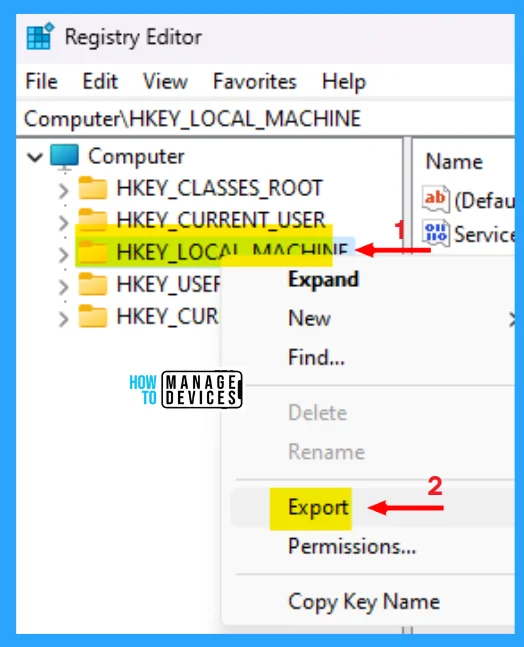
When the registry editor opens, you must take the backup for your registry editor. Follow the steps below to make a backup for your registry editor.
- Go to File.
- Right-click on HKEY_LOCAL_MACHINE
- Click on Export.
- Save it.
In the registry editor, follow a certain path for certain applications. The trail to reach the required folder for further modification is listed below. Under the Registry Editor, there is a folder named Computer expand the Computer folder and process further.
- Expand the HKEY_LOCAL_MACHINE
- Expand SYSTEM under HKEY_LOCAL_MACHINE
- Expand CurrentControlSet under SYSTEM
- Expand Control under CurrentControlSet
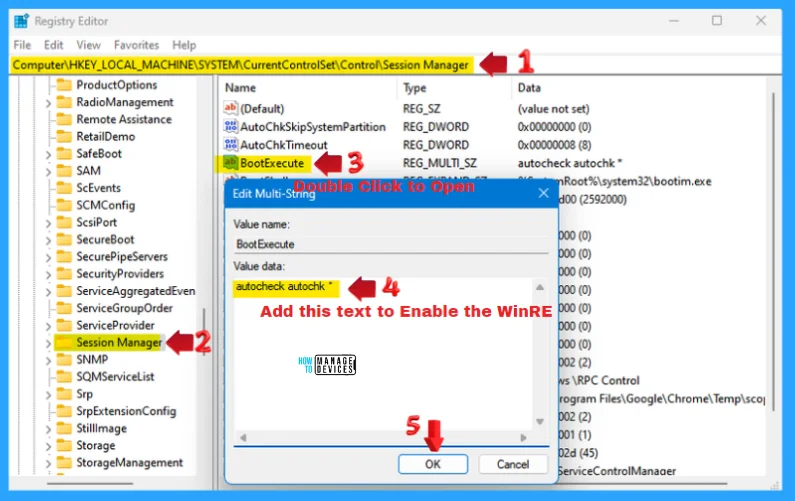
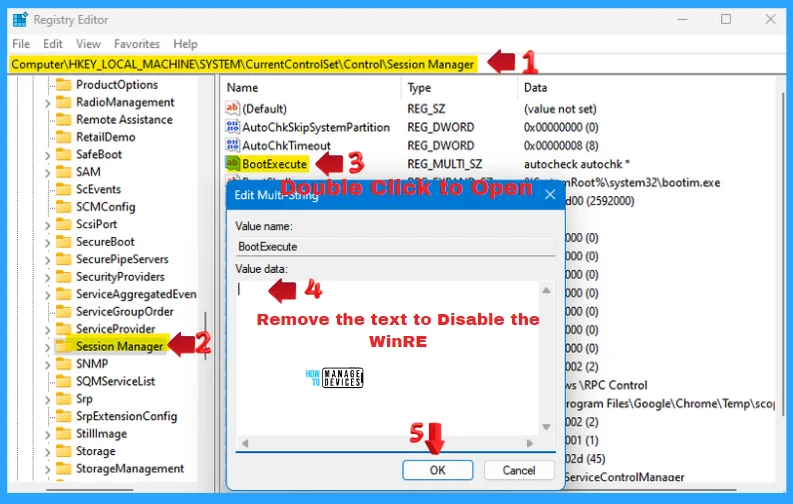
- Click on Session Manager and find the BootExecute
The path is HKEY_LOCAL_MACHINE\SYSTEM\CurrentControlSet\Control\Session Manager.
When you find the BootExecute option, double-click it to open it. Add the text autocheck autochk* and click OK to enable the WinRE in Windows 11, as shown in the image below.
Again, follow the trail to reach the required folder for further modification, which is listed below. Under the Registry Editor, there is a folder named Computer. Expand the Computer folder and process further.
- Expand the HKEY_LOCAL_MACHINE
- Expand SYSTEM under HKEY_LOCAL_MACHINE
- Expand CurrentControlSet under SYSTEM
- Expand Control under CurrentControlSet
- Click on Session Manager and find the BootExecute
The path is HKEY_LOCAL_MACHINE\SYSTEM\CurrentControlSet\Control\Session Manager.
When you find the BootExecute option, double-click it to open it. Remove the text autocheck autochk* and click OK to disable the WinRE in Windows 11, as shown in the image below.
NOTE! Restart the device after every change made by the user.
I hope the information on Modifying the Windows Recovery Environment (WinRE) in Windows 11 is helpful. Please follow us on the HTMD Community and visit our website, HTMD Forum, if you like our content. Suggest improvements, if any, and we’d love to know which topic you want us to explore next.
We are on WhatsApp. To get the latest step-by-step guides and news updates, Join our Channel. Click here – HTMD WhatsApp.
Author
Alok is a Master of Computer Applications (MCA) graduate. He loves writing on Windows 11 and related technologies. He likes to share his knowledge, quick tips, and tricks with Windows 11 or Windows 10 with the community.
