Fix Azure AD Subscription Error: We cannot proceed with Signup Due to an Issue with Your Account. I’m a big fan of Microsoft’s Azure AD and Azure AD Premium offerings. However, the new Azure AD subscription does not always meet my expectations.
I encountered the following 3 errors several times when subscribing to Azure AD and Azure AD Premium. This post will explore how to resolve troubles/issues during the New Azure AD subscription signup.
This post provides all the details about the Azure AD Subscription Error. We cannot proceed with the signup process due to an issue with your Azure AD subscription account.
Follow these steps to resolve the Azure AD subscription error preventing signup. Firstly, ensure no issues with your account hinder the signup process. If you encounter difficulties during verification, verify your account through phone verification.
If no subscription is found, you must obtain one before accessing Microsoft Azure and its services. By addressing these steps, you can effectively resolve the Azure AD subscription error and proceed with your signup without further issues.
Table of Contents
- Best way to use Azure Capacity Reservation to Reduce the Azure Cost
- Transfer Azure Subscription to Different Azure AD Directory
- New Azure AD Audit Logs | MicrosoftGraphActivityLogs | EnrichedOffice365AuditLogs
Fix Azure AD Subscription Error We cannot Proceed with Signup Due to an Issue with Your Account
Learn how to use Azure AD subscription error, Azure AD phone verification error, and Azure AD no subscription error. Here is a video tutorial to learn more about the workaround (or solution?) for the Azure AD subscription issue.
| Fix Azure AD Subscription Error? |
|---|
| We cannot proceed with Signup Due to an Issue with Your Account |
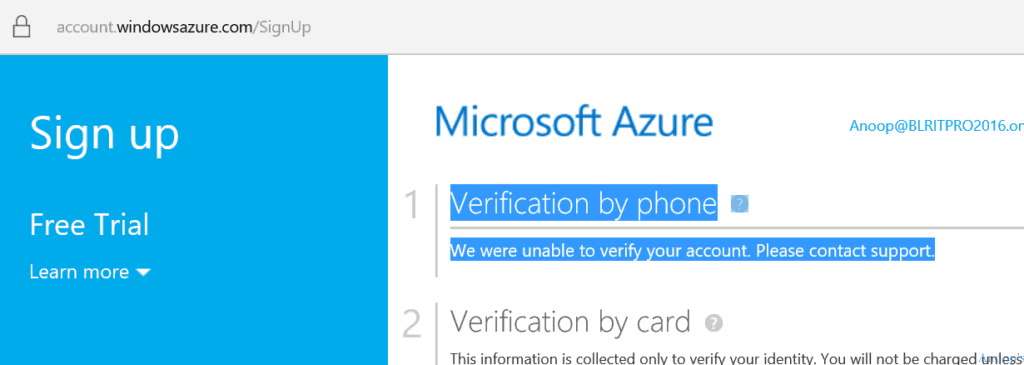
| Verification by phone – We were unable to verify your account |
| No subscription found – Before you can start using Microsoft Azure, you need to get a subscription |
- Microsoft Azure Error We cannot proceed with Signup Due to an Issue with Your Account

- Azure AD Error – Verification by phone – We could not verify your account.

- No subscription found – Before you can start using Microsoft Azure, you need to get a subscription
All these Azure AD subscription errors are linked. The no subscription error can be caused by using a different username and password to log in to Azure AD.
Try to open the Azure AD portal in a private browser. Before activating the Azure AD subscription, the Microsoft verification team will check the phone number to see whether there is an active/expired subscription for the mobile number. They will not send the authentication code to your mobile if it’s there. This could be one of the scenarios in which you will get error 2 ( Verification by phone—We could not verify your account).
In one of the EMS guides here, I read that “NOTE: Signing up for an Azure trial requires that you provide a credit card that has NEVER been used previously to sign up for an Azure subscription to verify your identity. Your credit card will be charged $1.00 initially to prove it is valid.
The charge will later be reversed. You may have only one trial account that uses the same billing information. If you already have a valid Azure trial account, you must use that for the labs or a different credit card.”
In my scenario, the mobile number was used for a different active AAD subscription. However, the email ID has never been used for any subscription before. The solution was to use the existing Azure AD subscription and create a new directory.
Log in to the Azure portal (https://manage.windowsazure.com) with your existing username and password (active AAD subscription). Navigate to Active Directory and click the NEW button at the bottom of the screen. You may have to raise a support call with Microsoft if you don’t have an active subscription.

Once you click the NEW button, Navigate via APP Services -> Active Directory -> Directory –> Custom Create. Click on the Custom Create button!

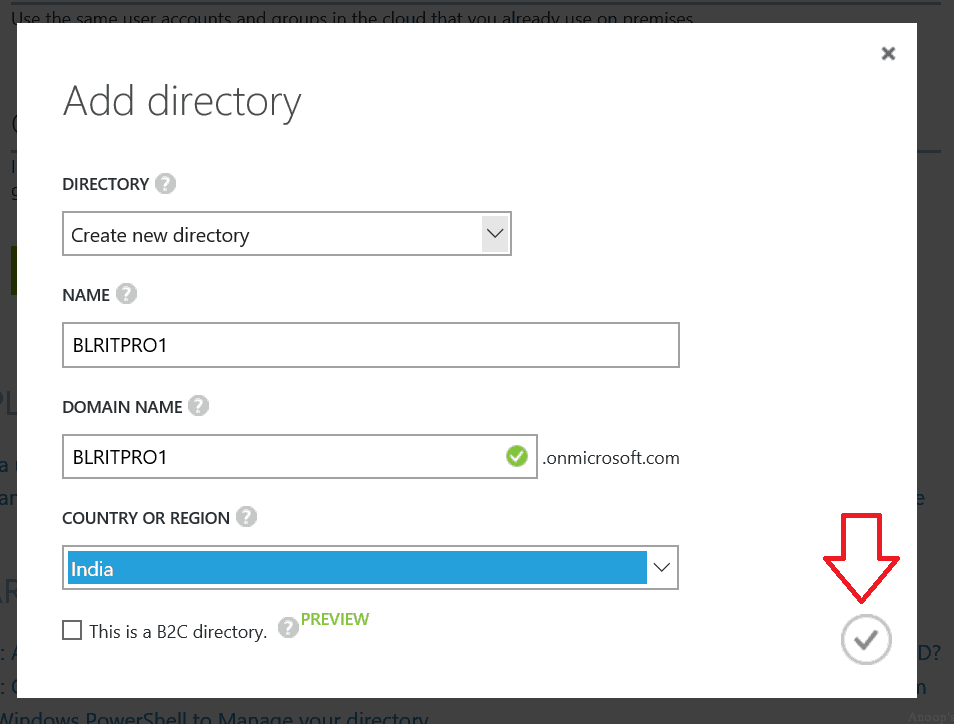
Once you click the custom create button, provide the directory and other details (Create a new directory, Name, and Domain name) on the “Add Directory” page, as shown in the following picture. Then click on the RIGHT mark.

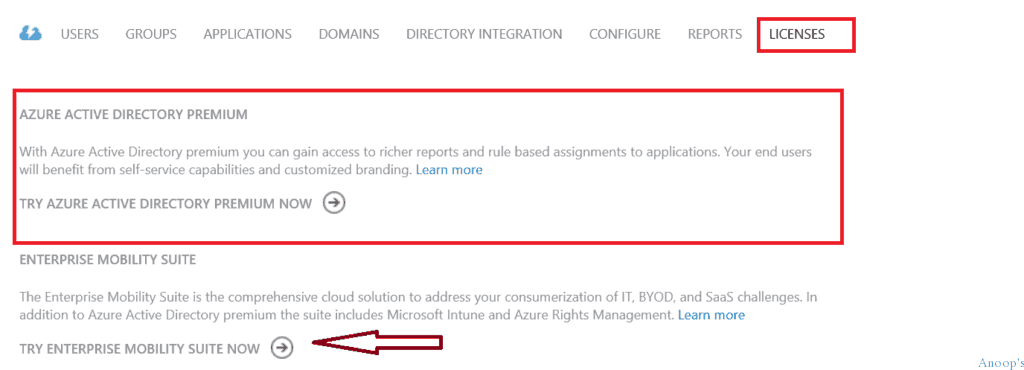
Click on the new directory you created and navigate to the Licenses tab. Once in the AAD licenses tab, click “Try Azure Active Directory Premium Now” or “Try Enterprise Mobility Suite Now“.
You just activated an Azure AD Premium or EMS subscription to a newly created Azure AD.

We are on WhatsApp now. To get the latest step-by-step guides, news, and updates, Join our Channel. Click here. HTMD WhatsApp.
Author
Anoop C Nair is Microsoft MVP! He is a Device Management Admin with more than 20 years of experience (calculation done in 2021) in IT. He is a Blogger, Speaker, and Local User Group HTMD Community leader. His main focus is on Device Management technologies like SCCM 2012, Current Branch, and Intune. He writes about ConfigMgr, Windows 11, Windows 10, Azure AD, Microsoft Intune, Windows 365, AVD, etc.


