Let’s discuss Microsoft Azure CLI Deployment using Intune Enterprise App Catalog App. Deploying Microsoft Azure CLI through Intune’s Enterprise App Catalog makes managing software on all your organization’s devices easy.
The Azure command-line interface (Azure CLI) is a set of commands you can use to create and manage Azure services. It works across Azure services and is designed to help you start using Azure quickly, focusing on automating tasks. So, instead of clicking around in the Azure portal, you can type in commands to get things done quickly and easily.
Microsoft has just introduced the Intune Enterprise App Catalog App, a new type of application. Similar to the Microsoft Store app, it comes as a pre-made package. All the essential details, like app names, descriptions, and other info, are already filled in for you.
This post covers everything you need to know about deploying Microsoft Azure CLI using the Intune Enterprise App Catalog App. The Intune Enterprise App Catalog App contains lots of apps with different versions. This makes it the best solution for dealing with patching issues.

- Install Mozilla Firefox with Intune Enterprise App Catalog App
- Install Mozilla Firefox Browser from Microsoft Store using MEM Intune
- Guidelines for Installing Microsoft PC Manager from New Microsoft Store in Intune
- 6 Exciting Features Coming to Intune Enterprise App Management
- Create and Deploy Python Applications with Intune Enterprise App Catalog App
- Install Zoom Client using Windows Enterprise App Catalog App with Intune
What can I Do with Azure CLI?
With Azure CLI, you can perform administrative tasks on Azure resources. You can create, update, and delete resources such as virtual machines, databases, storage accounts, etc.
Can I Use Azure CLI on Any Platform?
Azure CLI is cross-platform so that you can use it on Windows, Linux, or macOS.
Microsoft Azure CLI Deployment using Intune Enterprise App Catalog App
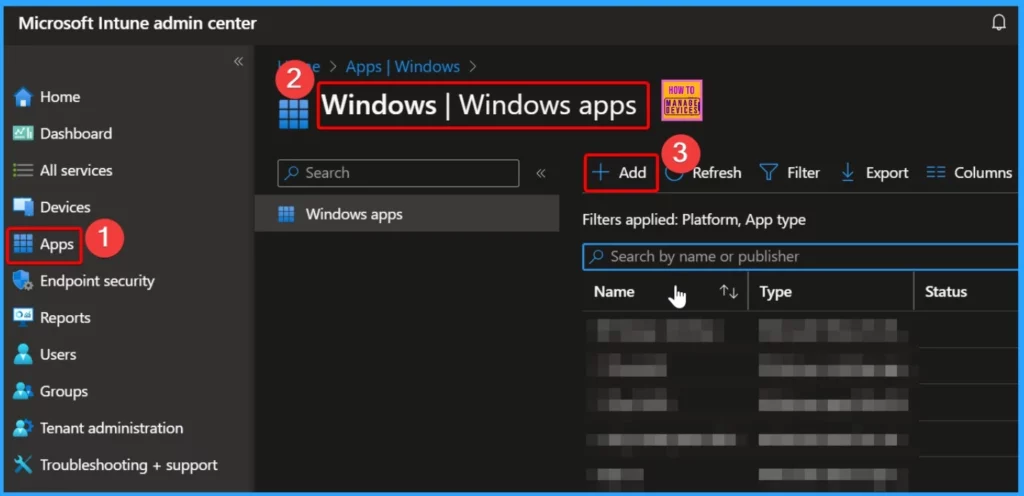
You can easily install Microsoft Azure CLI Deployment using the Intune Enterprise Catalogue App. Sign in to the Intune Admin Center portal. Go to Apps > Windows > Windows Apps. Select the Add button from the below window.
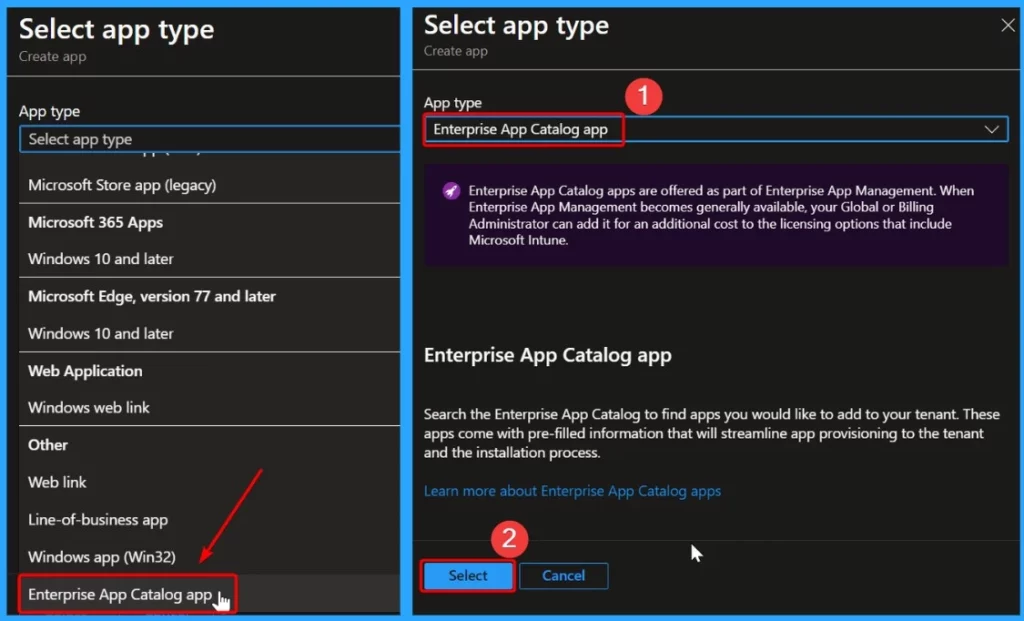
Enterprise App Catalog apps are offered as part of Enterprise App Management. When Enterprise App Management becomes generally available, your Global or Billing Administrator can add it for an additional cost to the licensing options, including Microsoft Intune.
- Select the app type as Enterprise app catalog app
- Click the Select button
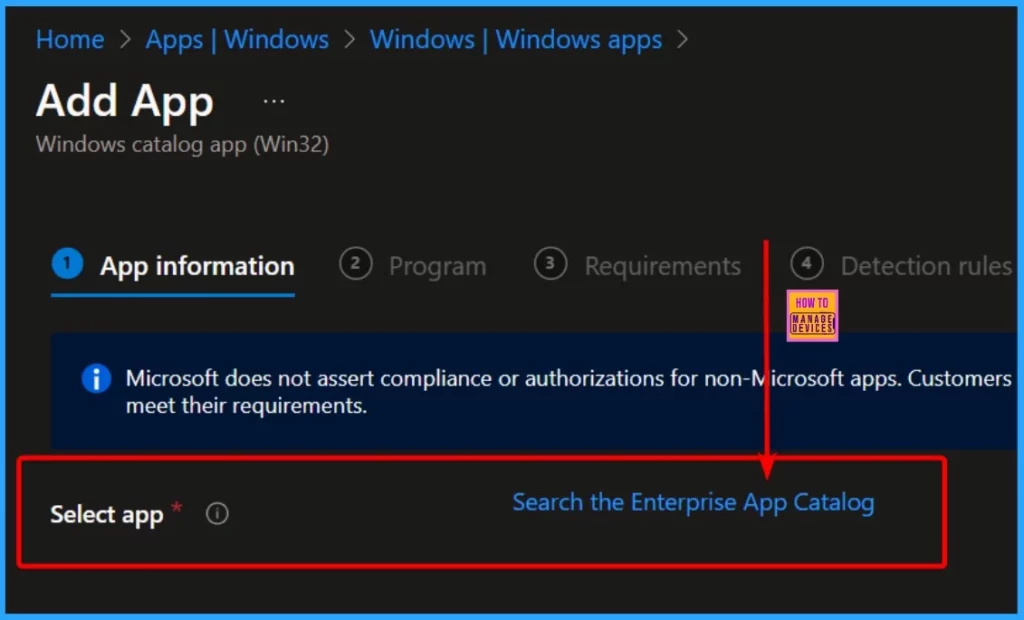
In the “App Information” section, you’ll see a part labelled “Select app,” where you can choose which app to install. A clickable link also says, “Search the Enterprise app catalog app.” If you click this link, you can pick the app you want to use on your system.
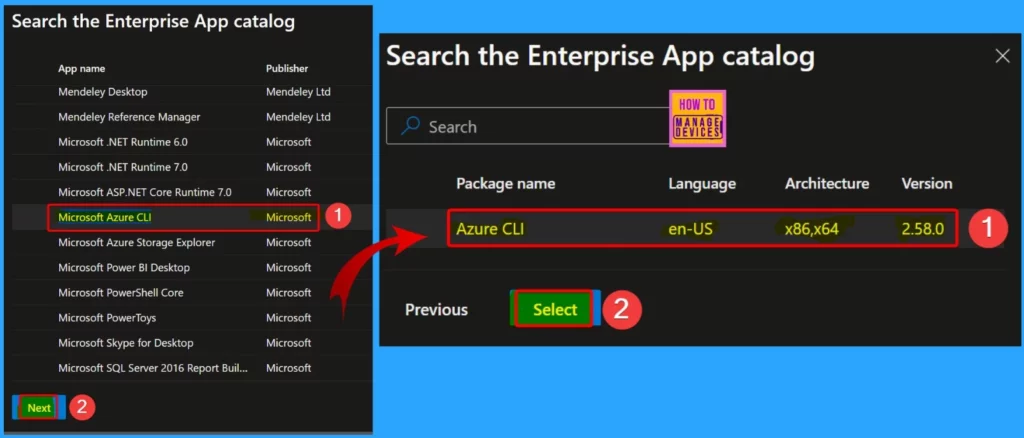
In the “Search the Enterprise app catalog” window, choose “Microsoft Azure CLI” as the file type. Microsoft publishes this app. The second window will appear after clicking the “Next” button and show the following information.
| Package name | Language | Architecture | Version |
|---|---|---|---|
| Azure CLI | en-US | x86,x64 | 2.58.0 |
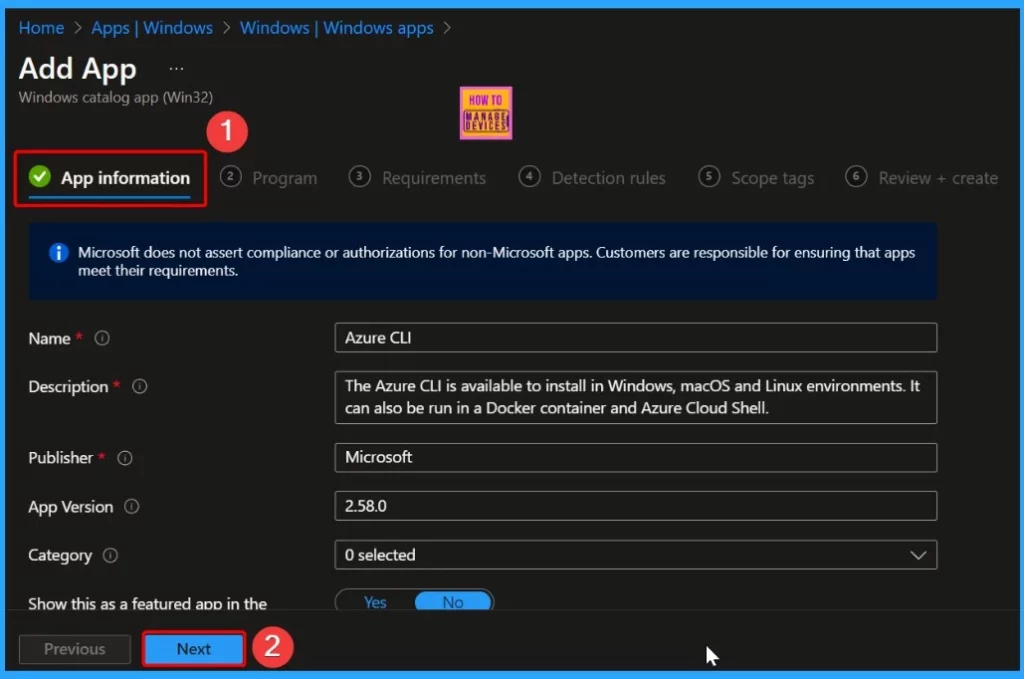
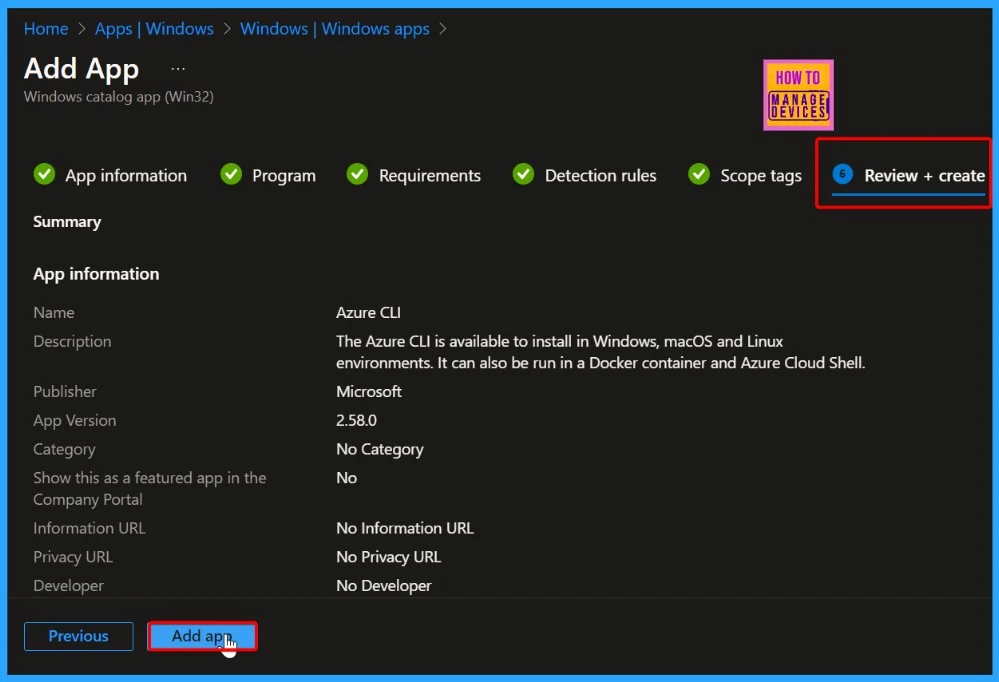
Let’s talk about the “App Information” tab. This is the first tab you’ll see when deploying an app in Intune. Here, you’ll find the following information. Take a look at the screenshot below for a visual guide.
- Name: This is the name of the app you’re deploying.
- Description: A brief description of what the app does.
- Publisher: The company or entity that created the app.
- App Version: The app version number.
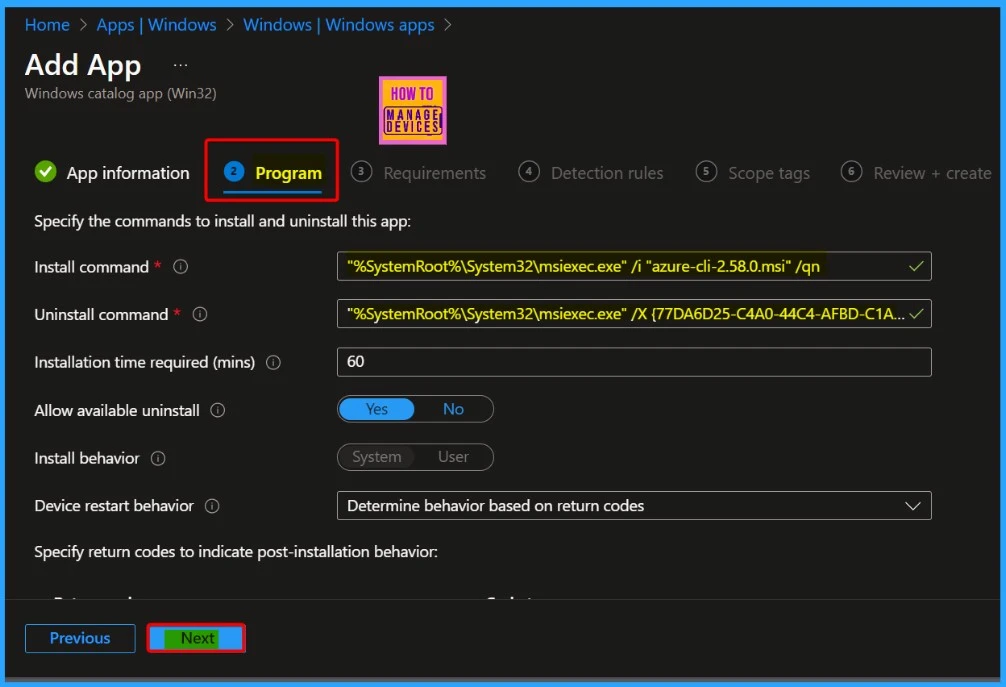
The program tab is the second tab that helps you show information such as the install command, uninstall command, Installation time required, allowable uninstall and Install behaviour.
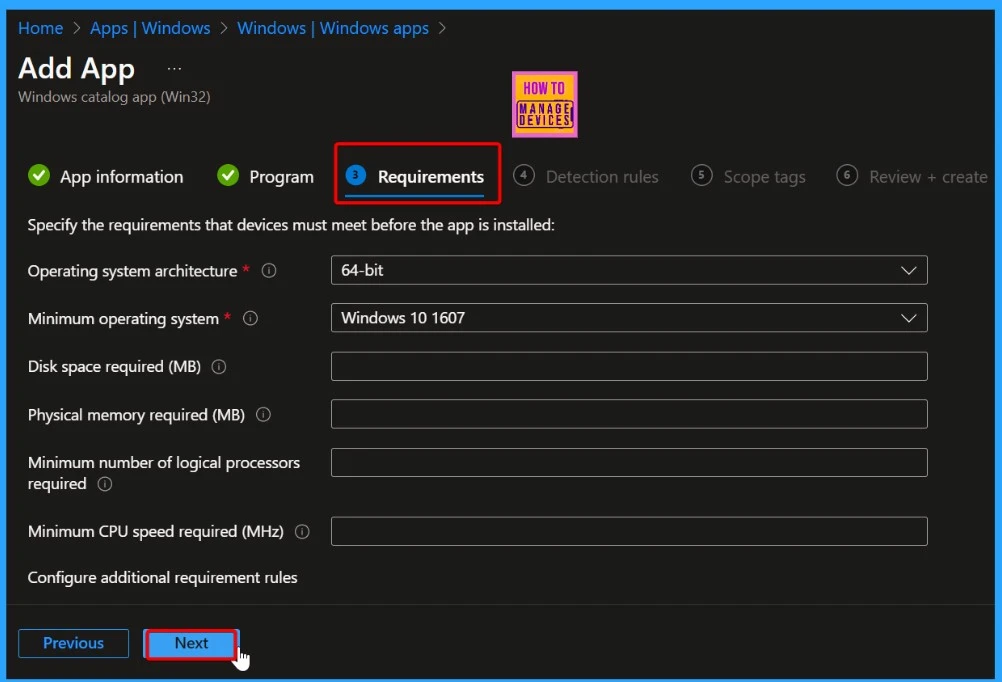
The “Requirements” tab is the third tab that provides essential information about the app’s requirements. Here, you can see details such as Operating System Architecture, which tells you if the app is designed for 64-bit or 32-bit systems.
Minimum Operating System: This specifies the earliest operating system version required for the app to work. For example, “Windows 10 1607” means the app needs at least Windows 10 version 1607 to run. These details help ensure that the app can run smoothly on your device.
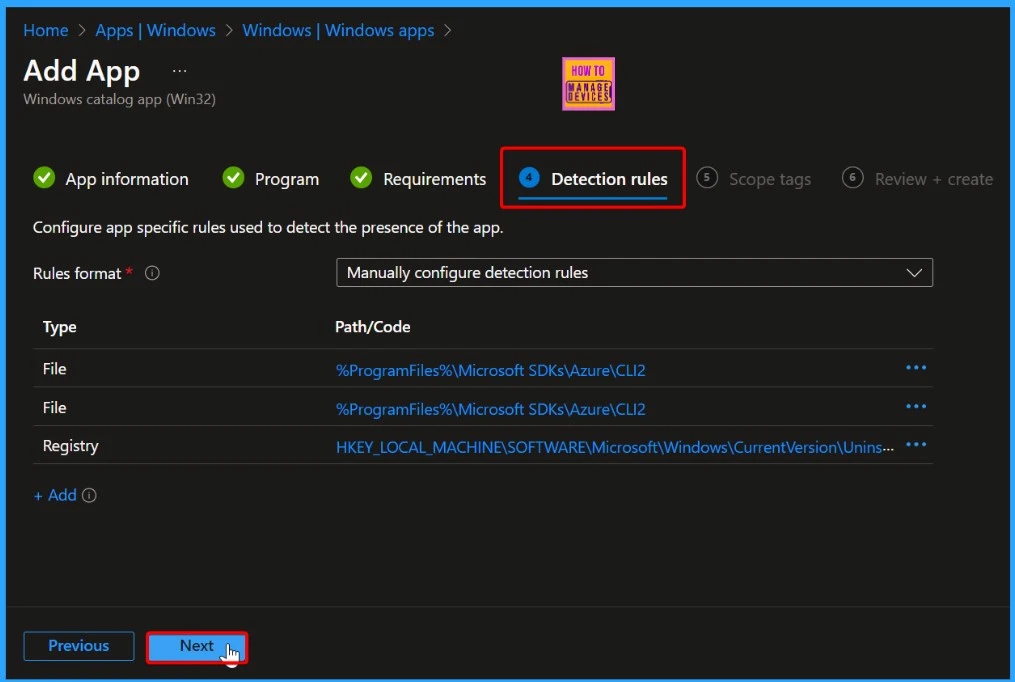
The Detection rules show the following details. Rules format – Manually configure detection rules. Type – Path/Code.
- File – %ProgramFiles%\Microsoft SDKs\Azure\CLI2
- File – %ProgramFiles%\Microsoft SDKs\Azure\CLI2
- Registry – HKEY_LOCAL_MACHINE\SOFTWARE\Microsoft\Windows\CurrentVersion\Unins
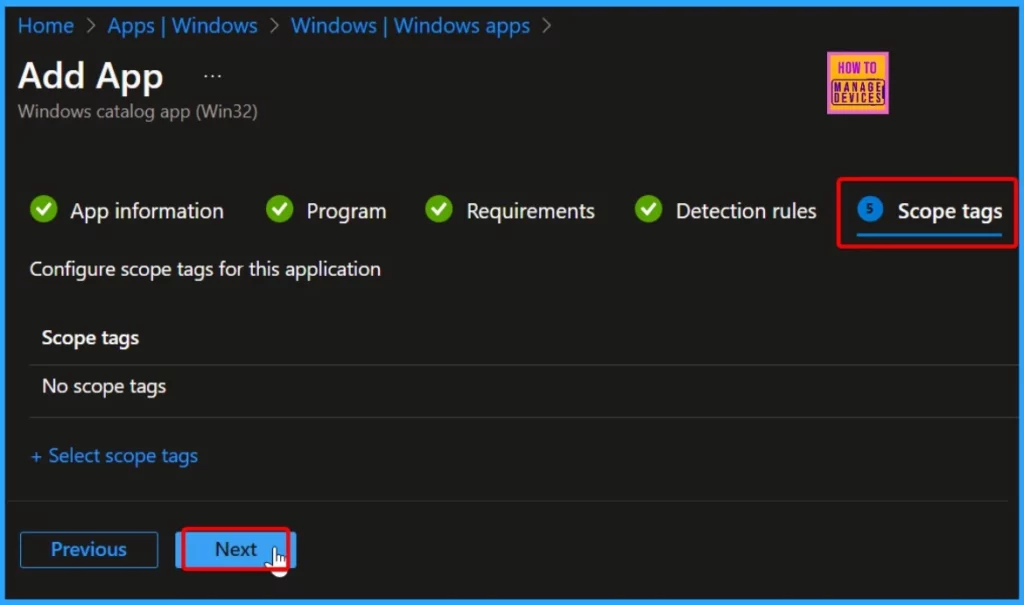
Using Scope tags, you can assign a tag to filter the profile to specific IT groups. One can add scope tags (if required) and click Next to continue.
You need to review your settings in the Review+ Create tab. After clicking Create, your changes are saved, and the profile is assigned.
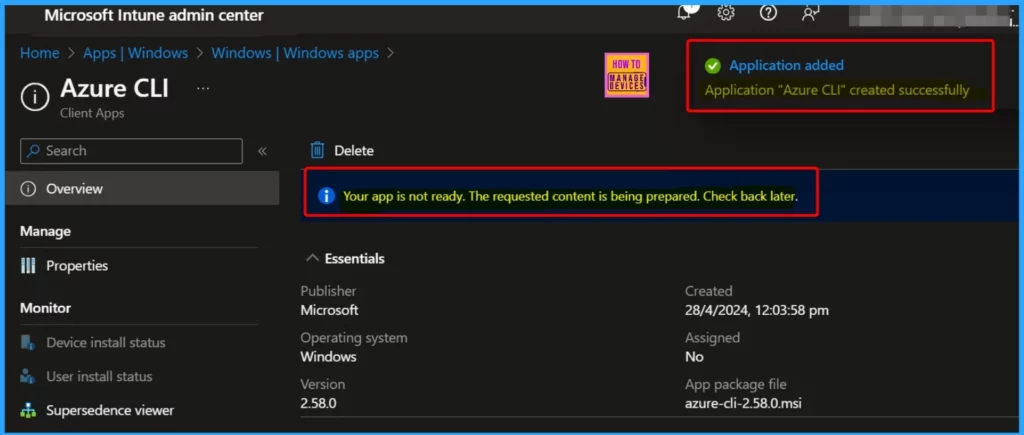
On the Overview page, you can see the status of the application you’ve created. If the Microsoft Azure CLI application has been successfully created, you’ll receive a notification confirming it. However, a banner message might indicate, “Your app is not ready. The requested content is being prepared. Check back later.”
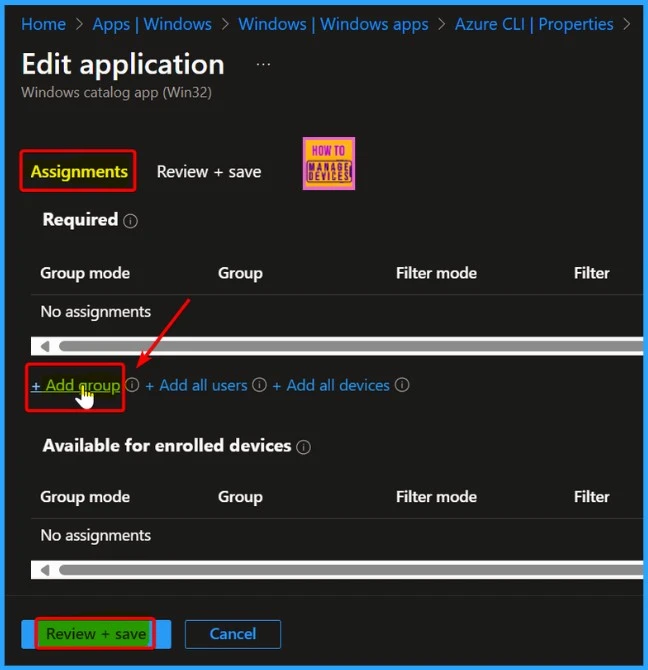
To assign the app to specific groups or users, click the “Add group” link in the assignments section. When you do, a window will appear, showing you a list of groups and a search box. In that search box, type the name of the group you want to assign the app to, then pick the group from the list. This lets you quickly select which groups can use the app.
Monitoring Deployment Status
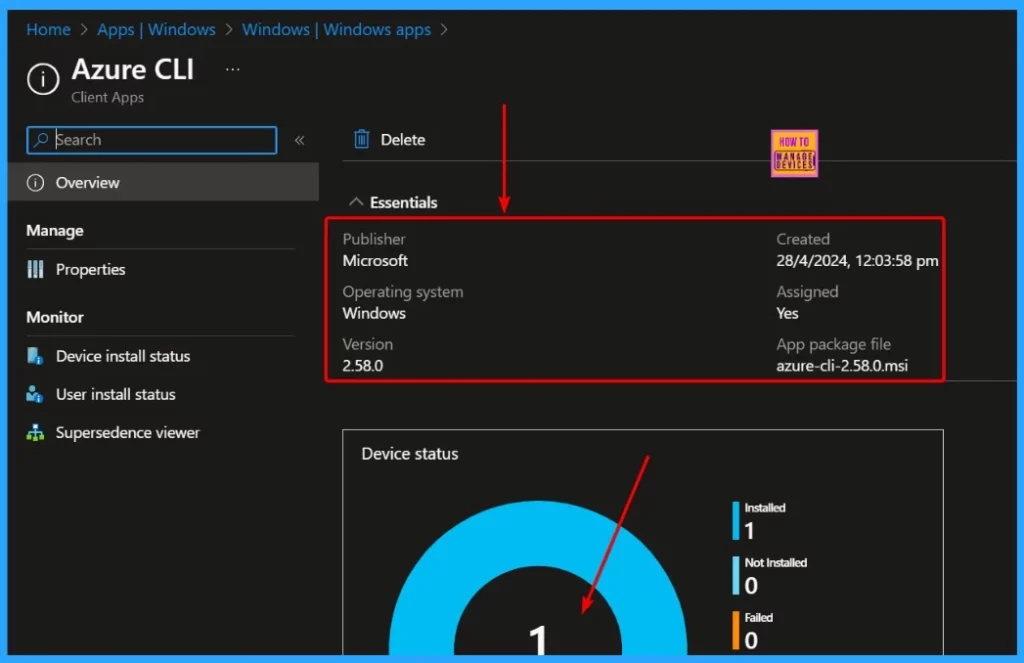
Let’s check the Monitoring Deployment Status of Azure CLI. This section displays essential information like the publisher’s name, creation date, supported operating system, assignment status, version, and the app package file. This helps you keep track of the deployment progress and ensures everything is running smoothly.
End-User Experience
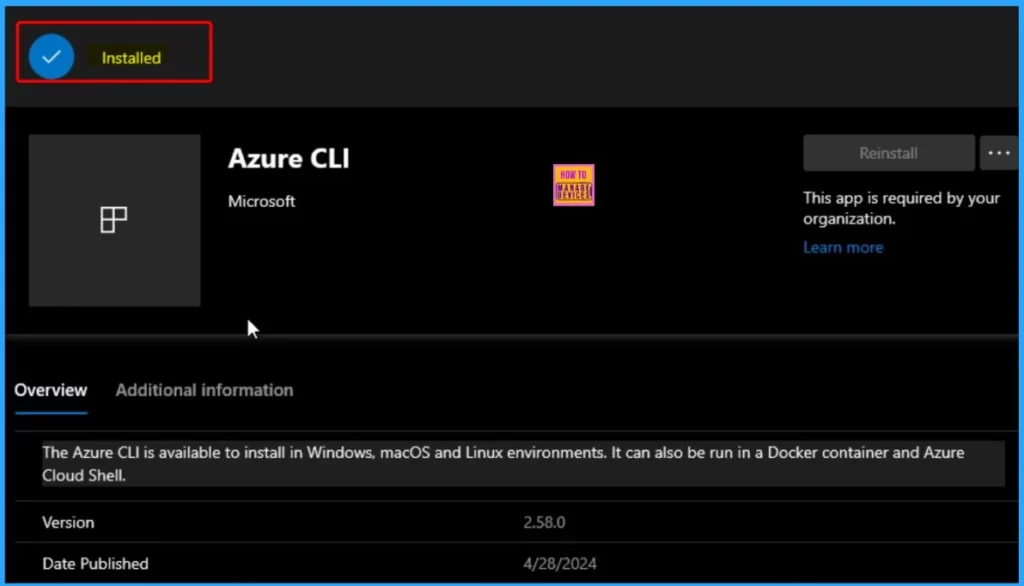
The screenshot below shows that the Azure CLI is installed successfully. It can be installed in Windows, macOS, and Linux environments and run in a Docker container and Azure Cloud Shell.
- Launch the Company Portal app on your device. You can find it in your list of installed apps.
- Look for the menu or navigation bar once you’re in the Company Portal.
- Tap on “Download & Updates” or a similar option.
We are on WhatsApp now. To get the latest step-by-step guides, news, and updates, Join our Channel. Click here. HTMD WhatsApp.
Author
About the Author: Vidya is a computer enthusiast. She is here to share quick tips and tricks with Windows 11 or Windows 10 users. She loves writing about Windows 11 and related technologies. She is also keen to find solutions and write about day-to-day tech problems.
