Hello, everyone. Today, let’s learn how to Configure Android shared devices using Intune. In today’s world, every organization is making significant changes toward digital transformation, especially companies in production and distribution areas.
It is essential to provide the necessary tools and access for all employees in the organization while undergoing digital transformation. This includes front-line workers such as field workers, retail associates, flight crew members, etc. These can be achieved by enrolling the devices as dedicated devices or KIOSK devices.
We can utilize the KIOSK model if your organization has a single purpose. What if your organization has a large retail chain and associates and requires user-specific apps and access? Here comes the option of shared devices. It is hard for you to provide devices for each of them, so we can share the devices with multiple users and manage the user-specific apps and policies using Intune.
Our previous article discussed enrolling Android devices in Corporate-Owned Dedicated Devices for single-app and multi-app modes using the Microsoft Managed Home Screen application. This article will discuss the Entra shared model for corporate-owned dedicated devices. This method can be used only for corporate-owned devices, which requires formatting them for enrolling.
- Prepare Android Virtual Device For Intune Deployment Testing
- Best Way To Remediate Vulnerabilities With Microsoft Defender For Endpoint Using Intune
Pre-requisites
Intune introduced Android Enterprise dedicated devices into Entra AD Shared device mode in preview mode in 2010 and made general availability in the April release of 2104. With shared mode, end-users can sign in and sign out of all participating applications on the device. Let’s look at the prerequisites for using Android-shared devices in Intune.
- Devices must be on Android 6.0 or later versions.
- Devices must support Google Mobile Services (GMS) and should be able to connect to GMS.
- Integrate Managed Google PalyStore to Intune.
Create an Enrolment Profile for Android Shared Devices
In order to enrol the devices using the Corporate-Owned dedicated method, we need to create an Enrollment profile. This enrollment profile contains a token that can be used to enroll the device and has an expiration date. let’s see how to create an Enrollment profile in the below steps
- Login to Microsoft Intune Admin Center.
- Click on Devices > Android > Android Enrollment.
- Now click on Corporate-owned dedicated devices.
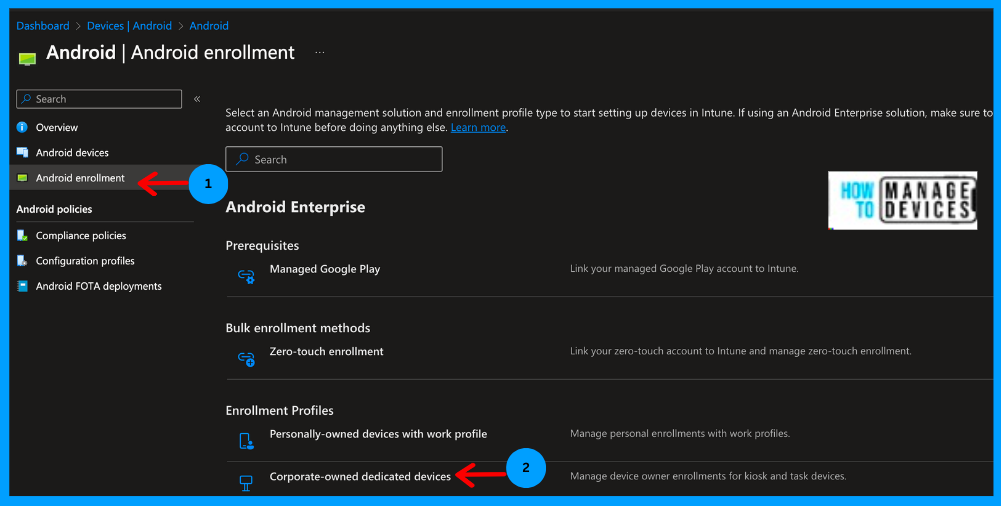
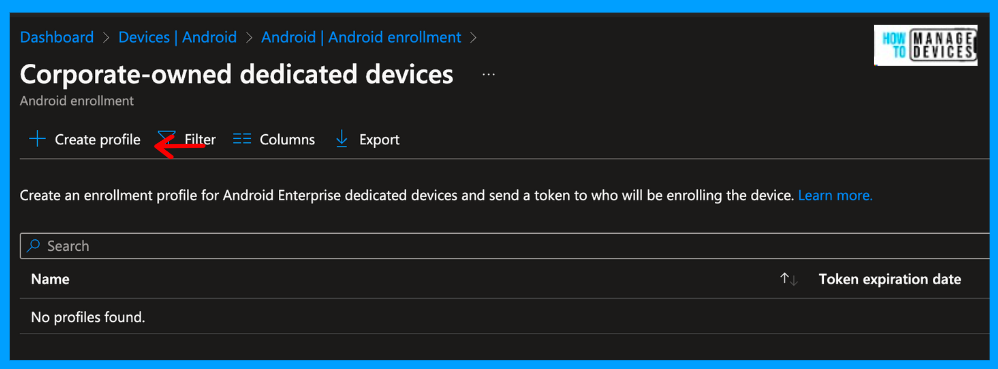
Here, we can view all the profiles that we have created earlier. As we do not have any profile created as of now, it is showing as blank. Now, we need to create a profile. Click on Create Profile.
On the basics page, provide the profile’s Name and Description. Under Token type, we have two options: Corporate-Owned dedicated device(default) and Corporate-Owned dedicated device with Microsoft Entra Shared Mode.
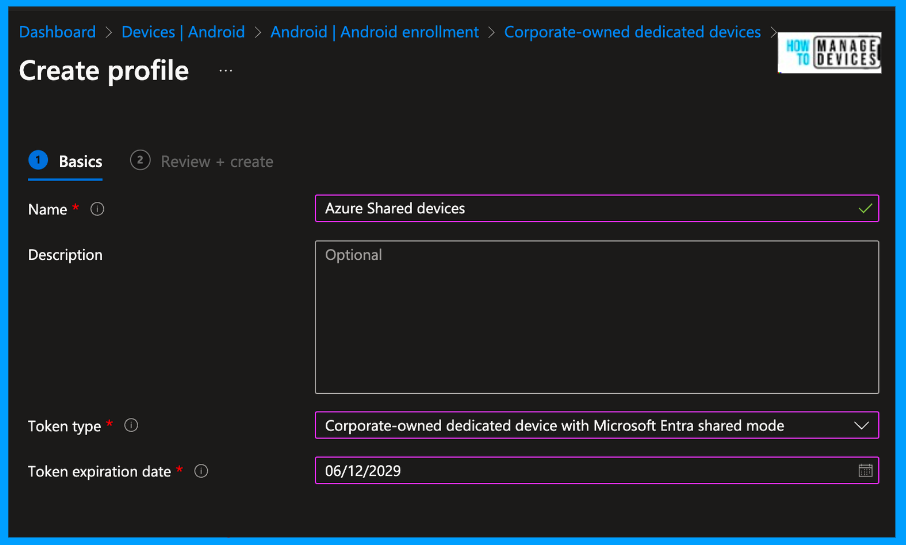
As we want Shared mode, I have selected a Corporate-Owned dedicated device with Microsoft Entra Shared Mode. We need to define the token’s expiry date. I have chosen 5 years for the token expiry. You can check the above screenshot. You can choose a shorter time as per your organizational requirements.
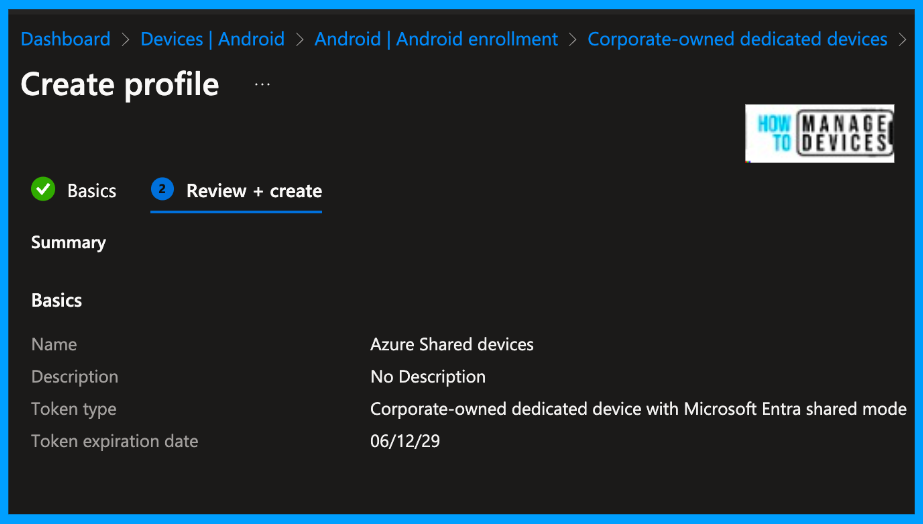
Once defined, click on Next to Review + Create screen. Now validate the details and click on Create. This will create the enrollment profile, which can be used to enroll the devices in Corporate-Owned dedicated shared device mode.
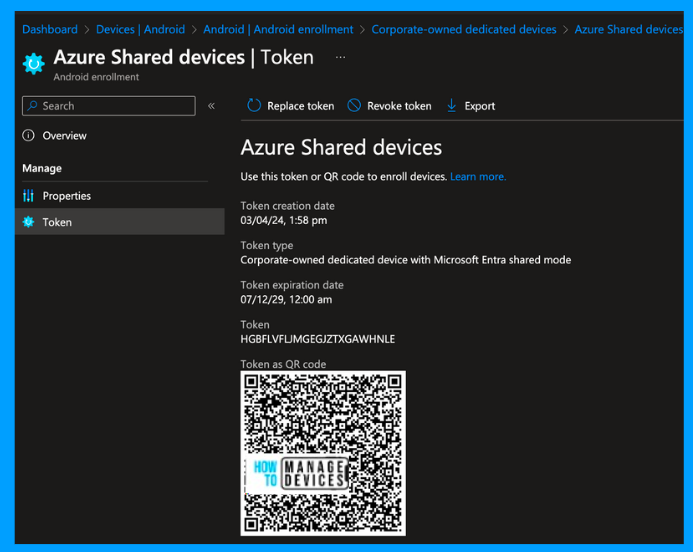
To view the enrollment token, click on the profile, Token, and Show Token to view the QR code for the token and Token value. We can choose a QR code or token value to enrol the devices. We will discuss this further in the User Experience section.
Create a Dynamic Group
Before deploying the profiles and applications to the devices, we need to create a Dynamic Group based on the Enrollment profile created above. This dynamic device group allows us to group and manage all the devices that enrolled with the profile we created. We can create groups either from the Entra portal or from Microsoft Intune. Follow the below steps to create a Dynamic group.
- Login to Microsoft Entra Admin Center.
- Click on Groups > All Groups.
- Click on New Group.

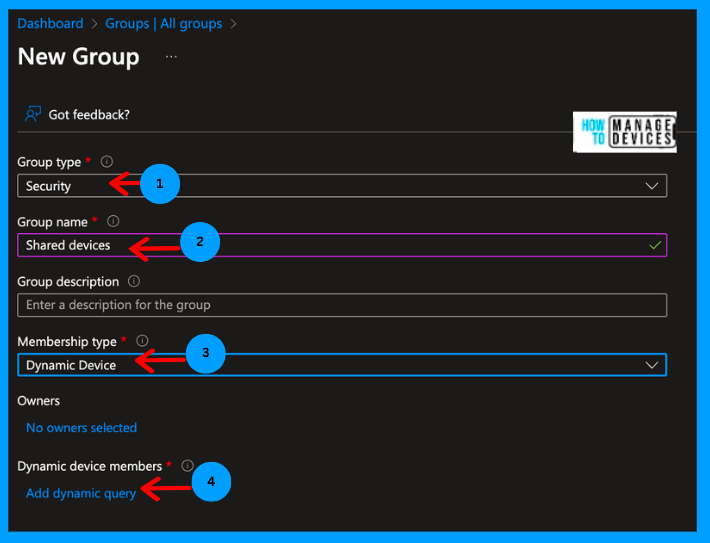
In the New group page, Select the Group type as Security, and Provide the Name and Description for the group. Now, select the Membership type as Dynamic device and click on Add dynamic query to add the dynamic query.
Now, on the Dynamic membership rules page, click on Property, select enrollmentProfileName, set Operator to Equals, and provide the enrollment profile name we created under the Value tab, as shown in the screenshot below. Once done, click on Save. Now click on Create. This will create a Dynamic group. The Dynamic query looks like this: “(device.enrollmentProfileName -eq “Azure Shared Devices”)“
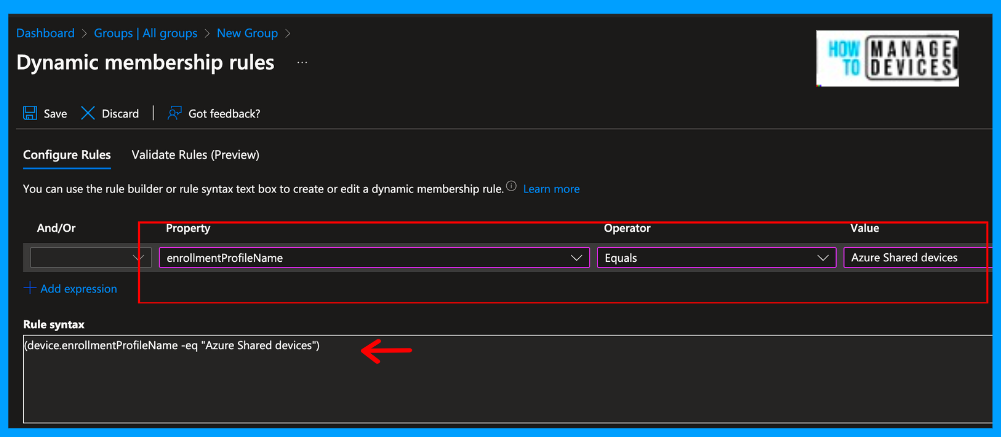
We can use this dynamic group to assign the device profiles and applications. Thus, whenever a device enrols with the Azure Shared Device enrollment profile, it will be part of the Dynamic group that we created and get the Profiles and apps assigned to it.
Deploy Managed Home Screen
Shared devices can be used to access multiple applications on the device. To deploy multiple apps on shared devices, it is always advisable to deploy the Intune Managed Home Screen as a required application and configure the application as per your requirements. To deploy the app, follow the steps.
- Login to Microsoft Intune Admin Center.
- Click on Apps > Android Apps.
- Click on Add.

Under App Type, select Managed Google Play app and click Select. Now, on iFrame, search for Managed Home screen, click Select and click Sync. I approved the Managed Home Screen earlier in the screenshot below, so it is showing as Approved.
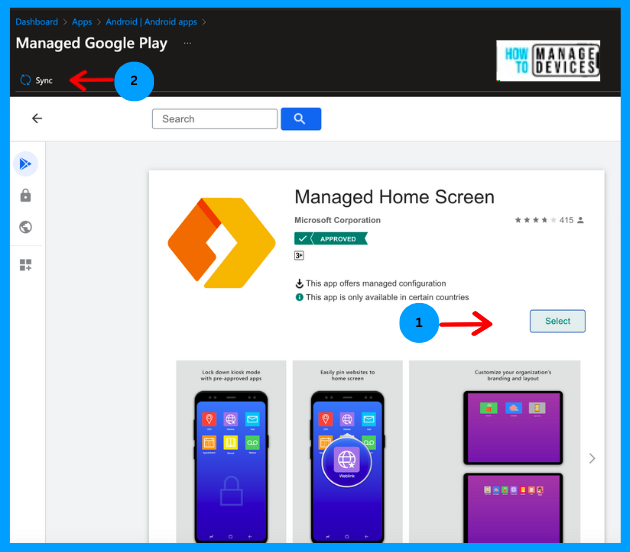
After the sync is complete, the Managed Home screen will synced to the app store and be available for deployment to the end users. We must assign the app to the Dynamic group we created above. Search for the app.
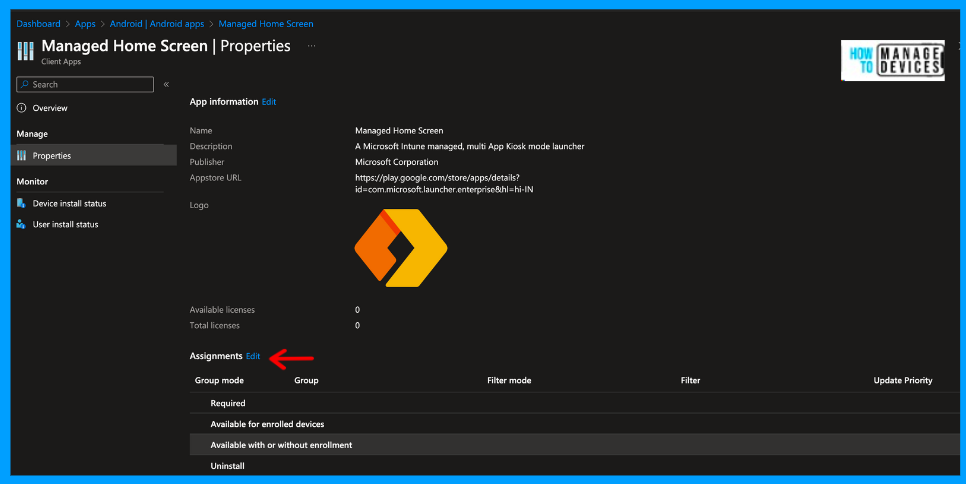
Select the app and click on App Properties. Click on edit under Assignments. Under Required mode, click Add Group, Search for the Dynamic group, and select the group. Click on Select and Review and Save it. In the same way, assign the required apps to a dynamic group.
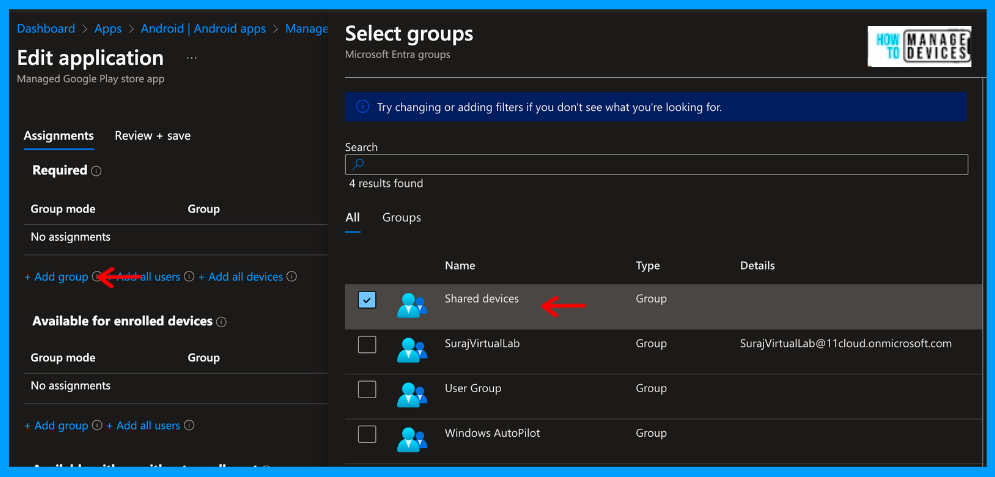
The Managed Home screen will be installed as soon as the device enrols using the Enrolment Token. We need to configure the Manage Home Screen according to our requirements. This can be done using the Application Configuration profile. You must assign the various apps to the end user as per your requirements. I have assigned Outlook and Edge browsers for reference.
Before this, we must enable multi-app mode using the device configuration profile. In the previous article, we discussed the device configuration profile setup for corporate-owned dedicated devices in detail, which we refer to here.
Create an Application Configuration Profile to Configure Managed Home Screen
Let’s create an Application Configuration Profile to configure the Managed Home Screens. This configuration allows users to sign in, sign out, auto sign out, etc. Let’s see how to create a configuration profile for a Managed Home Screen.
- Login to Microsoft Intune Admin Center.
- Click on Apps > App Configuration Policies.
- Click on Add and select Managed Devices.
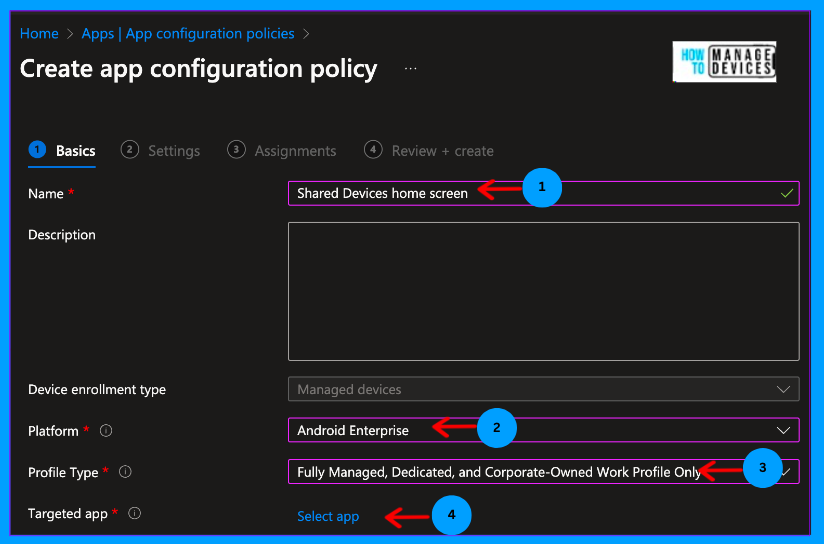
Now, provide the Name and Description for the Configuration profile. Click on Platform and select Android Enterprise. Click on Profile type and select Fully Managed, Dedicated, and Corporate-Owned Work Profile Only, as we are configuring for Dedicated devices.
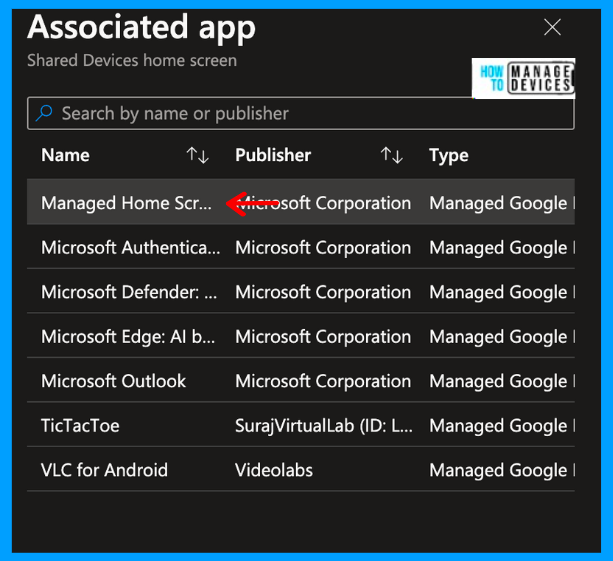
Now click on Select App, and another window opens with the list of all the Apps synced from Managed Google PlayStore. Select Managed Home Screen, and click Next to proceed to the configuration page, where we can configure the Managed Home Screen.
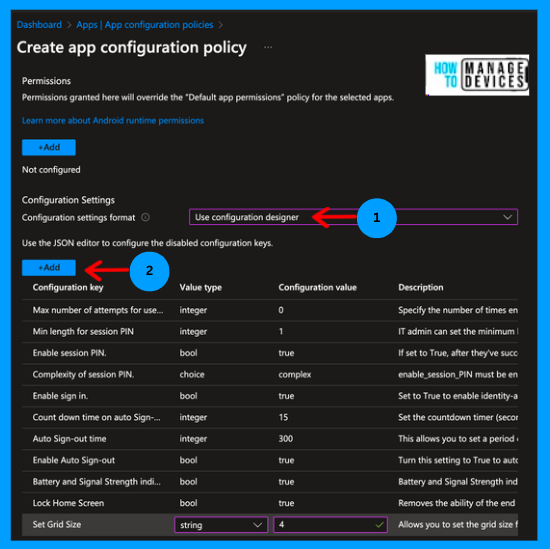
We can configure the Managed Home Screen configuration settings in two ways: using the configuration designer or JSON Data. The Configuration Designer is an easy way to do this. I have selected a few essential configurations, as shown in the image above.
In the configuration designer, we need to select the settings as per our requirement, and Intune will show you the type of value we need to enter for the respective settings. I have drafted the settings in the table below. Based on your requirements, you can add or remove the settings.
| Configuration key | Value | Configuration value |
|---|---|---|
| Sign In Type | Count down time on auto Sign-out dialogue | AAD |
| Max number of attempts for the user to enter Exit Kiosk mode PIN | integer | 5 |
| Min length for session PIN | integer | 5 |
| Count down time on auto Sign-out dialog | integer | 15 |
| Auto Sign-out time | integer | 300 |
| Enable Auto Sign-out | bool | TRUE |
| Complexity of session PIN. | Choice | complex |
| Enable session PIN. | bool | TRUE |
| Enable sign-in. | bool | TRUE |
| Battery and Signal Strength indicator bar | bool | TRUE |
| Lock Home Screen | bool | TRUE |
| Set Grid Size | string | 4 |
Click Next to move to the Assignment page, search for the dynamic group we created, add the group, and click Next to Review + Create page to review the settings and create the policy. Once any user enrols in the device, the device will receive the APP Configuration Profile.
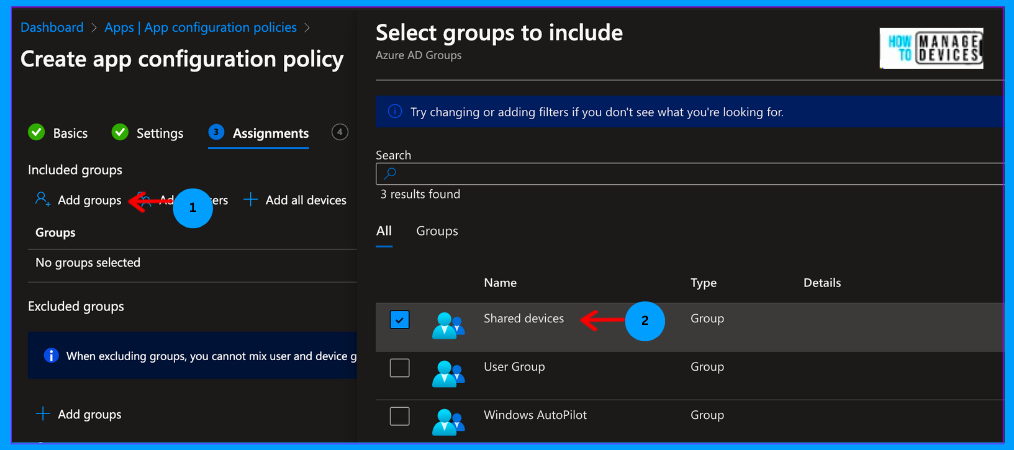
Now that we have completed all the steps to enable Shared mode for Android devices, we are ready to enrol the device. Let’s see the user experience in the next section.
User Experience
We need to format the Android devices to enroll them in shared mode. We can enrol the devices in various ways, like using a Token or QR Scanner. I’m choosing to enroll the device using a QR scanner. If you provide the devices to stores and advise them to enrol, provide the QR code and a Token for enrolling the device.
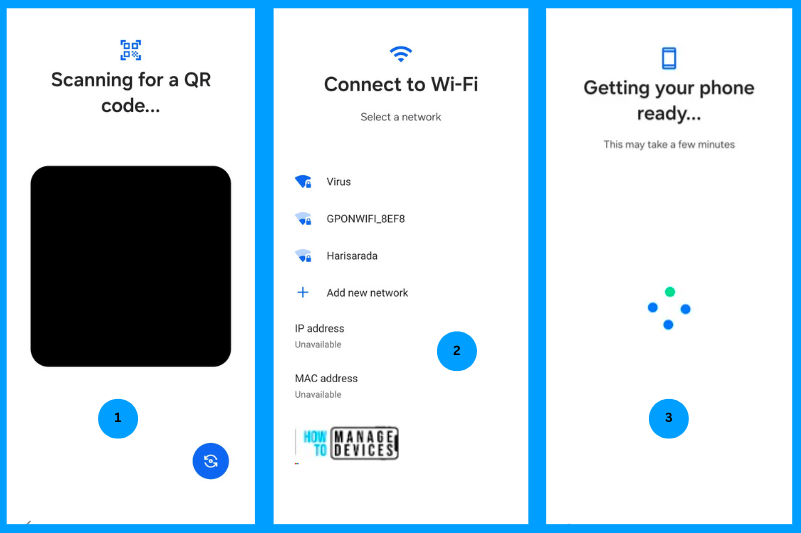
Once the device is reset or turned on (in the case of a new device), on the Welcome screen, tap on the screen 5-6 times to enable the camera to scan the QR code of the enrolment profile. Now scan the QR code, after validating the code, user is prompted to connect to Wi-Fi.
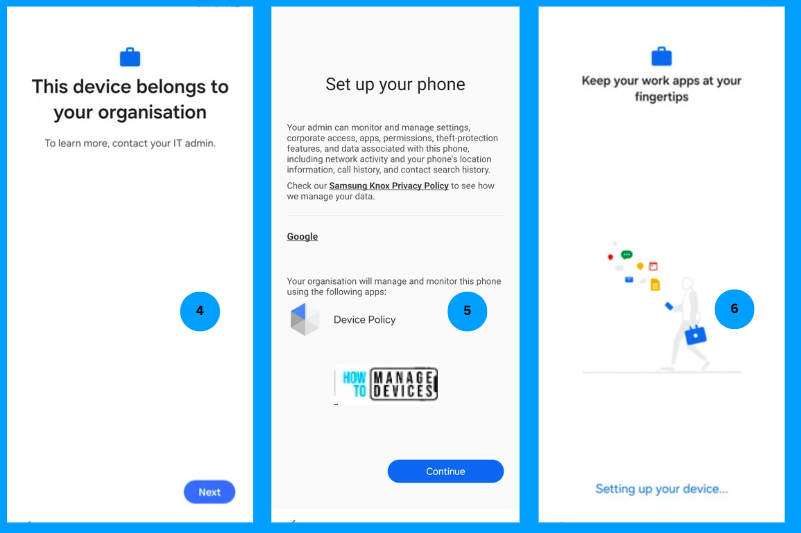
Once the device is connected to the network, it will validate and find that it belongs to an organization and prompt the user to install DPM(Device Policy Manager). Once installed, it will start setting up your device. This will take a while, depending on your network speed.
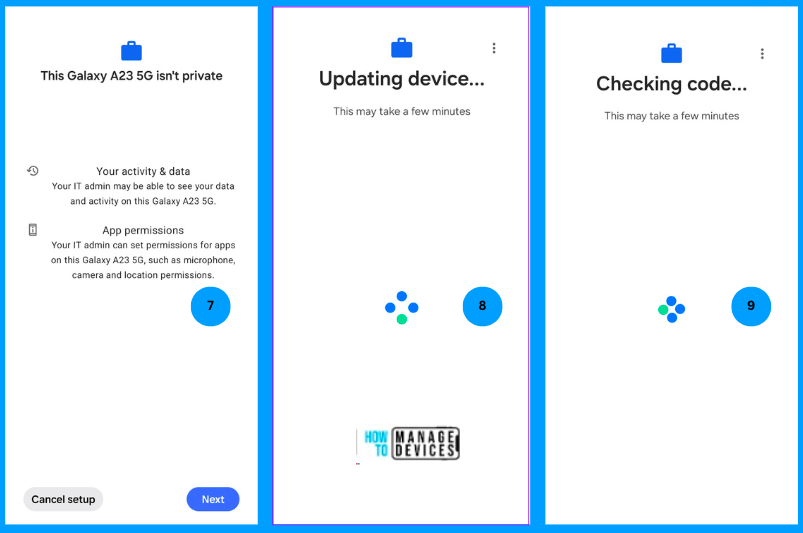
Once the device is ready, the user will be prompted with information about what an Admin can view once the device is enrolled in Intune. Click on Next to proceed. The device will check for all the policies and validate the enrolment token, and all these steps will be completed in 2-5 minutes.
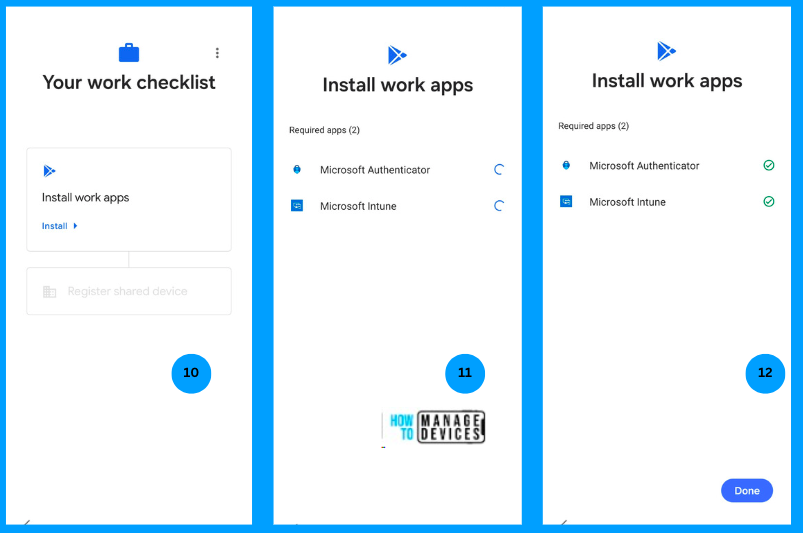
Once the code is validated, the user will be prompted to install Work apps like Microsoft Authenticator and Microsoft Intune app. These mandatory apps will be installed as part of enrollment once you click on Done to register the device.
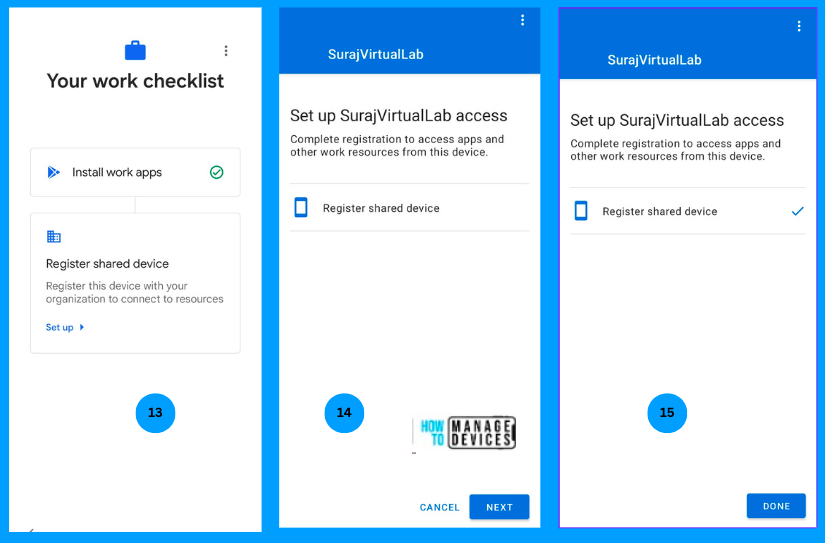
To register the device, click on setup. The user is prompted to register the device, and he or she clicks Next on the following screen. This will kick-start the registration process. Once the device is registered, click on Done. The user will be taken to the device’s home screen.
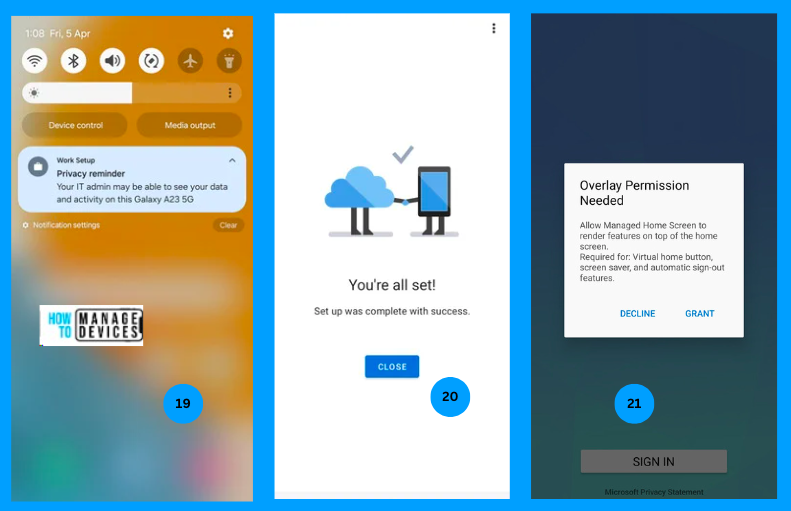
The user will be notified that the Admin will view the device data. This message ensures that users will only use the device for corporate use. You can observe that the Microsoft Intune app is installed. When we open the app, it will show that we are all set. This will complete the enrollment. Now, the device will be added to the Dynamic group we created.
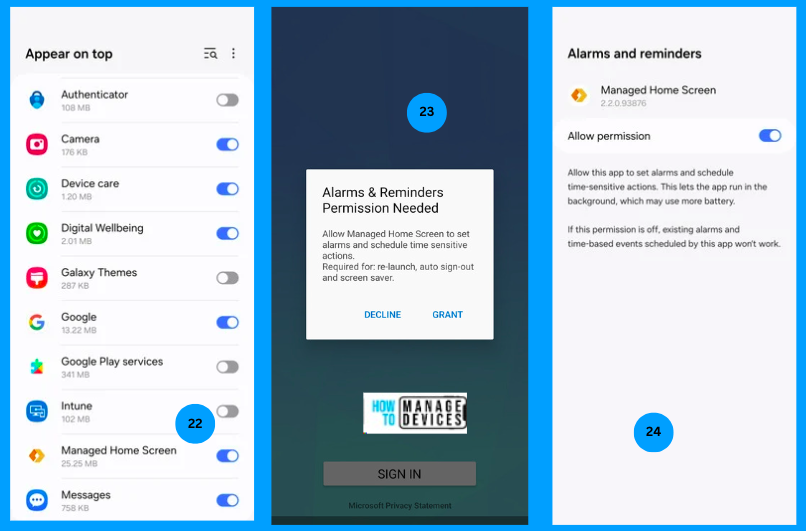
After a couple of minutes, the user will be shown the Managed Home Screen Sign-in page. The Managed Home screen will request a few permissions. Please grant the permissions. We can suppress these permissions using Application Configuration Policies. I didn’t provide permission for the app for our discussion, so the user is prompted with the required permissions.
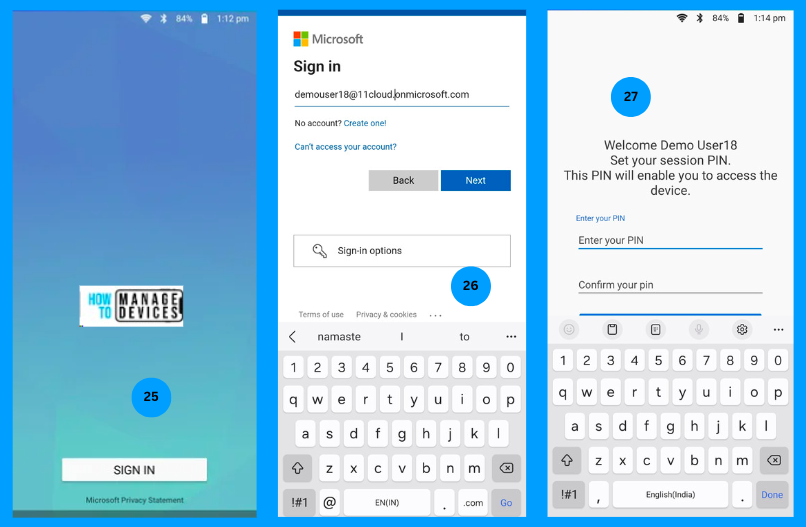
Once the permissions are granted, the user will be presented with the Sign-In page. Click on Sign In and enter the user credentials. Once the user is authenticated successfully, the user is prompted to set a PIN for the session. We have configured these settings in our application configuration policy. Once the user sets the PIN, the user can enter the Device’s Home Screen.
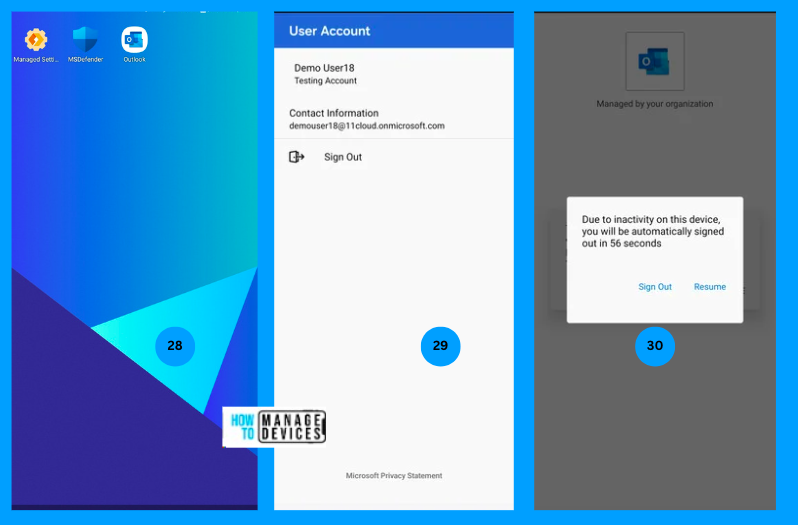
We have deployed only apps for users Outlook and Microsoft Defender, so you can see that these apps are shown on the Home screens. The Home Screen layout can be configured using Device configuration policies. Ensure you configure the home screen layout in the Device Experience of Configuration policy. Else, the app will not show on the home screen.
We have configured a session timeout. After the session timeout, the user will be prompted to Sign in or sign out from the session. If the user does not provide a response, the user will be logged out and prompted to sign in again. The session PIN that we have set will expire. Now, the user needs to sign in again and set the session PIN again.
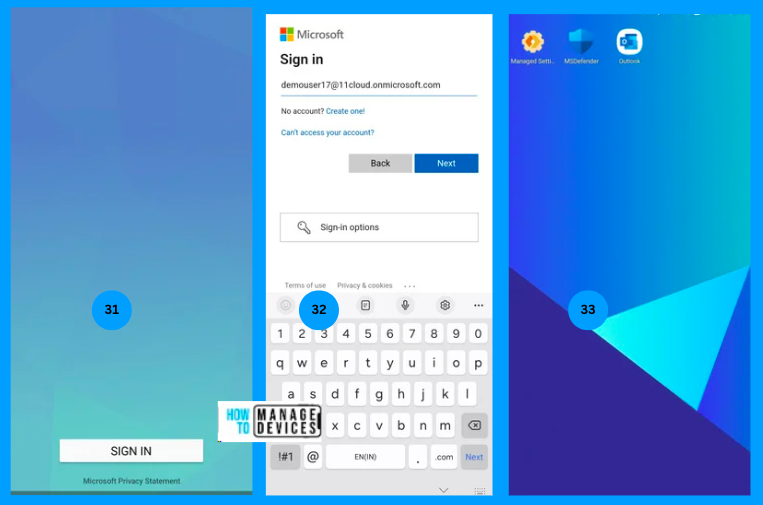
Once the current user shift ends, we can hand over the device to another user. The new user needs to sign in, authenticate with credentials, and set the session PIN. Once logged in, he can also view the apps assigned to the device and configure the apps as per the requirement.
While configuring the session timeout, ensure you configure enough time, such as shift hours. Otherwise, the user must sign in again. If you want the current user to sign out before the session timeout kicks in, click on the Managed Home screen and click on Sign Out, as shown in figure 25.
Conclusion
This way, we can empower your organization’s front-line workers to have a single device with multiple users sign in and access the required apps. I hope this article offered something new to learn today. Let’s catch up again in another article. Till then Hasta la Vista.
We are on WhatsApp. To get the latest step-by-step guides and news updates, Join our Channel. Click here –HTMD WhatsApp.
Author
About Author – Narendra Kumar Malepati (Naren) has 12+ years of experience in IT, working on different MDM tools. Over the last Eight years, Naren has been working on various features of Intune, including migration from different MDMs to Intune. Naren mainly focuses on Android, iOS, and MacOS.

Hi. Very helpful guide.
Do you know is it possible to use FIDO2 login into shared android device?
The “Enable Sign-In” MHS app config doesn’t seem to work. MHS is not requring a sign-in to the end-user on my test device. However, when you enabled Sign-in in a device configuration policy (under Device Experience) it then seems to work.
Hi
How can you supress the permissions using Application Configuration Policies? I couldnt find anything. I need to configure this in the Managed Home Screen App configuration policy, dont i?