Let’s learn how to Create a New Intune Policy using Copilot. In this post, you can easily understand how Intune and generative AI work together to help you effectively manage and secure your devices in the cloud.
It is a simple way to learn about the exciting things happening with Intune and how they can benefit you. In the Microsoft takeoff session, the Intune team discussed what they were working on and exploring for the future.
The Intune Team wants to boost the power of Security Copilot in Intune to help even more IT admins. The main aim is to give these admins extra abilities and control.
There is a handy Copilot button in the actions menu. Click on it to get started. Once you do, a few options will pop up for you. You can explore the device, compare it to others, or ask about a specific error. We have covered all these topics in detail in our guide on Intune Device Assistance Features with Copilot.
- Overview of Security Copilot with Microsoft Intune
- Turn Off Copilot in Windows using Intune and Group Policy
- Overview of Security Copilot with Microsoft Intune
- Turn Off Copilot in Windows using Intune and Group Policy
- Download Microsoft 365 Copilot Architecture Visio
How Does Security Copilot Simplify the Process for IT Admins?
Instead of IT admins spending lots of time searching for solutions, they can integrate security Copilot and directly ask for guidance on achieving specific outcomes, such as restricting external storage device connections.
Create New Intune Policy using Copilot
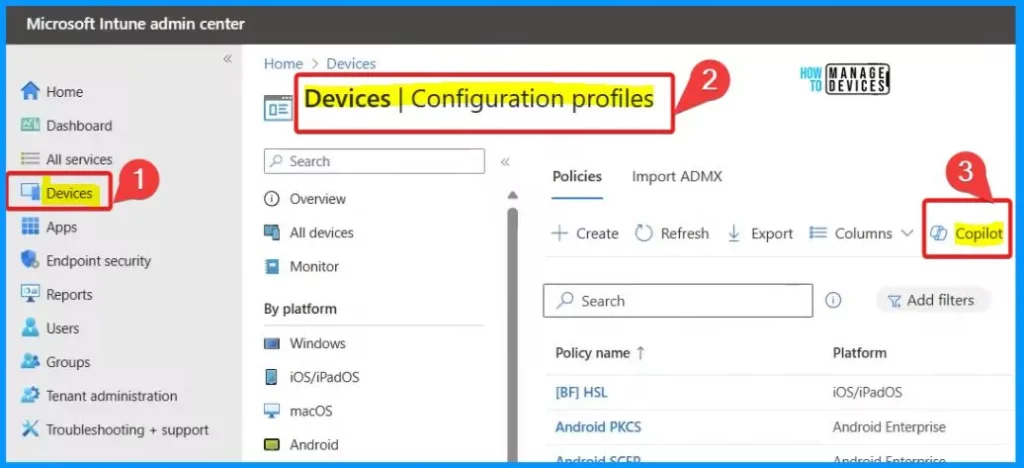
Sign in to the Intune Admin Center portal https://intune.microsoft.com/. Once logged in, navigate to the “Devices” section on the left side of the Intune admin center. Under “Devices,” select “Configuration profiles.” On the configuration page, you will find a set of menus, including options like Create, Refresh, Export, and more. Additionally, there is a specific option called “Copilot.”
- Select the Copilot option from the screenshot below.
Copilot Policy Assistant
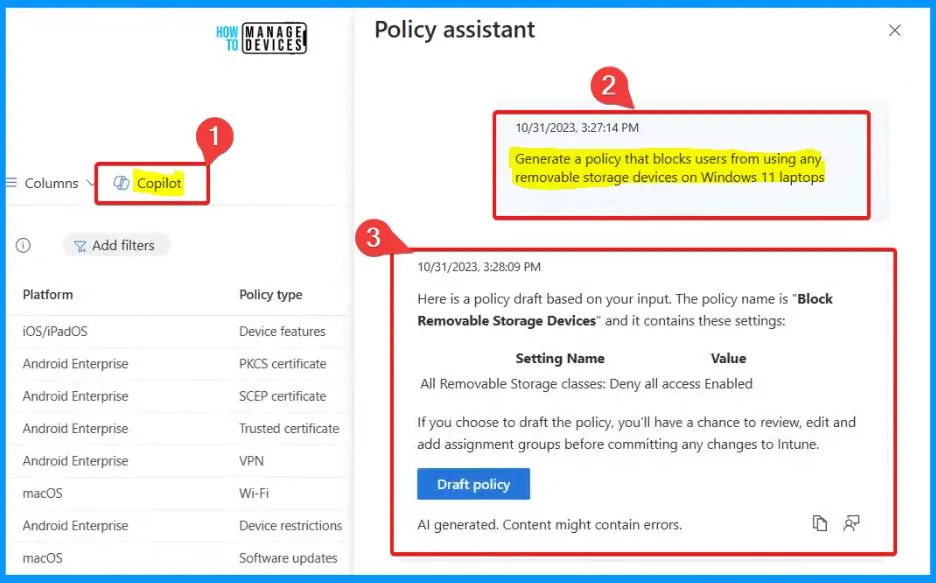
You can make it easy if you are an IT admin and want to stop people from plugging in USB drives or other removable storage into their Windows 11 laptops. Use Copilot from the screenshot below. For example – ask the question, “Create a rule that says no one can use removable storage on our Windows 11 laptops.” Copilot will help you figure out the details.
Generate a Policy that Blocks Users from using any Removable Storage Devices on Windows 11 Laptops.
Here is a policy draft based on your input. The policy is “Block Removable Storage Devices“, containing these settings. Setting Name – All Removable Storage classes and value – Deny all access Enabled. If you choose to draft the policy, you can review, edit and add assignment groups before committing any changes to Intune.
| Settings Name | Value |
|---|---|
| All Removable Storage Classes: Deny all access | Enabled |
Setting up rules with Copilot helps you through the process and makes it easy to choose the correct settings. It gathers info from different places, like Microsoft Docs, to give you helpful insights. If you want to dive deeper, it links you to its sources. It is not just Microsoft docs – Copilot also checks security baselines for extra guidance on your settings.
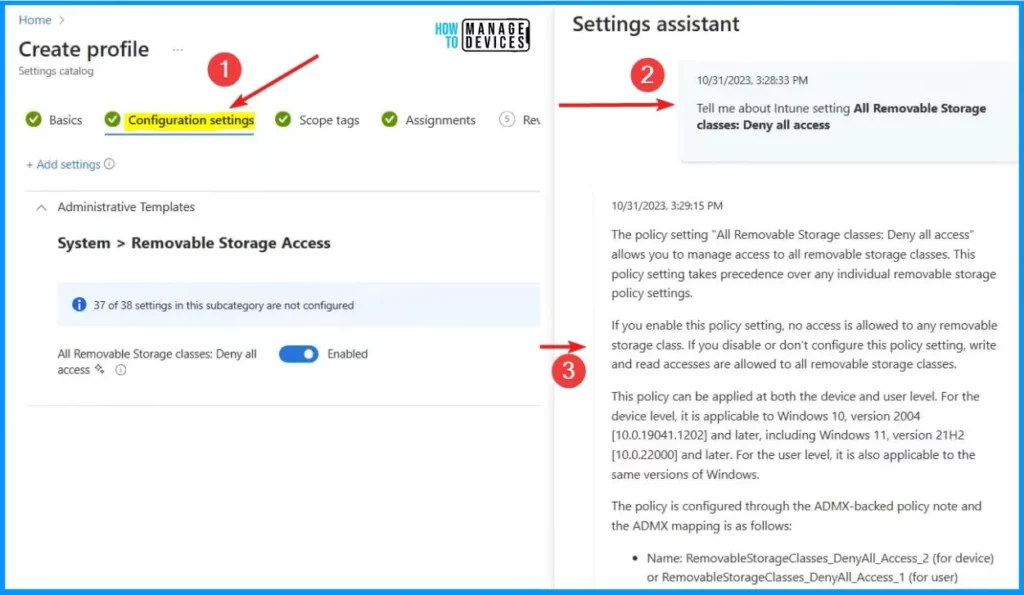
Tell me about Intune Setting All Removable Storage Classes: Dany All Access.
The policy setting “All Removable storage classes: Dany all access” allows you to manage access to all removable storage classes. This policy setting takes precedence over any individual removable storage policy settings.
If you enable this policy setting, no access is allowed to any removable storage class. If you disable or don’t configure this policy setting, write and read accesses are permitted to all removable storage classes.
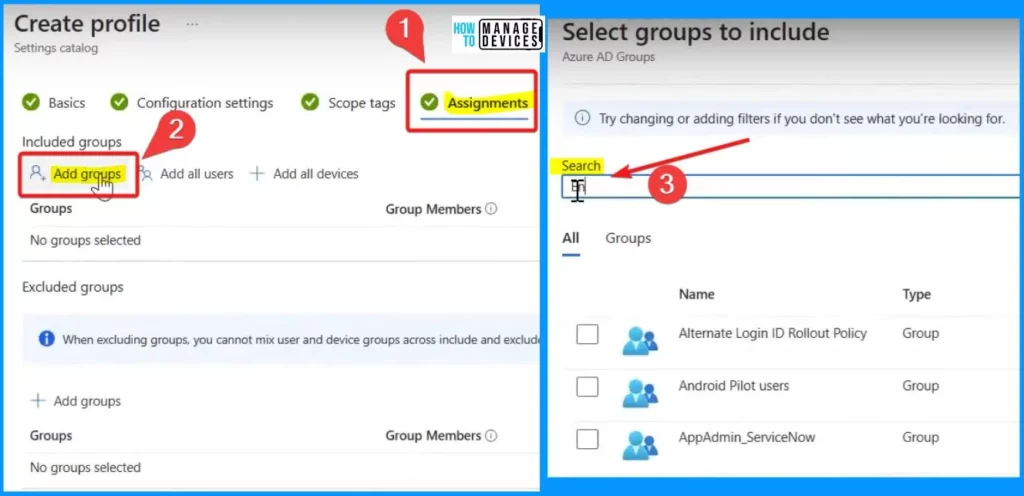
If you are in the Assignments tab and want to add groups, it is simple; look for the “Add group” button like in the screenshot below. Click it, and a window will pop up. You can search for the group you want and select it.
Easily Summarize Policy
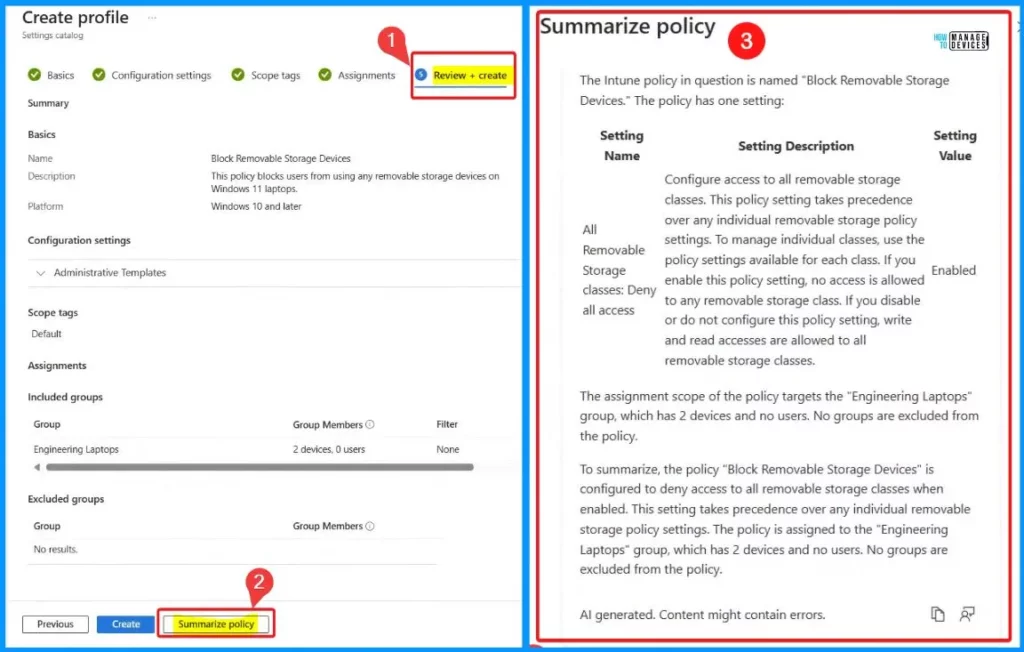
Copilot can help summarize all the things you are going to do. Copilot explains the policy and its settings and shows how it might affect users or devices using data from Microsoft, like Entra ID. Click the Summarize policy button from the screenshot below.
The Intune Policy in Question is Named “Block Removable Storage
Devices.” The Policy has One Setting
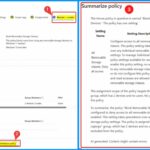
Setting Name – All Removable Storage classes: Deny all access
Setting Value – Enabled
Setting Description – Configure access to all removable storage classes. This policy setting takes precedence over any individual removable storage policy settings. To manage individual classes, use the policy settings available for each class. If you enable this policy setting, no access is allowed to any removable storage class. If you disable or do not configure this policy setting, write and read accesses are permitted to all removable storage classes.
The assignment scope of the policy targets the “Engineering Laptops”
group, which has 2 devices and no users. No groups are excluded from
the policy.
To summarize, the policy “Block Removable Storage Devices” is
configured to deny access to all removable storage classes whenThe
enabled. This Setting takes precedence over any individual removable
storage policy settings. The policy is assigned to the “Engineering
Laptops” group, which has 2 devices and no users. No groups are
excluded from the policy.
(37) Generative AI and the next generation of Intune features – YouTube – NOTE! – Microsoft shared detailed information on Creating a new intune policy using Copilot with the latest technical takeoff session by Scott Duffey.
We are on WhatsApp. To get the latest step-by-step guides and news updates, Join our Channel. Click here – HTMD WhatsApp.
Author
About the Author – Vidya is a computer enthusiast. She is here to share quick tips and tricks with Windows 11 or Windows 10 users. She loves writing on Windows 11 and related technologies. She is also keen to find solutions and write about day-to-day tech problems.
