Let’s learn how to Create Custom XML File for Office 365 Intune Deployment. The additional MUI Language configurations for Office 365 pro plus will be discussed.
In this blog, I have described how to deploy the Microsoft 365 applications in a specific language based on the OS primary language using Intune. Microsoft released new solutions to create and deploy Microsoft 365 Apps with the Microsoft Endpoint Manager Admin portal on Windows 10 and Windows 11.
Microsoft 365 Apps application can be installed during the Autopilot OOBE provisioning process or after the Autopilot process is completed. You can use Microsoft Admin center or Office Customization Tool (without any login) to Create a Custom XML File using the Customization Tool for Office 365 Intune Deployment.
The Microsoft Office 365 ProPlus product has been renamed to Microsoft 365 Apps for the enterprise. I will refer to it as Microsoft 365 Apps throughout this blog.
Microsoft provides two options for creating Microsoft 365 Apps with Intune.
1. Configuration Designer tool integrated with MEM.
2. Custom XML Data using Office Customization Tool.
Create Office 365 App in Intune using Configuration Designer
Let’s try using Configuration Designer to configure the standard options for this Microsoft 365 desktop apps assignment.
By selecting Configuration designer, you’ll see an additional three settings areas:
- Configure app suite
- App suite information
- Properties
You can refer to the MEM Intune Deploy Office 365 Pro Plus Suite to Windows 10/11 step-by-step instructions.
Create Custom XML File using Configuration Designer
You can create the custom XML configuration file to specify the Microsoft 365 app deployment settings in this method. Using Microsoft 365 Admin center, create the custom Deployment Configuration as per requirement. The below settings can be customized for XML configuration file creation.
Let’s select the product and release for Office 365 pro plus deployment within your organization. The 64 version would be challenging to deploy because of macro and plugin compatibility issues with the x64 bit version.
- Products and Release
- Architecture (32-bit or 64-bit)
- Products (Office Suites, Visio, Project, and Additional products)
- Update channel (select the update channel, select the version)
- Apps(Turn apps on or off to include or exclude them from being deployed)
- Access
- OneDrive (Groove)
- OneDrive Desktop
- Outlook
- Publisher
- Word
- Excel
- Skype for Business
- OneNote
- PowerPoint
- Teams
- Features (Background service for Microsoft Search in Bing)
You have to select Language configuration as mentioned below using XML Data.
- Language
- Select the Primary language
- Select the additional languages
- Select additional proofing tools)
Where do you want to Install Office 365 Pro Plus from or user interaction behavior during the installation of Office 365 pro plus (aka Microsoft 365 apps)
- Installation
- Where do you want to deploy Office from?
- Office Content Delivery Network (CDN)
- Local source
- Microsoft Endpoint Configuration Manager
- Show installation to User (On/Off)
- Shut down running applications (On/Off)
- Where do you want to deploy Office from?
In this section of the XML, you need to specify and define the Update and Upgrade behavior of Office 365 pro plus.
- Update and upgrade
- Upgrade and upgrade options
- Where do you want to deploy Office from?
- Office Content Delivery Network (CDN)
- Local source
- Microsoft Endpoint Configuration Manager
- Automatically check for updates (On/Off)
- Where do you want to deploy Office from?
- Upgrade options
- Uninstall any MSI version of Office, including Visio and Project (On/Off)
- Uninstall Visio (On/Off)
- Uninstall Project (On/Off)
- Uninstall SharePoint Designer (On/Off)
- Uninstall InfoPath (On/Off)
- For uninstalled MSI versions of Office, install the same languages (On/Off)
- Automatically upgrade to the selected architecture (On/Off)
- Uninstall any MSI version of Office, including Visio and Project (On/Off)
- Upgrade and upgrade options
This is where you mention Licensing and upgrading Office 365 proplus using XML configuration.
- Licensing and upgrade
- Automatically accept the EULA (On/Off)
- Product Key
- Product activation
- User based
- Share Computer
- Device based
- General
- Provide your organization name to set the Company property on Office documents
- Describe this configuration for documentation purposes
Office 365 Pro Plus application preferences are important for the end-user experience of the user.
Application preferences:

NOTE! – A problem exists in Microsoft 365 with MUI-based OS that does not work in Autopilot Preprovisioning (White Glove). In the example above, if you provision with English OS, and during the OOBE experience you choose a language other than English, Microsoft 365 apps still display in English.
Create Custom XML File using Customization Tool for Office 365 Intune Deployment
Let’s try to Create Custom XML File using the Customization Tool for Office 365 Intune Deployment. Open a web browser and launch Microsoft 365 Admin center. On the Home page, select Go to Office Customization Tool in Device Configuration to create a custom XML file.
A free tool that you can use as an XML editor for Office 365 is available on Office Customization Tool – Products and releases (https://config.office.com/deploymentsettings).
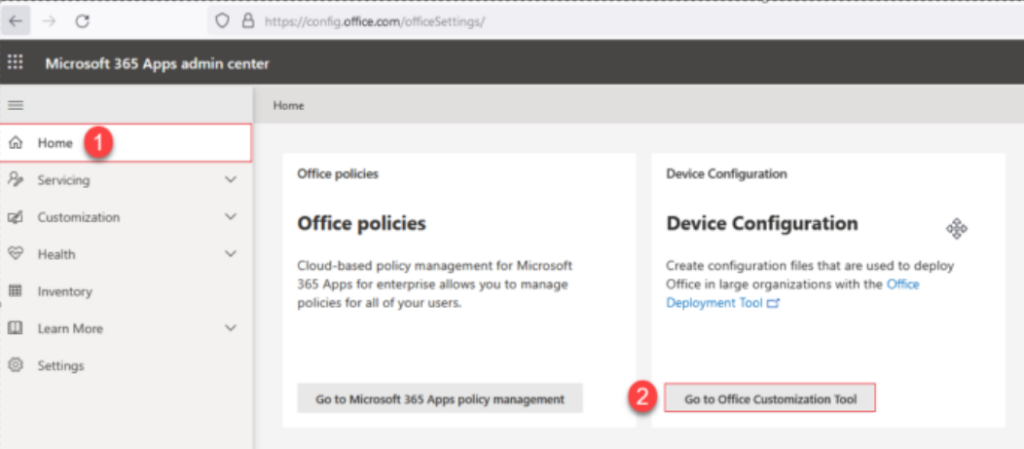
On the Customization panel, select My Configuration and then click Create options.

Type the name of the .XML file.
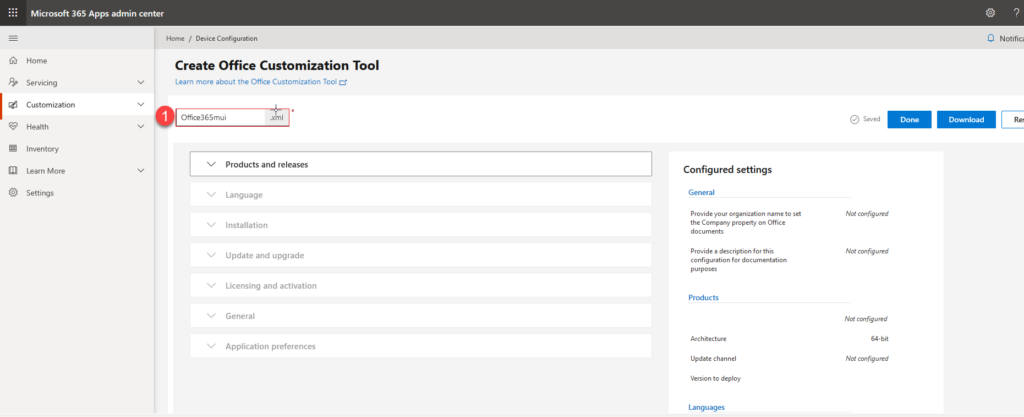
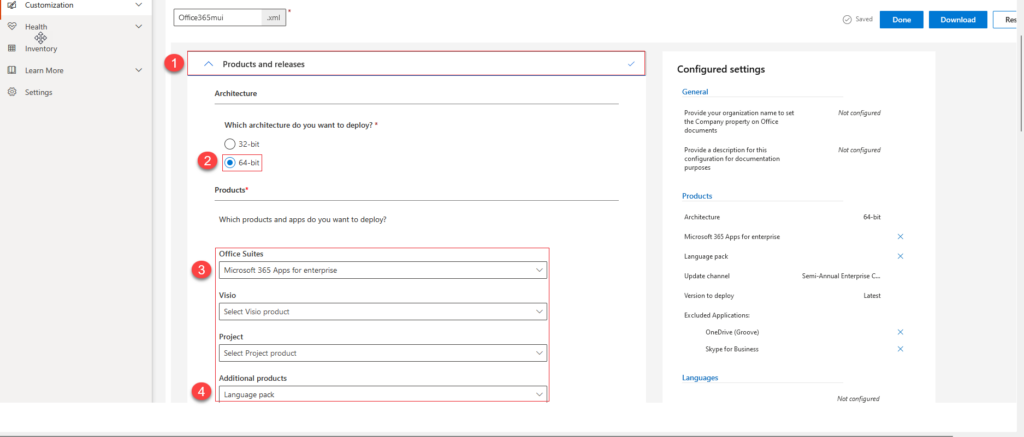
On the Product and release tab, choose the options based on the requirement
Architecture tab – Which architecture do you want to deploy: 64-bit
Products tab -Office Suites: Microsoft 365 Apps for enterprise
- The below Office suites products are available to choose
- Microsoft 365 Apps for enterprise
- Microsoft 365 Apps for business
- Office LTSC Professional Plus 2021 – Volume License
- Office LTSC Professional Plus 2021 (SPLA) – Volume License
- Office LTSC Standard 2021 – Volume License
- Office LTSC Standard 2021 (SPLA) – Volume License
- Office Professional Plus 2019 – Volume License
- Office Standard 2019 – Volume License
List of Visio License available:
The below Visio versions are available to choose from.
- Visio Plan 2
- Visio LTSC Professional 2021 – Volume License
- Visio LTSC Standard 2021 – Volume License
- Visio Professional 2019 – Volume License
- Visio Standard 2019 – Volume License
- Visio Professional 2016 – Volume License
- Visio Standard 2016 – Volume License
Project Licenses or SKUs available to us:
- Project Online Desktop Client
- Project LTSC Professional 2021 – Volume License
- Project LTSC Standard 2021 – Volume License
- Project Professional 2019 – Volume License
- Project Standard 2019 – Volume License
- Project Professional 2016 – Volume License
- Project Standard 2016 – Volume License
Additional Languages for Office 365 Proplus
Additional products: Language pack. You can select additional languages from this screen of Configuration Designer. Deploy Office 365 ProPlus for non-English Operating Systems using Intune | MUI Language.
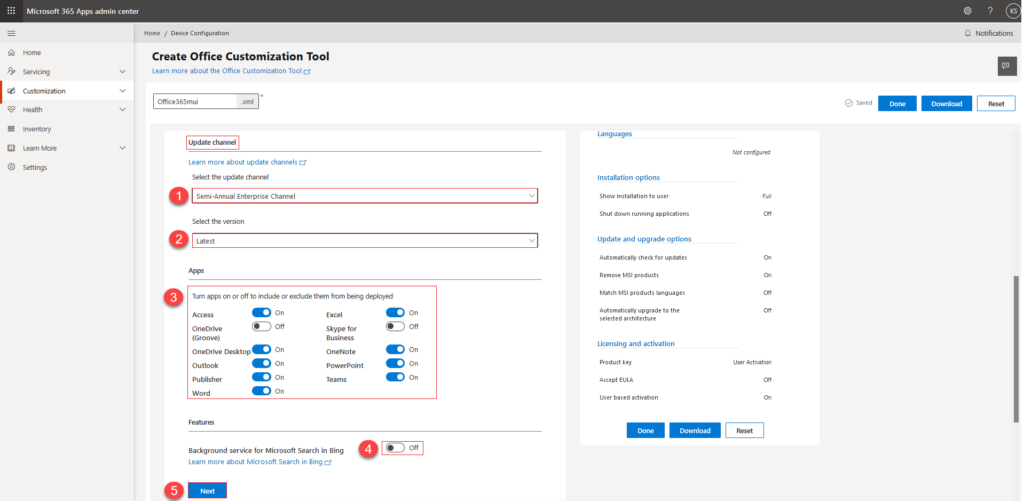
Office 365 Update Channel Configurations – Create Office 365 ProPlus XML File
On the Update Channel tab, choose the options based on the requirements.
Select the update channel: Semi-Annual Enterprise Channel. The supported updated channel is below.
- Current Channel
- Current Channel (Preview)
- Monthly Enterprise Channel
- Semi-Annual Enterprise Channel
- Semi-Annual Enterprise Channel (Preview)
Select the version: Latest (choose the options version based on requirement)
Apps: Choose the Office apps based on the requirement; I have chosen all the Apps except OneDrive(Groove) and Skype of Business.
- Background service for Microsoft Search in Bing: Off.
- Click Next
Select Languages for Office 365 Pro Plus Deployments
Let’s select Select Languages for Office 365 Pro Plus Deployments using Configuration
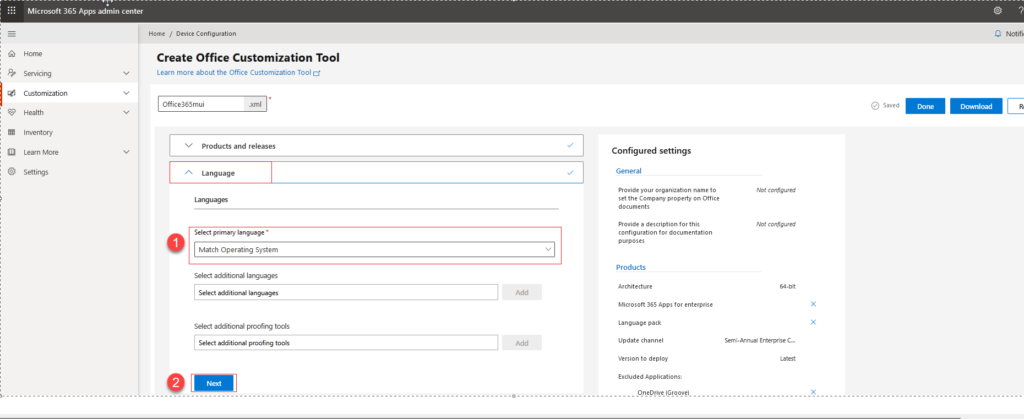
On the Language tab.
Select primary language: Match Operating System.
Click Next.
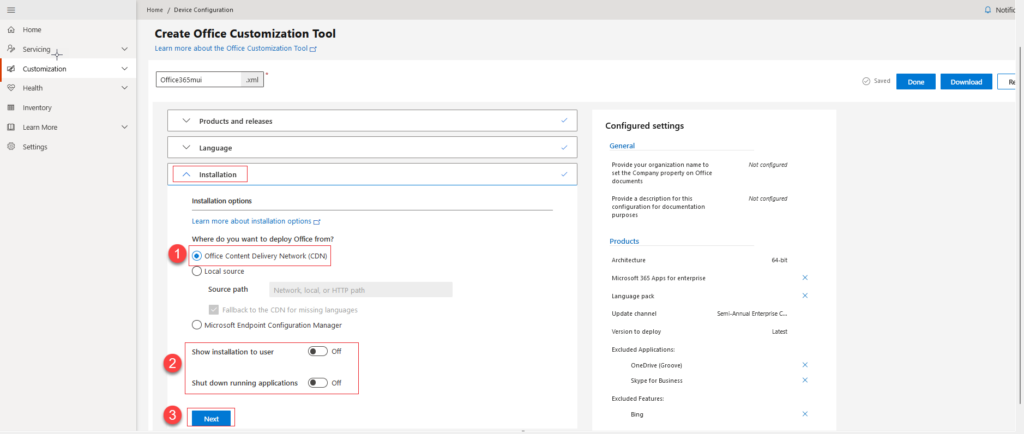
Office Customization Tool – Installation Options XML Configuration
Let’s use Office Customization Tool to configure Installation Options for Office 365 using Microsoft Admin center and deploy it using Intune.
- On the Installation tab.
- Select Office Content Delivery Network (CND).
- Show installation to the user: Off.
- Shut down running application: Off.
- Click Next.
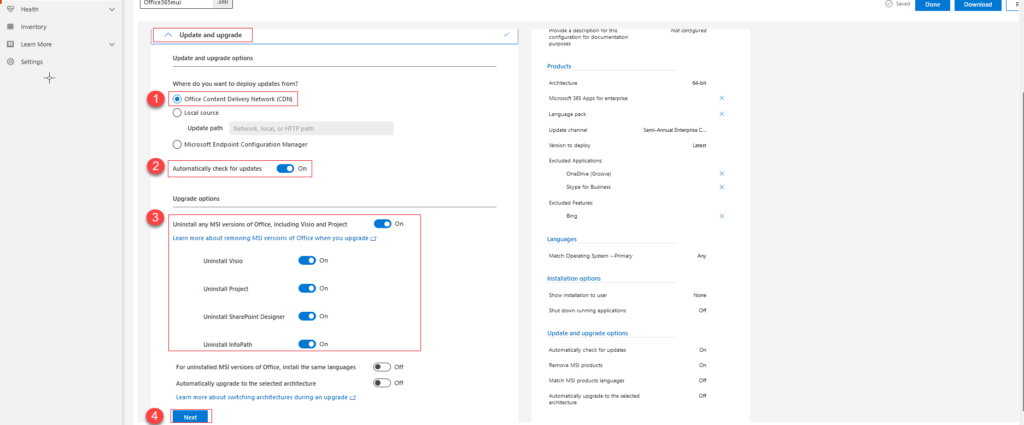
On the Update and upgrade tab,
Where do you want to deploy updates from? Office Content Delivery Network (CDN)
Automatically check for Updates: On
Uninstall any MSI version of Office, including Visio and Project: On
Uninstall Visio: On
Uninstall Project: On
Uninstall SharePoint Designer: On
Uninstall InfoPath: On
- Click Next.
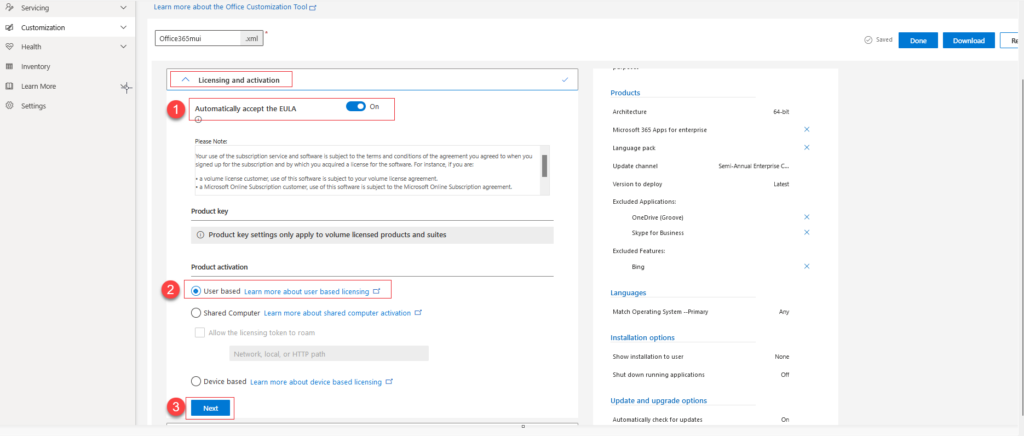
License Activation Settings for Office 365 XML File
On the Licensing and activation tab.
- Automatically accept the EULA: On
- Product activation: User-based
- Click Next
Office 365 XML Editor Tool from Microsoft
Let’s discuss Office 365 XML Editor Tool from Microsoft. You can use this tool for free from Office Customization Tool – Products and releases (https://config.office.com/deploymentsettings) for free.
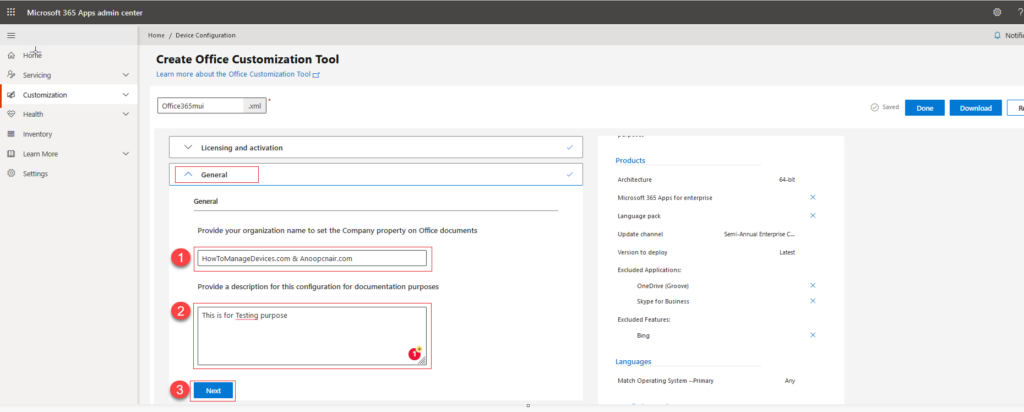
On the General tab of Office 365 Pro plus
Provide your Organization Name to set the Company Property on Office documents: HowToManageDevices.com & Anoopcnair.com
Click Next
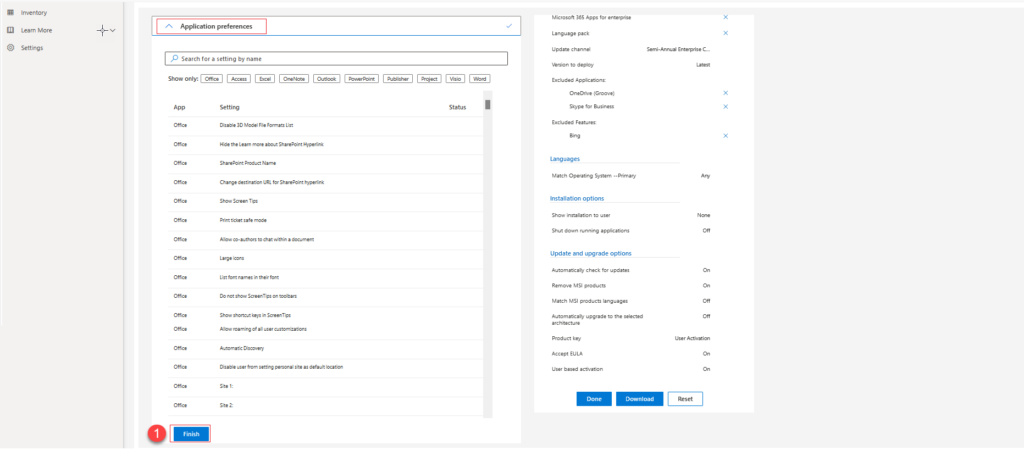
On the Application preferences tab.
<If the organization needs modification on production, choose this option to perform the changes to Office apps>
Click Next
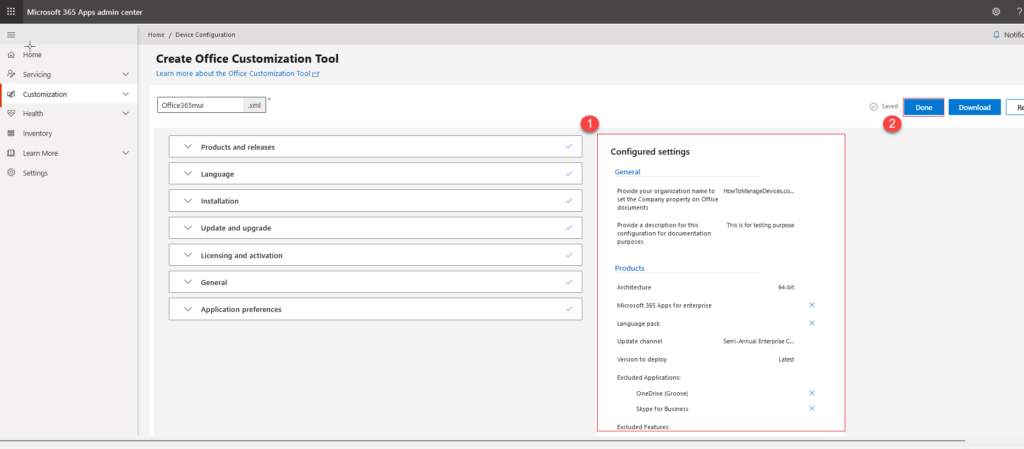
Review the Configuration settings of the setup configuration.
Click Done.
Download Office 365 Pro Plus XML for Intune Deployment
Now that you are ready with Office 365 Pro Plus XML, you can download Download Office 365 Pro Plus XML for Intune Deployment.
On Microsoft 365 Admin center page.
On the Lefthand panel, select the Customization tab.
Select the .xml file and select download the .xml file to your computer.
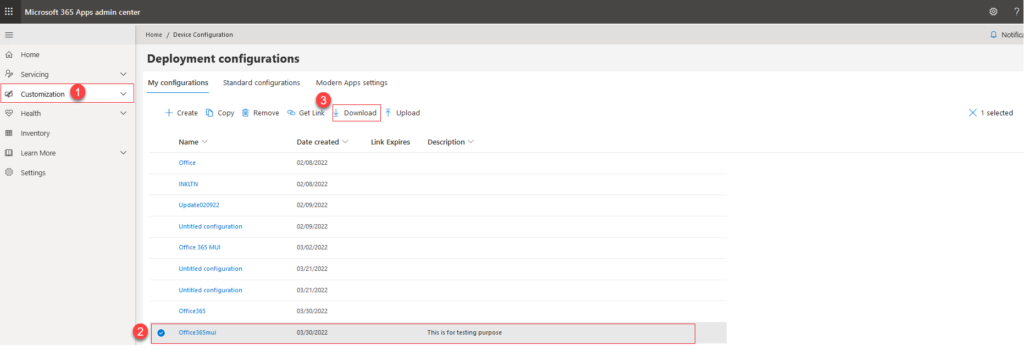
Click Download to save the file on the computer.
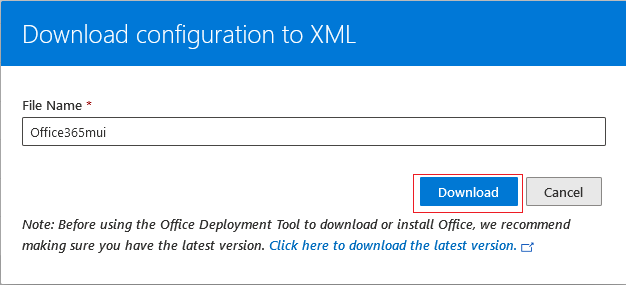
The below sample script for the .xml file for Office setup settings.
<Configuration ID="b8tu74efa-c844-ka2ee-9a0f-aksklkasu25">
<Info Description="This is for testing purpose"/>
<Add OfficeClientEdition="64" Channel="SemiAnnual">
<Product ID="O365ProPlusRetail">
<Language ID="MatchOS"/>
<ExcludeApp ID="Groove"/>
<ExcludeApp ID="Lync"/>
<ExcludeApp ID="Bing"/>
</Product>
<Product ID="LanguagePack">
<Language ID="MatchOS"/>
</Product>
</Add>
<Property Name="SharedComputerLicensing" Value="0"/>
<Property Name="FORCEAPPSHUTDOWN" Value="FALSE"/>
<Property Name="DeviceBasedLicensing" Value="0"/>
<Property Name="SCLCacheOverride" Value="0"/>
<Property Name="TenantId" Value="dwyfa037-7f26-euyia-a7bb-4akajs7529df"/>
<Updates Enabled="TRUE"/>
<RemoveMSI/>
<AppSettings>
<Setup Name="Company" Value="HowToManageDevices.com & Anoopcnair.com"/>
<User Key="software\microsoft\office\16.0\excel\options" Name="defaultformat" Value="51" Type="REG_DWORD" App="excel16" Id="L_SaveExcelfilesas"/>
<User Key="software\microsoft\office\16.0\powerpoint\options" Name="defaultformat" Value="27" Type="REG_DWORD" App="ppt16" Id="L_SavePowerPointfilesas"/>
<User Key="software\microsoft\office\16.0\word\options" Name="defaultformat" Value="" Type="REG_SZ" App="word16" Id="L_SaveWordfilesas"/>
</AppSettings>
<Display Level="None" AcceptEULA="TRUE"/>
</Configuration>
Creation of Microsoft 365 App in Endpoint Manager Admin portal
Let’s walk through the Microsoft 365 app creation using Intune using the Create Office 365 ProPlus XML File customization.
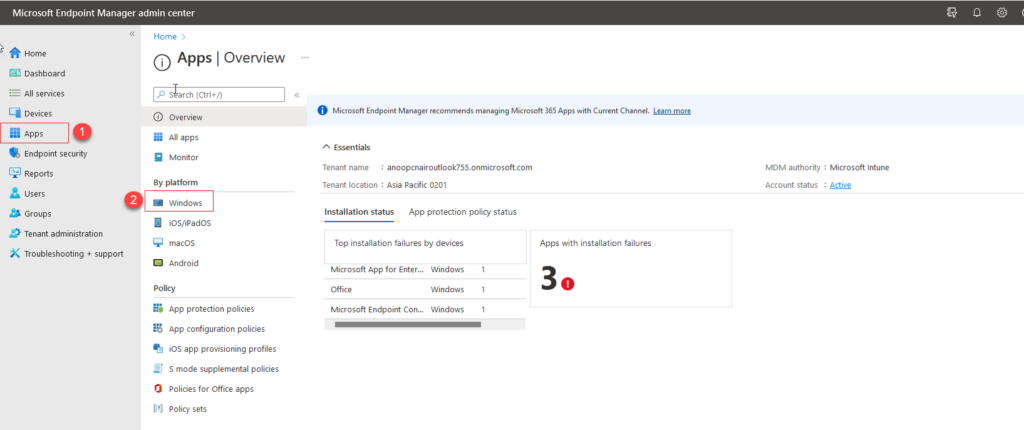
Launch the Microsoft Endpoint Manager admin center. On the Microsoft Endpoint Manager admin center portal, select Apps, and then select Windows.
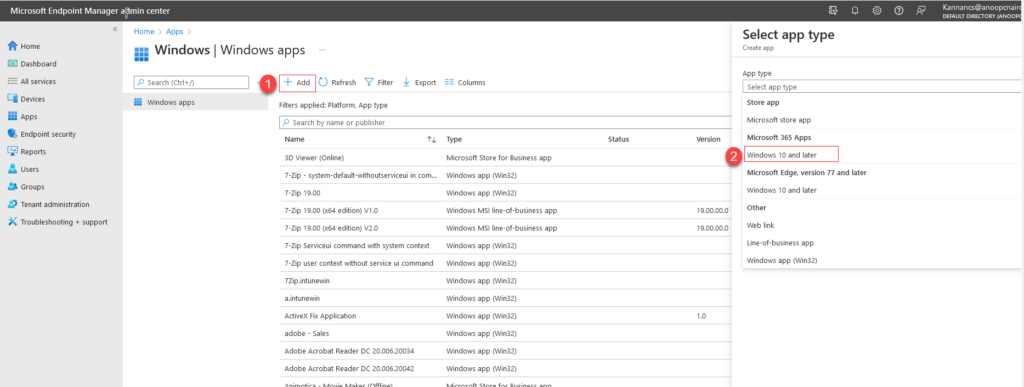
On the Windows App page, select Add to create the application.
On the right corner, Select the app type page, select the App type drop-down menu, choose Microsoft 365 Apps -> Windows 10 and Later.
Click Select to start creating the application.
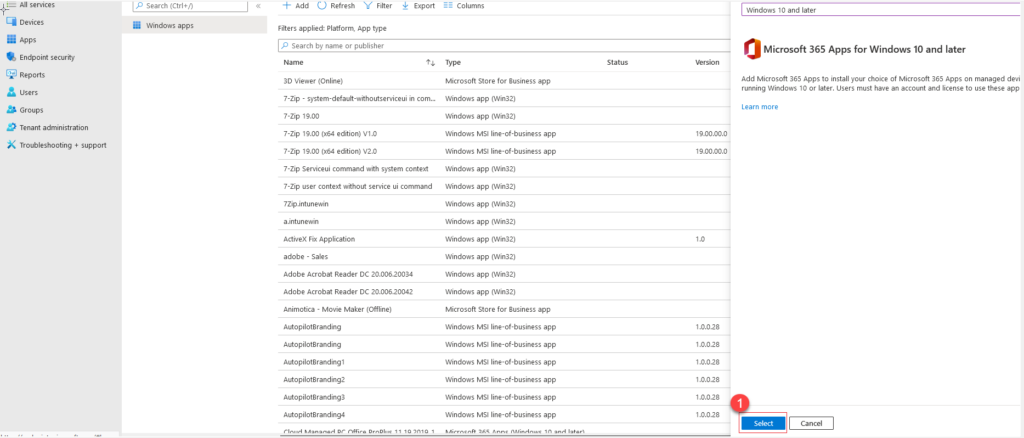
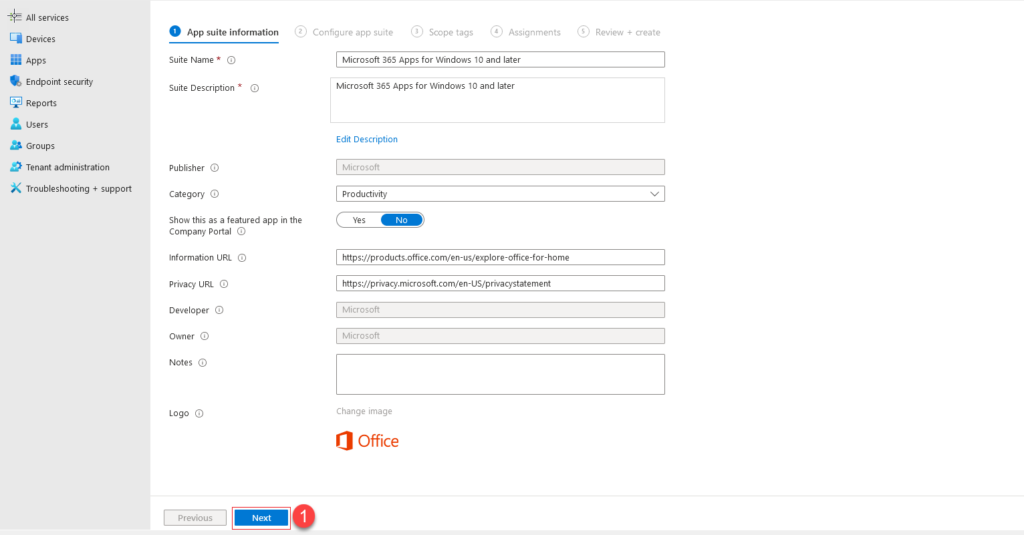
On the App suite information tab.
Click Next.
Configure Office 365 App using XML Data
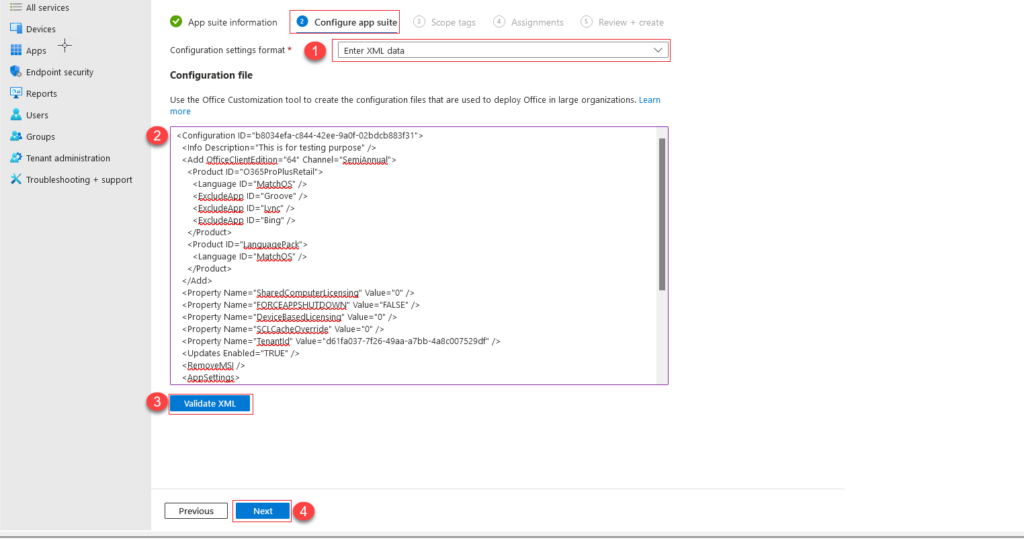
Let’s see how to configure the Office 365 App using XML Data.
On the Configure app suite tab.
Choose Configuration settings format as entering XML Data
Copy and paste the .xml file in the Configuration file window.
Click Validate XML and then click Next.
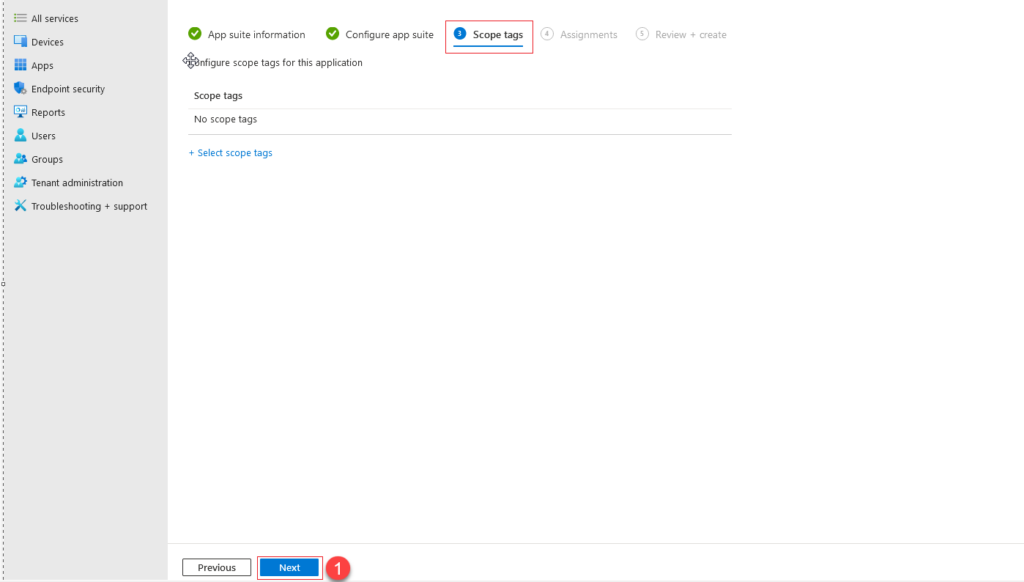
On the Scope tags tab.
Click Next.
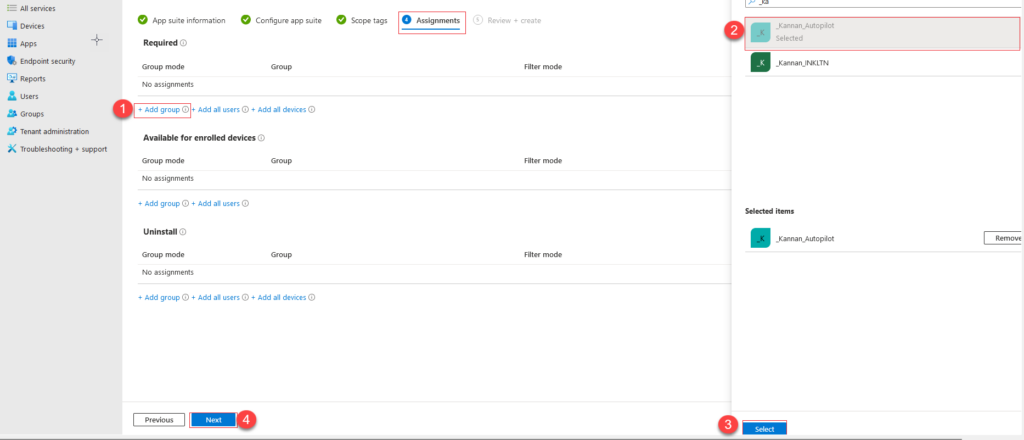
On the Assignment tab, choose the Required > Add group option.
Select the group’s tab in the right corner, Select the AAD group, and click Select.
Click Next on the Assignment tab.
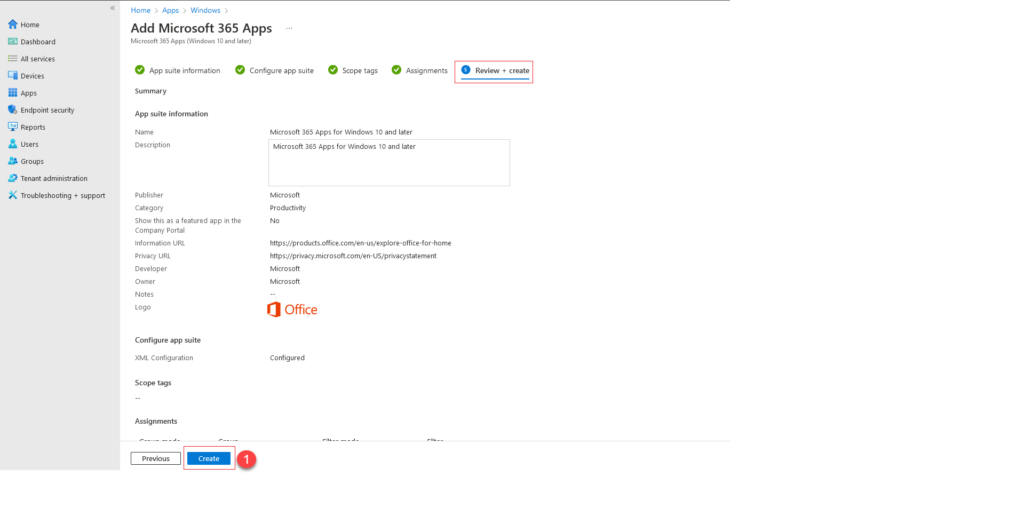
On the Review + create tab, review the Microsoft 365 properties, and select Create to complete the Intune application.
Create Office 365 ProPlus XML Non English Language – Conclusion
Create Office 365 ProPlus XML Non-English Language and my experience here. I want to thank both Patrick and Oleskii for providing the opportunity to explore the different options for Office setup. Two methods to Create Custom XML File for Office 365 ProPlus Intune Deployment.
There is no need to create the Microsoft 365 apps for different languages by adding the language packs in this scenario. Microsoft 365 Application management becomes less of an administrative task with this simple method.

Question:
If I modify/update an xml file that is already pushed to devices, how does it affect the existing devices that already got the previous configuration through Microsoft Intune?
Goal is to remove the fr and jp languages off of new and existing devices which was added as part of old xml.
When i deploy office using XML to devices, getting below error in the event viewer. could you please guide me here what i am missing
Enrollment Name: (MDMDeviceWithAAD), Provider Name: (Office), Command Type: (Execute), CSP URI: (./Vendor/MSFT/Office/Installation/251f0659-02a7-4af7-9f2b-cd68fbd68688/Install), Result: (The system cannot find the file specified.).